Page 153 of 288
2. Pull down on the shoulder belt
and then grasp the shoulder belt
and lap belt together.
3. While holding the shoulder and
lap belt portions together, route the
tongue through the child seat
according to the child seat
manufacturer’s instructions. Be sure
the belt webbing is not twisted.
4. Insert the belt tongue into the
proper buckle (the buckle closest to
the direction the tongue is coming
from) for that seating position until
you hear a snap and feel the latch
engage. Make sure the tongue is
latched securely by pulling on it.
2006 Freestyle(219)
Owners Guide (post-2002-fmt)
USA(fus)
Seating and Safety Restraints
153
Page 154 of 288

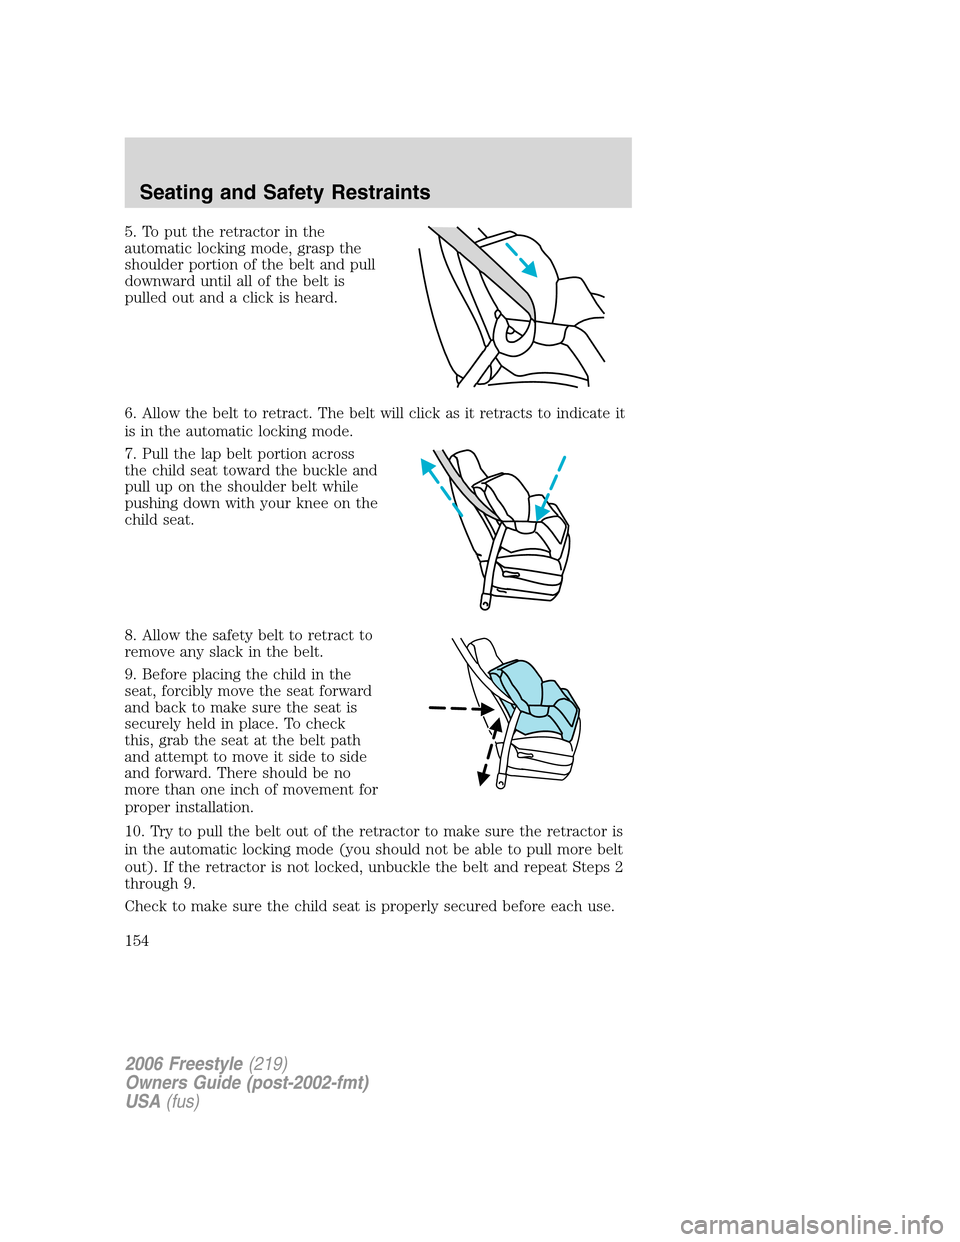
5. To put the retractor in the
automatic locking mode, grasp the
shoulder portion of the belt and pull
downward until all of the belt is
pulled out and a click is heard.
6. Allow the belt to retract. The belt will click as it retracts to indicate it
is in the automatic locking mode.
7. Pull the lap belt portion across
the child seat toward the buckle and
pull up on the shoulder belt while
pushing down with your knee on the
child seat.
8. Allow the safety belt to retract to
remove any slack in the belt.
9. Before placing the child in the
seat, forcibly move the seat forward
and back to make sure the seat is
securely held in place. To check
this, grab the seat at the belt path
and attempt to move it side to side
and forward. There should be no
more than one inch of movement for
proper installation.
10. Try to pull the belt out of the retractor to make sure the retractor is
in the automatic locking mode (you should not be able to pull more belt
out). If the retractor is not locked, unbuckle the belt and repeat Steps 2
through 9.
Check to make sure the child seat is properly secured before each use.
2006 Freestyle(219)
Owners Guide (post-2002-fmt)
USA(fus)
Seating and Safety Restraints
154
Page 155 of 288
Attaching child safety seats with tether straps
Most new forward-facing child safety seats include a tether strap which
goes over the back of the seat and hooks to an anchoring point. Tether
straps are available as an accessory for many older safety seats. Contact
the manufacturer of your child seat for information about ordering a
tether strap.
Children should be placed in the rear in an appropriate child
safety seat that is properly secured to the vehicle.
The tether anchors in your vehicle are in the positions shown:
40/40 second row seats
60/40 second row seats
Delivery van
2006 Freestyle(219)
Owners Guide (post-2002-fmt)
USA(fus)
Seating and Safety Restraints
155
Page 176 of 288

SNOW TIRES AND CHAINS
Snow tires must be the same size and grade as the tires you
currently have on your vehicle.
The tires on your vehicle have all weather treads to provide traction in
rain and snow. However, in some climates, you may need to use snow
tires and chains.
Follow these guidelines when using snow tires and chains:
•Use only SAE class “S” cables or equivalent on the front axle for
P215/65R17 equipped vehicles. SAE class “S” chains or other
conventional link chains may cause damage to the vehicles wheel
house and/or body. Use of optional spike type traction devices or
equivalent is also acceptable.
•Do not install tire chains, cables, or optional traction devices on the
rear tires. This could cause damage to the vehicle’s wheel house or
body.
•Do not use tire chains, cables, or optional traction devices with
optional P225/60R18 tires.
•Install cable chains securely, verifying that the cables do not touch any
wiring, brake lines or fuel lines.
•Drive cautiously. If you hear the cables rub or bang against your
vehicle, stop and re-tighten the cables. If this does not work, remove
the cables to prevent damage to your vehicle.
•If possible, avoid fully loading your vehicle.
•Remove the tire cables when they are no longer needed. Do not use
tire cables on dry roads.
•The suspension insulation and bumpers will help prevent vehicle
damage. Do not remove these components from your vehicle when
using snow tires and chains.
•Do not exceed 30 mph (48 km/h) with tire cables on your vehicle.
VEHICLE LOADING – WITH AND WITHOUT A TRAILER
This section will guide you in the proper loading of your vehicle and/or
trailer, to keep your loaded vehicle weight within its design rating
capability, with or without a trailer. Properly loading your vehicle will
provide maximum return of vehicle design performance. Before loading
your vehicle, familiarize yourself with the following terms for determining
2006 Freestyle(219)
Owners Guide (post-2002-fmt)
USA(fus)
Tires, Wheels and Loading
176
Page 191 of 288

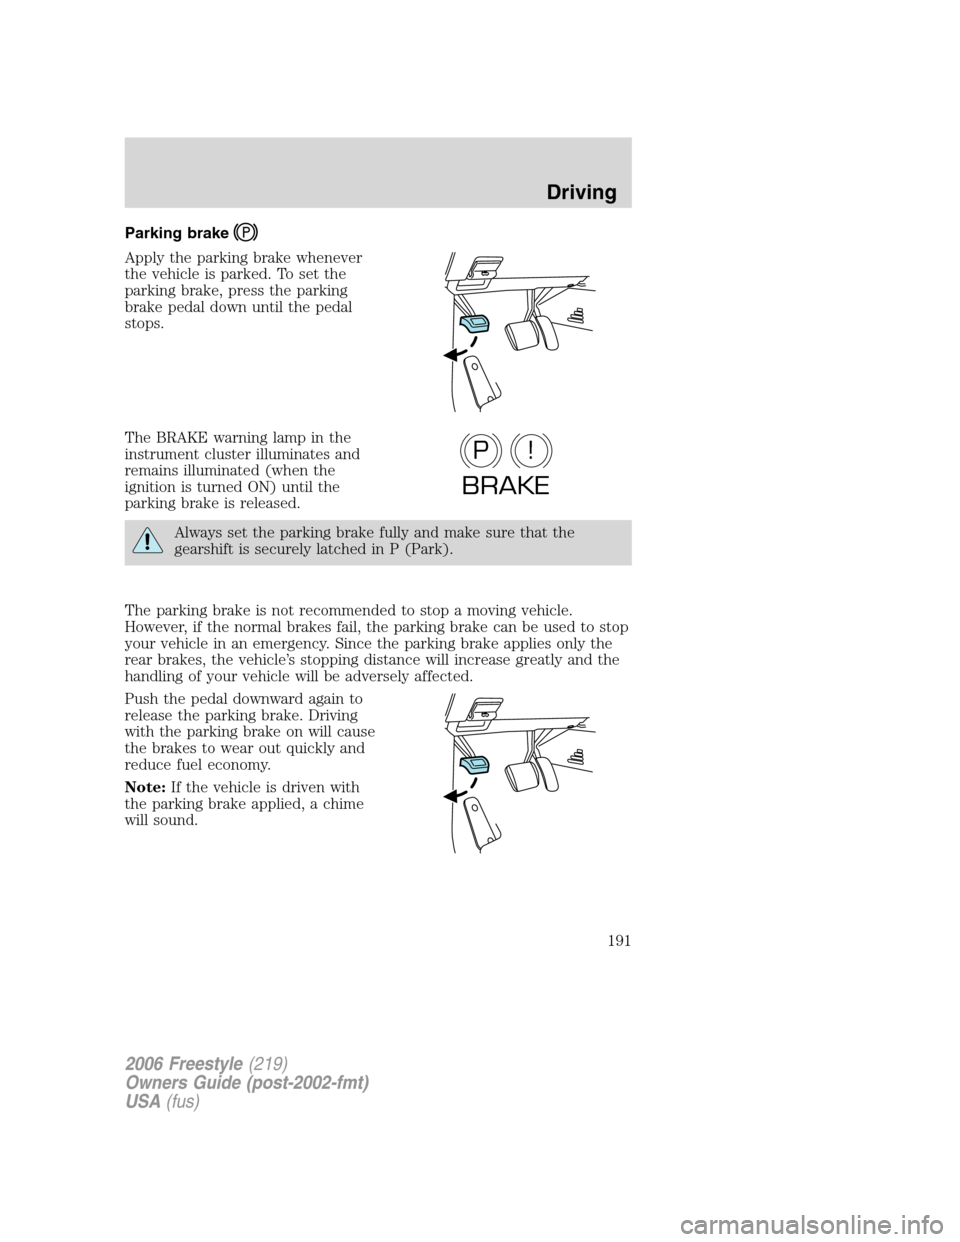
Parking brake
Apply the parking brake whenever
the vehicle is parked. To set the
parking brake, press the parking
brake pedal down until the pedal
stops.
The BRAKE warning lamp in the
instrument cluster illuminates and
remains illuminated (when the
ignition is turned ON) until the
parking brake is released.
Always set the parking brake fully and make sure that the
gearshift is securely latched in P (Park).
The parking brake is not recommended to stop a moving vehicle.
However, if the normal brakes fail, the parking brake can be used to stop
your vehicle in an emergency. Since the parking brake applies only the
rear brakes, the vehicle’s stopping distance will increase greatly and the
handling of your vehicle will be adversely affected.
Push the pedal downward again to
release the parking brake. Driving
with the parking brake on will cause
the brakes to wear out quickly and
reduce fuel economy.
Note:If the vehicle is driven with
the parking brake applied, a chime
will sound.
P!
BRAKE
2006 Freestyle(219)
Owners Guide (post-2002-fmt)
USA(fus)
Driving
191
Page 196 of 288

To put your vehicle in P (Park):
•Come to a complete stop
•Move the gearshift lever and securely latch it in P (Park)
Always set the parking brake fully and make sure the gearshift is
latched in P (Park). Turn the ignition to the LOCK position and
remove the key whenever you leave your vehicle.
R (Reverse)
With the gearshift lever in R (Reverse), the vehicle will move backward.
Always come to a complete stop before shifting into and out of R
(Reverse).
N (Neutral)
With the gearshift lever in N (Neutral), the vehicle can be started and is
free to roll. Hold the brake pedal down while in this position.
D (Drive)
The normal driving position for the best fuel economy.
L (Low)
Provides more engine braking when the accelerator pedal is released
than D (Drive).
REVERSE SENSING SYSTEM (IF EQUIPPED)
The Reverse Sensing System (RSS) sounds a tone to warn the driver of
obstacles near the rear bumper when R (Reverse) is selected and the
vehicle is moving at speeds less than 3 mph (5 km/h). The system is not
effective at speeds above 3 mph (5 km/h) and may not detect certain
angular or moving objects.
To help avoid personal injury, please read and understand the
limitations of the reverse sensing system as contained in this
section. Reverse sensing is only an aid for some (generally large and
fixed) objects when moving in reverse on a flat surface at “parking
speeds”. Inclement weather may also affect the function of the RSS;
this may include reduced performance or a false activation.
To help avoid personal injury, always use caution when in R
(Reverse) and when using the RSS.
2006 Freestyle(219)
Owners Guide (post-2002-fmt)
USA(fus)
Driving
196
Page 209 of 288
The fuses are coded as follows.
Fuse/Relay
LocationFuse Amp
RatingPassenger Compartment Fuse
Panel Description
F1 20A High beams
F2 15A Interior lamps (Courtesy and
demand lamps), Delayed
accessory (Power windows and
moonroof)
F3 25A Access/Security (Power door lock
actuators, Liftgate lock actuator,
Liftgate solenoid)
F4 15A Adjustable pedal switch
F5 20A Horns
F6 20A Audio (Subwoofer)
F7 7.5A Power/Keep Alive Memory
(KAM): Cluster and Powertrain
Control Module (PCM), Climate
control, Analog clock
F8 15A Park lamps, Side markers, Trailer
tow protect
F9 20A Cigar lighter, Data Link Connector
(DLC)
F10 7.5A Mirrors and memory module
F11 20A Audio, Family Entertainment
System (FES)
F12 10A Back-up lamps, Electrochromatic
mirror, Reverse Sensing System
(RSS), Trailer tow protect
F13 7.5A Audio
F14 7.5A Starter relay coil, PCM
2006 Freestyle(219)
Owners Guide (post-2002-fmt)
USA(fus)
Roadside Emergencies
209
Page 217 of 288
1. Remove the carpeted floor panel
located in the rear of the vehicle,
remove the wing nut that secures
the spare tire by turning it
counterclockwise.
2. Lift and remove the spare tire
from the trunk.
3. Remove the second wing nut that
secures the jack retention bracket
by turning it counterclockwise,
remove the jack kit from the
vehicle.
4. Remove the jack and the wrench
from the felt bag. Fold down the
wrench socket to use to loosen the
lug nuts and to operate the jack.
Tire change procedure
1. Park on a level surface, activate
hazard flashers and set the parking
brake.
When one of the front wheels is off the ground, the transaxle
alone will not prevent the vehicle from moving or slipping off the
jack, even if the vehicle is in P (Park).
2006 Freestyle(219)
Owners Guide (post-2002-fmt)
USA(fus)
Roadside Emergencies
217