2006 FORD FREESTYLE spare tire
[x] Cancel search: spare tirePage 170 of 288
Sometimes irregular tire wear can be corrected by rotating the tires.
Note:If your tires show uneven wear ask an authorized dealer to check
for and correct any wheel misalignment, tire imbalance or mechanical
problem involved before tire rotation.
Note:Your vehicle may be equipped with a dissimilar spare tire/wheel. A
dissimilar spare tire/wheel is defined as a spare tire and/or wheel that is
different in brand, size or appearance from the road tires and wheels. If
you have a dissimilar spare tire/wheel it is intended for temporary use
only and should not be used in a tire rotation.
Note:After having your tires rotated, inflation pressure must be checked
and adjusted to the vehicle requirements.
TIRE REPLACEMENT REQUIREMENTS
Your vehicle is equipped with tires designed to provide a safe ride and
handling capability.
Only use replacement tires and wheels that are the same size and
type (such as P-metric versus LT-metric or all-season versus
all-terrain) as those originally provided by Ford. Use of any tire or wheel
not recommended by Ford can affect the safety and performance of your
vehicle, which could result in an increased risk of loss of vehicle control,
vehicle rollover, personal injury and death. Additionally the use of
non-recommended tires and wheels could cause steering, suspension,
axle or transfer case/power transfer unit failure. If you have questions
regarding tire replacement, see an authorized dealer.
Important:Remember to replace the wheel valve stems when the road
tires are replaced on your vehicle.
It is recommended that the two front tires or two rear tires generally be
replaced as a pair.
INFORMATION CONTAINED ON THE TIRE SIDEWALL
Federal law requires tire manufacturers to place standardized
information on the sidewall of all tires. This information identifies and
describes the fundamental characteristics of the tire and also provides a
U.S. DOT Tire Identification Number for safety standard certification and
in case of a recall.
2006 Freestyle(219)
Owners Guide (post-2002-fmt)
USA(fus)
Tires, Wheels and Loading
170
Page 198 of 288
indicator light on the control will illuminate when the system is turned
off. If the indicator light illuminates when the RSS is not turned off, it
may indicate a failure in the RSS.
Keep the RSS sensors (located on the rear bumper/fascia) free
from snow, ice and large accumulations of dirt (do not clean the
sensors with sharp objects). If the sensors are covered, it will
affect the accuracy of the RSS.
If your vehicle sustains damage to the rear bumper/fascia, leaving
it misaligned or bent, the sensing zone may be altered causing
inaccurate measurement of obstacles or false alarms.
ALL WHEEL DRIVE (AWD) SYSTEM (IF EQUIPPED)
Your vehicle may be equipped with a full-time All Wheel Drive (AWD)
system. With the AWD option, power will be delivered to the front
wheels and distributed to the rear wheels as needed. The AWD system is
active all the time and requires no input from the operator.
All components of the AWD system are sealed for life and require no
maintenance.
If your vehicle is equipped with AWD, a spare tire of a different size
other than the tire provided should never be used. A dissimilar spare tire
size (other than the spare tire provided) or major dissimilar tire sizes
between the front and rear axles could cause the AWD system to stop
functioning and default to front wheel drive.
Note:Your AWD vehicle is not intended for off-road use. The AWD
feature gives your vehicle some limited off-road capabilities in which
driving surfaces are relatively level, obstruction-free and otherwise
similar to normal on-road driving conditions. Operating your vehicle
under other than those conditions could subject the vehicle to excessive
stress which might result in damage which is not covered under your
warranty.
Driving off-highway with AWD vehicles
AWD vehicles are specially equipped for driving on sand, snow, mud and
rough roads and have operating characteristics that are somewhat
different from conventional vehicles, both on and off the highway.
When driving at slow speeds off-highway under high outside
temperatures, use L (Low) gear when possible. L (Low) gear operation
will maximize the engine and transmission cooling capability.
Under severe operating conditions, the A/C may cycle on and off to
protect overheating of the engine.
2006 Freestyle(219)
Owners Guide (post-2002-fmt)
USA(fus)
Driving
198
Page 205 of 288
ROADSIDE ASSISTANCE
Getting roadside assistance
To fully assist you should you have a vehicle concern, Ford Motor
Company offers a complimentary roadside assistance program. This
program is separate from the New Vehicle Limited Warranty. The service
is available:
•24–hours, seven days a week
•for the New Vehicle Limited Warranty period of three years or 36,000
miles (60,000 km), whichever occurs first on Ford and Mercury
vehicles, and four years or 50,000 miles (80,000 km) on Lincoln
vehicles.
Roadside assistance will cover:
•a flat tire change with a good spare (except Ford GT which has a tire
inflation kit)
•battery jump start
•lock-out assistance (key replacement cost is the customer’s
responsibility)
•fuel delivery (2.0 gallons [7.5L], maximum two occurrences within 12
month period)
•towing of your disabled vehicle to the nearest authorized dealer, or
your selling authorized dealer if within 35 miles (56.3 km) of the
nearest authorized dealer (one tow per disablement). Even
non-warranty related tows, like accidents, are covered (some
exclusions apply, such as impound towing or repossession).
Canadian customers refer to your Owner Information Guide for
information on:
•coverage period
•exact fuel amounts
•towing of your disabled vehicle
•emergency travel expense reimbursement
•travel planning benefits
Using roadside assistance
Complete the roadside assistance identification card and place it in your
wallet for quick reference. In the United States, this card is found in the
Owner Guide portfolio in the glove compartment. In Canada, the card is
found in theOwner Information Guidein the glove compartment.
2006 Freestyle(219)
Owners Guide (post-2002-fmt)
USA(fus)
Roadside Emergencies
205
Page 214 of 288
Fuse/Relay
LocationFuse Amp
RatingPower Distribution Box
Description
51 Full ISO relay Starter motor solenoid
52 Full ISO relay Front A/C blower motor, Coolant
pump relay coil
53 — Not used
54 — Not used
55 — Not used
56 — Not used
57 — Not used
58 High current
relayWipers
* Cartridge Fuses ** Mini Fuses
CHANGING THE TIRES
If you get a flat tire while driving:
•do not brake heavily.
•gradually decrease the vehicle’s speed.
•hold the steering wheel firmly.
•slowly move to a safe place on the side of the road.
The use of tire sealants is not recommended and may damage
your tires.
Dissimilar spare tire/wheel information
Failure to follow these guidelines could result in an increased
risk of loss of vehicle control, injury or death.
If you have a dissimilar spare tire/wheel, then it is intended for
temporary use only. This means that if you need to use it, you should
replace it as soon as possible with a road tire/wheel that is the same size
and type as the road tires and wheels that were originally provided by
Ford. If the dissimilar spare tire or wheel is damaged, it should be
replaced rather than repaired.
2006 Freestyle(219)
Owners Guide (post-2002-fmt)
USA(fus)
Roadside Emergencies
214
Page 215 of 288
A dissimilar spare tire/wheel is defined as a spare tire and/or wheel that
is different in brand, size or appearance from the road tires and wheels
and can be one of three types:
1.T-type mini-spare:This spare tire begins with the letter “T” for tire
size and may have “Temporary Use Only” molded in the sidewall
2.Full-size dissimilar spare with label on wheel:This spare tire has
a label on the wheel that states: “THIS TIRE AND WHEEL FOR
TEMPORARY USE ONLY”
When driving with one of the dissimilar spare tires listed above,do not:
•Exceed 50 mph (80 km/h)
•Load the vehicle beyond maximum vehicle load rating listed on the
Safety Compliance Label
•Tow a trailer
•Use snow chains on the end of the vehicle with the dissimilar spare
tire
•Use more than one dissimilar spare tire at a time
•Use commercial car washing equipment
•Try to repair the dissimilar spare tire
Use of one of the dissimilar spare tires listed above at any one wheel
location can lead to impairment of the following:
•Handling, stability and braking performance
•Comfort and noise
•Ground clearance and parking at curbs
•Winter weather driving capability
•Wet weather driving capability
For vehicles equipped with 4WD, it is not recommended that the vehicle
be operated in 4WD modes with a temporary emergency spare tire. If
4WD operation is necessary, do not operate above speeds of 10 mph
(16 km/h) or for distances above 50 miles (80 km).
2006 Freestyle(219)
Owners Guide (post-2002-fmt)
USA(fus)
Roadside Emergencies
215
Page 216 of 288
3.Full-size dissimilar spare without label on wheel
When driving with the full-size dissimilar spare tire/wheel,do not:
•Exceed 70 mph (113 km/h)
•Use more than one dissimilar spare tire/wheel at a time
•Use commercial car washing equipment
•Use snow chains on the end of the vehicle with the dissimilar spare
tire/wheel
The usage of a full-size dissimilar spare tire/wheel can lead to
impairment of the following:
•Handling, stability and braking performance
•Comfort and noise
•Ground clearance and parking at curbs
•Winter weather driving capability
•Wet weather driving capability
•All-Wheel driving capability (if applicable)
•Load leveling adjustment (if applicable)
When driving with the full-size dissimilar spare tire/wheel additional
caution should be given to:
•Towing a trailer
•Driving vehicles equipped with a camper body
•Driving vehicles with a load on the cargo rack
Drive cautiously when using a full-size dissimilar spare tire/wheel and
seek service as soon as possible.
Removing the spare tire and jack
If the 3rd row seat (if equipped) is stowed in the floor, you will need to
unstow it to access the spare tire and jack. Refer toUnstowing the 3rd
row seatin theSeating and Safety Restraintchapter for this
procedure.
2006 Freestyle(219)
Owners Guide (post-2002-fmt)
USA(fus)
Roadside Emergencies
216
Page 217 of 288
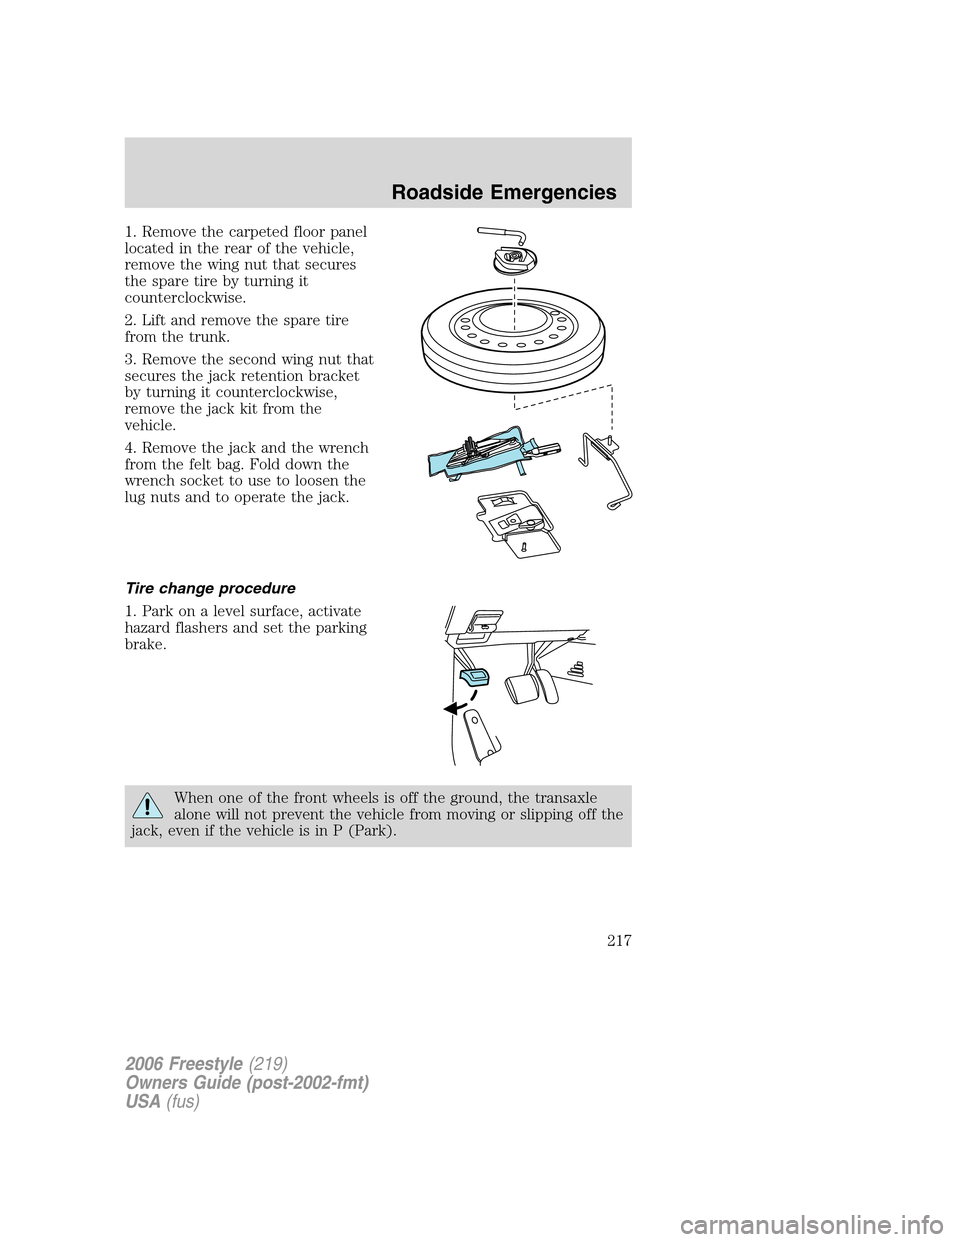
1. Remove the carpeted floor panel
located in the rear of the vehicle,
remove the wing nut that secures
the spare tire by turning it
counterclockwise.
2. Lift and remove the spare tire
from the trunk.
3. Remove the second wing nut that
secures the jack retention bracket
by turning it counterclockwise,
remove the jack kit from the
vehicle.
4. Remove the jack and the wrench
from the felt bag. Fold down the
wrench socket to use to loosen the
lug nuts and to operate the jack.
Tire change procedure
1. Park on a level surface, activate
hazard flashers and set the parking
brake.
When one of the front wheels is off the ground, the transaxle
alone will not prevent the vehicle from moving or slipping off the
jack, even if the vehicle is in P (Park).
2006 Freestyle(219)
Owners Guide (post-2002-fmt)
USA(fus)
Roadside Emergencies
217
Page 219 of 288
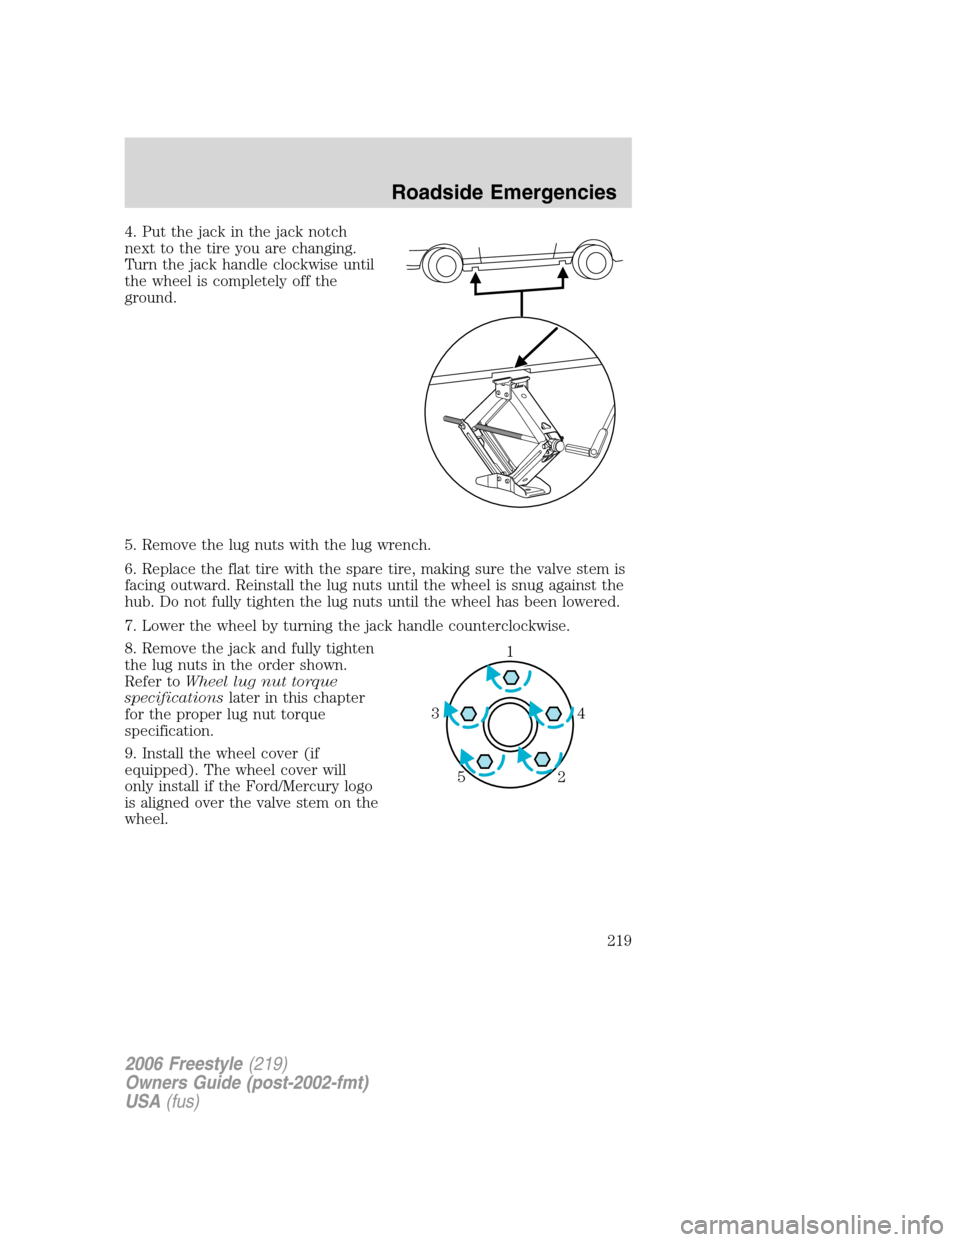
4. Put the jack in the jack notch
next to the tire you are changing.
Turn the jack handle clockwise until
the wheel is completely off the
ground.
5. Remove the lug nuts with the lug wrench.
6. Replace the flat tire with the spare tire, making sure the valve stem is
facing outward. Reinstall the lug nuts until the wheel is snug against the
hub. Do not fully tighten the lug nuts until the wheel has been lowered.
7. Lower the wheel by turning the jack handle counterclockwise.
8. Remove the jack and fully tighten
the lug nuts in the order shown.
Refer toWheel lug nut torque
specificationslater in this chapter
for the proper lug nut torque
specification.
9. Install the wheel cover (if
equipped). The wheel cover will
only install if the Ford/Mercury logo
is aligned over the valve stem on the
wheel.
1
4 3
2 5
2006 Freestyle(219)
Owners Guide (post-2002-fmt)
USA(fus)
Roadside Emergencies
219