Page 1 of 288
Introduction 4
Instrument Cluster 10
Warning and control lights 10
Gauges 14
Entertainment Systems 17
AM/FM stereo with CD 17
AM/FM stereo with in-dash six CD 20
Family entertainment system 25
Climate Controls 40
Manual heating and air conditioning 40
Automatic temperature control 42
Rear window defroster 51
Lights 52
Headlamps 52
Turn signal control 56
Bulb replacement 56
Driver Controls 61
Windshield wiper/washer control 61
Steering wheel adjustment 62
Power windows 66
Mirrors 68
Speed control 70
Message center 78
Locks and Security 90
Keys 90
Locks 90
Anti-theft system 100
Table of Contents
1
2006 Freestyle(219)
Owners Guide (post-2002-fmt)
USA(fus)
Page 63 of 288
ILLUMINATED VISOR MIRROR (IF EQUIPPED)
Lift the mirror cover to turn on the
visor mirror lamp. The visor will
slide back and forth on the rod for
increased sunlight coverage.
INSTRUMENT PANEL STORAGE COMPARTMENT
The storage compartment may be
used to secure sunglasses or similar
sized objects. Press the control to
open the storage compartment.
CENTER CONSOLE
Your vehicle may be equipped with a variety of console features. These
include:
•Utility compartment with power
point
•Gear Shift
•Cup holders
•Rear vent and cup holders (if
equipped)
Use only soft cups in the cupholder. Hard objects can injure you
in a collision.
2006 Freestyle(219)
Owners Guide (post-2002-fmt)
USA(fus)
Driver Controls
63
Page 64 of 288
Second row center console features (if equipped)
The second row center console
incorporates the following features:
•Utility compartment
•Cupholders
•Flip forward armrest to provide a
flat load floor
Use only soft cups in the
cupholder. Hard objects can
injure you in a collision.
OVERHEAD CONSOLE
The appearance of your vehicle’s overhead console will vary according to
your option package.
Storage compartment
Press the latch to open the storage
compartment. The door will open
slightly and can be moved to full
open.
The storage compartment may be
used to secure sunglasses or a
similar object.
Conversation mirror (if equipped)
The conversation mirror allows the driver to view the rear seating area.
This does not replace the rear view mirror.
2006 Freestyle(219)
Owners Guide (post-2002-fmt)
USA(fus)
Driver Controls
64
Page 65 of 288

Pull down on the housing to lock it
in place. Adjust the mirror, as
needed, in any direction.
The rear view mirror may have to
be adjusted to its lower arm position
to prevent interference when the
conversation mirror is extended
down.
AUXILIARY POWER POINT (12VDC)
Power outlets are designed for accessory plugs only. Do not insert
any other object in the power outlet as this will damage the
outlet and blow the fuse. Do not hang any type of accessory or
accessory bracket from the plug. Improper use of the power
outlet can cause damage not covered by your warranty.
The auxiliary power points are
located on the instrument panel, in
the center console utility
compartment and on the left-hand
trim panel.
Do not use the power point for
operating the cigarette lighter
element (if equipped).
To prevent the fuse from being
blown, do not use the power
point(s) over the vehicle capacity of 12 VDC/180W.
To prevent the battery from being discharged, do not use the power
point longer than necessary when the engine is not running.
Always keep the power point caps closed when not being used.
Cigar/Cigarette lighter (if equipped)
Do not plug optional electrical accessories into the cigarette lighter
socket.
Do not hold the lighter in with your hand while it is heating, this will
damage the lighter element and socket. The lighter will be released from
its heating position when it is ready to be used.
Improper use of the lighter can cause damage not covered by your
warranty.
PULL
DOWN
TO LOCK
2006 Freestyle(219)
Owners Guide (post-2002-fmt)
USA(fus)
Driver Controls
65
Page 68 of 288

AUTOMATIC DIMMING INSIDE REAR VIEW MIRROR (IF EQUIPPED)
Your vehicle may be equipped with
an inside rear view mirror with an
auto-dimming function. The
electronic day/night mirror will
change from the normal (high
reflective) state to the non-glare
(darkened) state when bright lights (glare) reach the mirror. When the
mirror detects bright light from behind the vehicle, it will automatically
adjust (darken) to minimize glare.
The mirror will automatically return to the normal state whenever the
vehicle is placed in R (Reverse) to ensure a bright clear view when
backing up.
Do not block the sensor on the backside of the inside rear view mirror
since this may impair proper mirror performance.
EXTERIOR MIRRORS
Power side view mirrors
To adjust your mirrors:
1. Rotate the control clockwise to
adjust the right mirror and rotate
the control counterclockwise to
adjust the left mirror.
2. Move the control in the direction
you wish to tilt the mirror.
3. Return to the center position to
lock mirrors in place.
Fold-away mirrors
Pull the side mirrors in carefully
when driving through a narrow
space, like an automatic car wash.
2006 Freestyle(219)
Owners Guide (post-2002-fmt)
USA(fus)
Driver Controls
68
Page 69 of 288

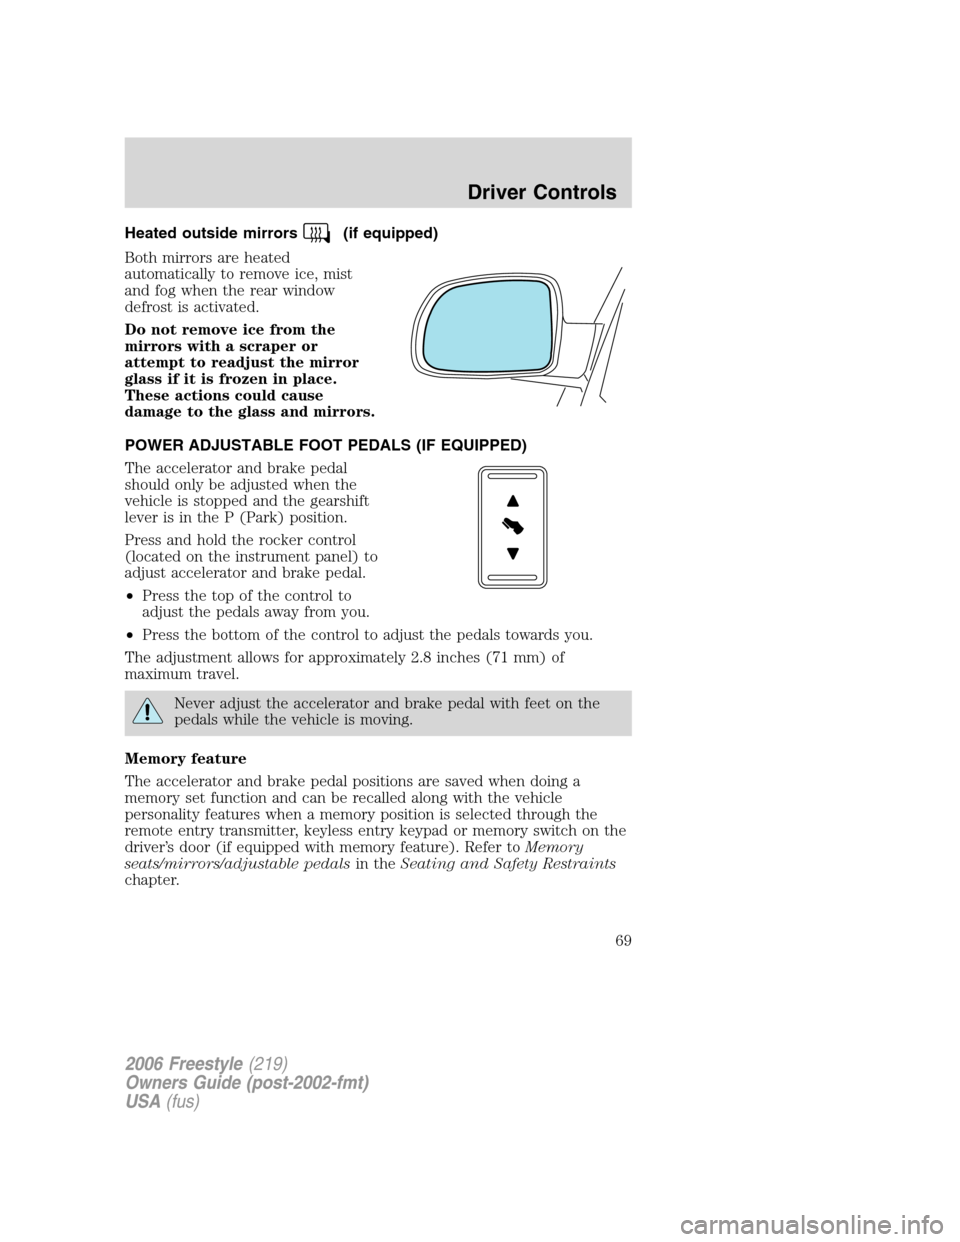
Heated outside mirrors(if equipped)
Both mirrors are heated
automatically to remove ice, mist
and fog when the rear window
defrost is activated.
Do not remove ice from the
mirrors with a scraper or
attempt to readjust the mirror
glass if it is frozen in place.
These actions could cause
damage to the glass and mirrors.
POWER ADJUSTABLE FOOT PEDALS (IF EQUIPPED)
The accelerator and brake pedal
should only be adjusted when the
vehicle is stopped and the gearshift
lever is in the P (Park) position.
Press and hold the rocker control
(located on the instrument panel) to
adjust accelerator and brake pedal.
•Press the top of the control to
adjust the pedals away from you.
•Press the bottom of the control to adjust the pedals towards you.
The adjustment allows for approximately 2.8 inches (71 mm) of
maximum travel.
Never adjust the accelerator and brake pedal with feet on the
pedals while the vehicle is moving.
Memory feature
The accelerator and brake pedal positions are saved when doing a
memory set function and can be recalled along with the vehicle
personality features when a memory position is selected through the
remote entry transmitter, keyless entry keypad or memory switch on the
driver’s door (if equipped with memory feature). Refer toMemory
seats/mirrors/adjustable pedalsin theSeating and Safety Restraints
chapter.
2006 Freestyle(219)
Owners Guide (post-2002-fmt)
USA(fus)
Driver Controls
69
Page 93 of 288

The remote entry system activates the illuminated entry feature; this
feature turns on the lamps for 25 seconds or until the ignition is turned
to the 3 (RUN) position.
The inside lights will not turn off if:
•they have been turned on using the dimmer control or
•any door is open.
The battery saver feature will turn off the interior lamps 30 minutes after
the ignition is turned to the 1 (LOCK) position.
Locking the doors/liftgate
1. Pressand release to lock all the doors and liftgate. The turn lamps
will flash.Note:If any door or the liftgate is not closed properly, the
lamps will not flash.
2. Press
and release again within three seconds to confirm that all the
doors are closed.Note:The doors will lock again, the horn will chirp and
the turn lamps will flash once if all the doors and liftgate are closed. If
any door or the liftgate is not closed, or if the hood is not closed in
vehicles equipped with the perimeter alarm feature, the horn will chirp
twice and the lamps will not flash.
Sounding a panic alarm
Press
to activate the alarm. The horn will sound and the turn lamps
will flash for a maximum of 3 minutes. Press again or turn the ignition to
the 3 (RUN) position to deactivate, or wait for the alarm to timeout in 3
minutes.
Note:The panic alarm will only operate when the ignition is in the 1
(LOCK) or 2 (ACC) position.
Memory seats/power mirrors/adjustable pedals (if equipped)
The remote entry system can also control the memory seat /power
mirrors/adjustable pedals feature.
Press
to automatically move the seat, mirrors and adjustable pedals to
the desired memory position (the positions correspond to the transmitter
being used).Note:You can associate a specific remote entry transmitter
to each memory position. For more information on programming the
transmitters to Driver 1 and Driver 2 memory positions respectively,
refer toHow to reprogram your remote entry transmitterslater in this
chapter.
2006 Freestyle(219)
Owners Guide (post-2002-fmt)
USA(fus)
Locks and Security
93
Page 94 of 288
Activating the memory seat feature
To activate this feature:
1. Position the seat, mirrors and adjustable pedals to the position
desired.
2. Press the SET control on the
driver’s door panel.
3. Within 5 five seconds, press the 1
or 2 control on the driver’s door
panel to which you would like to
associate with the seat, mirrors and
adjustable pedals and Driver 1 or
Driver 2 positions.
4. Repeat this procedure for the
other Driver position if desired.
Replacing the battery
The remote entry transmitter uses one coin type three-volt lithium
battery CR2032 or equivalent.
To replace the battery:
1. Twist a thin coin between the two
halves of the remote entry
transmitter near the key ring. DO
NOT TAKE THE RUBBER COVER
AND CIRCUIT BOARD OFF THE
FRONT HOUSING OF THE
REMOTE ENTRY TRANSMITTER.
2. Do not wipe off any grease on the
battery terminals on the back
surface of the circuit board.
2006 Freestyle(219)
Owners Guide (post-2002-fmt)
USA(fus)
Locks and Security
94