2006 FORD FREESTAR ECU
[x] Cancel search: ECUPage 1 of 320

Introduction 4
Instrument Cluster 10
Warning and control lights 10
Gauges 15
Entertainment Systems 18
AM/FM stereo 18
AM/FM stereo with CD 20
AM/FM stereo cassette with CD 23
AM/FM stereo with in-dash six CD 26
Climate Controls 33
Manual heating and air conditioning 33
Rear window defroster 42
Lights 43
Headlamps 43
Turn signal control 47
Bulb replacement 49
Driver Controls 54
Windshield wiper/washer control 54
Steering wheel adjustment 55
Power windows 65
Mirrors 66
Speed control 68
Message center 76
Locks and Security 91
Keys 91
Locks 91
Anti-theft system 105
Table of Contents
1
2006 Freestar(win)
Owners Guide (post-2002-fmt)
USA(fus)
Page 7 of 320

To access this information, special equipment must be directly connected
to the recording modules. Ford Motor Company and Ford of Canada do
not access event data recorder information without obtaining consent,
unless pursuant to court order or where required by law enforcement,
other government authorities or other third parties acting with lawful
authority. Other parties may seek to access the information
independently of Ford Motor Company and Ford of Canada.
Cell phone use
The use of Mobile Communications Equipment has become increasingly
important in the conduct of business and personal affairs. However,
drivers must not compromise their own or others’ safety when using
such equipment. Mobile Communications can enhance personal safety
and security when appropriately used, particularly in emergency
situations. Safety must be paramount when using mobile communications
equipment to avoid negating these benefits.
Mobile Communication Equipment includes, but is not limited to cellular
phones, pagers, portable email devices, in-vehicle communications
systems, telematics devices and portable two-way radios.
A driver’s first responsibility is the safe operation of the vehicle.
The most important thing you can do to prevent a crash is to
avoid distractions and pay attention to the road. Wait until it is safe to
operate Mobile Communications Equipment.
Middle East/North Africa vehicle specific information
For your particular global region, your vehicle may be equipped with
features and options that are different from the ones that are described
in thisOwner’s Guide;therefore, a supplement has been supplied that
complements this book. By referring to the pages in the provided
supplement, you can properly identify those features, recommendations
and specifications that are unique to your vehicle.Refer to this
Owner’s Guide for all other required information and warnings.
2006 Freestar(win)
Owners Guide (post-2002-fmt)
USA(fus)
Introduction
7
Page 29 of 320

17.CD:Press to enter CD mode. If
a CD is already loaded into the
system, CD play will begin where it
ended last.
18.LOAD:Press to load a CD, then
select a slot number using the radio
presets 1 through 6. If you don’t
select a slot within 5 seconds, the
radio shall choose the first available
slot for you. Press and hold for 2 seconds to auto load up to six CDs.
19.CD eject:Press to eject a CD,
then select the desired CD slot
using the radio presets 1 through 6.
If a slot is not selected within 5 seconds, the radio shall eject the current
disc. Press and hold for 2 seconds to auto eject all CDs present in the
radio mechanism.
20.CD slot:Insert a CD label side
up.
Auxiliary audio controls (if equipped)
Your vehicle may be equipped with auxiliary audio controls. This feature
allows the front and middle seat passengers to listen to different media
sources (radio, cassette, CD or DVD) simultaneously. (However, the front
and middle-seat passengers cannot listen to two different radio stations
at the same time.)
1.Volume:Press to
/
increase/decrease volume control.
2.Media:Press to select from
different playing medias.
3.
/: Press to activate dual
play mode and enable the rear seat
passengers to hear audio through
the headphones. Press again to
deactivate.
4.MEM:Press consecutively to scroll through the preset stations,
change tape side (if equipped), or to change discs on multiple disc
radios (if equipped).
2006 Freestar(win)
Owners Guide (post-2002-fmt)
USA(fus)
Entertainment Systems
29
Page 45 of 320

Flash to pass
Pull toward you slightly to activate
and release to deactivate.
Battery saver
The battery saver will shut off the exterior lamps and interior lamps,
except the hazard warning lamps if activated, 10 minutes after the
ignition control has been turned off. The battery saver will extend the
time-out period for courtesy lamps to 30 minutes if the liftgate is ajar or
the dome lamp is on via manual activation using the dome lamp switch
or the headlamp switch, whichever is provided. The system will not turn
off the parking lamps if the headlamp control is in the PARK position.
For interior lights, refer toIlluminated entryin theLocks and security
chapter.
PANEL DIMMER CONTROL
Use to adjust the brightness of the
instrument panel during headlight
and parklamp operation.
•Rotate the thumbwheel from left
to right to brighten the
instrument panel.
•Rotate the thumbwheel from right
to left to dim the instrument
panel.
Your vehicle also contains a feature called “sleeping baby mode” — in
which the dome lamps will remain off and only the lower lamps will
illuminate. This lighting mode can be activated by rotating the
thumbwheel to the first left detent position (as denoted by the half filled
circle above).
Domelamp Control
The panel dimmer control also controls the domelamp operation.
•Rotate the thumbwheel fully to the right, past detent to activate the
domelamp.
2006 Freestar(win)
Owners Guide (post-2002-fmt)
USA(fus)
Lights
45
Page 53 of 320

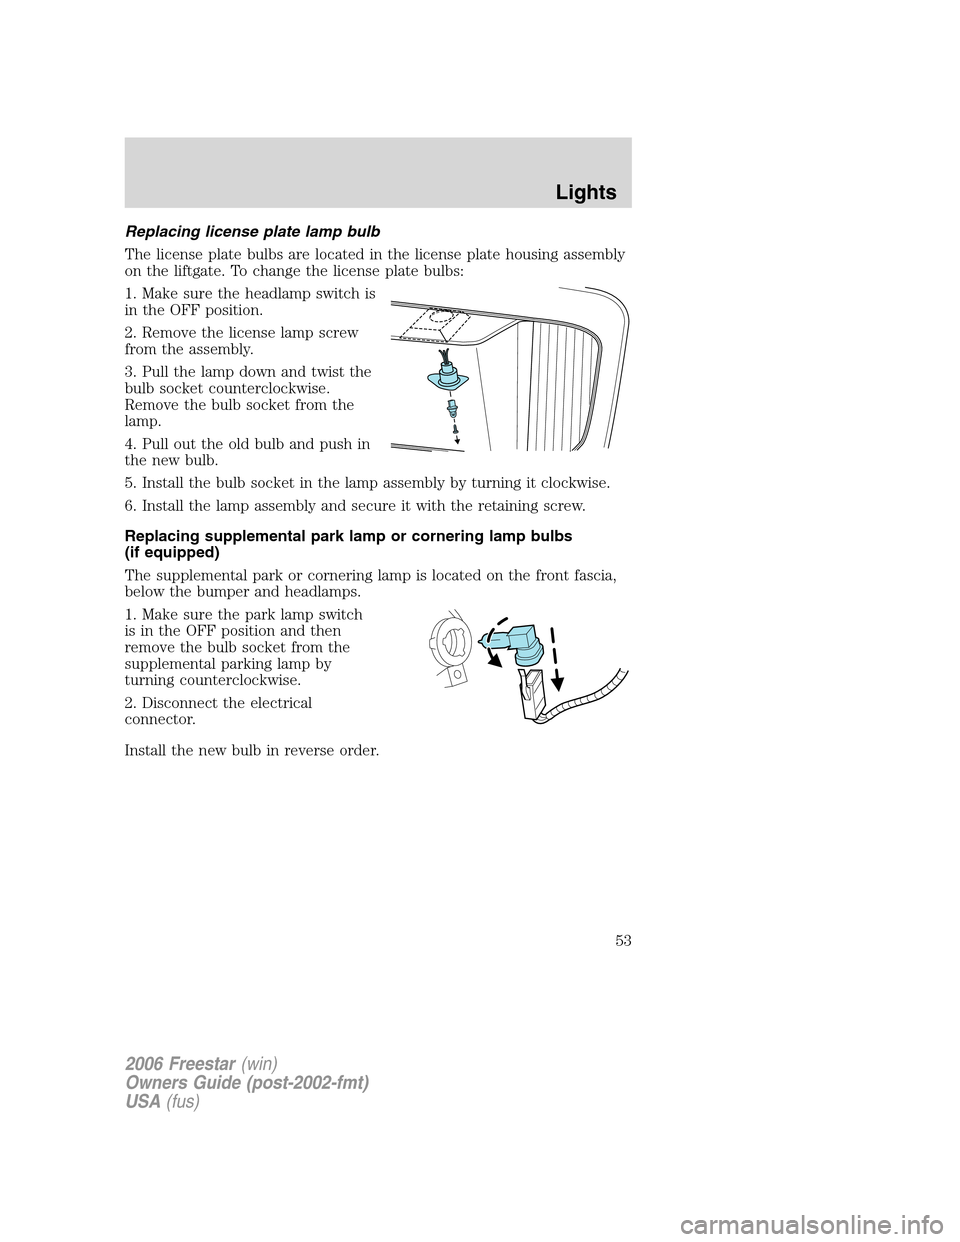
Replacing license plate lamp bulb
The license plate bulbs are located in the license plate housing assembly
on the liftgate. To change the license plate bulbs:
1. Make sure the headlamp switch is
in the OFF position.
2. Remove the license lamp screw
from the assembly.
3. Pull the lamp down and twist the
bulb socket counterclockwise.
Remove the bulb socket from the
lamp.
4. Pull out the old bulb and push in
the new bulb.
5. Install the bulb socket in the lamp assembly by turning it clockwise.
6. Install the lamp assembly and secure it with the retaining screw.
Replacing supplemental park lamp or cornering lamp bulbs
(if equipped)
The supplemental park or cornering lamp is located on the front fascia,
below the bumper and headlamps.
1. Make sure the park lamp switch
is in the OFF position and then
remove the bulb socket from the
supplemental parking lamp by
turning counterclockwise.
2. Disconnect the electrical
connector.
Install the new bulb in reverse order.
2006 Freestar(win)
Owners Guide (post-2002-fmt)
USA(fus)
Lights
53
Page 59 of 320

Manual door operation when vehicle is stopped or parked on a
downhill grade
In some cases it may be necessary
to have someone hold the door
while rear seat passengers are
entering or exiting the vehicle. The
hold open mechanism will restrain
the door open when the vehicle is
parked on moderate downhill
grades.On more severe grades,
the operator should ensure that
the open door is stable and
secure against the stop, before
allowing passengers to enter or exit the vehicle or before
loading/unloading cargo.
Do not operate vehicle with the door in the open position. Abrupt
vehicle acceleration or deceleration could cause the door to move
suddenly and could result in personal injury or damage to the door.
If the vehicle is parked on a downhill grade, the door could slam
shut and could result in injury or damage to the door. Ensure
that the open door is secure against the stop before allowing
passengers to enter or exit the vehicle.
Power Sliding Door (PSD) (if equipped)
With this option, you can open and close the sliding door(s) with the
following controls inside your vehicle.
•overhead console button
•remote entry transmitter button
•second row passenger control switch
•inside and outside release handle
Opening and closing the PSD
The PSD will operate without the key in the ignition. The transaxle must
be in PARK to open the PSD, when the key is in the ignition and turned
to the ON position.
The sliding door must be unlocked for the PSD to power open from the
rear trim switches and the inside or outside PSD handles. The fuel filler
door must be closed in order to avoid damage to it when the left sliding
door is opened.
2006 Freestar(win)
Owners Guide (post-2002-fmt)
USA(fus)
Driver Controls
59
Page 60 of 320

The Power Door Lockout Control is
located in the overhead console.
With the control in the OFF
position, power operation is disabled
from both PSD handles and from
both second row passenger
switches. The overhead console switch and remote entry transmitter will
operate the power doors regardless of the position of the lockout switch.
When opening or closing the sliding doors, you should verify
they are free of obstructions and ensure that children and/or
pets are not in the proximity of the sliding door openings. Injury could
result if body parts are caught or pinched in an uncontrolled sliding
door.
To power open or close the PSD
from the Overhead console:
Push and release the overhead
console right or left hand control.
Pressing this control will also
simultaneously unlock all doors.
To power open or close the PSD
from the second row passenger
control switch:
•Ensure that the PSD is unlocked,
using the remote entry
transmitter or power door unlock.
Refer toRemote Entry Systemin
theLocks and securitychapter.
•Push and release the right or left hand second row passenger control.
The control(s) are located on the trim panel in front of the sliding
door.
To power open the PSD with the inside or outside release handle:
•Ensure that the PSD is unlocked, using the remote entry transmitter
or power door unlock. Refer toRemote Entry Systemin theLocks
and securitychapter.
•Manually pull the inside or outside sliding door handle to engage the
power assist feature. Release the handle as soon as the PSD begins to
power open.
2006 Freestar(win)
Owners Guide (post-2002-fmt)
USA(fus)
Driver Controls
60
Page 62 of 320

Resetting the PSD
The power sliding door may operate incorrectly or not at all because of
the following conditions:
•a low voltage or dead battery
•the door is left opened for more than 6 hours
•the battery is disconnected
•the PSD Passenger compartment fuse panel fuse (fuse #11) is
removed or blown. Refer toFuses and relaysin theRoadside
Emergencieschapter.
If any of the above conditions has occurred, perform the following steps
to reset the PSD so that electronics can relearn the open and closed
positions:
1. Check to see if PSD is securely closed.
2. Make sure the gearshift is in (P) Park.
3. Push the PSD control on the overhead console to open the door.
4. Wait five (5) seconds and close the door by pressing the PSD control
on the overhead console.
5. Wait five (5) seconds and repeat Steps 3 and 4 then go on to Step 6.
6. Repeat Steps 3–5 for opposite door.
If the door still does not operate correctly:
7. Ensure the ignition is in the OFF position
8. Remove the PSD fuse (fuse #11) from the passenger fuse panel and
leave it out for thirty (30) seconds. Refer to the chapter on Fuses and
Relays. Refer toFuses and relaysin theRoadside emergencies
chapter.
9. Reinstall the fuse and wait ten (10) seconds.
10. Repeat Steps 1–6 above.
If the door still does not operate correctly, see your dealer for service.
Sliding Door Child Safety Lock
Your vehicle is equipped with a sliding door child safety lock that helps
prevent passengers from operating the sliding door by using the inside
door handle, refer to theChildproof door locksin theLocks and
securitychapter.
2006 Freestar(win)
Owners Guide (post-2002-fmt)
USA(fus)
Driver Controls
62