2006 FORD F250 SUPER DUTY parking brake
[x] Cancel search: parking brakePage 218 of 312
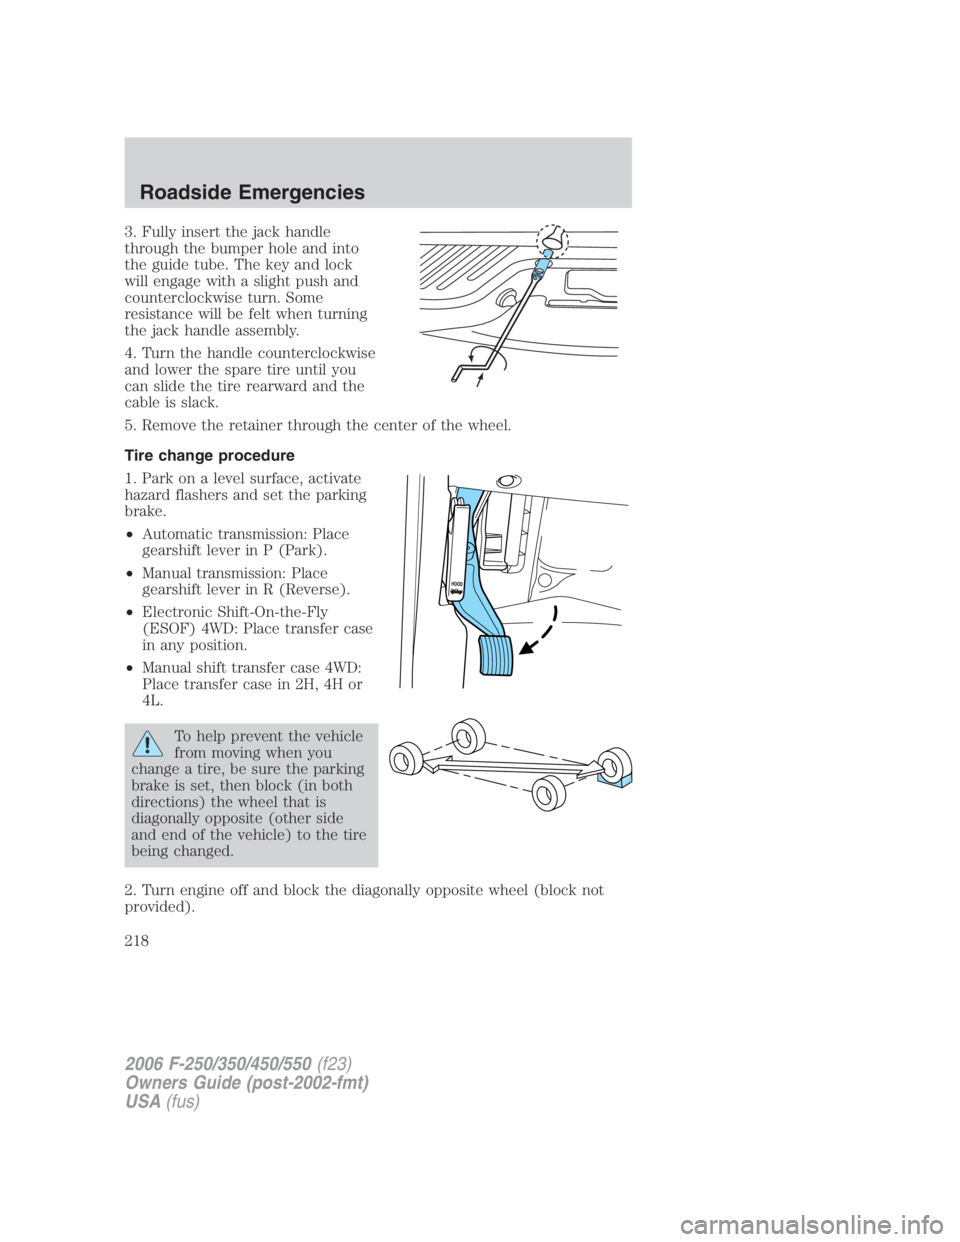
3. Fully insert the jack handle
through the bumper hole and into
the guide tube. The key and lock
will engage with a slight push and
counterclockwise turn. Some
resistance will be felt when turning
the jack handle assembly.
4. Turn the handle counterclockwise
and lower the spare tire until you
can slide the tire rearward and the
cable is slack.
5. Remove the retainer through the center of the wheel.
Tire change procedure
1. Park on a level surface, activate
hazard flashers and set the parking
brake.
• Automatic transmission: Place
gearshift lever in P (Park).
• Manual transmission: Place
gearshift lever in R (Reverse).
• Electronic Shift-On-the-Fly
(ESOF) 4WD: Place transfer case
in any position.
• Manual shift transfer case 4WD:
Place transfer case in 2H, 4H or
4L.
To help prevent the vehicle
from moving when you
change a tire, be sure the parking
brake is set, then block (in both
directions) the wheel that is
diagonally opposite (other side
and end of the vehicle) to the tire
being changed.
2. Turn engine off and block the diagonally opposite wheel (block not
provided).
2006 F-250/350/450/550 (f23)
Owners Guide (post-2002-fmt)
USA (fus)Roadside Emergencies
218
Page 219 of 312
3. Remove the jack, jack handle, lug wrench and spare tire from the
stowage locations.
4. Use the tip of the lug wrench to remove any wheel trim.
5. Loosen each wheel lug nut one-half turn counterclockwise but do not
remove them until the wheel is raised off the ground.
When one of the rear wheels is off the ground, the transmission
alone will not prevent the vehicle from moving or slipping off the
jack, even if the transmission is in P (Park) (automatic transmission)
or R (Reverse) (manual transmission). To prevent the vehicle from
moving when you change the tire, be sure that the parking brake is set
and the diagonally opposite wheel is blocked.
If the vehicle slips off the jack, you or someone else could be
seriously injured.
The following steps apply to F–250/F–350 Single Rear Wheel
(SRW) vehicles only (unless otherwise noted):
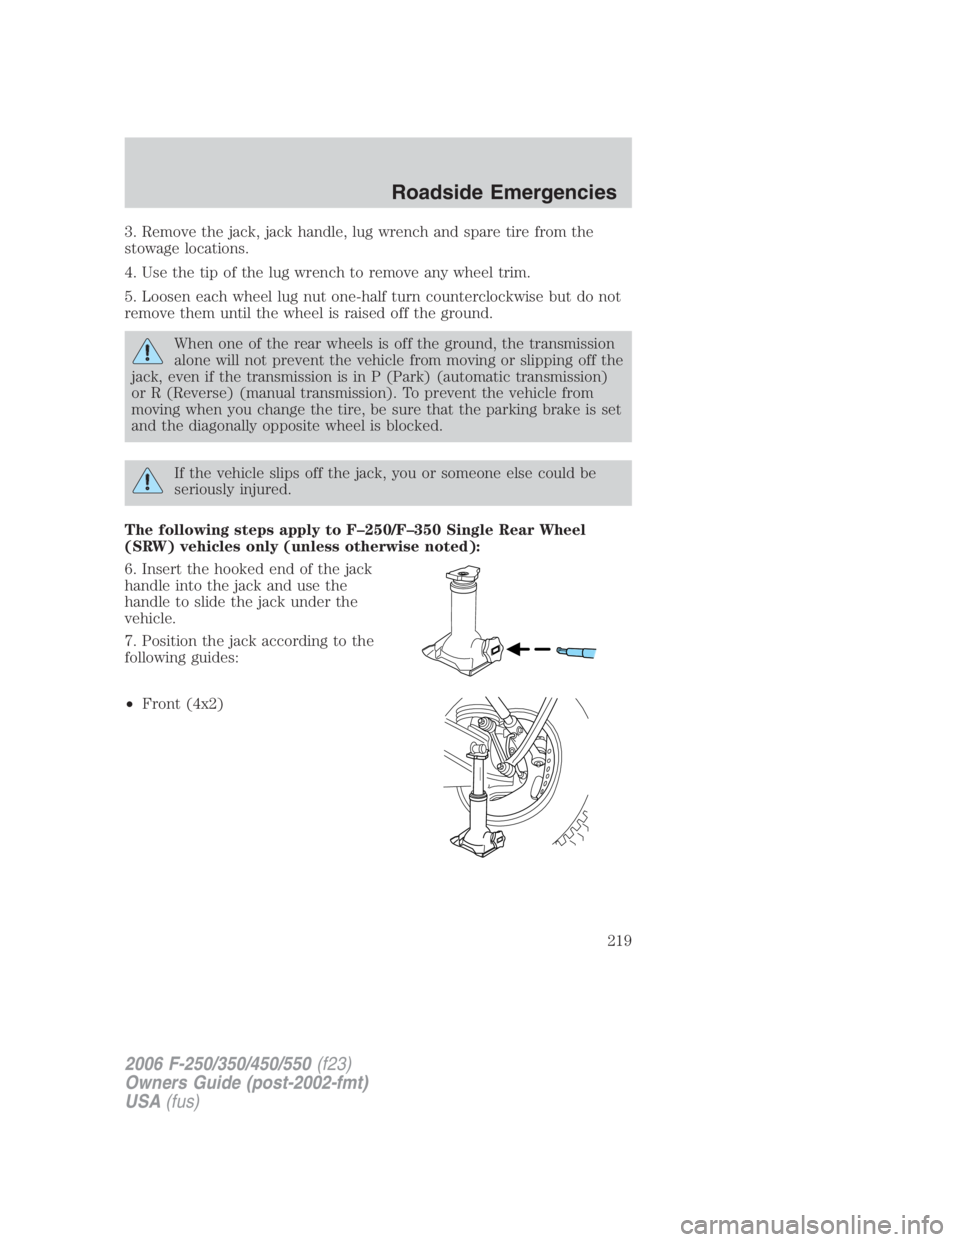
6. Insert the hooked end of the jack
handle into the jack and use the
handle to slide the jack under the
vehicle.
7. Position the jack according to the
following guides:
• Front (4x2)
2006 F-250/350/450/550 (f23)
Owners Guide (post-2002-fmt)
USA (fus) Roadside Emergencies
219
Page 227 of 312
Preparing your vehicle
When the battery is disconnected or a new battery is installed, the
transmission must relearn its shift strategy. As a result, the transmission
may have firm and/or soft shifts. This operation is considered normal and
will not affect function or durability of the transmission. Over time, the
adaptive learning process will fully update transmission operation.
1. Use only a 12–volt supply to start your vehicle.
2. Do not disconnect the battery of the disabled vehicle as this could
damage the vehicle’s electrical system.
3. Park the booster vehicle close to the hood of the disabled vehicle
making sure the two vehicles do not touch. Set the parking brake on
both vehicles and stay clear of the engine cooling fan and other moving
parts.
4. Check all battery terminals and remove any excessive corrosion before
you attach the battery cables. Ensure that vent caps are tight and level.
5. Turn the heater fan on in both vehicles to protect any electrical
surges. Turn all other accessories off.
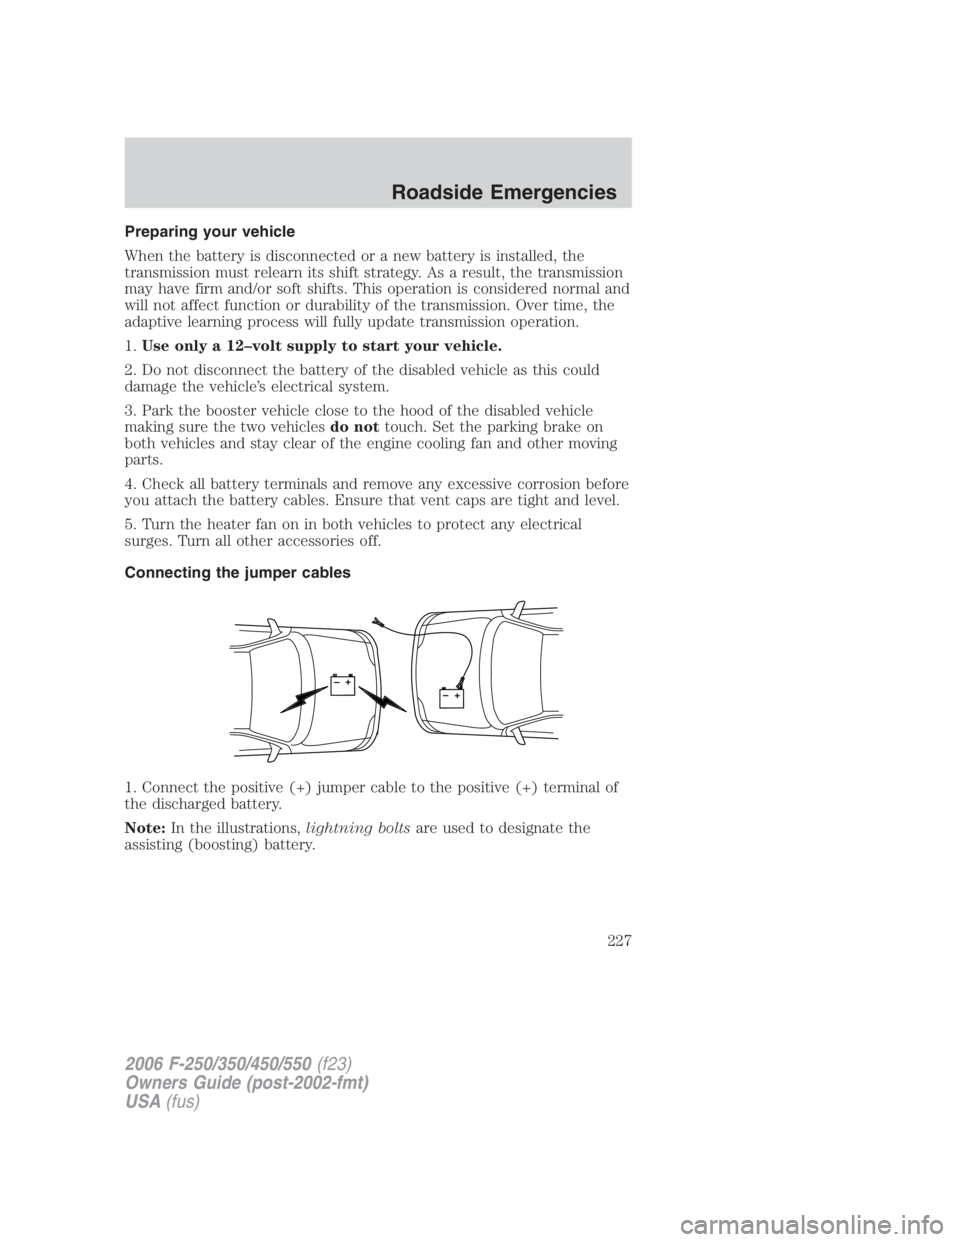
Connecting the jumper cables
1. Connect the positive (+) jumper cable to the positive (+) terminal of
the discharged battery.
Note: In the illustrations, lightning bolts are used to designate the
assisting (boosting) battery.
+
–
+
– 2006 F-250/350/450/550 (f23)
Owners Guide (post-2002-fmt)
USA (fus) Roadside Emergencies
227
Page 249 of 312
SERVICE RECOMMENDATIONS
To help you service your vehicle:
• We highlight do-it-yourself items in the engine compartment for easy
location.
• We provide a scheduled maintenance guide which makes tracking
routine service easy.
If your vehicle requires professional service, your authorized dealer can
provide the necessary parts and service. Check your Warranty
Guide/Owner Information Guide to find out which parts and services
are covered.
Use only recommended fuels, lubricants, fluids and service parts
conforming to specifications. Motorcraft parts are designed and built to
provide the best performance in your vehicle.
PRECAUTIONS WHEN SERVICING YOUR VEHICLE
• Do not work on a hot engine.
• Make sure that nothing gets caught in moving parts.
• Do not work on a vehicle with the engine running in an enclosed
space, unless you are sure you have enough ventilation.
• Keep all open flames and other burning (cigarettes) material away
from the battery and all fuel related parts.
Working with the engine off
• Automatic transmission:
1. Set the parking brake and shift to P (Park).
2. Turn off the engine and remove the key.
3. Block the wheels.
• Manual transmission:
1. Set the parking brake, depress the clutch and place the gearshift in 1
(First).
2. Turn off the engine and remove the key.
3. Block the wheels.
2006 F-250/350/450/550 (f23)
Owners Guide (post-2002-fmt)
USA (fus) Maintenance and Specifications
249
Page 250 of 312
Working with the engine on
• Automatic transmission:
1. Set the parking brake and shift to P (Park).
2. Block the wheels.
• Manual transmission:
1. Set the parking brake, depress the clutch and place the gearshift in N
(Neutral).
2. Block the wheels.
Note: Do not start your engine with the air cleaner removed and do not
remove it while the engine is running.
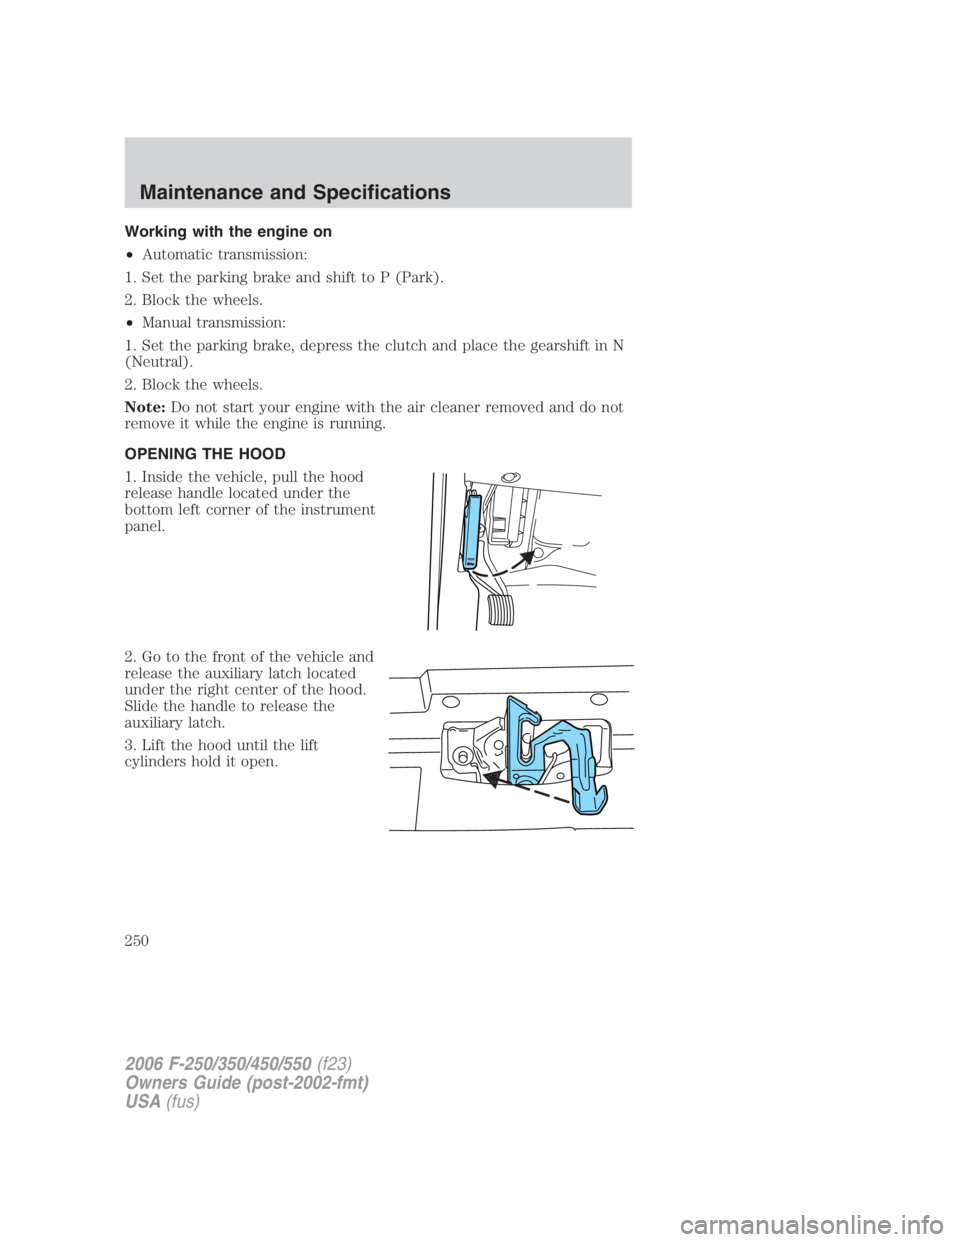
OPENING THE HOOD
1. Inside the vehicle, pull the hood
release handle located under the
bottom left corner of the instrument
panel.
2. Go to the front of the vehicle and
release the auxiliary latch located
under the right center of the hood.
Slide the handle to release the
auxiliary latch.
3. Lift the hood until the lift
cylinders hold it open.
2006 F-250/350/450/550 (f23)
Owners Guide (post-2002-fmt)
USA (fus)Maintenance and Specifications
250
Page 254 of 312
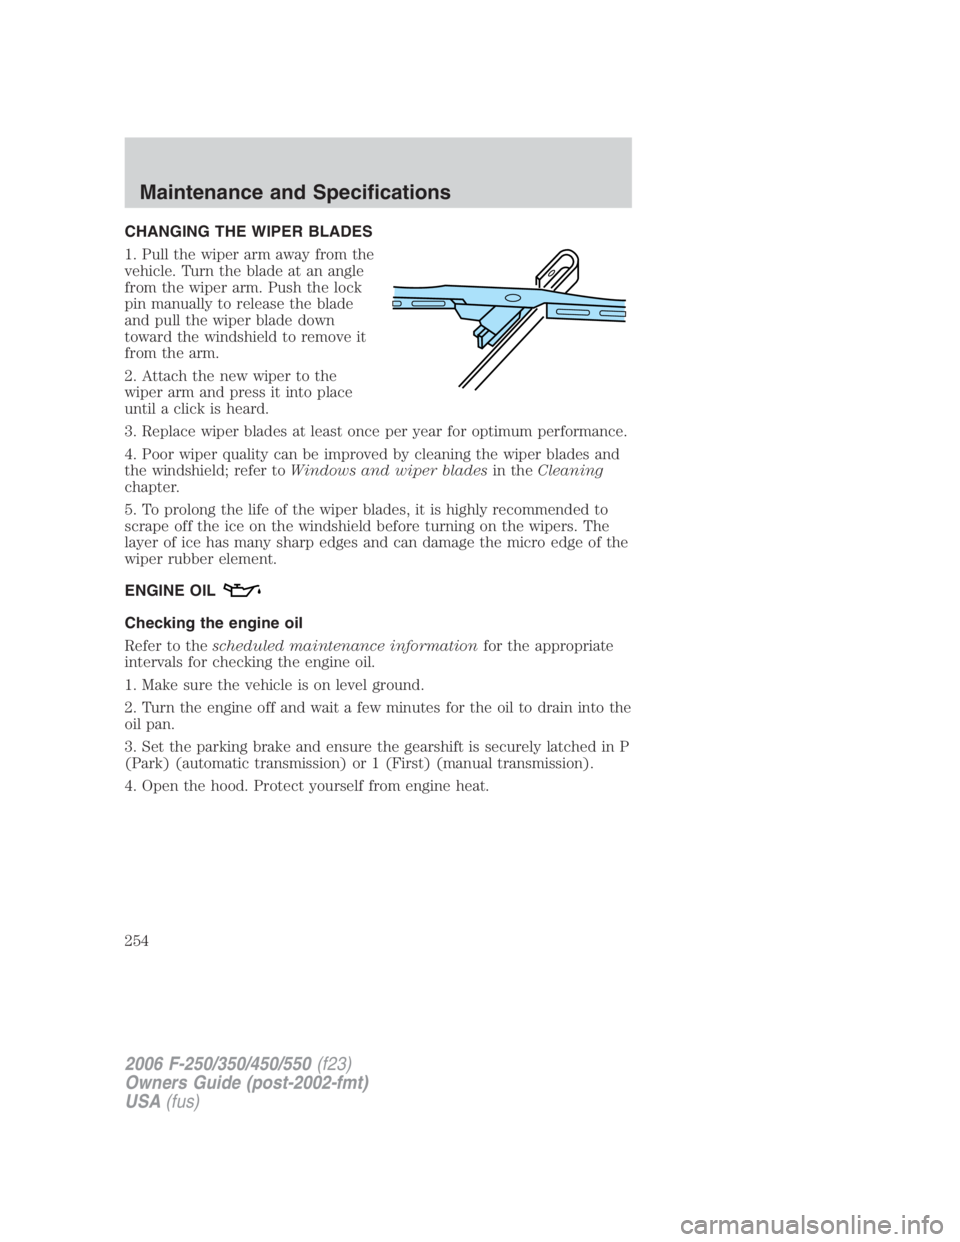
CHANGING THE WIPER BLADES
1. Pull the wiper arm away from the
vehicle. Turn the blade at an angle
from the wiper arm. Push the lock
pin manually to release the blade
and pull the wiper blade down
toward the windshield to remove it
from the arm.
2. Attach the new wiper to the
wiper arm and press it into place
until a click is heard.
3. Replace wiper blades at least once per year for optimum performance.
4. Poor wiper quality can be improved by cleaning the wiper blades and
the windshield; refer to Windows and wiper blades in the Cleaning
chapter.
5. To prolong the life of the wiper blades, it is highly recommended to
scrape off the ice on the windshield before turning on the wipers. The
layer of ice has many sharp edges and can damage the micro edge of the
wiper rubber element.
ENGINE OIL
Checking the engine oil
Refer to the scheduled maintenance information for the appropriate
intervals for checking the engine oil.
1. Make sure the vehicle is on level ground.
2. Turn the engine off and wait a few minutes for the oil to drain into the
oil pan.
3. Set the parking brake and ensure the gearshift is securely latched in P
(Park) (automatic transmission) or 1 (First) (manual transmission).
4. Open the hood. Protect yourself from engine heat.
2006 F-250/350/450/550 (f23)
Owners Guide (post-2002-fmt)
USA (fus)Maintenance and Specifications
254
Page 259 of 312
Batteries normally produce explosive gases which can cause
personal injury. Therefore, do not allow flames, sparks or lighted
substances to come near the battery. When working near the battery,
always shield your face and protect your eyes. Always provide proper
ventilation.
When lifting a plastic-cased battery, excessive pressure on the
end walls could cause acid to flow through the vent caps,
resulting in personal injury and/or damage to the vehicle or battery.
Lift the battery with a battery carrier or with your hands on opposite
corners.
Keep batteries out of reach of children. Batteries contain sulfuric
acid. Avoid contact with skin, eyes or clothing. Shield your eyes
when working near the battery to protect against possible splashing of
acid solution. In case of acid contact with skin or eyes, flush
immediately with water for a minimum of 15 minutes and get prompt
medical attention. If acid is swallowed, call a physician immediately.
Battery posts, terminals and related accessories contain lead and
lead compounds. Wash hands after handling .
For information on transmission operation after the battery has been
disconnected, refer to Shift strategy in the Driving chapter.
Because your vehicle’s engine is also electronically controlled by a
computer, some control conditions are maintained by power from the
battery. When the battery is disconnected or a new battery is installed,
the engine must relearn its idle and fuel trim strategy for optimum
driveability and performance. To begin this process:
1. With the vehicle at a complete stop, set the parking brake.
2. Put the gearshift in P (Park) (automatic transmission) or the neutral
position (manual transmission), turn off all accessories and start the
engine.
3. Run the engine until it reaches normal operating temperature.
4. Allow the engine to idle for at least one minute.
5. Turn the A/C on and allow the engine to idle for at least one minute.
2006 F-250/350/450/550 (f23)
Owners Guide (post-2002-fmt)
USA (fus) Maintenance and Specifications
259
Page 279 of 312
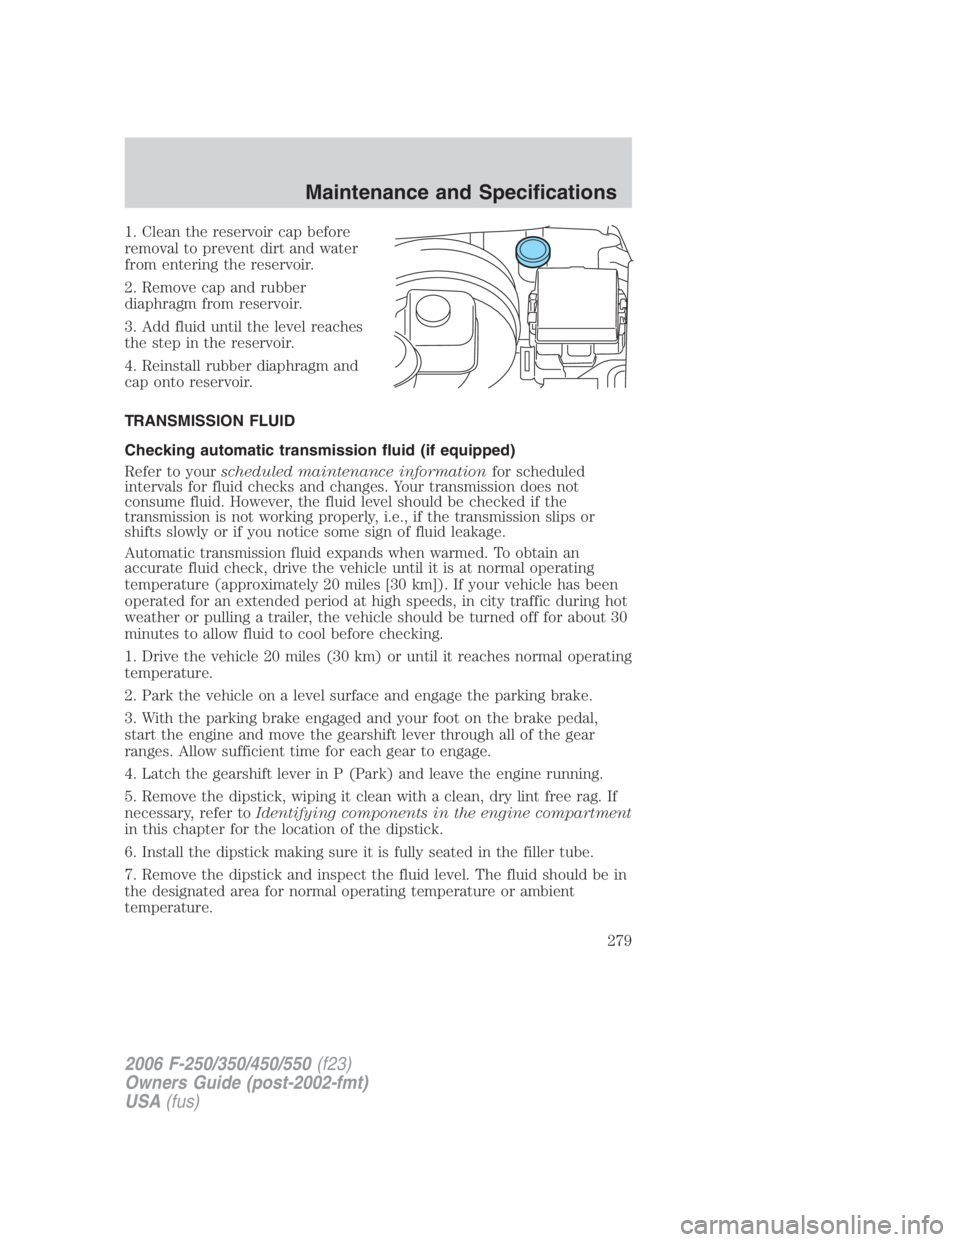
1. Clean the reservoir cap before
removal to prevent dirt and water
from entering the reservoir.
2. Remove cap and rubber
diaphragm from reservoir.
3. Add fluid until the level reaches
the step in the reservoir.
4. Reinstall rubber diaphragm and
cap onto reservoir.
TRANSMISSION FLUID
Checking automatic transmission fluid (if equipped)
Refer to your scheduled maintenance information for scheduled
intervals for fluid checks and changes. Your transmission does not
consume fluid. However, the fluid level should be checked if the
transmission is not working properly, i.e., if the transmission slips or
shifts slowly or if you notice some sign of fluid leakage.
Automatic transmission fluid expands when warmed. To obtain an
accurate fluid check, drive the vehicle until it is at normal operating
temperature (approximately 20 miles [30 km]). If your vehicle has been
operated for an extended period at high speeds, in city traffic during hot
weather or pulling a trailer, the vehicle should be turned off for about 30
minutes to allow fluid to cool before checking.
1. Drive the vehicle 20 miles (30 km) or until it reaches normal operating
temperature.
2. Park the vehicle on a level surface and engage the parking brake.
3. With the parking brake engaged and your foot on the brake pedal,
start the engine and move the gearshift lever through all of the gear
ranges. Allow sufficient time for each gear to engage.
4. Latch the gearshift lever in P (Park) and leave the engine running.
5. Remove the dipstick, wiping it clean with a clean, dry lint free rag. If
necessary, refer to Identifying components in the engine compartment
in this chapter for the location of the dipstick.
6. Install the dipstick making sure it is fully seated in the filler tube.
7. Remove the dipstick and inspect the fluid level. The fluid should be in
the designated area for normal operating temperature or ambient
temperature.
2006 F-250/350/450/550 (f23)
Owners Guide (post-2002-fmt)
USA (fus) Maintenance and Specifications
279