2006 FORD F250 SUPER DUTY light
[x] Cancel search: lightPage 199 of 312
SNOWPLOWING
Ford recommends that the Super Duty F-Series used for snow removal
include a snow plow package option.
Installing the snowplow
Weight limits and guidelines for selecting and installing the snowplow can
be found in the Ford Truck Body Builders Layout Book, Snowplow
section, found at www.fleet.ford.com/truckbbas. A typical installation
affects the following:
• Certification to government safety laws such as occupant protection
and airbag deployment, braking, and lighting. Look for an “Alterer’s
Label” on the vehicle from the snowplow installer certifying that the
installation meets all applicable Federal Motor Vehicle Safety
Standards (FMVSS).
• The Total Accessory Reserve Capacity (TARC) is shown on the lower
right side of the vehicle’s Safety Compliance Certification Label. This
applies to Ford-completed vehicles of 10,000 lb. (4,536 kg) GVWR or
less. This is the weight of permanently-attached auxiliary equipment,
such as snowplow frame-mounting hardware, that can be added to the
vehicle and satisfy Ford compliance certification to FMVSS. Exceeding
this weight may require the auxiliary equipment installer additional
safety certification responsibility. The Front Accessory Reserve
Capacity (FARC) is added for customer convenience.
• Rear ballast weight behind the rear axle may be required to prevent
exceeding the FGAWR, and provide front-to-rear weight balance for
proper braking and steering.
• Front wheel toe may require re-adjustment to prevent premature
uneven tire wear. Specifications are found in the Ford Workshop
Manual .
• Headlight aim may require re-adjustment.
• Federal and some local regulations require additional exterior lamps
for snowplow-equipped vehicles. Consult your authorized dealer for
additional information.
• Snowplowing with vehicles equipped with a 6.0 Liter Power Stroke
diesel engine may result in engine overheating under certain operating
conditions unless equipped with the special engine cooling fan clutch
that is included with a snow plow package option.
2006 F-250/350/450/550 (f23)
Owners Guide (post-2002-fmt)
USA (fus) Driving
199
Page 201 of 312
Transmission operation while plowing
Operate the vehicle with the automatic transmission gearshift lever in
the D (Overdrive) position and Tow/Haul OFF.
• Shift transfer case to 4x4 LOW (4WD Low) when plowing in small
areas at speeds below 5 mph (8 km/h).
• Shift transfer case to 4x4 HIGH (4WD High) when plowing larger
areas or light snow at higher speeds. Do not exceed 15 mph
(24 km/h).
• Do not shift the transmission from a forward gear to R (Reverse) until
the engine is at idle and the wheels are stopped.
• If the vehicle is stuck, shift the transmission in a steady motion
between forward and reverse gears. Do not rock the vehicle for more
than a few minutes. The transmission and tires may be damaged or
the engine can overheat.
Do not rock the vehicle if the engine is not at normal operating
temperature. Do not rock the vehicle for more than a minute. The
transmission and tires may be damaged or the engine may
overheat.
Refer to Transmission temperature gauge in the Instrument Cluster
chapter for transmission fluid temperature information.
Do not spin the wheels at over 35 mph (55 km/h). The tires may
fail and injure a passenger or bystander.
Removing the snowplow frame mount
A metal crossmember is included below the front bumper on Super Duty
vehicles called a “BlockerBeam”. Typical snowplow installations require
removal of this BlockerBeam to install the snowplow mounting hardware
to the vehicle frame.
The BlockerBeam must be re-installed if the snowplow
frame-mounting hardware is removed from the vehicle to ensure
proper airbag deployment in a crash.
2006 F-250/350/450/550 (f23)
Owners Guide (post-2002-fmt)
USA (fus) Driving
201
Page 208 of 312
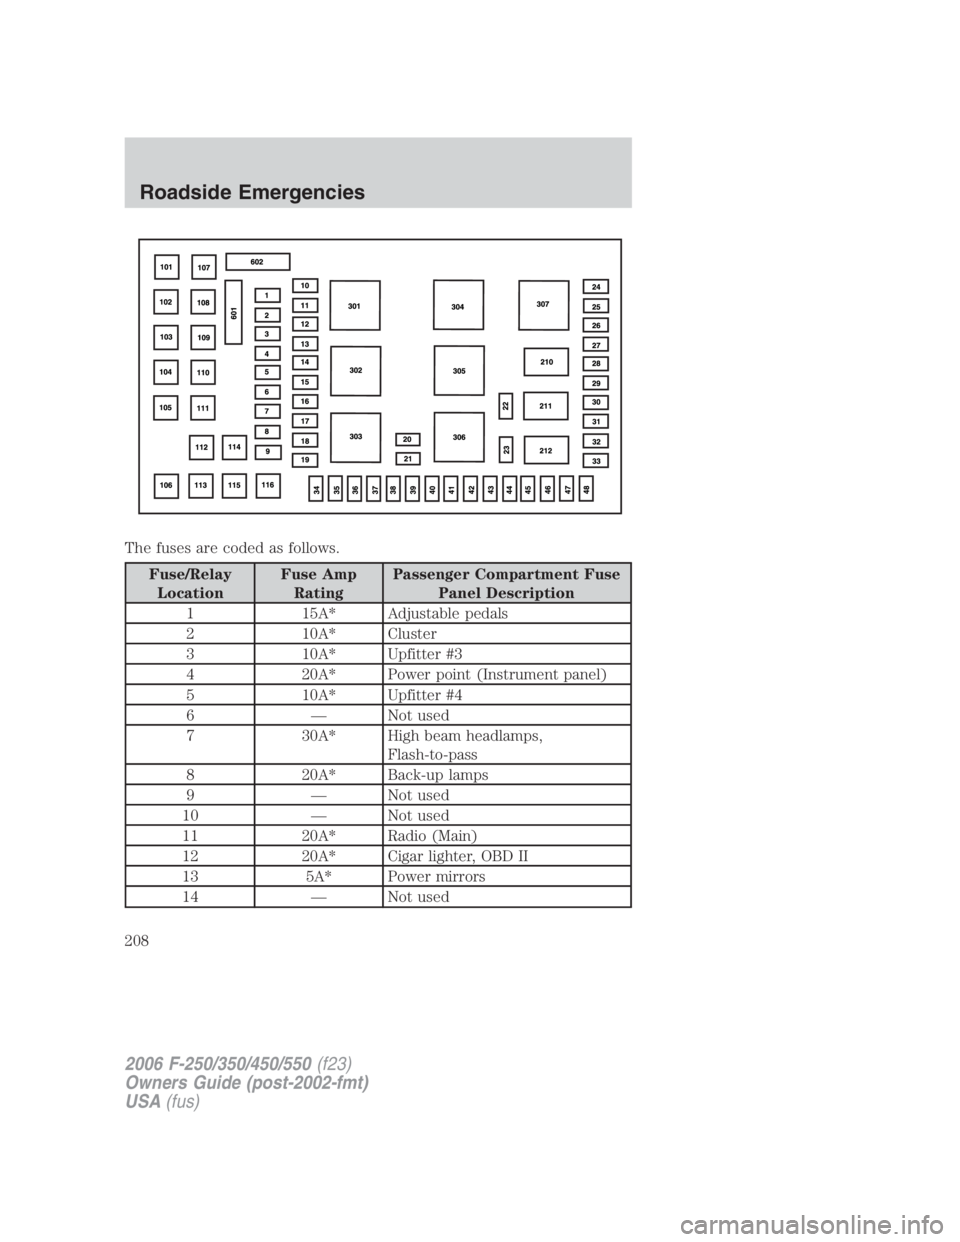
The fuses are coded as follows.
Fuse/Relay
Location Fuse Amp
Rating Passenger Compartment Fuse
Panel Description
1 15A* Adjustable pedals
2 10A* Cluster
3 10A* Upfitter #3
4 20A* Power point (Instrument panel)
5 10A* Upfitter #4
6 — Not used
7 30A* High beam headlamps,
Flash-to-pass
8 20A* Back-up lamps
9 — Not used
10 — Not used
11 20A* Radio (Main)
12 20A* Cigar lighter, OBD II
13 5A* Power mirrors
14 — Not used
2006 F-250/350/450/550 (f23)
Owners Guide (post-2002-fmt)
USA (fus)Roadside Emergencies
208
Page 218 of 312
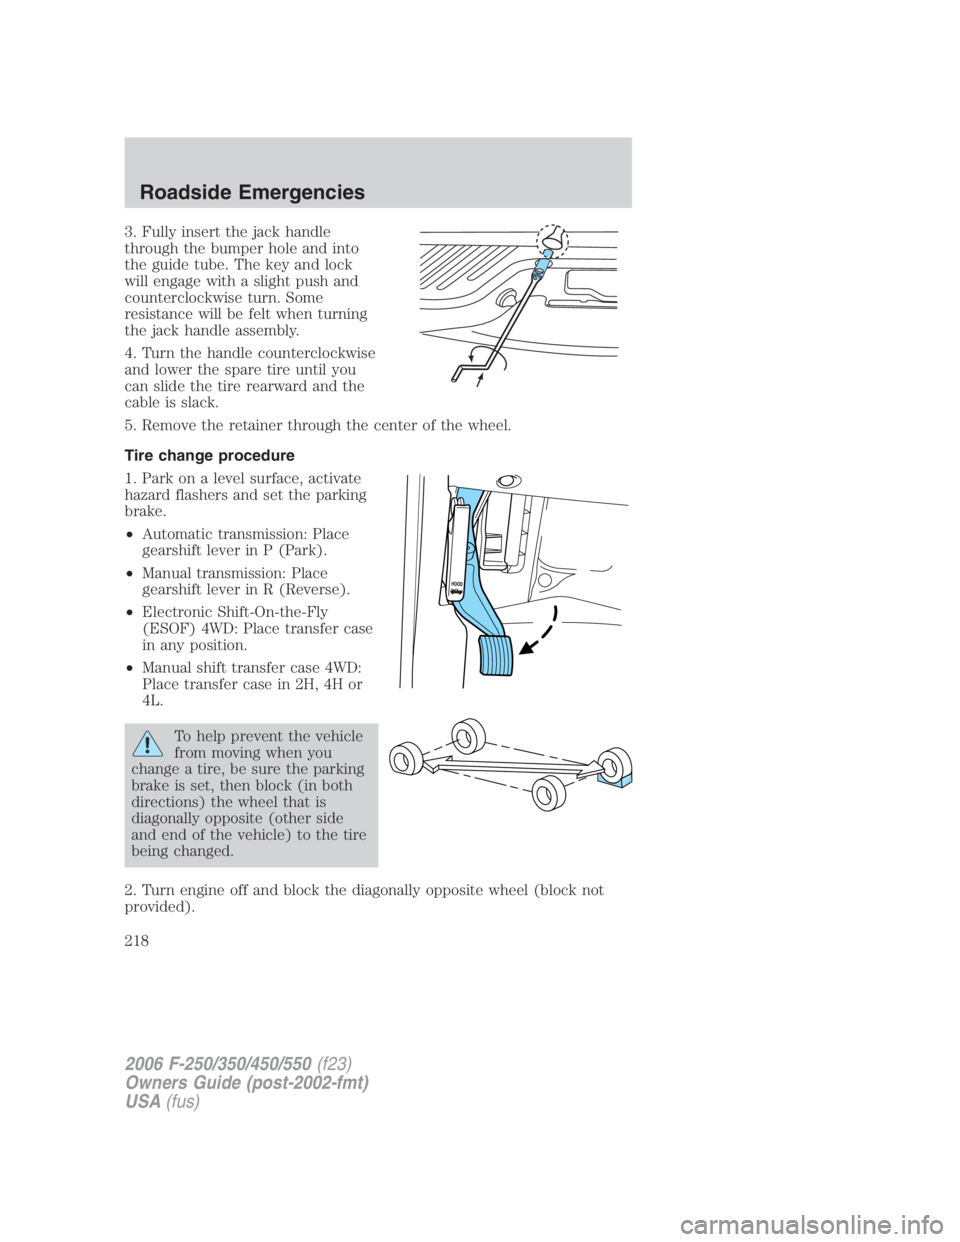
3. Fully insert the jack handle
through the bumper hole and into
the guide tube. The key and lock
will engage with a slight push and
counterclockwise turn. Some
resistance will be felt when turning
the jack handle assembly.
4. Turn the handle counterclockwise
and lower the spare tire until you
can slide the tire rearward and the
cable is slack.
5. Remove the retainer through the center of the wheel.
Tire change procedure
1. Park on a level surface, activate
hazard flashers and set the parking
brake.
• Automatic transmission: Place
gearshift lever in P (Park).
• Manual transmission: Place
gearshift lever in R (Reverse).
• Electronic Shift-On-the-Fly
(ESOF) 4WD: Place transfer case
in any position.
• Manual shift transfer case 4WD:
Place transfer case in 2H, 4H or
4L.
To help prevent the vehicle
from moving when you
change a tire, be sure the parking
brake is set, then block (in both
directions) the wheel that is
diagonally opposite (other side
and end of the vehicle) to the tire
being changed.
2. Turn engine off and block the diagonally opposite wheel (block not
provided).
2006 F-250/350/450/550 (f23)
Owners Guide (post-2002-fmt)
USA (fus)Roadside Emergencies
218
Page 227 of 312
Preparing your vehicle
When the battery is disconnected or a new battery is installed, the
transmission must relearn its shift strategy. As a result, the transmission
may have firm and/or soft shifts. This operation is considered normal and
will not affect function or durability of the transmission. Over time, the
adaptive learning process will fully update transmission operation.
1. Use only a 12–volt supply to start your vehicle.
2. Do not disconnect the battery of the disabled vehicle as this could
damage the vehicle’s electrical system.
3. Park the booster vehicle close to the hood of the disabled vehicle
making sure the two vehicles do not touch. Set the parking brake on
both vehicles and stay clear of the engine cooling fan and other moving
parts.
4. Check all battery terminals and remove any excessive corrosion before
you attach the battery cables. Ensure that vent caps are tight and level.
5. Turn the heater fan on in both vehicles to protect any electrical
surges. Turn all other accessories off.
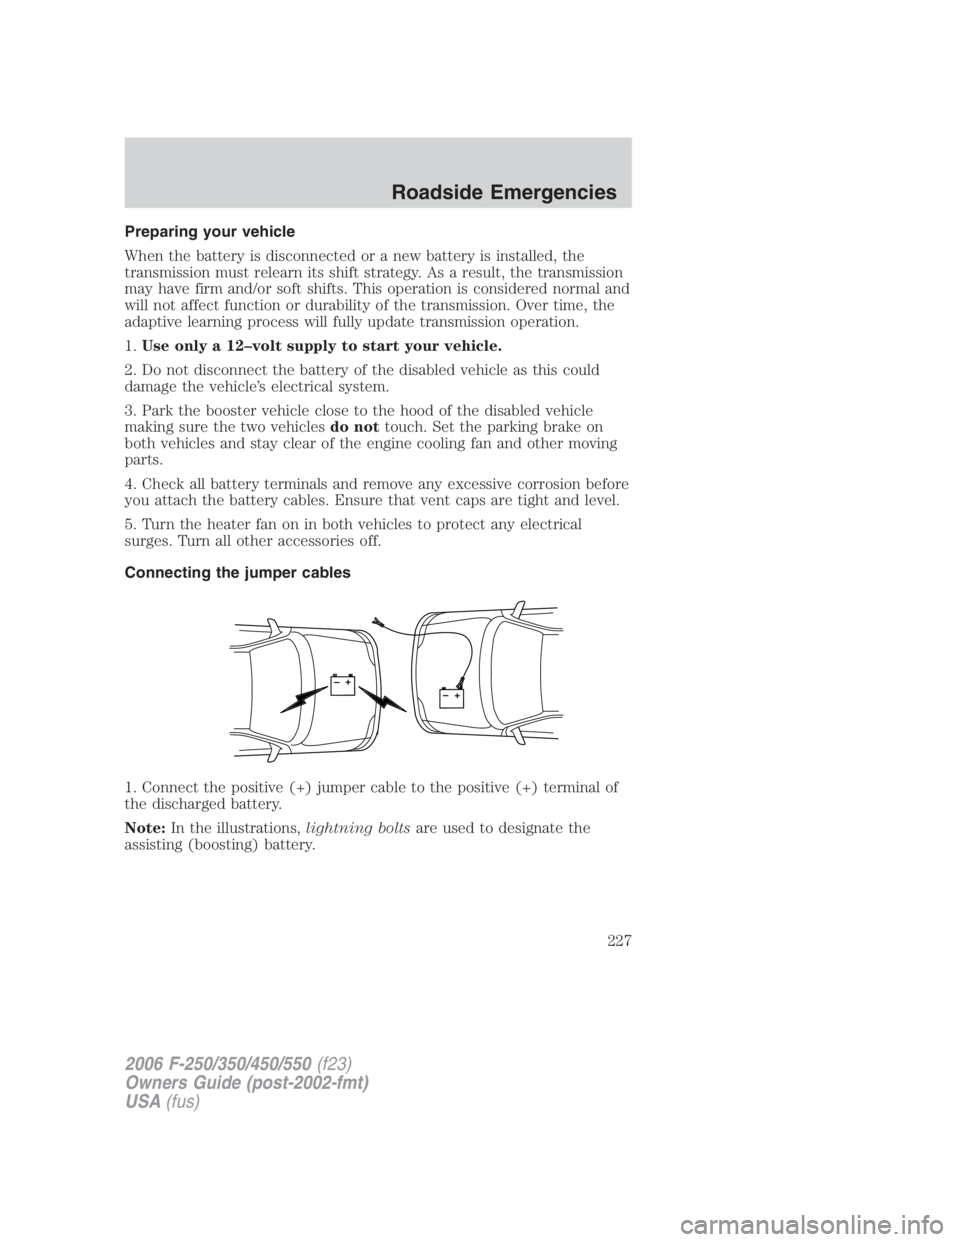
Connecting the jumper cables
1. Connect the positive (+) jumper cable to the positive (+) terminal of
the discharged battery.
Note: In the illustrations, lightning bolts are used to designate the
assisting (boosting) battery.
+
–
+
– 2006 F-250/350/450/550 (f23)
Owners Guide (post-2002-fmt)
USA (fus) Roadside Emergencies
227
Page 230 of 312
Removing the jumper cables
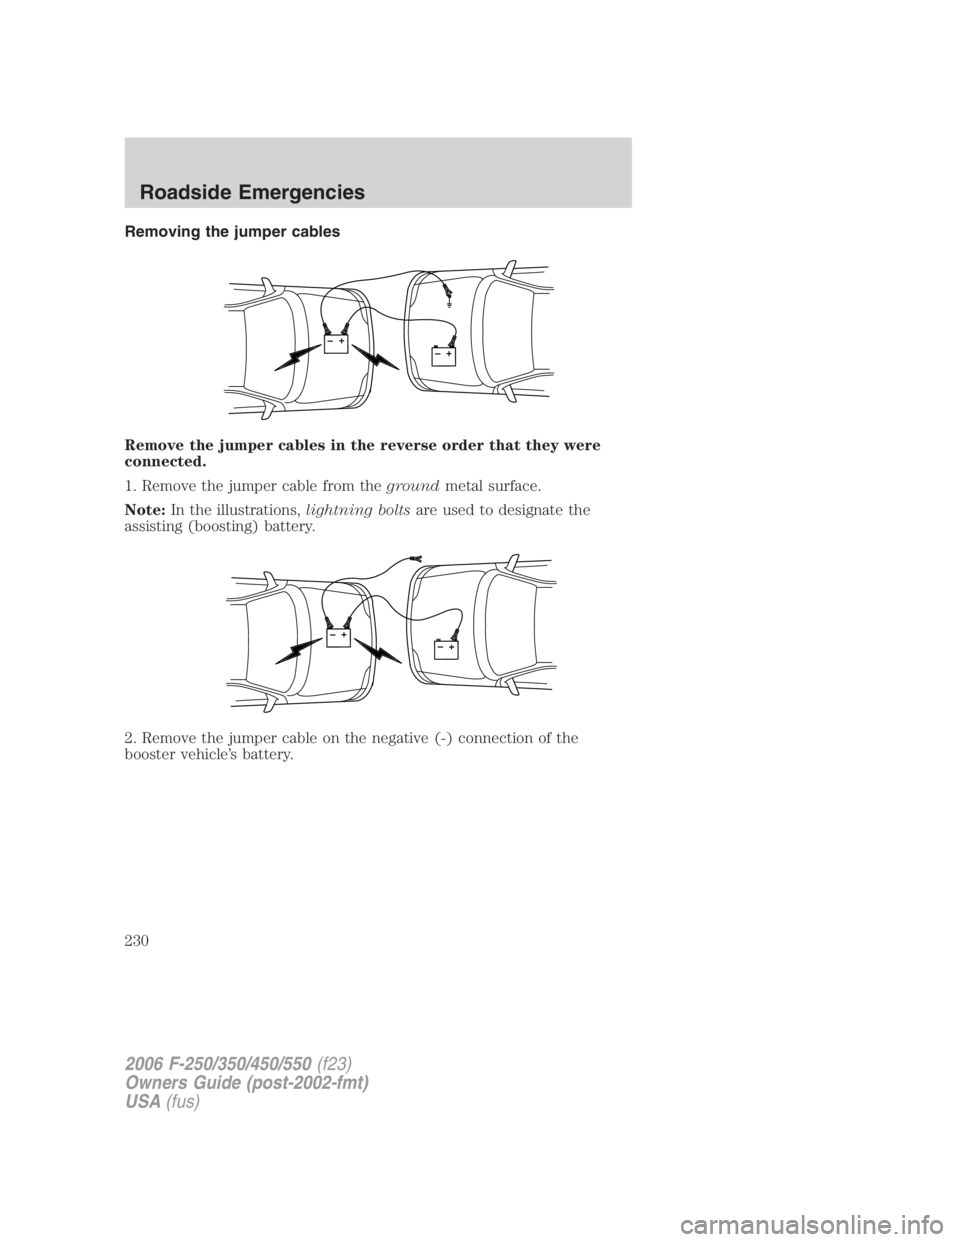
Remove the jumper cables in the reverse order that they were
connected.
1. Remove the jumper cable from the ground metal surface.
Note: In the illustrations, lightning bolts are used to designate the
assisting (boosting) battery.
2. Remove the jumper cable on the negative (-) connection of the
booster vehicle’s battery.
+
–
+
–
+
–
+
– 2006 F-250/350/450/550 (f23)
Owners Guide (post-2002-fmt)
USA (fus)Roadside Emergencies
230
Page 238 of 312
UTILIZING THE MEDIATION/ARBITRATION PROGRAM
(CANADA ONLY)
In those cases where you continue to feel that the efforts by Ford of
Canada and the authorized dealer to resolve a factory-related vehicle
service concern have been unsatisfactory, Ford of Canada participates in
an impartial third party mediation/arbitration program administered by
the Canadian Motor Vehicle Arbitration Plan (CAMVAP).
The CAMVAP program is a straight-forward and relatively speedy alternative
to resolve a disagreement when all other efforts to produce a settlement
have failed. This procedure is without cost to you and is designed to
eliminate the need for lengthy and expensive legal proceedings.
In the CAMVAP program, impartial third-party arbitrators conduct
hearings at mutually convenient times and places in an informal
environment. These impartial arbitrators review the positions of the
parties, make decisions and, when appropriate, render awards to resolve
disputes. CAMVAP decisions are fast, fair, and final as the arbitrator’s
award is binding both to you and Ford of Canada.
CAMVAP services are available in all Canadian territories and provinces.
For more information, without charge or obligation, call your CAMVAP
Provincial Administrator directly at 1-800-207-0685.
FORD EXTENDED SERVICE PLAN
You can get more protection for your new car or light truck by
purchasing Ford Extended Service Plan (Ford ESP) coverage. It provides
the following:
• Benefits during the warranty period depending on the plan you
purchase (such as: reimbursement for rentals; coverage for certain
maintenance and wear items).
• Protection against covered repair costs after your Bumper-to-Bumper
Warranty expires.
You may purchase Ford ESP from any participating Ford and Lincoln
Mercury and Ford of Canada authorized dealer. There are several plans
available in various time, distance and deductible combinations which
can be tailored to fit your own driving needs. Ford ESP also offers
reimbursement benefits for towing and rental coverage.
When you buy Ford ESP, you receive Peace-of-Mind protection
throughout the United States and Canada, provided by a network of
more than 4,600 participating Ford or Lincoln Mercury and Ford of
Canada authorized dealers.
2006 F-250/350/450/550 (f23)
Owners Guide (post-2002-fmt)
USA (fus)Customer Assistance
238
Page 241 of 312
WASHING THE EXTERIOR
Wash your vehicle regularly with cool or lukewarm water and a neutral
pH shampoo, such as Motorcraft Detail Wash (ZC-3–A), which is
available from your authorized dealer.
• Never use strong household detergents or soap, such as dish washing
or laundry liquid. These products can discolor and spot painted
surfaces.
• Never wash a vehicle that is “hot to the touch” or during exposure to
strong, direct sunlight.
• Always use a clean sponge or car wash mitt with plenty of water for
best results.
• Dry the vehicle with a chamois or soft terry cloth towel in order to
eliminate water spotting.
• It is especially important to wash the vehicle regularly during the
winter months, as dirt and road salt are difficult to remove and cause
damage to the vehicle.
• Immediately remove items such as gasoline, diesel fuel, bird droppings
and insect deposits because they can cause damage to the vehicle’s
paintwork and trim over time.
• Remove any exterior accessories, such as antennas, before entering a
car wash.
• Suntan lotions and insect repellents can damage any painted
surface; if these substances come in contact with your vehicle,
wash off as soon as possible.
• If your vehicle is equipped with running boards, do not use
rubber, plastic and vinyl protectant products on the running
board surface, as the area may become slippery.
WAXING
Applying Motorcraft Paint Sealant (ZC-45) to your vehicle every six
months will assist in reducing minor scratches and paint damage.
• Wash the vehicle first.
• Do not use waxes that contain abrasives. Use Motorcraft Premium
Liquid Wax, ZC-53-A, which is available from your authorized dealer,
or an equivalent quality product.
2006 F-250/350/450/550 (f23)
Owners Guide (post-2002-fmt)
USA (fus) Cleaning
241