Page 266 of 360
U.S. Ford or Mercury vehicle customers who require roadside assistance,
call 1–800–241–3673; Lincoln vehicle customers call 1–800–521–4140.
Canadian customers who require roadside assistance, call
1–800–665–2006.
If you need to arrange roadside assistance for yourself, Ford Motor
Company will reimburse a reasonable amount. To obtain reimbursement
information, U.S. Ford or Mercury vehicles customers call
1-800-241-3673; Lincoln vehicle customers call 1–800–521–4140.
Canadian customers who need to obtain reimbursement information, call
1–800–665–2006.
Roadside coverage beyond basic warranty
In the United States, you may purchase additional roadside assistance
coverage beyond this period through the Ford Auto Club by contacting
your authorized dealer.
Similarly in Canada, for uninterrupted Roadside Assistance coverage, you
may purchase extended coverage prior to your Basic Warranty’s Roadside
Assistance expiring. For more information and enrollment, contact
1–877–294–2582 or visit our website at www.ford.ca.
HAZARD FLASHER
Use only in an emergency to warn traffic of vehicle breakdown,
approaching danger, etc. The hazard flashers can be operated when the
ignition is off.
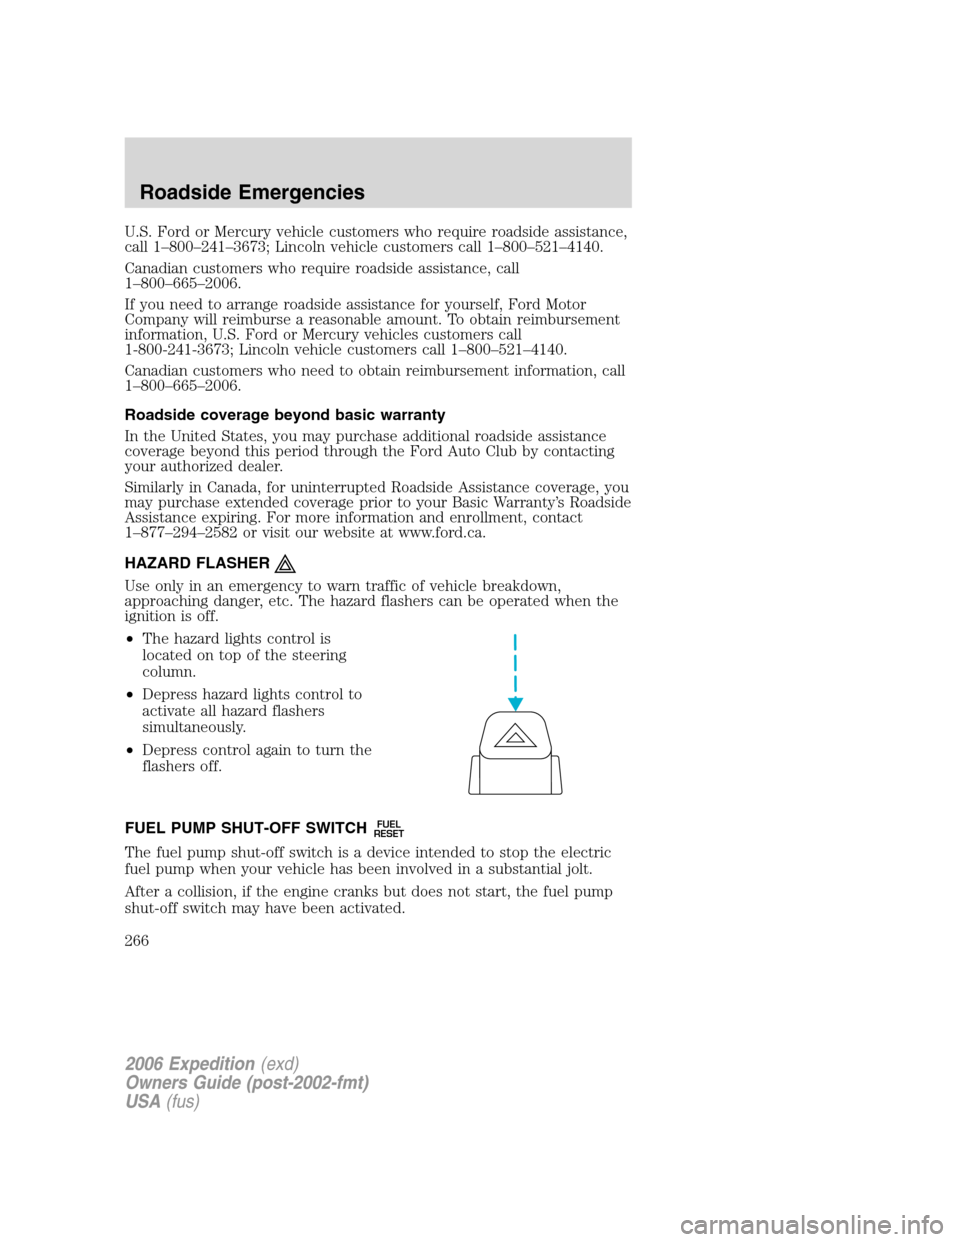
•The hazard lights control is
located on top of the steering
column.
•Depress hazard lights control to
activate all hazard flashers
simultaneously.
•Depress control again to turn the
flashers off.
FUEL PUMP SHUT-OFF SWITCH
FUEL
RESET
The fuel pump shut-off switch is a device intended to stop the electric
fuel pump when your vehicle has been involved in a substantial jolt.
After a collision, if the engine cranks but does not start, the fuel pump
shut-off switch may have been activated.
2006 Expedition(exd)
Owners Guide (post-2002-fmt)
USA(fus)
Roadside Emergencies
266
Page 267 of 360
The fuel pump shut-off switch is located in the left rear quarter trim
panel, near the liftgate. The switch is located behind an access panel.
The fuel pump shut-off switch has a
red reset button on top of it and is
located beneath the air suspension
switch (if equipped).
Use the following procedure to reset the fuel pump shut-off switch.
1. Turn the ignition to the OFF position.
2. Check the fuel system for leaks.
3. If no fuel leak is apparent, reset the fuel pump shut-off switch by
pushing in on the reset button.
4. Turn the ignition to the ON position. Pause for a few seconds and
return the key to the OFF position.
5. Make a further check for leaks in the fuel system.
2006 Expedition(exd)
Owners Guide (post-2002-fmt)
USA(fus)
Roadside Emergencies
267
Page 272 of 360
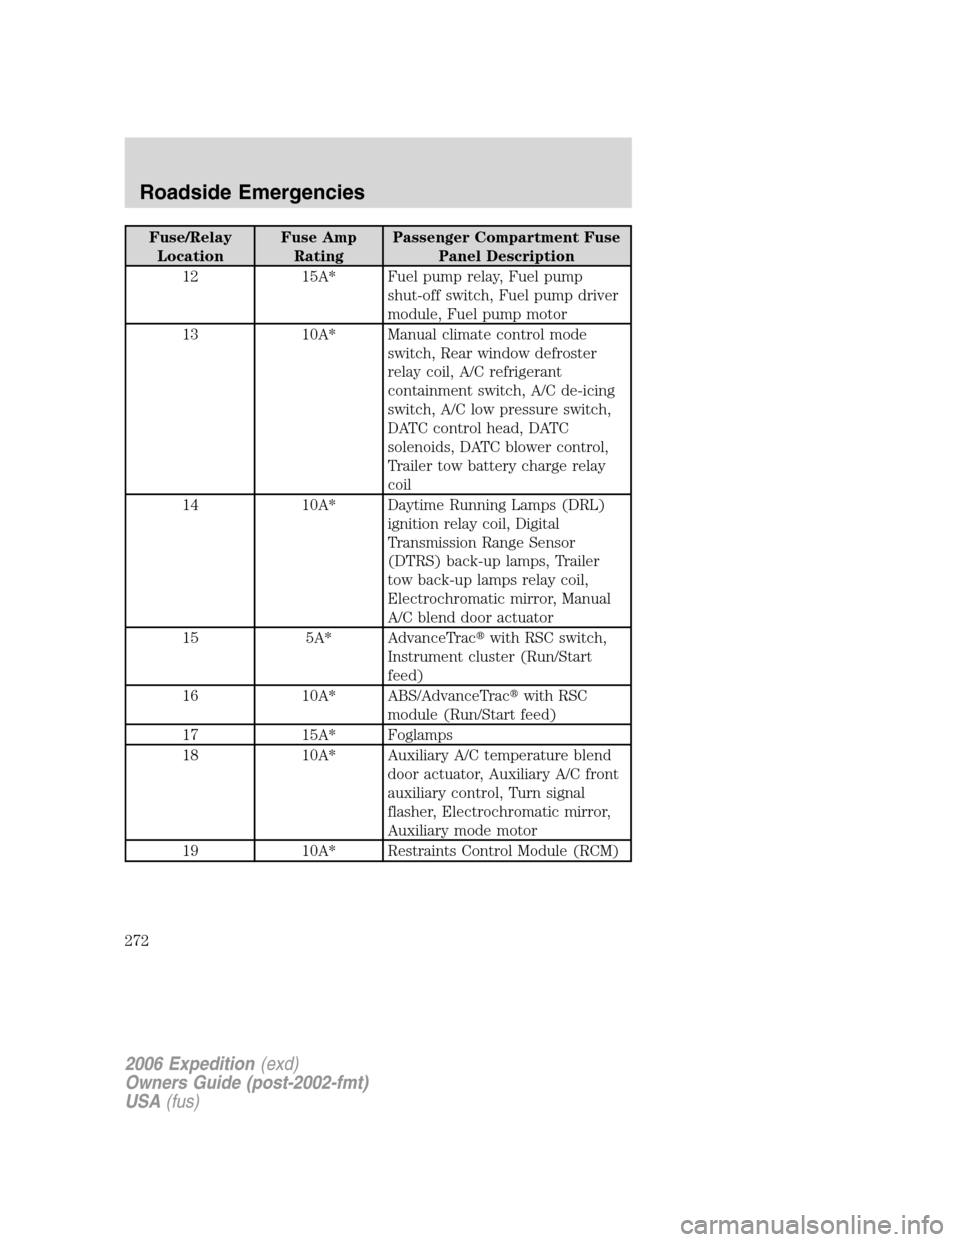
Fuse/Relay
LocationFuse Amp
RatingPassenger Compartment Fuse
Panel Description
12 15A* Fuel pump relay, Fuel pump
shut-off switch, Fuel pump driver
module, Fuel pump motor
13 10A* Manual climate control mode
switch, Rear window defroster
relay coil, A/C refrigerant
containment switch, A/C de-icing
switch, A/C low pressure switch,
DATC control head, DATC
solenoids, DATC blower control,
Trailer tow battery charge relay
coil
14 10A* Daytime Running Lamps (DRL)
ignition relay coil, Digital
Transmission Range Sensor
(DTRS) back-up lamps, Trailer
tow back-up lamps relay coil,
Electrochromatic mirror, Manual
A/C blend door actuator
15 5A* AdvanceTrac�with RSC switch,
Instrument cluster (Run/Start
feed)
16 10A* ABS/AdvanceTrac�with RSC
module (Run/Start feed)
17 15A* Foglamps
18 10A* Auxiliary A/C temperature blend
door actuator, Auxiliary A/C front
auxiliary control, Turn signal
flasher, Electrochromatic mirror,
Auxiliary mode motor
19 10A* Restraints Control Module (RCM)
2006 Expedition(exd)
Owners Guide (post-2002-fmt)
USA(fus)
Roadside Emergencies
272
Page 275 of 360
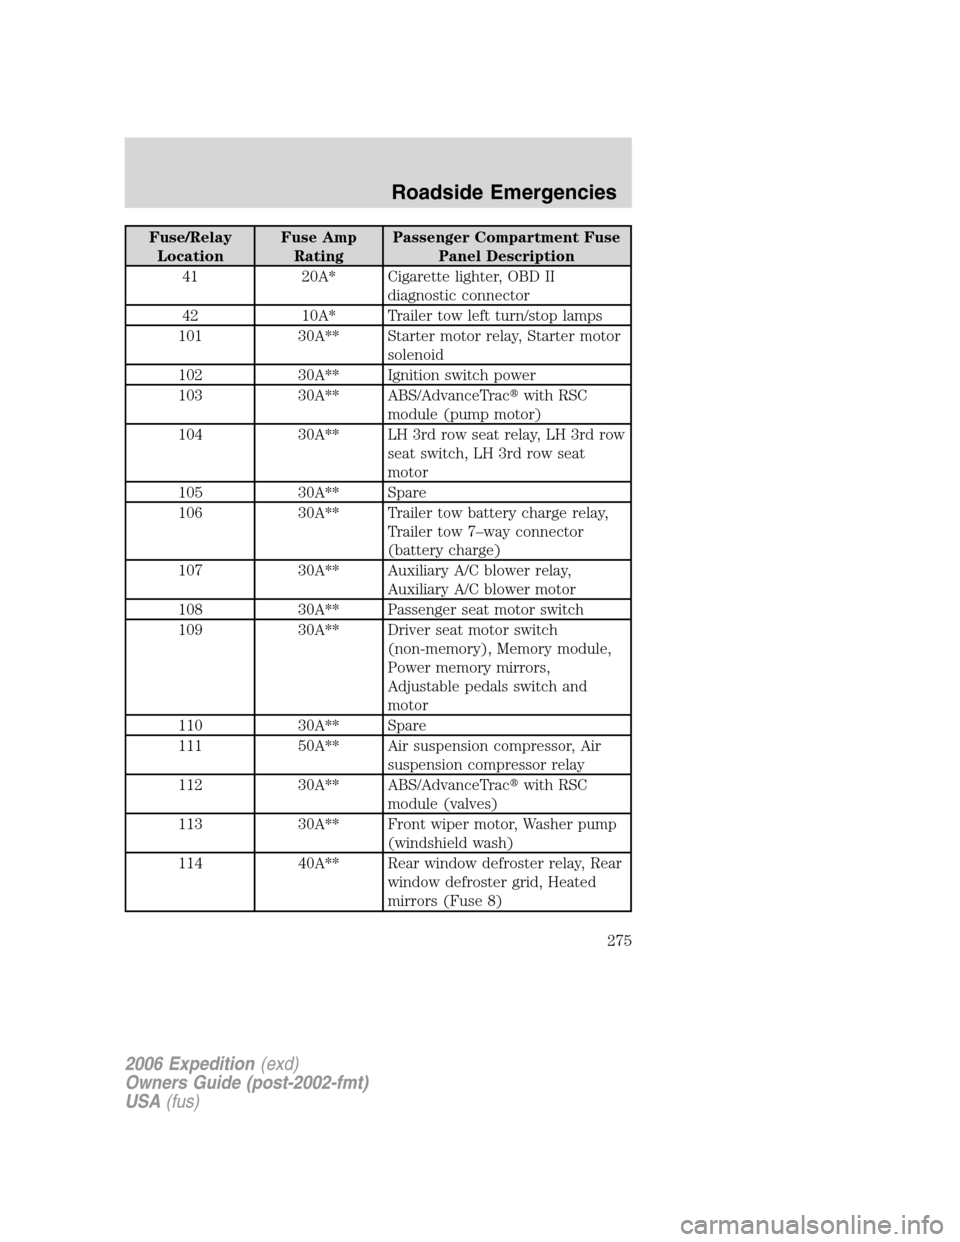
Fuse/Relay
LocationFuse Amp
RatingPassenger Compartment Fuse
Panel Description
41 20A* Cigarette lighter, OBD II
diagnostic connector
42 10A* Trailer tow left turn/stop lamps
101 30A** Starter motor relay, Starter motor
solenoid
102 30A** Ignition switch power
103 30A** ABS/AdvanceTrac�with RSC
module (pump motor)
104 30A** LH 3rd row seat relay, LH 3rd row
seat switch, LH 3rd row seat
motor
105 30A** Spare
106 30A** Trailer tow battery charge relay,
Trailer tow 7–way connector
(battery charge)
107 30A** Auxiliary A/C blower relay,
Auxiliary A/C blower motor
108 30A** Passenger seat motor switch
109 30A** Driver seat motor switch
(non-memory), Memory module,
Power memory mirrors,
Adjustable pedals switch and
motor
110 30A** Spare
111 50A** Air suspension compressor, Air
suspension compressor relay
112 30A** ABS/AdvanceTrac�with RSC
module (valves)
113 30A** Front wiper motor, Washer pump
(windshield wash)
114 40A** Rear window defroster relay, Rear
window defroster grid, Heated
mirrors (Fuse 8)
2006 Expedition(exd)
Owners Guide (post-2002-fmt)
USA(fus)
Roadside Emergencies
275
Page 290 of 360
WRECKER TOWING
If you need to have your vehicle towed, contact a professional towing
service or, if you are a member of a roadside assistance program, your
roadside assistance service provider.
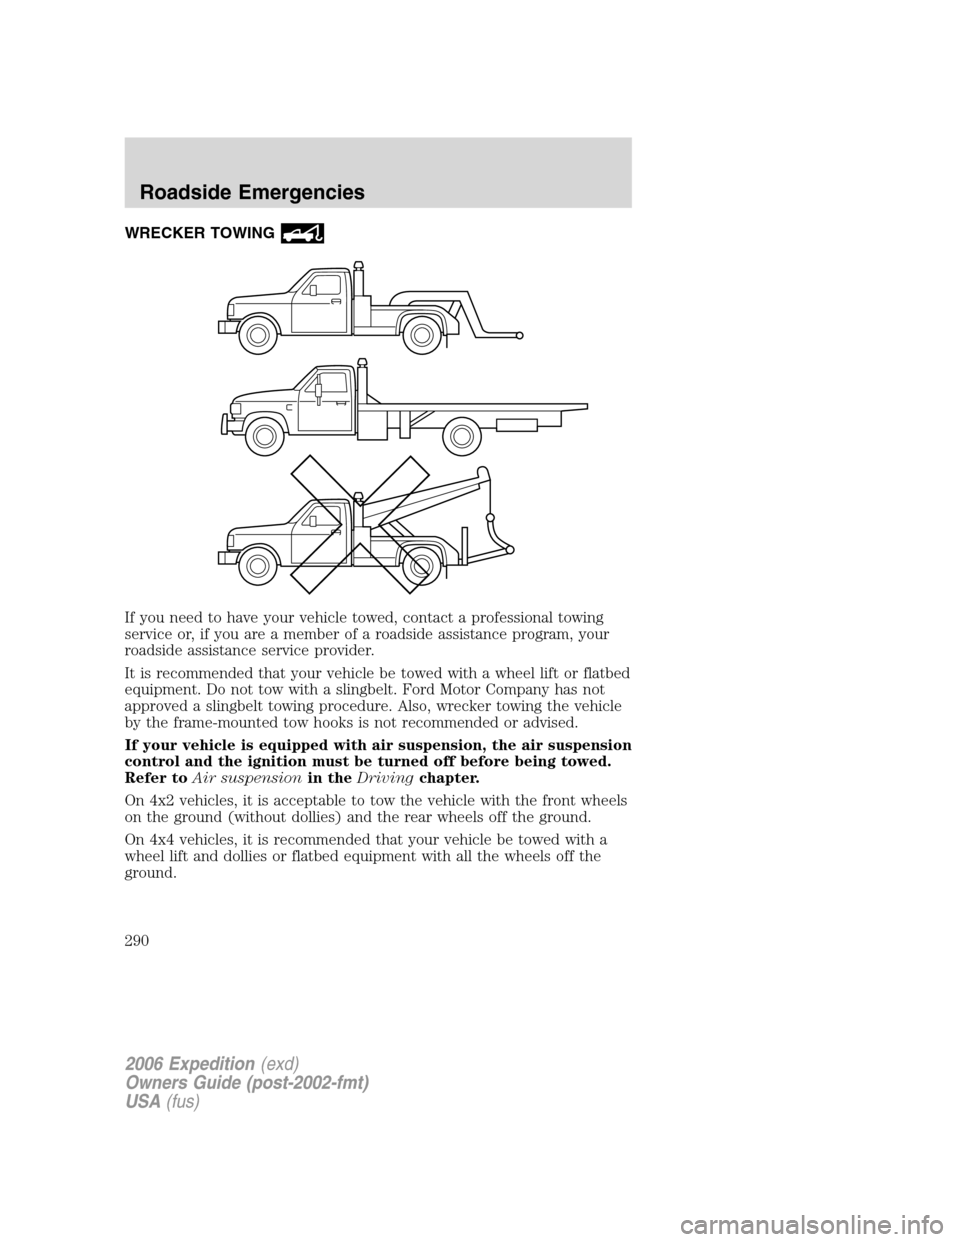
It is recommended that your vehicle be towed with a wheel lift or flatbed
equipment. Do not tow with a slingbelt. Ford Motor Company has not
approved a slingbelt towing procedure. Also, wrecker towing the vehicle
by the frame-mounted tow hooks is not recommended or advised.
If your vehicle is equipped with air suspension, the air suspension
control and the ignition must be turned off before being towed.
Refer toAir suspensionin theDrivingchapter.
On 4x2 vehicles, it is acceptable to tow the vehicle with the front wheels
on the ground (without dollies) and the rear wheels off the ground.
On 4x4 vehicles, it is recommended that your vehicle be towed with a
wheel lift and dollies or flatbed equipment with all the wheels off the
ground.
2006 Expedition(exd)
Owners Guide (post-2002-fmt)
USA(fus)
Roadside Emergencies
290
Page 291 of 360
If the vehicle is towed by other means or incorrectly, vehicle
damage may occur.
With a disabled vehicle (without access to wheel dollies, car hauling
trailer or flatbed transport vehicle) your vehicle can be towed (all wheels
on the ground) under the following conditions:
Special Conditions:
•Release the parking brake.
•Turn the air suspension (if equipped) control to OFF.
•Turn the ignition to the OFF/UNLOCKED position.
•Place the transmission in N (Neutral).
If the vehicle’s battery is discharged, refer toAutomatic transmission
operationin theDrivingchapter for directions on how to move the
gearshift lever out of the P (Park) position, for proper towing.
•Do not exceed a distance of 50 miles (80 km).
•Do not exceed 35 mph (56 km/h) vehicle speed.
Ford Motor Company produces a towing manual for all authorized tow
truck operators. Have your tow truck operator refer to this manual for
proper hook-up and towing procedures for your vehicle.
2006 Expedition(exd)
Owners Guide (post-2002-fmt)
USA(fus)
Roadside Emergencies
291
Page 329 of 360
rating. Aftermarket products could cause damage to the fuel system.
Repairs to correct the effects of using an aftermarket product in your
fuel may not be covered by your warranty.
Many of the world’s automakers approved the World-wide Fuel Charter
that recommends gasoline specifications to provide improved
performance and emission control system protection for your vehicle.
Gasolines that meet the World-wide Fuel Charter should be used when
available. Ask your fuel supplier about gasolines that meet the
World-wide Fuel Charter.
Cleaner air
Ford endorses the use of reformulated “cleaner-burning” gasolines to
improve air quality.
Running out of fuel
Avoid running out of fuel because this situation may have an adverse
effect on powertrain components.
If you have run out of fuel:
•You may need to cycle the ignition from OFF to ON several times after
refueling, to allow the fuel system to pump the fuel from the tank to
the engine.
•The
indicator may come on. For more information on the “Check
Engine” or the “Service engine soon” indicator, refer to the
Instrument Clusterchapter.
ESSENTIALS OF GOOD FUEL ECONOMY
Measuring techniques
Your best source of information about actual fuel economy is you, the
driver. You must gather information as accurately and consistently as
possible. Fuel expense, frequency of fill-ups or fuel gauge readings are
NOT accurate as a measure of fuel economy. We do not recommend
taking fuel economy measurements during the first 1,000 miles (1,600 km)
of driving (engine break-in period). You will get a more accurate
measurement after 2,000 miles-3,000 miles (3,000 km–5,000 km).
Filling the tank
The advertised fuel capacity of the fuel tank on your vehicle is equal to
the rated refill capacity of the fuel tank as listed in theRefill capacities
section of this chapter.
2006 Expedition(exd)
Owners Guide (post-2002-fmt)
USA(fus)
Maintenance and Specifications
329
Page 330 of 360
The advertised capacity is the amount of the indicated capacity and the
empty reserve combined. Indicated capacity is the difference in the
amount of fuel in a full tank and a tank when the fuel gauge indicates
empty. Empty reserve is the small amount of fuel remaining in the fuel
tank after the fuel gauge indicates empty.
The amount of usable fuel in the empty reserve varies and should
not be relied upon to increase driving range. When refueling your
vehicle after the fuel gauge indicates empty, you might not be
able to refuel the full amount of the advertised capacity of the
fuel tank due to the empty reserve still present in the tank.
For consistent results when filling the fuel tank:
•Turn the engine/ignition switch to the off position prior to refueling,
an error in the reading will result if the engine is left running.
•Use the same filling rate setting (low — medium — high) each time
the tank is filled.
•Allow no more than two automatic click-offs when filling.
•Always use fuel with the recommended octane rating.
•Use a known quality gasoline, preferably a national brand.
•Use the same side of the same pump and have the vehicle facing the
same direction each time you fill up.
•Have the vehicle loading and distribution the same every time.
Your results will be most accurate if your filling method is consistent.
Calculating fuel economy
1. Fill the fuel tank completely and record the initial odometer reading
(in miles or kilometers).
2. Each time you fill the tank, record the amount of fuel added (in
gallons or liters).
3. After at least three to five tank fill-ups, fill the fuel tank and record
the current odometer reading.
4. Subtract your initial odometer reading from the current odometer
reading.
5. Follow one of the simple calculations in order to determine fuel
economy:
Calculation 1:Divide total miles traveled by total gallons used.
Calculation 2:Multiply liters used by 100, then divide by total
kilometers traveled.
2006 Expedition(exd)
Owners Guide (post-2002-fmt)
USA(fus)
Maintenance and Specifications
330