Page 264 of 360
DRIVING THROUGH WATER
If driving through deep or standing
water is unavoidable, proceed very
slowly especially when the depth is
not known. Never drive through
water that is higher than the bottom
of the wheel rims (for cars) or the
bottom of the hubs (for trucks).
When driving through water, traction or brake capability may be limited.
Also, water may enter your engine’s air intake and severely damage your
engine or your vehicle may stall.Driving through deep water where
the transmission vent tube is submerged may allow water into the
transmission and cause internal transmission damage.
Once through the water, always dry the brakes by moving your
vehicle slowly while applying light pressure on the brake pedal.
Wet brakes do not stop the vehicle as quickly as dry brakes.
2006 Expedition(exd)
Owners Guide (post-2002-fmt)
USA(fus)
Driving
264
Page 271 of 360
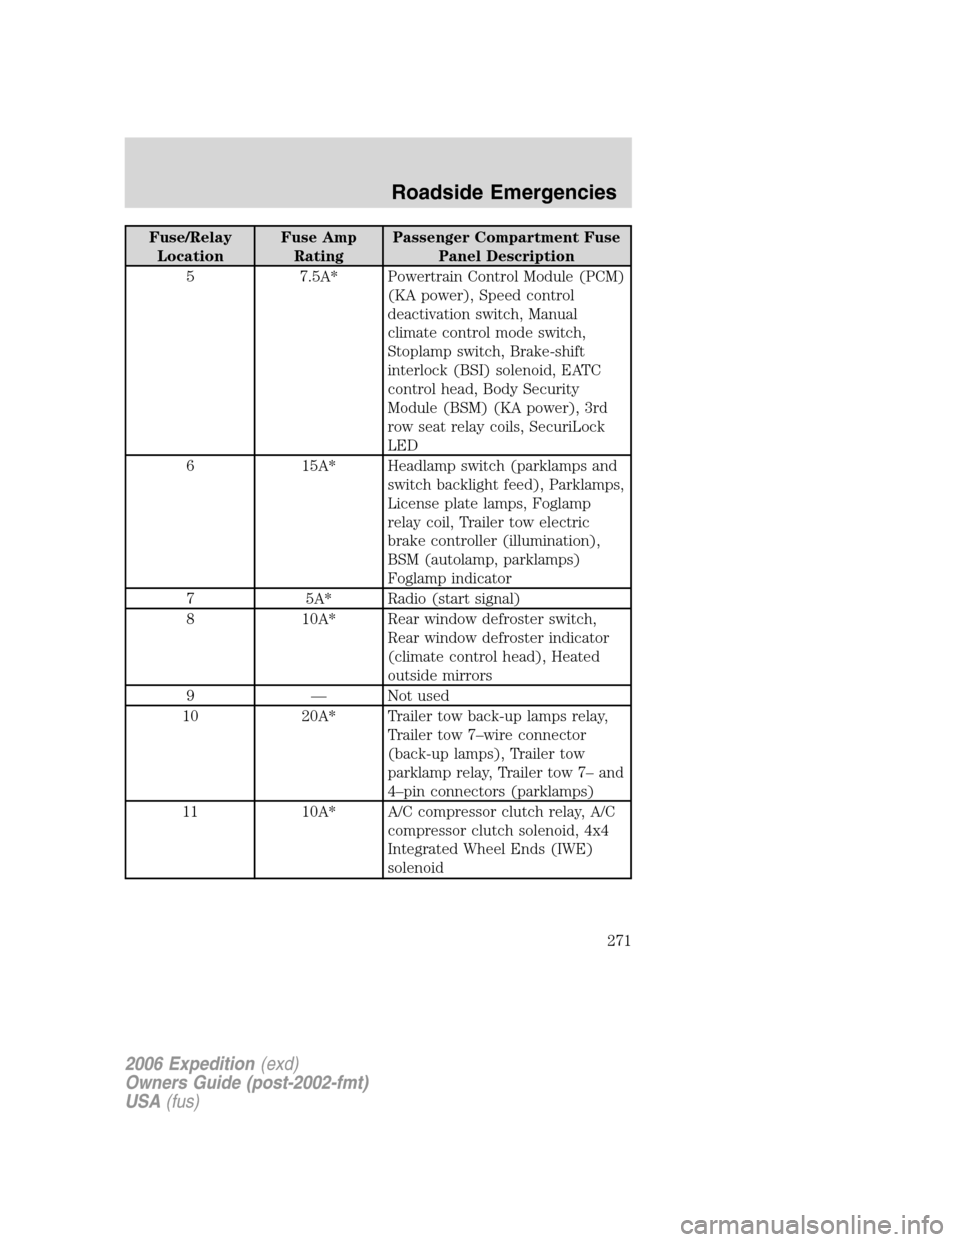
Fuse/Relay
LocationFuse Amp
RatingPassenger Compartment Fuse
Panel Description
5 7.5A* Powertrain Control Module (PCM)
(KA power), Speed control
deactivation switch, Manual
climate control mode switch,
Stoplamp switch, Brake-shift
interlock (BSI) solenoid, EATC
control head, Body Security
Module (BSM) (KA power), 3rd
row seat relay coils, SecuriLock
LED
6 15A* Headlamp switch (parklamps and
switch backlight feed), Parklamps,
License plate lamps, Foglamp
relay coil, Trailer tow electric
brake controller (illumination),
BSM (autolamp, parklamps)
Foglamp indicator
7 5A* Radio (start signal)
8 10A* Rear window defroster switch,
Rear window defroster indicator
(climate control head), Heated
outside mirrors
9 — Not used
10 20A* Trailer tow back-up lamps relay,
Trailer tow 7–wire connector
(back-up lamps), Trailer tow
parklamp relay, Trailer tow 7– and
4–pin connectors (parklamps)
11 10A* A/C compressor clutch relay, A/C
compressor clutch solenoid, 4x4
Integrated Wheel Ends (IWE)
solenoid
2006 Expedition(exd)
Owners Guide (post-2002-fmt)
USA(fus)
Roadside Emergencies
271
Page 273 of 360
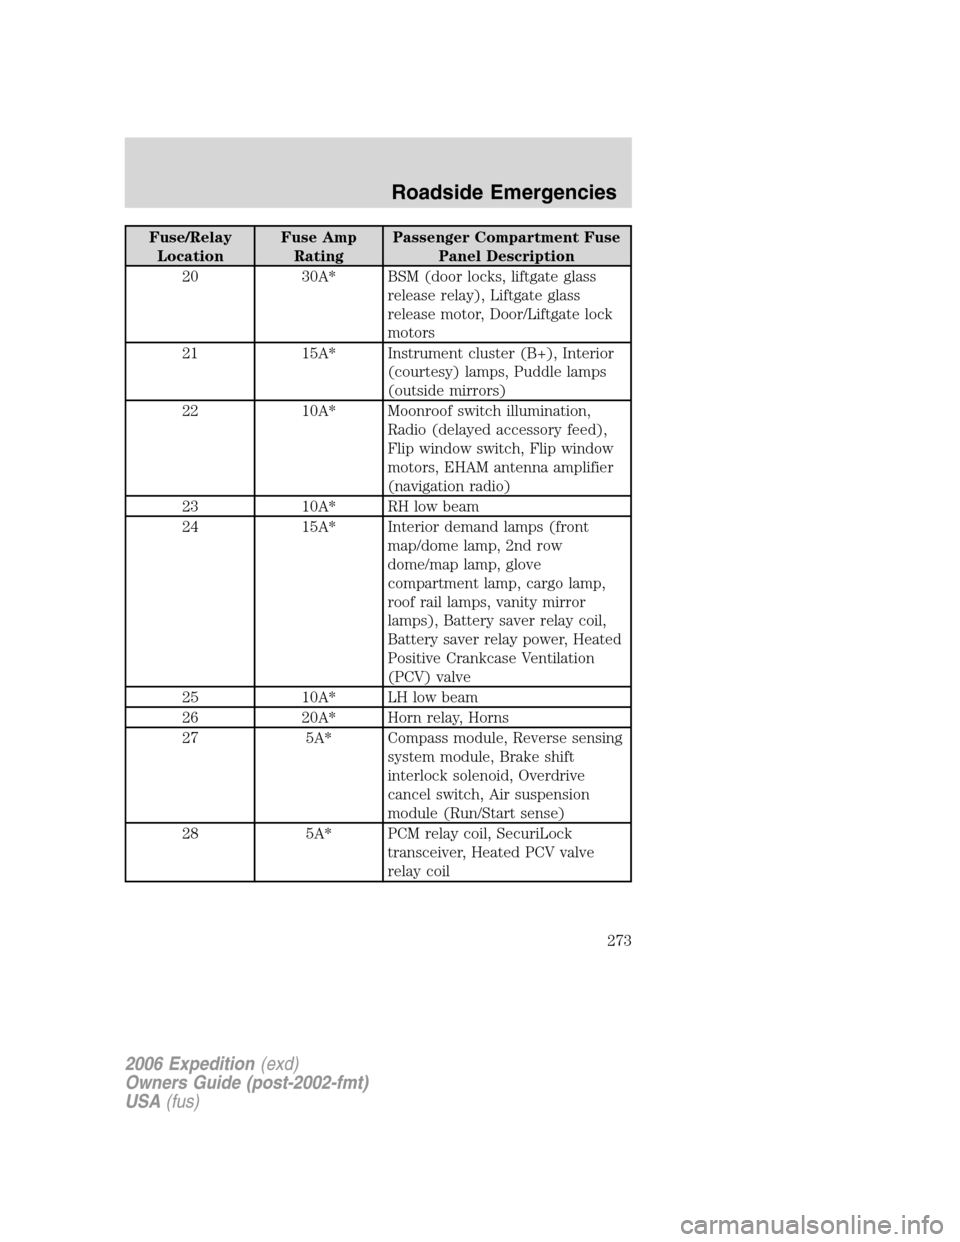
Fuse/Relay
LocationFuse Amp
RatingPassenger Compartment Fuse
Panel Description
20 30A* BSM (door locks, liftgate glass
release relay), Liftgate glass
release motor, Door/Liftgate lock
motors
21 15A* Instrument cluster (B+), Interior
(courtesy) lamps, Puddle lamps
(outside mirrors)
22 10A* Moonroof switch illumination,
Radio (delayed accessory feed),
Flip window switch, Flip window
motors, EHAM antenna amplifier
(navigation radio)
23 10A* RH low beam
24 15A* Interior demand lamps (front
map/dome lamp, 2nd row
dome/map lamp, glove
compartment lamp, cargo lamp,
roof rail lamps, vanity mirror
lamps), Battery saver relay coil,
Battery saver relay power, Heated
Positive Crankcase Ventilation
(PCV) valve
25 10A* LH low beam
26 20A* Horn relay, Horns
27 5A* Compass module, Reverse sensing
system module, Brake shift
interlock solenoid, Overdrive
cancel switch, Air suspension
module (Run/Start sense)
28 5A* PCM relay coil, SecuriLock
transceiver, Heated PCV valve
relay coil
2006 Expedition(exd)
Owners Guide (post-2002-fmt)
USA(fus)
Roadside Emergencies
273
Page 274 of 360
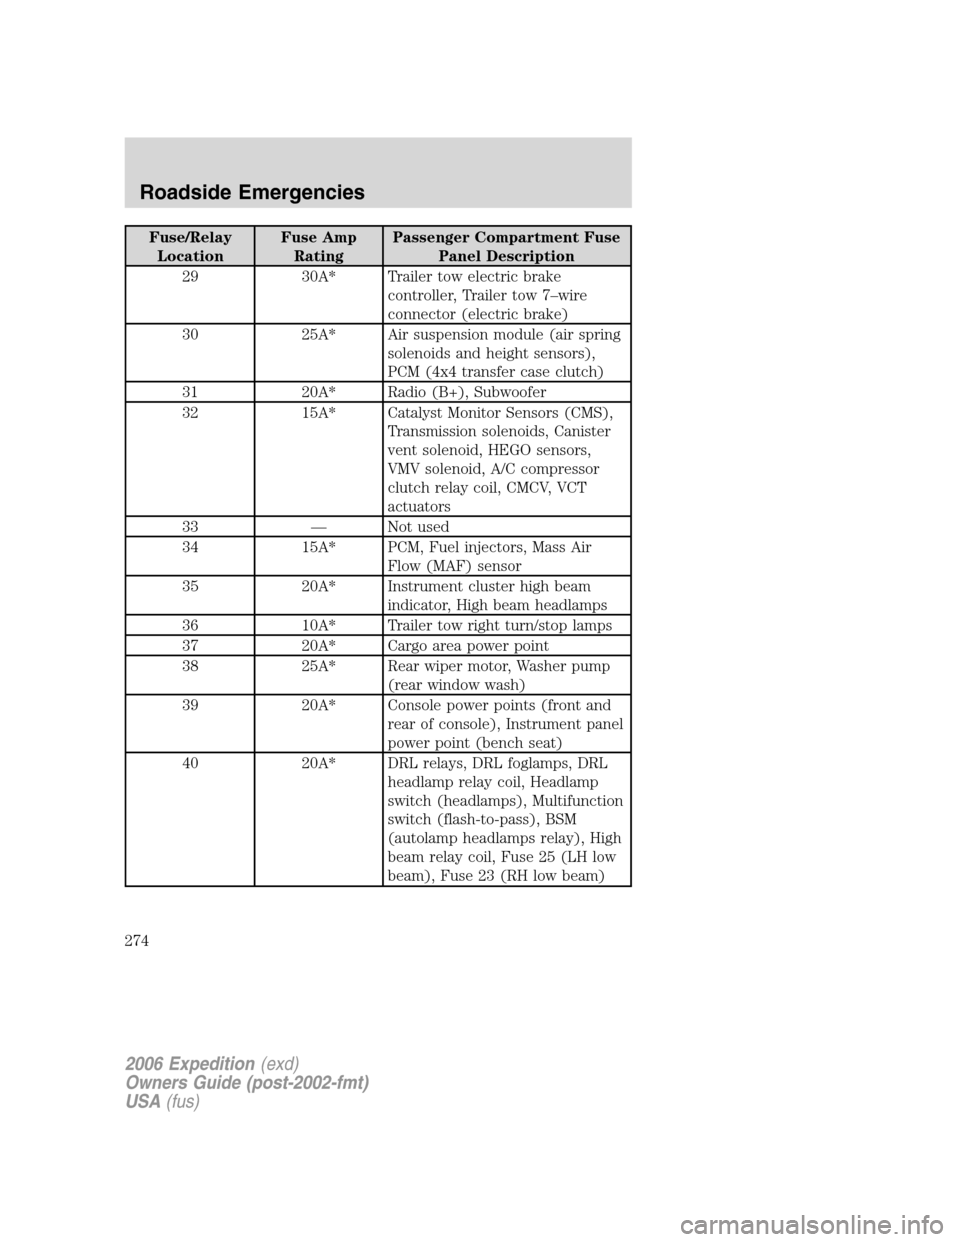
Fuse/Relay
LocationFuse Amp
RatingPassenger Compartment Fuse
Panel Description
29 30A* Trailer tow electric brake
controller, Trailer tow 7–wire
connector (electric brake)
30 25A* Air suspension module (air spring
solenoids and height sensors),
PCM (4x4 transfer case clutch)
31 20A* Radio (B+), Subwoofer
32 15A* Catalyst Monitor Sensors (CMS),
Transmission solenoids, Canister
vent solenoid, HEGO sensors,
VMV solenoid, A/C compressor
clutch relay coil, CMCV, VCT
actuators
33 — Not used
34 15A* PCM, Fuel injectors, Mass Air
Flow (MAF) sensor
35 20A* Instrument cluster high beam
indicator, High beam headlamps
36 10A* Trailer tow right turn/stop lamps
37 20A* Cargo area power point
38 25A* Rear wiper motor, Washer pump
(rear window wash)
39 20A* Console power points (front and
rear of console), Instrument panel
power point (bench seat)
40 20A* DRL relays, DRL foglamps, DRL
headlamp relay coil, Headlamp
switch (headlamps), Multifunction
switch (flash-to-pass), BSM
(autolamp headlamps relay), High
beam relay coil, Fuse 25 (LH low
beam), Fuse 23 (RH low beam)
2006 Expedition(exd)
Owners Guide (post-2002-fmt)
USA(fus)
Roadside Emergencies
274
Page 277 of 360
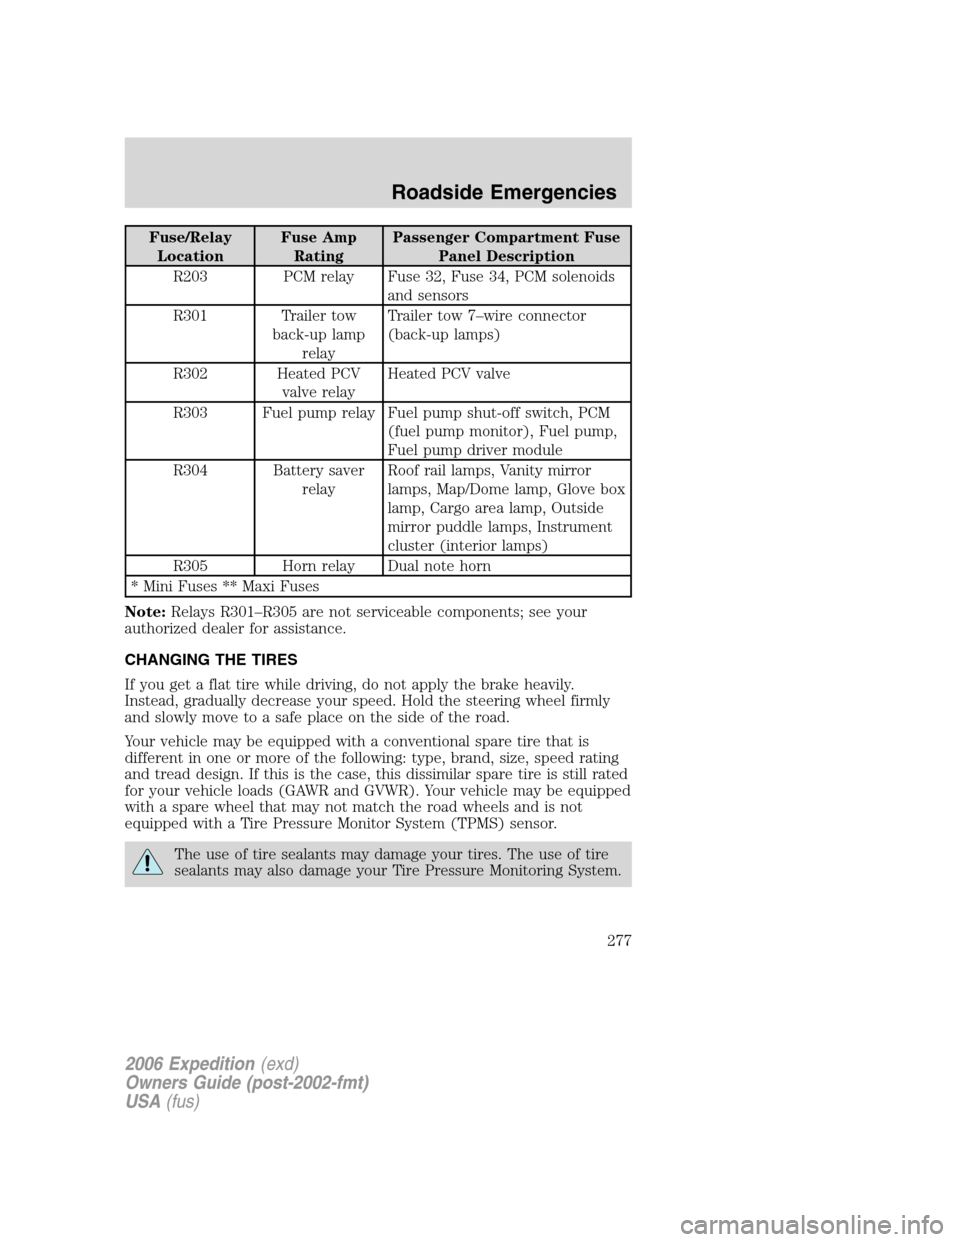
Fuse/Relay
LocationFuse Amp
RatingPassenger Compartment Fuse
Panel Description
R203 PCM relay Fuse 32, Fuse 34, PCM solenoids
and sensors
R301 Trailer tow
back-up lamp
relayTrailer tow 7–wire connector
(back-up lamps)
R302 Heated PCV
valve relayHeated PCV valve
R303 Fuel pump relay Fuel pump shut-off switch, PCM
(fuel pump monitor), Fuel pump,
Fuel pump driver module
R304 Battery saver
relayRoof rail lamps, Vanity mirror
lamps, Map/Dome lamp, Glove box
lamp, Cargo area lamp, Outside
mirror puddle lamps, Instrument
cluster (interior lamps)
R305 Horn relay Dual note horn
* Mini Fuses ** Maxi Fuses
Note:Relays R301–R305 are not serviceable components; see your
authorized dealer for assistance.
CHANGING THE TIRES
If you get a flat tire while driving, do not apply the brake heavily.
Instead, gradually decrease your speed. Hold the steering wheel firmly
and slowly move to a safe place on the side of the road.
Your vehicle may be equipped with a conventional spare tire that is
different in one or more of the following: type, brand, size, speed rating
and tread design. If this is the case, this dissimilar spare tire is still rated
for your vehicle loads (GAWR and GVWR). Your vehicle may be equipped
with a spare wheel that may not match the road wheels and is not
equipped with a Tire Pressure Monitor System (TPMS) sensor.
The use of tire sealants may damage your tires. The use of tire
sealants may also damage your Tire Pressure Monitoring System.
2006 Expedition(exd)
Owners Guide (post-2002-fmt)
USA(fus)
Roadside Emergencies
277
Page 280 of 360
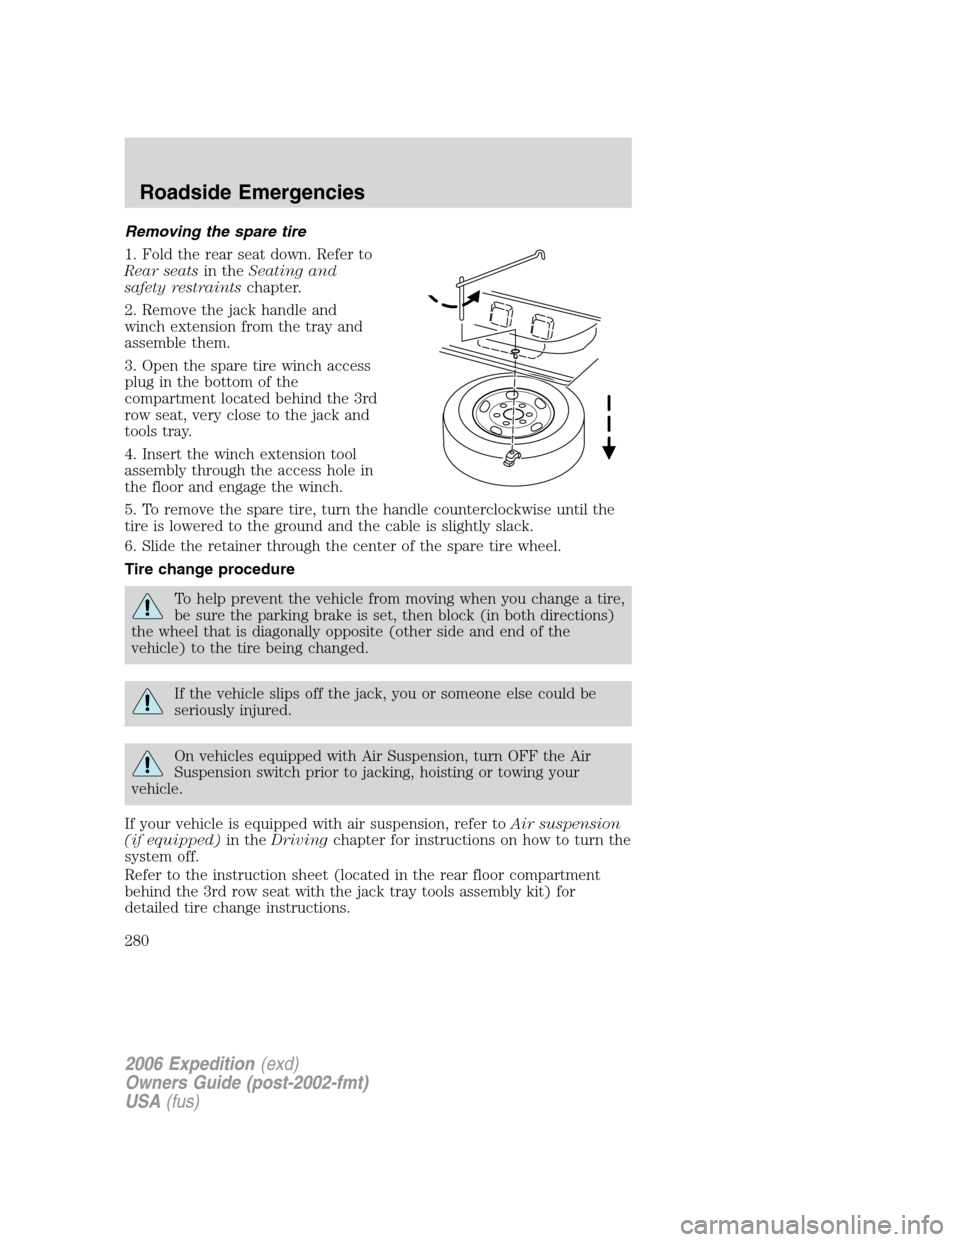
Removing the spare tire
1. Fold the rear seat down. Refer to
Rear seatsin theSeating and
safety restraintschapter.
2. Remove the jack handle and
winch extension from the tray and
assemble them.
3. Open the spare tire winch access
plug in the bottom of the
compartment located behind the 3rd
row seat, very close to the jack and
tools tray.
4. Insert the winch extension tool
assembly through the access hole in
the floor and engage the winch.
5. To remove the spare tire, turn the handle counterclockwise until the
tire is lowered to the ground and the cable is slightly slack.
6. Slide the retainer through the center of the spare tire wheel.
Tire change procedure
To help prevent the vehicle from moving when you change a tire,
be sure the parking brake is set, then block (in both directions)
the wheel that is diagonally opposite (other side and end of the
vehicle) to the tire being changed.
If the vehicle slips off the jack, you or someone else could be
seriously injured.
On vehicles equipped with Air Suspension, turn OFF the Air
Suspension switch prior to jacking, hoisting or towing your
vehicle.
If your vehicle is equipped with air suspension, refer toAir suspension
(if equipped)in theDrivingchapter for instructions on how to turn the
system off.
Refer to the instruction sheet (located in the rear floor compartment
behind the 3rd row seat with the jack tray tools assembly kit) for
detailed tire change instructions.
2006 Expedition(exd)
Owners Guide (post-2002-fmt)
USA(fus)
Roadside Emergencies
280
Page 281 of 360
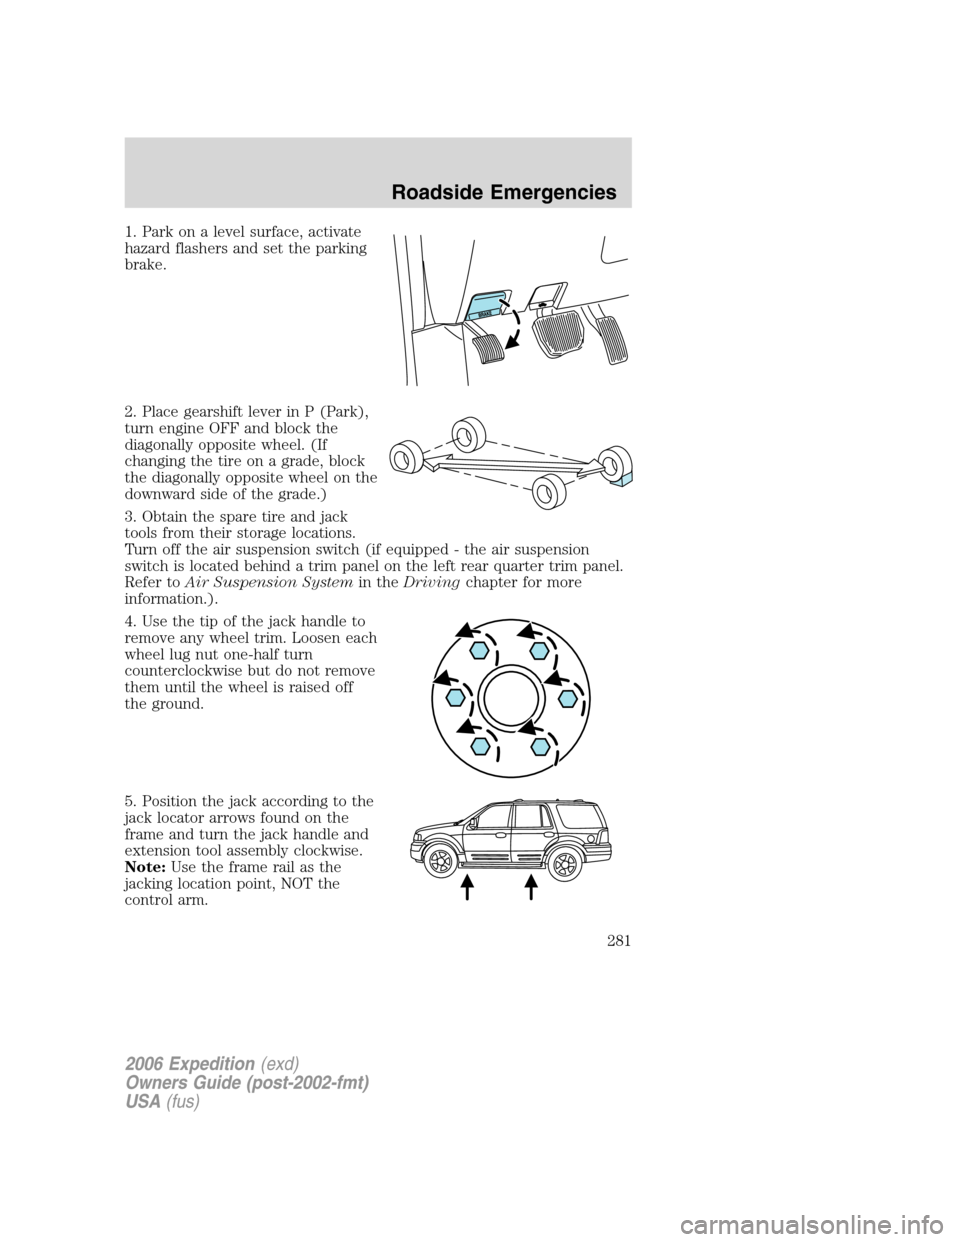
1. Park on a level surface, activate
hazard flashers and set the parking
brake.
2. Place gearshift lever in P (Park),
turn engine OFF and block the
diagonally opposite wheel. (If
changing the tire on a grade, block
the diagonally opposite wheel on the
downward side of the grade.)
3. Obtain the spare tire and jack
tools from their storage locations.
Turn off the air suspension switch (if equipped - the air suspension
switch is located behind a trim panel on the left rear quarter trim panel.
Refer toAir Suspension Systemin theDrivingchapter for more
information.).
4. Use the tip of the jack handle to
remove any wheel trim. Loosen each
wheel lug nut one-half turn
counterclockwise but do not remove
them until the wheel is raised off
the ground.
5. Position the jack according to the
jack locator arrows found on the
frame and turn the jack handle and
extension tool assembly clockwise.
Note:Use the frame rail as the
jacking location point, NOT the
control arm.
2006 Expedition(exd)
Owners Guide (post-2002-fmt)
USA(fus)
Roadside Emergencies
281
Page 282 of 360
6. Lift the vehicle so the tire is no further than 1 inch (2.5 cm) off the
ground when installing the spare tire.
When one of the rear wheels is off the ground, the transmission
alone will not prevent the vehicle from moving or slipping off the
jack, even if the transmission is in P (Park). To prevent the vehicle
from moving when you change the tire, be sure that the parking brake
is set and the diagonally opposite wheel is blocked. If the vehicle slips
off the jack, someone could be seriously injured.
•Front
•Rear
2006 Expedition(exd)
Owners Guide (post-2002-fmt)
USA(fus)
Roadside Emergencies
282