2006 FORD EXPEDITION towing
[x] Cancel search: towingPage 250 of 360
Always set the parking brake fully and make sure the gearshift is
latched in P (Park). Turn the ignition to the LOCK position and
remove the key whenever you leave your vehicle.
R (Reverse)
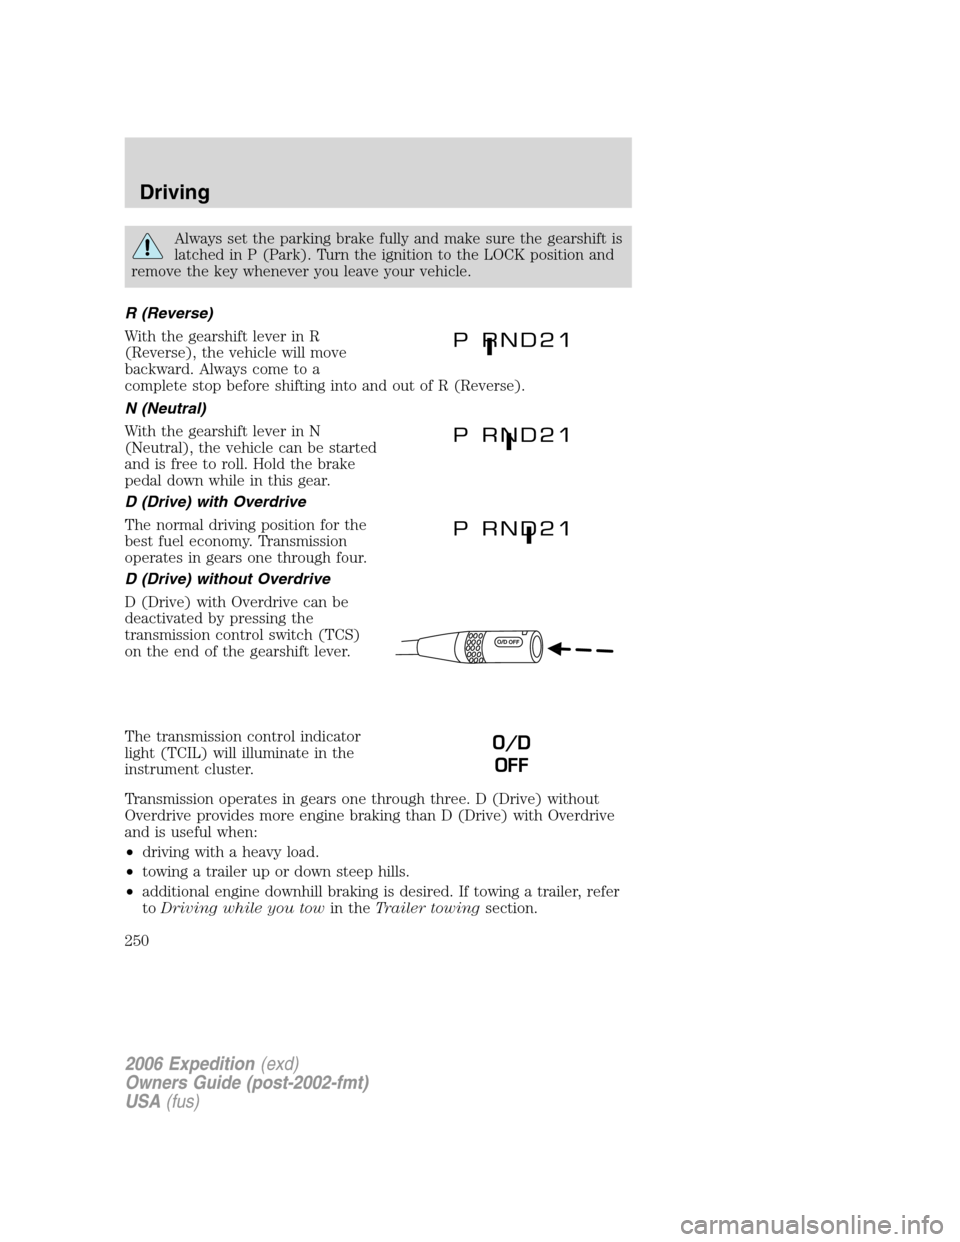
With the gearshift lever in R
(Reverse), the vehicle will move
backward. Always come to a
complete stop before shifting into and out of R (Reverse).
N (Neutral)
With the gearshift lever in N
(Neutral), the vehicle can be started
and is free to roll. Hold the brake
pedal down while in this gear.
D (Drive) with Overdrive
The normal driving position for the
best fuel economy. Transmission
operates in gears one through four.
D (Drive) without Overdrive
D (Drive) with Overdrive can be
deactivated by pressing the
transmission control switch (TCS)
on the end of the gearshift lever.
The transmission control indicator
light (TCIL) will illuminate in the
instrument cluster.
Transmission operates in gears one through three. D (Drive) without
Overdrive provides more engine braking than D (Drive) with Overdrive
and is useful when:
•driving with a heavy load.
•towing a trailer up or down steep hills.
•additional engine downhill braking is desired. If towing a trailer, refer
toDriving while you towin theTrailer towingsection.
O/D
OFF
2006 Expedition(exd)
Owners Guide (post-2002-fmt)
USA(fus)
Driving
250
Page 265 of 360
ROADSIDE ASSISTANCE
Getting roadside assistance
To fully assist you should you have a vehicle concern, Ford Motor
Company offers a complimentary roadside assistance program. This
program is separate from the New Vehicle Limited Warranty. The service
is available:
•24–hours, seven days a week
•for the New Vehicle Limited Warranty period of three years or
36,000 miles (60,000 km), whichever occurs first on Ford and Mercury
vehicles, and four years or 50,000 miles (80,000 km) on Lincoln
vehicles.
Roadside assistance will cover:
•a flat tire change with a good spare (except Ford GT which has a tire
inflation kit)
•battery jump start
•lock-out assistance (key replacement cost is the customer’s
responsibility)
•fuel delivery (2.0 gallons [7.5L], maximum two occurrences within
12 month period)
•towing of your disabled vehicle to the nearest authorized dealer, or
your selling authorized dealer if within 35 miles (56.3 km) of the
nearest authorized dealer (one tow per disablement). Even
non-warranty related tows, like accidents, are covered (some
exclusions apply, such as impound towing or repossession).
Canadian customers refer to your Owner Information Guide for
information on:
•coverage period
•exact fuel amounts
•towing of your disabled vehicle
•emergency travel expense reimbursement
•travel planning benefits
Using roadside assistance
Complete the roadside assistance identification card and place it in your
wallet for quick reference. In the United States, this card is found in the
Owner Guide portfolio in the glove compartment. In Canada, the card is
found in theOwner Information Guidein the glove compartment.
2006 Expedition(exd)
Owners Guide (post-2002-fmt)
USA(fus)
Roadside Emergencies
265
Page 279 of 360
•Towing a trailer
•Driving vehicles equipped with a camper body
•Driving vehicles with a load on the cargo rack
Drive cautiously when using a dissimilar spare tire/wheel and seek
service as soon as possible.
Spare tire information
Note:If your vehicle is equipped with the tire pressure monitoring
system (TPMS), the system indicator light will illuminate when the spare
is in use. To restore the full functionality of the TPMS system, all road
wheels equipped with the tire pressure monitoring sensors must be
mounted on the vehicle
If your vehicle is equipped with TPMS, have a flat tire serviced by an
authorized dealer in order to prevent damage to the TPMS sensor, refer
toTire Pressure Monitoring System (TPMS)in theTires, Wheels and
Loadingchapter. Replace the spare tire with a road tire as soon as
possible.
Location of the spare tire and tools
The spare tire and tools for your vehicle are stowed in the following
locations:
Item Location
Spare tire Under the vehicle, just forward of
the rear bumper
Jack tools and jacking instructions Under the access panel located in
the floor compartment behind the
rear seat
Removing the jack and tools
1. Open the liftgate, then locate the access panel on the floor behind the
3rd row seat. Unlatch and remove the panel.
2. Remove the jack and tools assembly tray from the compartment by
turning the wing-nut counterclockwise to relieve tension against the jack
assembly tray.
3. Unsnap the wheel lug nut wrench, jack extension and handle from the
plastic tray. Remove the jack and instruction sheet from the tray
assembly.
2006 Expedition(exd)
Owners Guide (post-2002-fmt)
USA(fus)
Roadside Emergencies
279
Page 280 of 360
Removing the spare tire
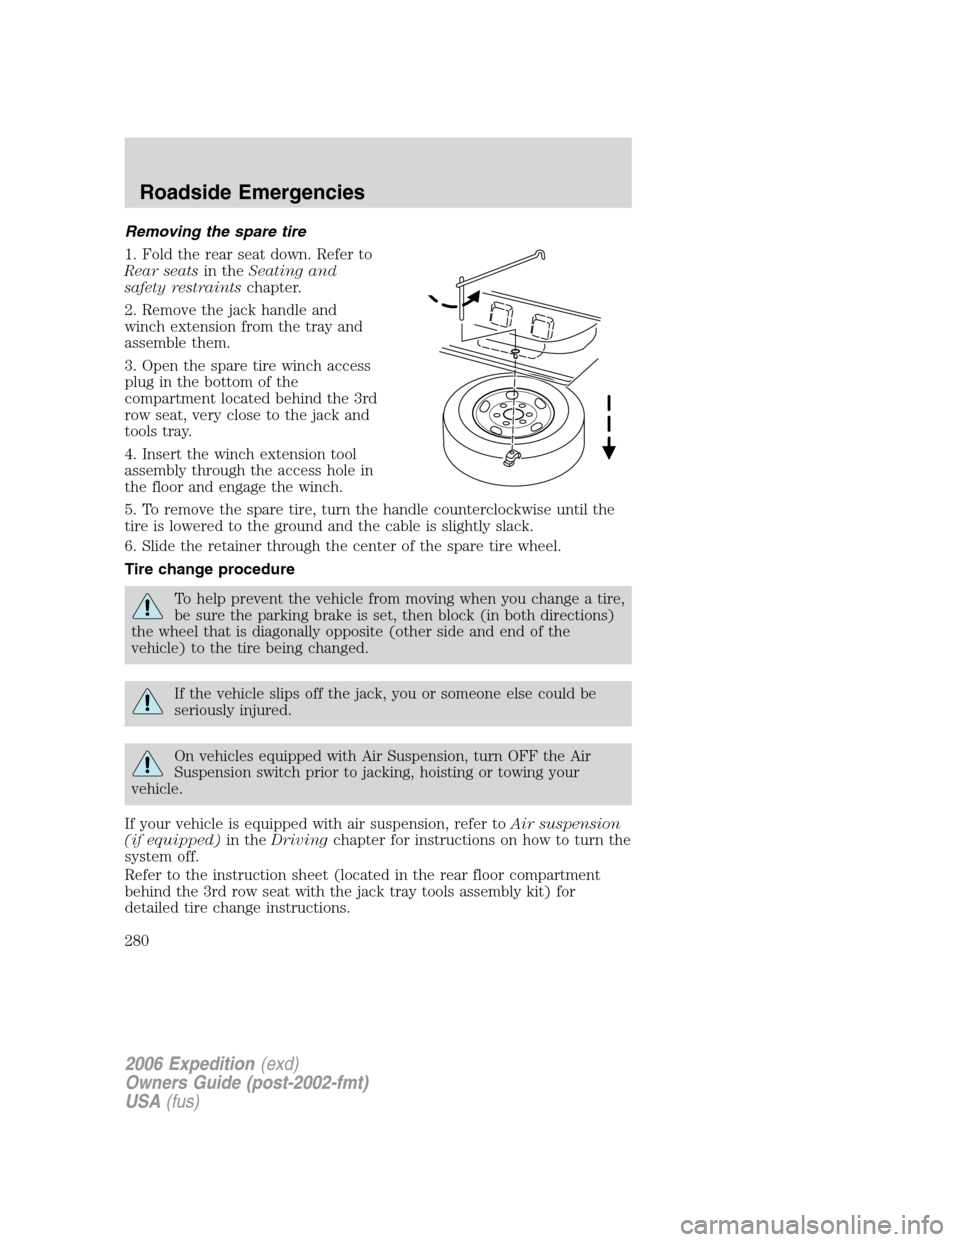
1. Fold the rear seat down. Refer to
Rear seatsin theSeating and
safety restraintschapter.
2. Remove the jack handle and
winch extension from the tray and
assemble them.
3. Open the spare tire winch access
plug in the bottom of the
compartment located behind the 3rd
row seat, very close to the jack and
tools tray.
4. Insert the winch extension tool
assembly through the access hole in
the floor and engage the winch.
5. To remove the spare tire, turn the handle counterclockwise until the
tire is lowered to the ground and the cable is slightly slack.
6. Slide the retainer through the center of the spare tire wheel.
Tire change procedure
To help prevent the vehicle from moving when you change a tire,
be sure the parking brake is set, then block (in both directions)
the wheel that is diagonally opposite (other side and end of the
vehicle) to the tire being changed.
If the vehicle slips off the jack, you or someone else could be
seriously injured.
On vehicles equipped with Air Suspension, turn OFF the Air
Suspension switch prior to jacking, hoisting or towing your
vehicle.
If your vehicle is equipped with air suspension, refer toAir suspension
(if equipped)in theDrivingchapter for instructions on how to turn the
system off.
Refer to the instruction sheet (located in the rear floor compartment
behind the 3rd row seat with the jack tray tools assembly kit) for
detailed tire change instructions.
2006 Expedition(exd)
Owners Guide (post-2002-fmt)
USA(fus)
Roadside Emergencies
280
Page 284 of 360
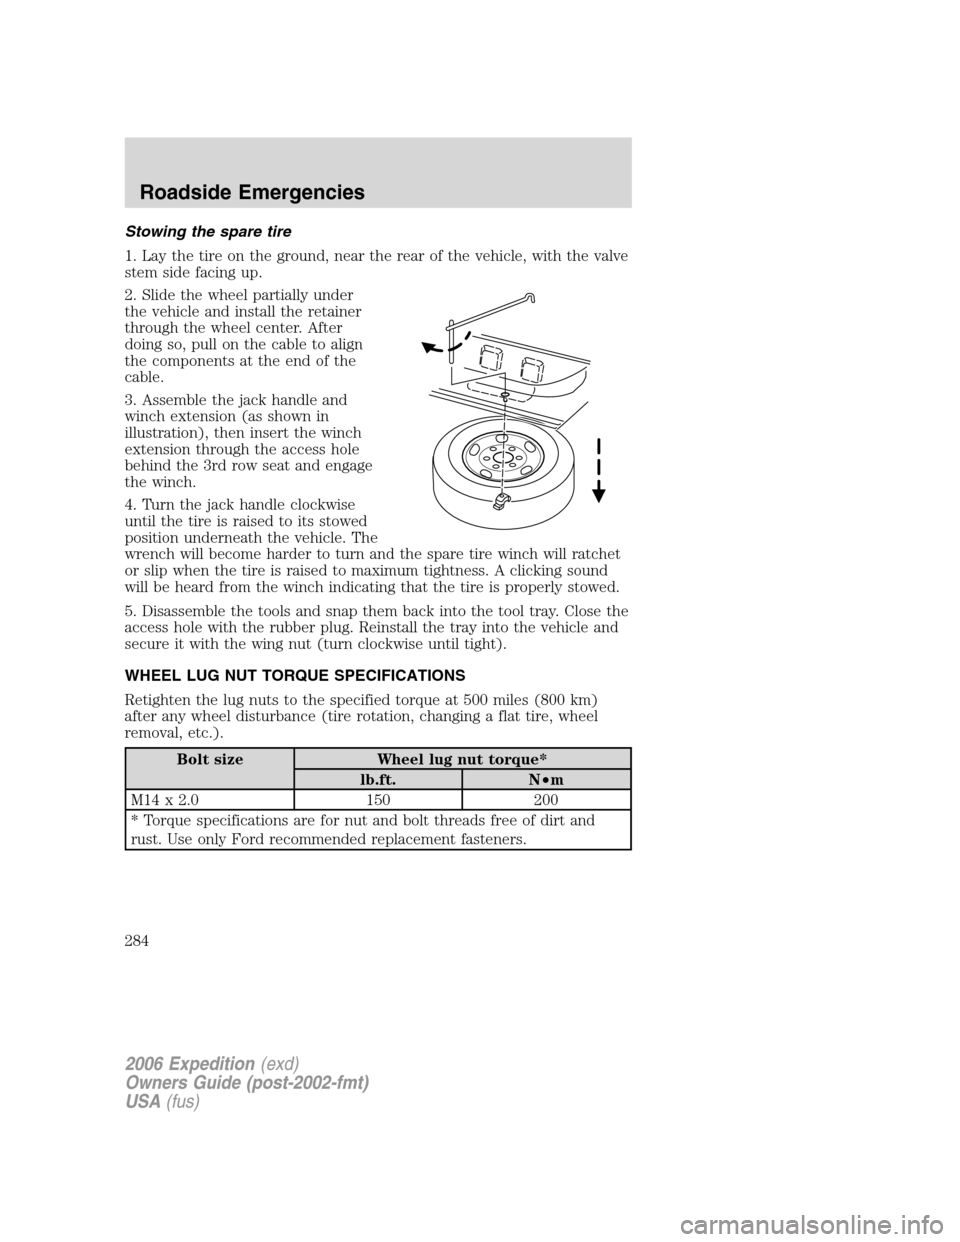
Stowing the spare tire
1. Lay the tire on the ground, near the rear of the vehicle, with the valve
stem side facing up.
2. Slide the wheel partially under
the vehicle and install the retainer
through the wheel center. After
doing so, pull on the cable to align
the components at the end of the
cable.
3. Assemble the jack handle and
winch extension (as shown in
illustration), then insert the winch
extension through the access hole
behind the 3rd row seat and engage
the winch.
4. Turn the jack handle clockwise
until the tire is raised to its stowed
position underneath the vehicle. The
wrench will become harder to turn and the spare tire winch will ratchet
or slip when the tire is raised to maximum tightness. A clicking sound
will be heard from the winch indicating that the tire is properly stowed.
5. Disassemble the tools and snap them back into the tool tray. Close the
access hole with the rubber plug. Reinstall the tray into the vehicle and
secure it with the wing nut (turn clockwise until tight).
WHEEL LUG NUT TORQUE SPECIFICATIONS
Retighten the lug nuts to the specified torque at 500 miles (800 km)
after any wheel disturbance (tire rotation, changing a flat tire, wheel
removal, etc.).
Bolt size Wheel lug nut torque*
lb.ft. N•m
M14 x 2.0 150 200
* Torque specifications are for nut and bolt threads free of dirt and
rust. Use only Ford recommended replacement fasteners.
2006 Expedition(exd)
Owners Guide (post-2002-fmt)
USA(fus)
Roadside Emergencies
284
Page 290 of 360
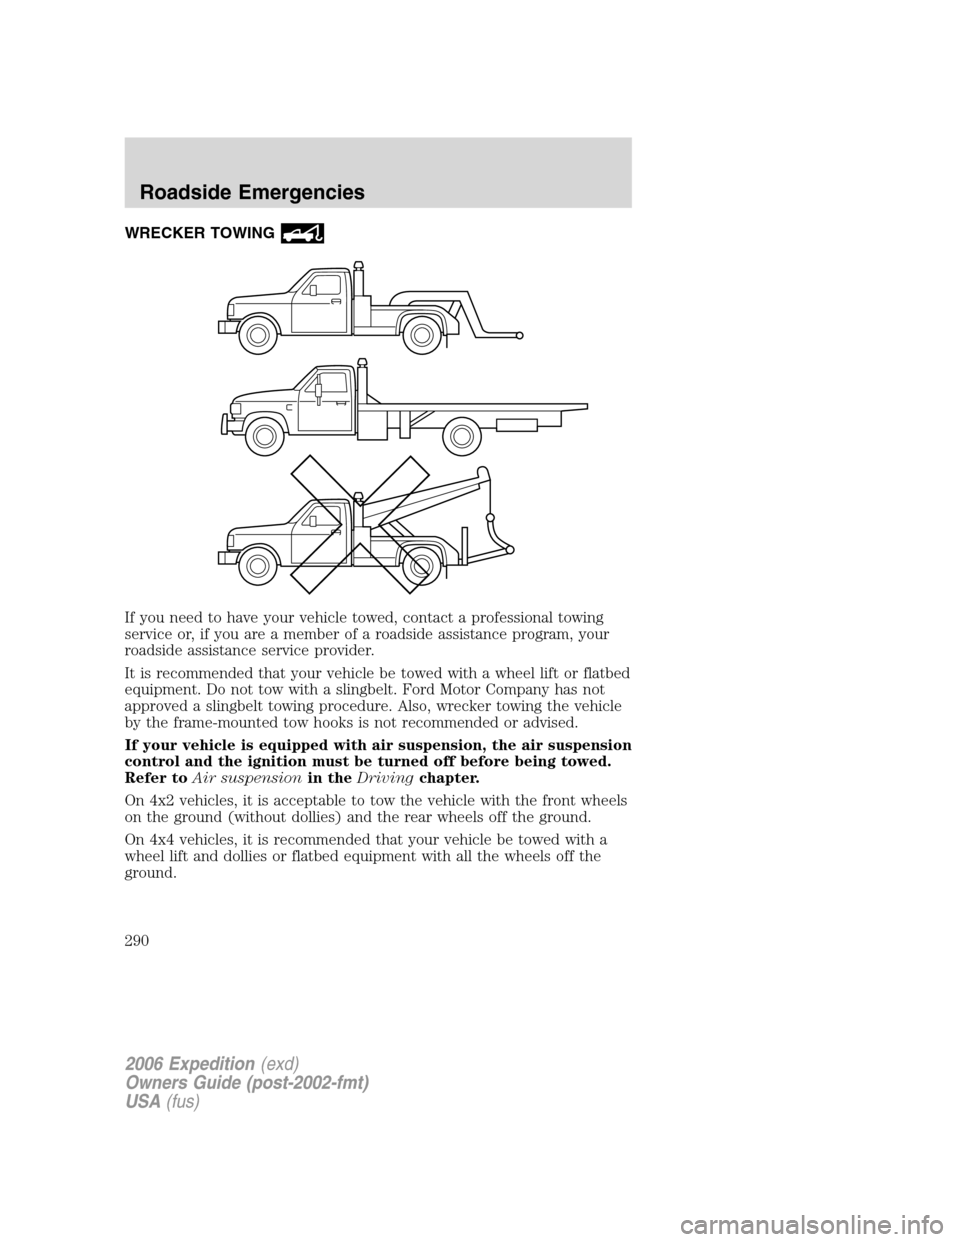
WRECKER TOWING
If you need to have your vehicle towed, contact a professional towing
service or, if you are a member of a roadside assistance program, your
roadside assistance service provider.
It is recommended that your vehicle be towed with a wheel lift or flatbed
equipment. Do not tow with a slingbelt. Ford Motor Company has not
approved a slingbelt towing procedure. Also, wrecker towing the vehicle
by the frame-mounted tow hooks is not recommended or advised.
If your vehicle is equipped with air suspension, the air suspension
control and the ignition must be turned off before being towed.
Refer toAir suspensionin theDrivingchapter.
On 4x2 vehicles, it is acceptable to tow the vehicle with the front wheels
on the ground (without dollies) and the rear wheels off the ground.
On 4x4 vehicles, it is recommended that your vehicle be towed with a
wheel lift and dollies or flatbed equipment with all the wheels off the
ground.
2006 Expedition(exd)
Owners Guide (post-2002-fmt)
USA(fus)
Roadside Emergencies
290
Page 291 of 360
If the vehicle is towed by other means or incorrectly, vehicle
damage may occur.
With a disabled vehicle (without access to wheel dollies, car hauling
trailer or flatbed transport vehicle) your vehicle can be towed (all wheels
on the ground) under the following conditions:
Special Conditions:
•Release the parking brake.
•Turn the air suspension (if equipped) control to OFF.
•Turn the ignition to the OFF/UNLOCKED position.
•Place the transmission in N (Neutral).
If the vehicle’s battery is discharged, refer toAutomatic transmission
operationin theDrivingchapter for directions on how to move the
gearshift lever out of the P (Park) position, for proper towing.
•Do not exceed a distance of 50 miles (80 km).
•Do not exceed 35 mph (56 km/h) vehicle speed.
Ford Motor Company produces a towing manual for all authorized tow
truck operators. Have your tow truck operator refer to this manual for
proper hook-up and towing procedures for your vehicle.
2006 Expedition(exd)
Owners Guide (post-2002-fmt)
USA(fus)
Roadside Emergencies
291
Page 298 of 360
UTILIZING THE MEDIATION/ARBITRATION PROGRAM
(CANADA ONLY)
For vehicles delivered to authorized Canadian dealers. In those cases
where you continue to feel that the efforts by Ford of Canada and the
authorized dealer to resolve a factory-related vehicle service concern
have been unsatisfactory, Ford of Canada participates in an impartial
third party mediation/arbitration program administered by the Canadian
Motor Vehicle Arbitration Plan (CAMVAP).
The CAMVAP program is a straight-forward and relatively speedy
alternative to resolve a disagreement when all other efforts to produce a
settlement have failed. This procedure is without cost to you and is
designed to eliminate the need for lengthy and expensive legal
proceedings.
In the CAMVAP program, impartial third-party arbitrators conduct
hearings at mutually convenient times and places in an informal
environment. These impartial arbitrators review the positions of the
parties, make decisions and, when appropriate, render awards to resolve
disputes. CAMVAP decisions are fast, fair, and final as the arbitrator’s
award is binding both to you and Ford of Canada.
CAMVAP services are available in all territories and provinces. For more
information, without charge or obligation, call your CAMVAP Provincial
Administrator directly at 1-800-207-0685.
FORD EXTENDED SERVICE PLAN
You can get more protection for your new car or light truck by
purchasing Ford Extended Service Plan (Ford ESP) coverage. It provides
the following:
•Benefits during the warranty period depending on the plan you
purchase (such as: reimbursement for rentals; coverage for certain
maintenance and wear items).
•Protection against covered repair costs after your Bumper-to-Bumper
Warranty expires.
You may purchase Ford ESP from any participating authorized Canadian
dealer. There are several plans available in various time, distance and
deductible combinations which can be tailored to fit your own driving
needs. Ford ESP also offers reimbursement benefits for towing and
rental coverage.
When you buy Ford ESP, you receive Peace-of-Mind protection
throughout the United States and Canada, provided by a network of
more than 4,600 participating authorized Canadian dealers.
2006 Expedition(exd)
Owners Guide (post-2002-fmt)
USA(fus)
Customer Assistance
298