2006 FORD EXPEDITION spare wheel
[x] Cancel search: spare wheelPage 217 of 360
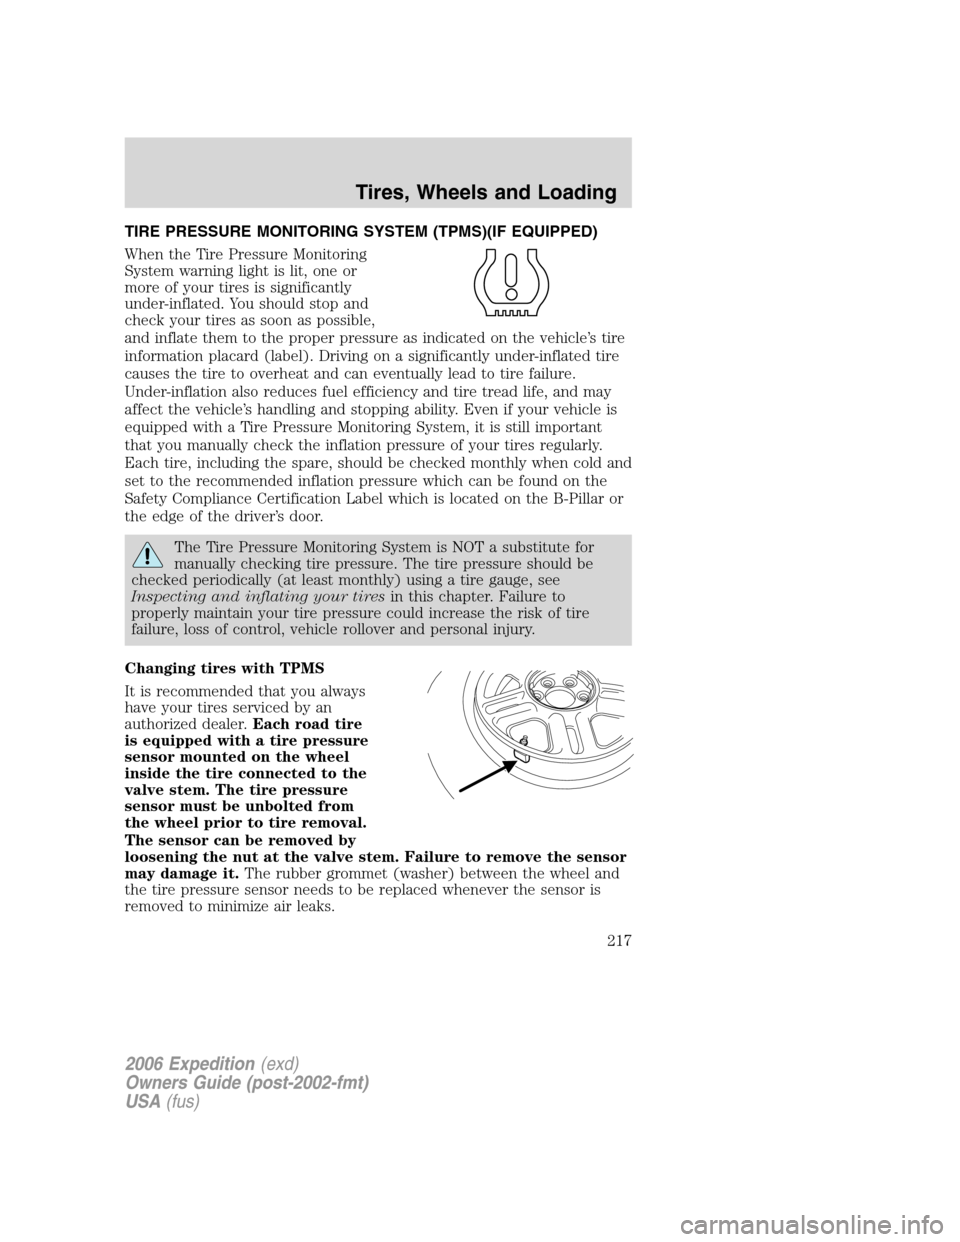
TIRE PRESSURE MONITORING SYSTEM (TPMS)(IF EQUIPPED)
When the Tire Pressure Monitoring
System warning light is lit, one or
more of your tires is significantly
under-inflated. You should stop and
check your tires as soon as possible,
and inflate them to the proper pressure as indicated on the vehicle’s tire
information placard (label). Driving on a significantly under-inflated tire
causes the tire to overheat and can eventually lead to tire failure.
Under-inflation also reduces fuel efficiency and tire tread life, and may
affect the vehicle’s handling and stopping ability. Even if your vehicle is
equipped with a Tire Pressure Monitoring System, it is still important
that you manually check the inflation pressure of your tires regularly.
Each tire, including the spare, should be checked monthly when cold and
set to the recommended inflation pressure which can be found on the
Safety Compliance Certification Label which is located on the B-Pillar or
the edge of the driver’s door.
The Tire Pressure Monitoring System is NOT a substitute for
manually checking tire pressure. The tire pressure should be
checked periodically (at least monthly) using a tire gauge, see
Inspecting and inflating your tiresin this chapter. Failure to
properly maintain your tire pressure could increase the risk of tire
failure, loss of control, vehicle rollover and personal injury.
Changing tires with TPMS
It is recommended that you always
have your tires serviced by an
authorized dealer.Each road tire
is equipped with a tire pressure
sensor mounted on the wheel
inside the tire connected to the
valve stem. The tire pressure
sensor must be unbolted from
the wheel prior to tire removal.
The sensor can be removed by
loosening the nut at the valve stem. Failure to remove the sensor
may damage it.The rubber grommet (washer) between the wheel and
the tire pressure sensor needs to be replaced whenever the sensor is
removed to minimize air leaks.
2006 Expedition(exd)
Owners Guide (post-2002-fmt)
USA(fus)
Tires, Wheels and Loading
217
Page 218 of 360
The tire pressure should be checked periodically (at least monthly) using
an accurate tire gauge, refer toInspecting and inflating your tiresin
this chapter.
Understanding your Tire Pressure Monitoring System (TPMS)
The Tire Pressure Monitoring System measures pressure in your four
road tires and sends the tire pressure readings to your vehicle every
minute while you are driving and once an hour when your vehicle is
parked. The Low Tire Warning Lamp will turn ON if the tire pressure is
25% below the pressure listed on the Safety Compliance Certification
Label (approximately 6 to 9 psi below the manufacturer’s recommend
tire pressure). If the tire pressure increases 2 psi above the “Light ON”
threshold, then the TPMS light will turn OFF. Once the light is
illuminated, your tires are under inflated and need to be inflated to the
manufacturer’s recommended tire pressure. Even if the light turns ON
and a short time later turns OFF, your tire pressure still needs to be
checked.
In short, once the light has turned ON, at least one tire may be under
inflated.
When your temporary spare tire is installed
When one of your road tires needs to be replaced with the temporary
spare, the TPMS system will continue to identify an issue to remind you
that the damaged road wheel/tire needs to be repaired and put back on
your vehicle. During this time, the low tire warning light can periodically
return or stay on, depending on the state of the damaged road
wheel/tire. This will include the message center messages (if equipped).
To restore the full functionality of the Tire Pressure Monitoring System,
have the damaged road wheel/tire repaired and remounted on your
vehicle. For additional information, refer toChanging tires with TPMS
in this section.
When you believe your system is not operating properly
The main function of the Tire Pressure Monitoring System is to warn you
when your tires need air. It can also warn you in the event the system is
no longer capable of functioning as intended. Please refer to the
following chart for information concerning your Tire Pressure Monitoring
System:
2006 Expedition(exd)
Owners Guide (post-2002-fmt)
USA(fus)
Tires, Wheels and Loading
218
Page 219 of 360
Low Tire Warning
LightCustomer Action Required
Solid Warning Light 1. Check your tire pressure to ensure they are
properly inflated, refer toInspecting and
inflating your tiresin this chapter. Ford
recommends the use of a digital or dial type
tire pressure gauge rather than a stick type
tire pressure gauge for increased accuracy.
2. After inflating your tires to the
manufacturer’s recommended air pressure as
shown on the Safety Compliance Certification
Label (located on the driver’s door or the
B-Pillar), the vehicle must be driven for at
least two minutes at 20 mph (32 km/h) to
guarantee that the light will turn off.
3. If the light remains on even after these
steps have been taken, have the system
inspected by your authorized dealer.
Flashing Warning Light
(flashes for 20 to 30
seconds either at
start-up or while
driving)1. Your spare tire is in use. Repair the
damaged road wheel and re-mount it on the
vehicle to restore system functionality. For a
description of how the system functions under
these conditions, refer toWhen You Have a
Flat Tirein this section.
2. If your tires are inflated to the
manufacturer’s recommended tire pressure,
and your spare tire is not in use, and a
flashing low time warning light is still present,
have the system inspected by your authorized
dealer.
When inflating your tires
When putting air into your tires (such as at a gas station or in your
garage), the Tire Pressure Monitoring System may not respond
immediately to the air added to your tires. Here are the details:
•The tire pressure monitor sensors mounted in your wheels updates
your vehicle with tire pressure information only once every minute,
2006 Expedition(exd)
Owners Guide (post-2002-fmt)
USA(fus)
Tires, Wheels and Loading
219
Page 277 of 360
Fuse/Relay
LocationFuse Amp
RatingPassenger Compartment Fuse
Panel Description
R203 PCM relay Fuse 32, Fuse 34, PCM solenoids
and sensors
R301 Trailer tow
back-up lamp
relayTrailer tow 7–wire connector
(back-up lamps)
R302 Heated PCV
valve relayHeated PCV valve
R303 Fuel pump relay Fuel pump shut-off switch, PCM
(fuel pump monitor), Fuel pump,
Fuel pump driver module
R304 Battery saver
relayRoof rail lamps, Vanity mirror
lamps, Map/Dome lamp, Glove box
lamp, Cargo area lamp, Outside
mirror puddle lamps, Instrument
cluster (interior lamps)
R305 Horn relay Dual note horn
* Mini Fuses ** Maxi Fuses
Note:Relays R301–R305 are not serviceable components; see your
authorized dealer for assistance.
CHANGING THE TIRES
If you get a flat tire while driving, do not apply the brake heavily.
Instead, gradually decrease your speed. Hold the steering wheel firmly
and slowly move to a safe place on the side of the road.
Your vehicle may be equipped with a conventional spare tire that is
different in one or more of the following: type, brand, size, speed rating
and tread design. If this is the case, this dissimilar spare tire is still rated
for your vehicle loads (GAWR and GVWR). Your vehicle may be equipped
with a spare wheel that may not match the road wheels and is not
equipped with a Tire Pressure Monitor System (TPMS) sensor.
The use of tire sealants may damage your tires. The use of tire
sealants may also damage your Tire Pressure Monitoring System.
2006 Expedition(exd)
Owners Guide (post-2002-fmt)
USA(fus)
Roadside Emergencies
277
Page 278 of 360
If your vehicle is equipped with a Tire Pressure Monitoring
System, refer toTire Pressure Monitoring System (TPMS)in
theTires, Wheels and Loadingchapter for important information. If
the tire pressure monitor sensor becomes damaged, it will no longer
function.
Dissimilar spare tire/wheel information (if equipped)
Failure to follow these guidelines could result in an increased
risk of loss of vehicle control, injury or death.
Your vehicle may be equipped with a dissimilar spare tire/wheel. A
dissimilar spare tire/wheel is defined as a spare tire and/or wheel that is
different in brand, size or appearance from the road tires and wheels. If
you have a dissimilar spare tire/wheel, then it is intended for temporary
use only. This means that if you need to use it, you should replace it as
soon as possible with a road tire/wheel that is the same size and type as
the road tires and wheels that were originally provided by Ford. If the
dissimilar spare tire or wheel is damaged, it should be replaced rather
than repaired.
When driving with the dissimilar spare tire/wheel,do not:
•Exceed 70 mph (113 km/h)
•Use more than one dissimilar spare tire/wheel at a time
•Use commercial car washing equipment
•Use snow chains on the end of the vehicle with the dissimilar spare
tire/wheel
The usage of a dissimilar spare tire/wheel can lead to impairment of the
following:
•Handling, stability and braking performance
•Comfort and noise
•Ground clearance and parking at curbs
•Winter weather driving capability
•Wet weather driving capability
•All-Wheel driving capability (if applicable)
•Load leveling adjustment (if applicable)
When driving with the dissimilar spare tire/wheel additional caution
should be given to:
2006 Expedition(exd)
Owners Guide (post-2002-fmt)
USA(fus)
Roadside Emergencies
278
Page 279 of 360
•Towing a trailer
•Driving vehicles equipped with a camper body
•Driving vehicles with a load on the cargo rack
Drive cautiously when using a dissimilar spare tire/wheel and seek
service as soon as possible.
Spare tire information
Note:If your vehicle is equipped with the tire pressure monitoring
system (TPMS), the system indicator light will illuminate when the spare
is in use. To restore the full functionality of the TPMS system, all road
wheels equipped with the tire pressure monitoring sensors must be
mounted on the vehicle
If your vehicle is equipped with TPMS, have a flat tire serviced by an
authorized dealer in order to prevent damage to the TPMS sensor, refer
toTire Pressure Monitoring System (TPMS)in theTires, Wheels and
Loadingchapter. Replace the spare tire with a road tire as soon as
possible.
Location of the spare tire and tools
The spare tire and tools for your vehicle are stowed in the following
locations:
Item Location
Spare tire Under the vehicle, just forward of
the rear bumper
Jack tools and jacking instructions Under the access panel located in
the floor compartment behind the
rear seat
Removing the jack and tools
1. Open the liftgate, then locate the access panel on the floor behind the
3rd row seat. Unlatch and remove the panel.
2. Remove the jack and tools assembly tray from the compartment by
turning the wing-nut counterclockwise to relieve tension against the jack
assembly tray.
3. Unsnap the wheel lug nut wrench, jack extension and handle from the
plastic tray. Remove the jack and instruction sheet from the tray
assembly.
2006 Expedition(exd)
Owners Guide (post-2002-fmt)
USA(fus)
Roadside Emergencies
279
Page 280 of 360
Removing the spare tire
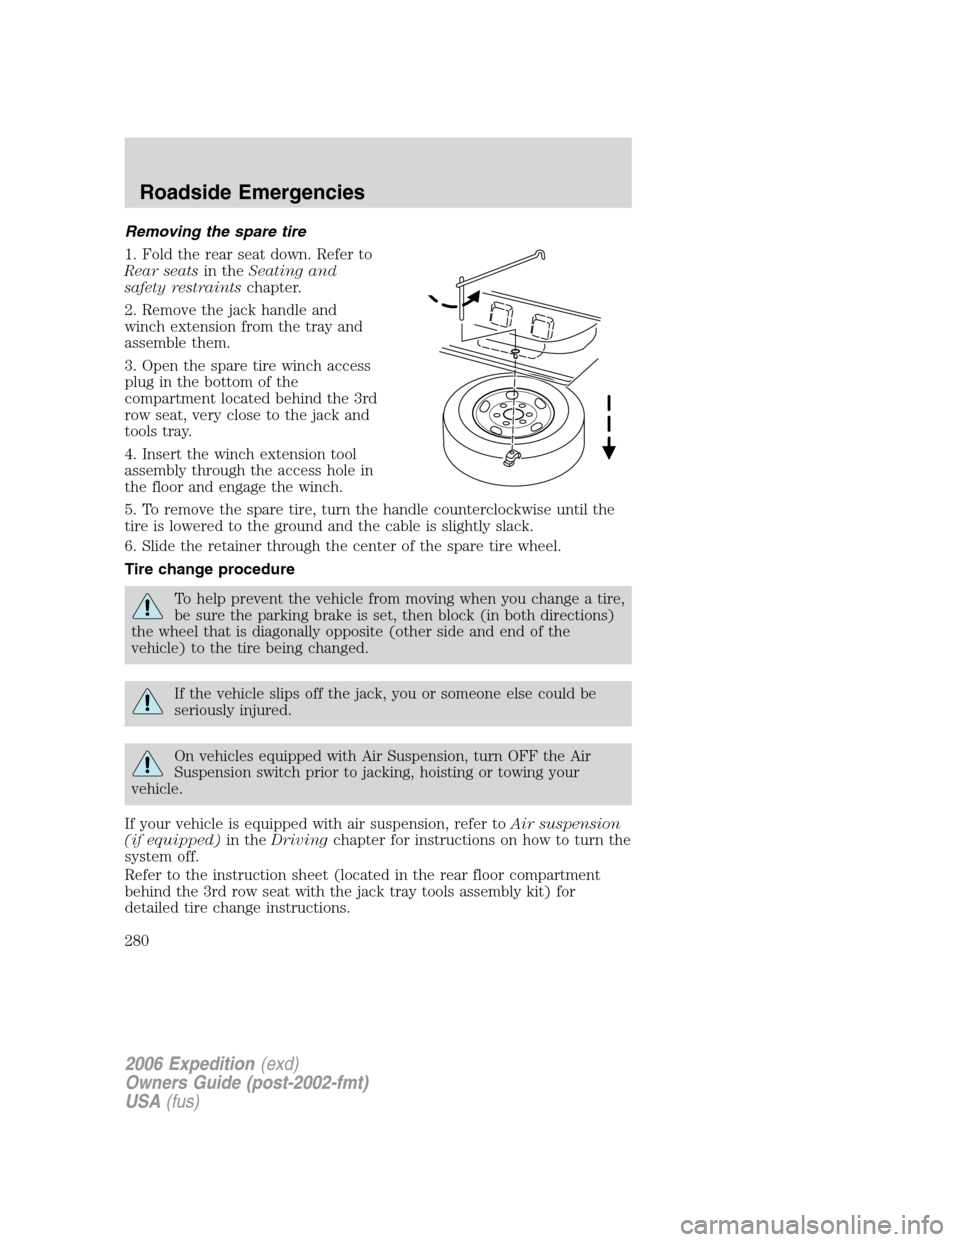
1. Fold the rear seat down. Refer to
Rear seatsin theSeating and
safety restraintschapter.
2. Remove the jack handle and
winch extension from the tray and
assemble them.
3. Open the spare tire winch access
plug in the bottom of the
compartment located behind the 3rd
row seat, very close to the jack and
tools tray.
4. Insert the winch extension tool
assembly through the access hole in
the floor and engage the winch.
5. To remove the spare tire, turn the handle counterclockwise until the
tire is lowered to the ground and the cable is slightly slack.
6. Slide the retainer through the center of the spare tire wheel.
Tire change procedure
To help prevent the vehicle from moving when you change a tire,
be sure the parking brake is set, then block (in both directions)
the wheel that is diagonally opposite (other side and end of the
vehicle) to the tire being changed.
If the vehicle slips off the jack, you or someone else could be
seriously injured.
On vehicles equipped with Air Suspension, turn OFF the Air
Suspension switch prior to jacking, hoisting or towing your
vehicle.
If your vehicle is equipped with air suspension, refer toAir suspension
(if equipped)in theDrivingchapter for instructions on how to turn the
system off.
Refer to the instruction sheet (located in the rear floor compartment
behind the 3rd row seat with the jack tray tools assembly kit) for
detailed tire change instructions.
2006 Expedition(exd)
Owners Guide (post-2002-fmt)
USA(fus)
Roadside Emergencies
280
Page 281 of 360
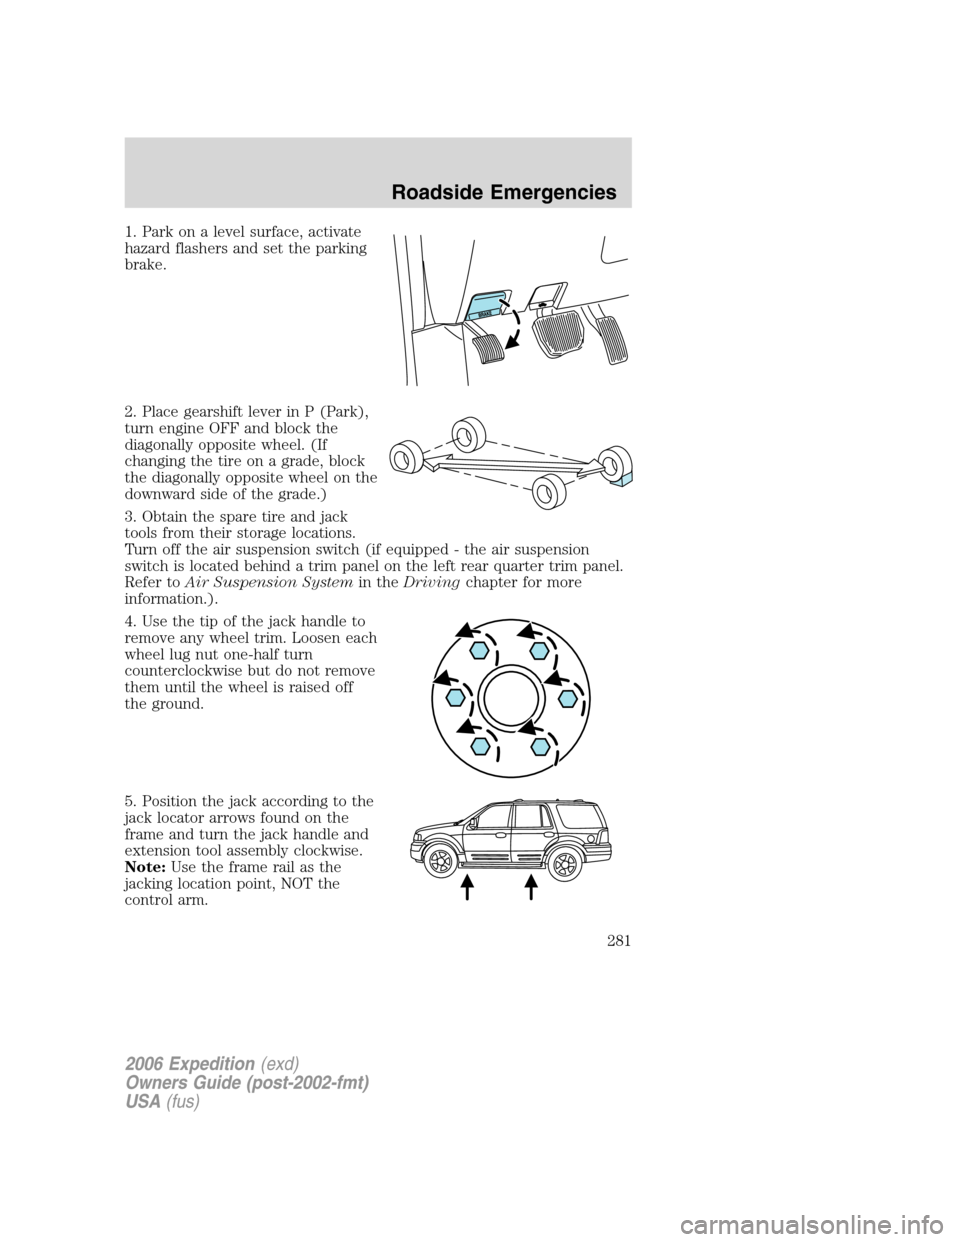
1. Park on a level surface, activate
hazard flashers and set the parking
brake.
2. Place gearshift lever in P (Park),
turn engine OFF and block the
diagonally opposite wheel. (If
changing the tire on a grade, block
the diagonally opposite wheel on the
downward side of the grade.)
3. Obtain the spare tire and jack
tools from their storage locations.
Turn off the air suspension switch (if equipped - the air suspension
switch is located behind a trim panel on the left rear quarter trim panel.
Refer toAir Suspension Systemin theDrivingchapter for more
information.).
4. Use the tip of the jack handle to
remove any wheel trim. Loosen each
wheel lug nut one-half turn
counterclockwise but do not remove
them until the wheel is raised off
the ground.
5. Position the jack according to the
jack locator arrows found on the
frame and turn the jack handle and
extension tool assembly clockwise.
Note:Use the frame rail as the
jacking location point, NOT the
control arm.
2006 Expedition(exd)
Owners Guide (post-2002-fmt)
USA(fus)
Roadside Emergencies
281