2006 FORD E450 lug nuts
[x] Cancel search: lug nutsPage 137 of 256

•If you will be towing a trailer frequently in hot weather, hilly
conditions, at GCW, or any combination of these factors, consider
refilling your rear axle with synthetic gear lube if not already so
equipped. Refer to theMaintenance and specificationschapter for
the lubricant specification. Remember that regardless of the rear axle
lube used, do not tow a trailer for the first 500 miles (800 km) of a
new vehicle, and that the first 500 miles (800 km) of towing be done
at no faster than 70 mph (112 km/h) with no full throttle starts.
•Do not tow a trailer for the first 500 miles (800 km) after changing
the rear axle lube
•Do not exceed 50 mph (80 km/h) for the first 500 miles (800 km) of
towing and do not perform and fast accelerations from a stop during
this time.
•After you have traveled 50 miles (80 km), thoroughly check your
hitch, electrical connections and trailer wheel lug nuts.
•When stopped in traffic for long periods of time in hot weather, place
the gearshift in P (Park) and increase idle speed. This aids engine
cooling and air conditioner efficiency.
•Vehicles with trailers should not be parked on a grade. If you must
park on a grade, place wheel chocks under the trailer’s wheels.
Launching or retrieving a boat
Disconnect the wiring to the trailer before backing the trailer
into the water. Reconnect the wiring to the trailer after the
trailer is removed from the water.
When backing down a ramp during boat launching or retrieval:
•do not allow the static water level to rise above the bottom edge of
the rear bumper.
•do not allow waves to break higher than 6 inches (15 cm) above the
bottom edge of the rear bumper.
Exceeding these limits may allow water to enter vehicle components:
•causing internal damage to the components.
•affecting driveability, emissions and reliability.
Replace the rear axle lubricant any time the axle has been submerged in
water. Rear axle lubricant quantities are not to be checked or changed
unless a leak is suspected or repair required.
2006 Econoline(eco)
Owners Guide (post-2002-fmt)
USA(fus)
Tires, Wheels and Loading
137
Page 176 of 256

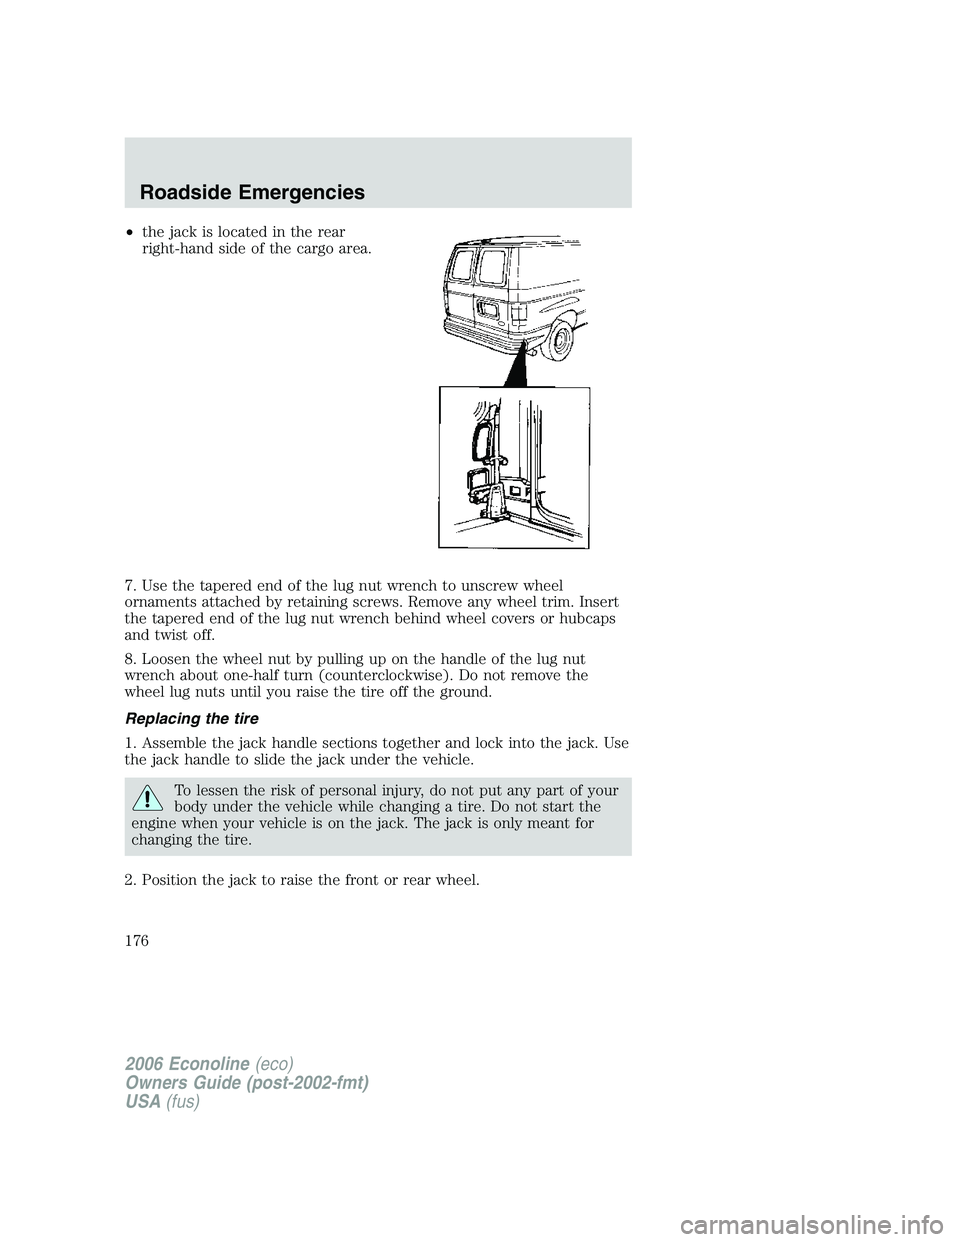
•the jack is located in the rear
right-hand side of the cargo area.
7. Use the tapered end of the lug nut wrench to unscrew wheel
ornaments attached by retaining screws. Remove any wheel trim. Insert
the tapered end of the lug nut wrench behind wheel covers or hubcaps
and twist off.
8. Loosen the wheel nut by pulling up on the handle of the lug nut
wrench about one-half turn (counterclockwise). Do not remove the
wheel lug nuts until you raise the tire off the ground.
Replacing the tire
1. Assemble the jack handle sections together and lock into the jack. Use
the jack handle to slide the jack under the vehicle.
To lessen the risk of personal injury, do not put any part of your
body under the vehicle while changing a tire. Do not start the
engine when your vehicle is on the jack. The jack is only meant for
changing the tire.
2. Position the jack to raise the front or rear wheel.
2006 Econoline(eco)
Owners Guide (post-2002-fmt)
USA(fus)
Roadside Emergencies
176
Page 178 of 256

Front axle jacking points:
Place the jack under thepinon the
front surface of the front axle.
Do not place the jack under or
on the steering linkage.
•Raise the jack until the wheel is
completely off the ground. (Turn
jack handle clockwise if your
vehicle is equipped with a
screw-type jack or pump the jack
if equipped with a hydraulic
jack.)
•Remove the lug nuts with the lug
nut wrench.
•Replace the flat tire with the
spare tire.
If your vehicle has single rear wheels, thread the lug nuts on the studs
with the beveled face toward the wheel.
If your vehicle has dual rear wheels, thread the two element swiveling
lug nuts on the studs with the flange facing toward the wheel.
3. Use the lug nut wrench to screw the lug nut snugly against the wheel.
4. Lower the vehicle by turning the jack handle counterclockwise.
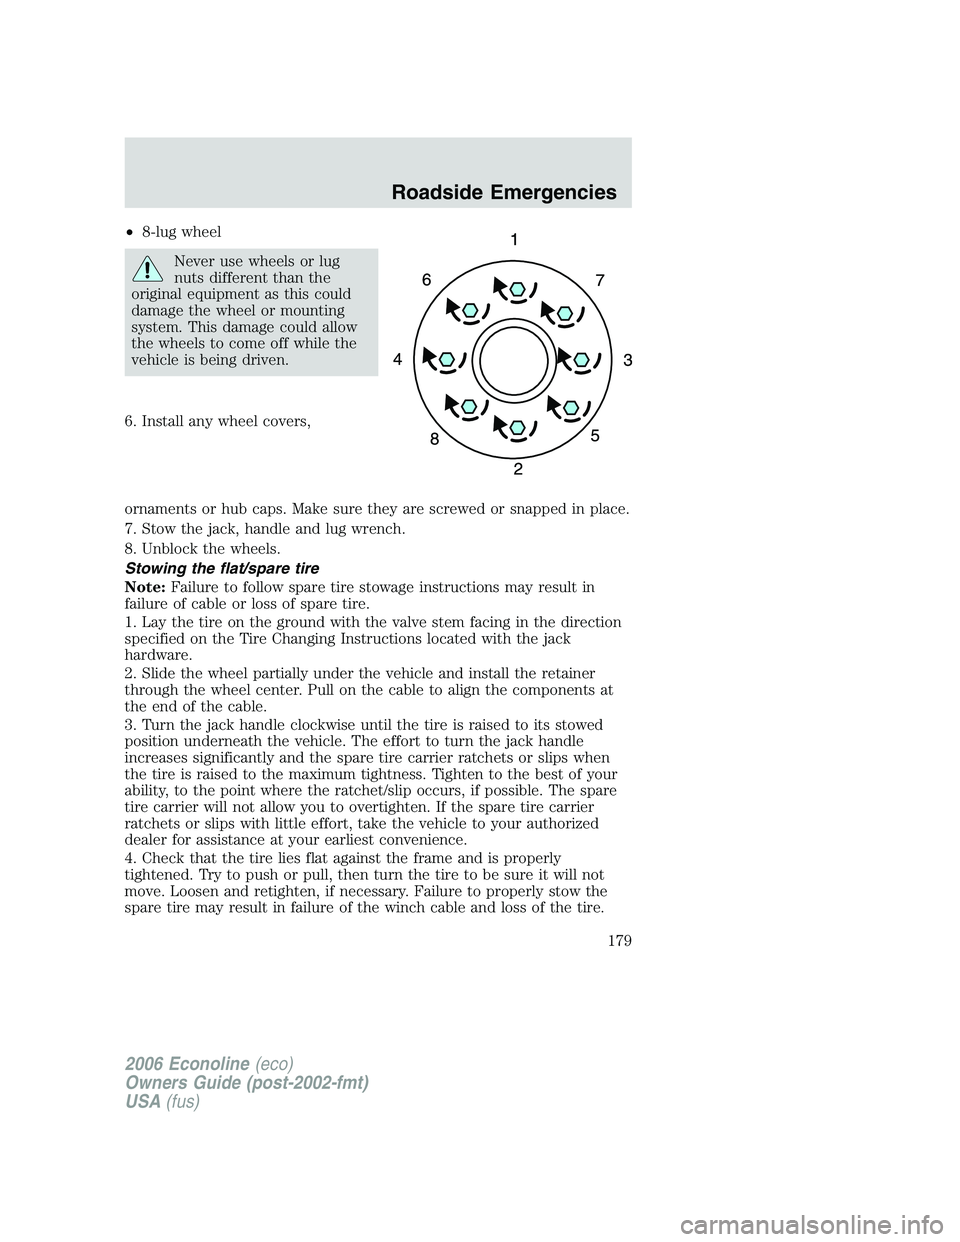
5. Remove the jack and fully tighten the lug nuts in the following pattern
(Refer toWheel lug nut torque specificationslater in this chapter for
the proper lug nut torque specification):
•5-lug wheel
1
4 3
2 5
2006 Econoline(eco)
Owners Guide (post-2002-fmt)
USA(fus)
Roadside Emergencies
178
Page 179 of 256

•8-lug wheel
Never use wheels or lug
nuts different than the
original equipment as this could
damage the wheel or mounting
system. This damage could allow
the wheels to come off while the
vehicle is being driven.
6. Install any wheel covers,
ornaments or hub caps. Make sure they are screwed or snapped in place.
7. Stow the jack, handle and lug wrench.
8. Unblock the wheels.
Stowing the flat/spare tire
Note:Failure to follow spare tire stowage instructions may result in
failure of cable or loss of spare tire.
1. Lay the tire on the ground with the valve stem facing in the direction
specified on the Tire Changing Instructions located with the jack
hardware.
2. Slide the wheel partially under the vehicle and install the retainer
through the wheel center. Pull on the cable to align the components at
the end of the cable.
3. Turn the jack handle clockwise until the tire is raised to its stowed
position underneath the vehicle. The effort to turn the jack handle
increases significantly and the spare tire carrier ratchets or slips when
the tire is raised to the maximum tightness. Tighten to the best of your
ability, to the point where the ratchet/slip occurs, if possible. The spare
tire carrier will not allow you to overtighten. If the spare tire carrier
ratchets or slips with little effort, take the vehicle to your authorized
dealer for assistance at your earliest convenience.
4. Check that the tire lies flat against the frame and is properly
tightened. Try to push or pull, then turn the tire to be sure it will not
move. Loosen and retighten, if necessary. Failure to properly stow the
spare tire may result in failure of the winch cable and loss of the tire.
2006 Econoline(eco)
Owners Guide (post-2002-fmt)
USA(fus)
Roadside Emergencies
179
Page 180 of 256

5. Repeat this tightness check procedure when servicing the spare tire
pressure (every six months, as per yourscheduled maintenance
information),or at any time that the spare tire is disturbed through
service of other components.
6. If removed, install the spare tire lock (if equipped) into the bumper
drive tube with the spare tire lock key (if equipped) and jack handle.
WHEEL LUG NUT TORQUE SPECIFICATIONS
On vehicles equipped with single rear wheels, retighten the lug nuts to
the specified torque at 500 miles (800 km) after any wheel disturbance
(tire rotation, changing a flat tire, wheel removal, etc.).
On vehicles equipped with dual rear wheels, retighten the wheel lug nuts
to the specified torque at 100 miles (160 km), and again at 500 miles
(800 km) of new vehicle operation and after any wheel disturbance (tire
rotation, changing a flat tire, wheel removal, etc.).
Bolt size Wheel lug nut torque*
lb.ft. N•m
E-150: 1/2–20 100 135
E-250, E-350 and
E-450: 9/16–18140 190
* Torque specifications are for nut and bolt threads free of dirt and
rust. Use only Ford recommended replacement fasteners.
On all two-piece flat wheel nuts,
apply one drop of motor oil between
the flat washer and the nut. Do not
apply motor oil to the wheel nut
threads or the wheel stud threads.
2006 Econoline(eco)
Owners Guide (post-2002-fmt)
USA(fus)
Roadside Emergencies
180
Page 249 of 256

interior lamps ...........................38
replacing bulbs .........................40
Lane change indicator
(see Turn signal) ........................38
Lights, warning and indicator ....12
anti-lock brakes (ABS) ..........143
Load limits .................................120
Loading instructions .................126
Locks ............................................54
doors ..........................................54
Lubricant specifications ...236, 239
Lug nuts ....................................180
Lumbar support, seats ...............60
M
Mirrors
fold away ...................................50
side view mirrors (power) .......49
Motorcraft parts ........199, 215, 231
O
Octane rating ............................219
Oil (see Engine oil) ..................203
P
Parking brake ............................144
Parts (see Motorcraft parts) ....231
Power distribution box
(see Fuses) ...............................167
Power door locks ........................54
Power mirrors .............................49
Power point .................................47
Power steering ..........................147
fluid, checking and adding ....225fluid, refill capacity ................232
fluid, specifications .........236, 239
Power Windows ...........................48
Preparing to drive your
vehicle ........................................148
R
Radio ................................19–20, 25
Relays ................................164, 170
Remote entry system .................54
illuminated entry ......................58
locking/unlocking doors ...........55
panic alarm ...............................55
replacement/additional
transmitters ...............................57
replacing the batteries .............56
Roadside assistance ..................160
S
Safety Belt Maintenance ............75
Safety belts
(see Safety restraints) .........65–69
Safety defects, reporting ..........193
Safety restraints ....................65–69
belt minder ...............................71
extension assembly ..................74
for adults .............................66–68
for children .........................84–85
lap belt ......................................70
safety belt maintenance ...........75
warning light and chime ....70–71
Safety seats for children ............89
Seat belts
(see Safety restraints) ...............65
Seats ............................................59
child safety seats ......................89
2006 Econoline(eco)
Owners Guide (post-2002-fmt)
USA(fus)
Index
249