Page 55 of 256

Changes or modifications not expressly approved by the party
responsible for compliance could void the user’s authority to
operate the equipment.
The typical operating range for your remote entry transmitter is
approximately 33 feet (10 meters). A decrease in operating range could
be caused by:
•weather conditions,
•nearby radio towers,
•structures around the vehicle, or
•other vehicles parked next to your vehicle.
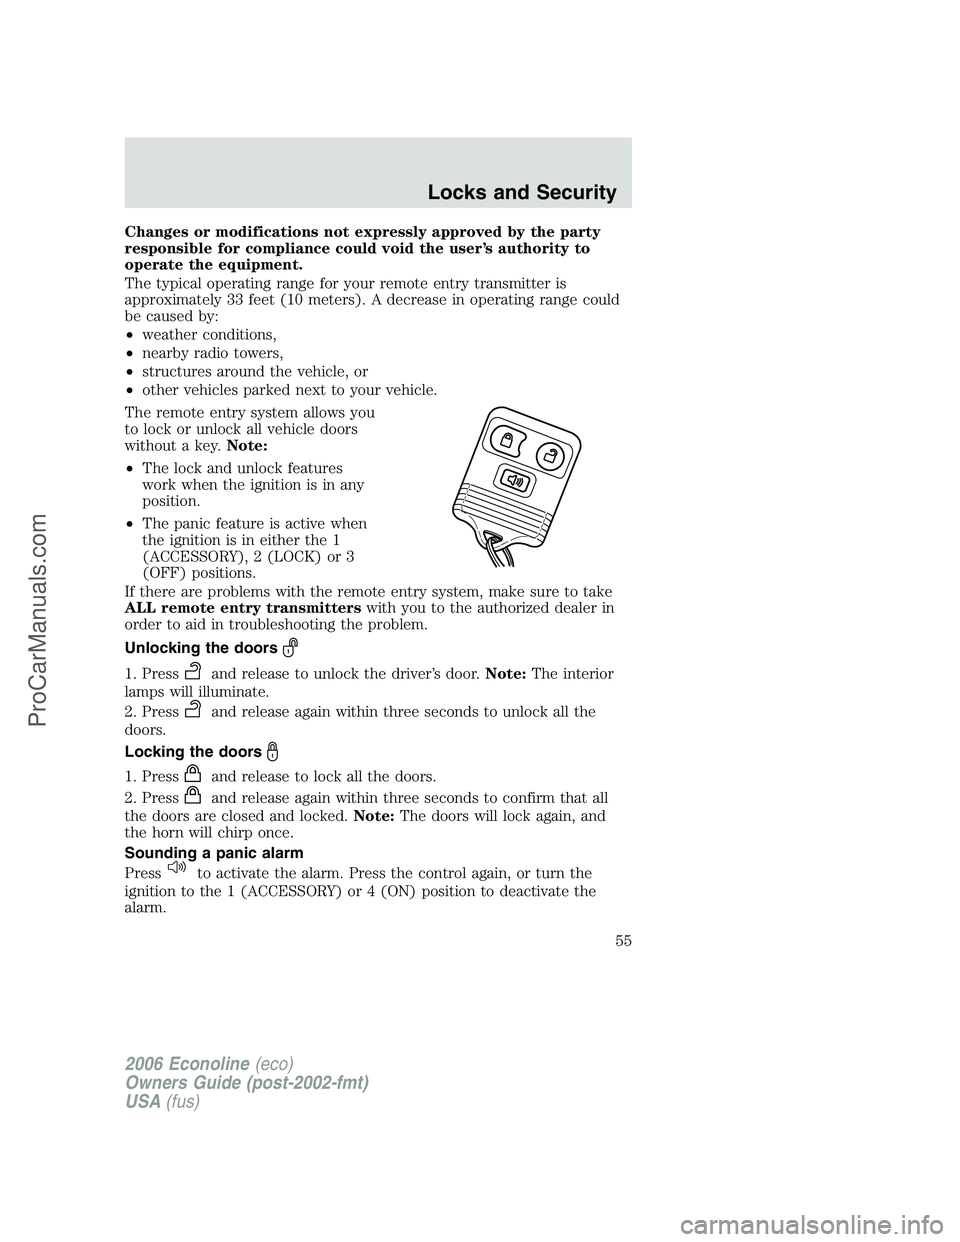
The remote entry system allows you
to lock or unlock all vehicle doors
without a key.Note:
•The lock and unlock features
work when the ignition is in any
position.
•The panic feature is active when
the ignition is in either the 1
(ACCESSORY), 2 (LOCK) or 3
(OFF) positions.
If there are problems with the remote entry system, make sure to take
ALL remote entry transmitterswith you to the authorized dealer in
order to aid in troubleshooting the problem.
Unlocking the doors
1. Pressand release to unlock the driver’s door.Note:The interior
lamps will illuminate.
2. Press
and release again within three seconds to unlock all the
doors.
Locking the doors
1. Pressand release to lock all the doors.
2. Press
and release again within three seconds to confirm that all
the doors are closed and locked.Note:The doors will lock again, and
the horn will chirp once.
Sounding a panic alarm
Press
to activate the alarm. Press the control again, or turn the
ignition to the 1 (ACCESSORY) or 4 (ON) position to deactivate the
alarm.
2006 Econoline(eco)
Owners Guide (post-2002-fmt)
USA(fus)
Locks and Security
55
ProCarManuals.com
Page 62 of 256
Stow the tongue end of the
detachable anchor.
2. Pull the seat latch handle, then
pull the seat toward the right side of
the vehicle to disengage four pins
from the floor mount.
3. Remove the seat.
To install the seat:
Check to see that the seat and seatback is latched securely in
position. Keep floor area free of objects that would prevent
proper seat engagement. Never attempt to adjust the seat while the
vehicle is in motion.
Ensure that the seat is latched to the vehicle floor by
pushing/pulling on the seat. If not latched, the seat may cause
injury during a sudden stop.
1. Position the seat to the floor
mount.
2. Pull the seat latch handle downward to lock the seat in position.
2006 Econoline(eco)
Owners Guide (post-2002-fmt)
USA(fus)
Seating and Safety Restraints
62
ProCarManuals.com
Page 64 of 256
Stow the tongue end of the
detachable anchor (2nd row only).
2. Pull the LH/RH seat latch handles
(located under the seat) rearward to
release the latch hook ends from the
front strikers.
3. Move the seat rearward and lift the seats rear hooks away from the
rear strikers prior to lifting the front hooks out from the front strikers.
4. With assistance, remove the seat assembly.
•To remove the 3rd, 4th, and 5th row seats (if equipped), repeat Steps
2 through 4.
To install the seat:
Ensure that the seat is latched to the vehicle floor by
pushing/pulling on the seat. If not latched, the seat may cause
injury during a sudden stop.
1. Position the seat in the vehicle.
2. Align front hooks to front strikers, prior to lowering the rear hooks
and aligning them with the rear strikers.
2006 Econoline(eco)
Owners Guide (post-2002-fmt)
USA(fus)
Seating and Safety Restraints
64
ProCarManuals.com
Page 77 of 256

Do not put anything on or over the air bag module. Placing
objects on or over the air bag inflation area may cause those
objects to be propelled by the air bag into your face and torso causing
serious injury.
Do not attempt to service, repair, or modify the airbag
supplemental restraint systems or its fuses. See your authorized
dealer.
Modifying or adding equipment to the front end of the vehicle
(including frame, bumper, front end body structure and tow
hooks) may affect the performance of the airbag system, increasing the
risk of injury. Do not modify the front end of the vehicle.
Additional equipment may affect the performance of the airbag
sensors increasing the risk of injury. Please refer to theBody
Builders Layout Bookfor instructions about the appropriate
installation of additional equipment.
Children and airbags
Children must always be properly
restrained. Accident statistics
suggest that children are safer when
properly restrained in the rear
seating positions than in the front
seating position. Failure to follow
these instructions may increase the
risk of injury in a collision.
Airbags can kill or injure a
child in a child seat.
NEVERplace a rear-facing child
seat in front of an active airbag. If
you must use a forward-facing
child seat in the front seat, move
the seat all the way back.
2006 Econoline(eco)
Owners Guide (post-2002-fmt)
USA(fus)
Seating and Safety Restraints
77
ProCarManuals.com
Page 89 of 256

Never use pillows, books, or towels to boost a child. They can
slide around and increase the likelihood of injury or death in a
collision.
SAFETY SEATS FOR CHILDREN
Child and infant or child safety seats
Use a safety seat that is recommended for the size and weight of the
child. Carefully follow all of the manufacturer’s instructions with the
safety seat you put in your vehicle. If you do not install and use the
safety seat properly, the child may be injured in a sudden stop or
collision.
When installing a child safety seat:
•Review and follow the information
presented in theAirbag
Supplemental Restraint System
section in this chapter.
•Use the correct safety belt buckle
for that seating position (the
buckle closest to the direction the
tongue is coming from).
•Insert the belt tongue into the
proper buckle until you hear a
snap and feel it latch. Make sure the tongue is securely fastened in the
buckle.
•For the front passenger seat, keep the buckle release button pointing
up and away from the safety seat, with the tongue between the child
seat and the release button, to prevent accidental unbuckling.
•For the front passenger seat, place seat back in upright position.
•Put the safety belt in the automatic locking mode. Refer toAutomatic
locking mode(passenger side front and outboard rear seating
positions) (if equipped).
•LATCH lower anchors are recommended for use by children up to 48
pounds (22 kg) in a child restraint. Top tether anchors can be used
for children up to 60 pounds (27 kg) in a child restraint, and to
provide upper torso restraint for children up to 80 pounds (36 kg)
using an upper torso harness and a belt-positioning booster.
Ford recommends the use of a child safety seat having a top tether
strap. Install the child safety seat in a seating position with LATCH and
2006 Econoline(eco)
Owners Guide (post-2002-fmt)
USA(fus)
Seating and Safety Restraints
89
ProCarManuals.com
Page 92 of 256

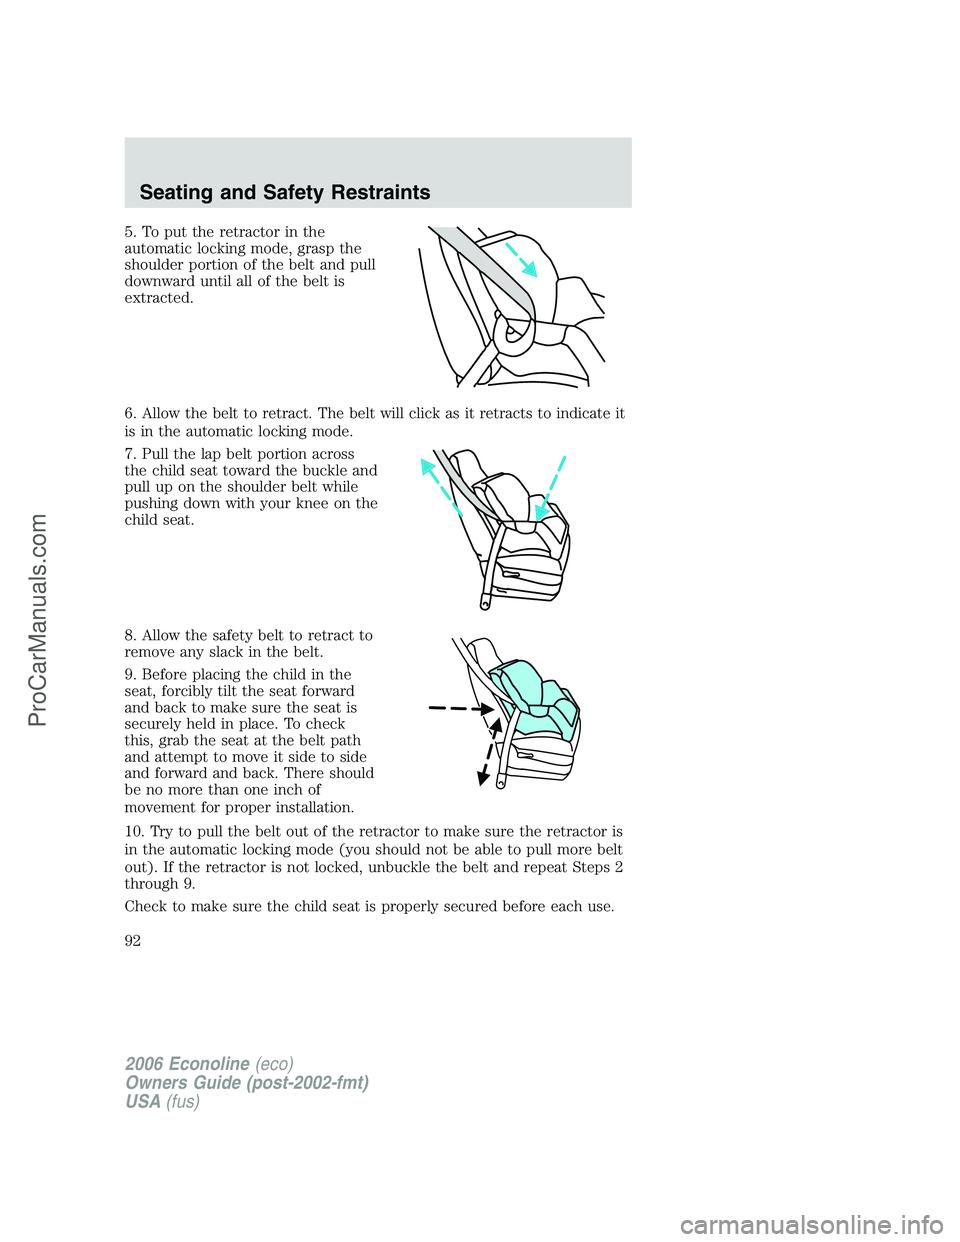
5. To put the retractor in the
automatic locking mode, grasp the
shoulder portion of the belt and pull
downward until all of the belt is
extracted.
6. Allow the belt to retract. The belt will click as it retracts to indicate it
is in the automatic locking mode.
7. Pull the lap belt portion across
the child seat toward the buckle and
pull up on the shoulder belt while
pushing down with your knee on the
child seat.
8. Allow the safety belt to retract to
remove any slack in the belt.
9. Before placing the child in the
seat, forcibly tilt the seat forward
and back to make sure the seat is
securely held in place. To check
this, grab the seat at the belt path
and attempt to move it side to side
and forward and back. There should
be no more than one inch of
movement for proper installation.
10. Try to pull the belt out of the retractor to make sure the retractor is
in the automatic locking mode (you should not be able to pull more belt
out). If the retractor is not locked, unbuckle the belt and repeat Steps 2
through 9.
Check to make sure the child seat is properly secured before each use.
2006 Econoline(eco)
Owners Guide (post-2002-fmt)
USA(fus)
Seating and Safety Restraints
92
ProCarManuals.com
Page 112 of 256

Highway hazards
No matter how carefully you drive there’s always the possibility that you
may eventually have a flat tire on the highway. Drive slowly to the
closest safe area out of traffic. This may further damage the flat tire, but
your safety is more important.
If you feel a sudden vibration or ride disturbance while driving, or you
suspect your tire or vehicle has been damaged, immediately reduce your
speed. Drive with caution until you can safely pull off the road. Stop and
inspect the tires for damage. If a tire is under-inflated or damaged,
deflate it, remove wheel and replace it with your spare tire and wheel. If
you cannot detect a cause, have the vehicle towed to the nearest repair
facility or tire dealer to have the vehicle inspected.
Tire and wheel alignment
A bad jolt from hitting a curb or pothole can cause the front end of your
vehicle to become misaligned or cause damage to your tires. If your
vehicle seems to pull to one side when you’re driving, the wheels may be
out of alignment. Have an authorized dealer check the wheel alignment
periodically.
Wheel misalignment in the front or the rear can cause uneven and rapid
treadwear of your tires and should be corrected by an authorized dealer.
Front wheel drive (FWD) vehicles and those with an independent rear
suspension (if equipped) may require alignment of all four wheels.
The tires should also be balanced periodically. An unbalanced tire and
wheel assembly may result in irregular tire wear.
Tire rotation
Rotating your tires at the recommended interval (as indicated in the
scheduled maintenance informationthat comes with your vehicle) will
help your tires wear more evenly, providing better tire performance and
longer tire life. Unless otherwise specified, rotate the tires approximately
every 5,000 miles (8,000 km).
2006 Econoline(eco)
Owners Guide (post-2002-fmt)
USA(fus)
Tires, Wheels and Loading
112
ProCarManuals.com
Page 122 of 256
Example only:
Cargo Weight– includes all weight added to the Base Curb Weight,
including cargo and optional equipment. When towing, trailer tongue load
or king pin weight is also part of cargo weight.
GAW (Gross Axle Weight)– is the total weight placed on each axle
(front and rear) – including vehicle curb weight and all payload.
2006 Econoline(eco)
Owners Guide (post-2002-fmt)
USA(fus)
Tires, Wheels and Loading
122
ProCarManuals.com