Page 18 of 272
5.Power/volume:Press to turn
ON/OFF; turn to increase or
decrease volume levels.
6.Tone:Press TONE until the
desired level — Bass, Treble, Fade
appears on the display. Turn the
volume control to raise/lower the
levels, or to move the audio sound
from the right to left or the front to
back (if equipped).
7.CLK (Clock):To set the hour,
press and hold CLK until CLOCK
SET appears in the display. Press
SEEK to decrease
or
increase
the hours.
To set the minute, press and hold CLK until CLOCK set appears in the
display. Press TUNE to decrease
or increasethe minutes.
TONE
CLK
2006 Crown Victoria(cro)
Owners Guide (post-2002-fmt)
USA(fus)
Entertainment Systems
18
Page 23 of 272
8.SEL:Use with Bass, Treble,
Balance, Fade and other menu
functions.
9.MENU:Press MENU to access
the following functions:
Compression:Brings soft and loud CD passages together for a more
consistent listening level when in CD mode. Press MENU until
compression status is displayed. Press
SELto enable the
compression feature when COMPRESS OFF is displayed. Press SEL
again to disable the feature when COMPRESS ON is displayed. When
activated, the compression icon will appear in the display.
Autoset:Allows you to set the strongest local radio stations without
losing your original manually set preset stations for AM/FM1/FM2. Press
MENU until AUTOSET appears in the display. Press
SELto
toggle ON/OFF. When the six strongest stations are filled, the station
stored in preset 1 will begin playing. If there are less than six strong
stations, the system will store the last one in the remaining presets.
When activated, AUTOSET will momentarily appear in the display when
any of the preset controls are pressed.
Speed sensitive volume:Radio volume changes automatically and
slightly with vehicle speed to compensate for road and wind noise.
Recommended level is 1–3. Level 0 turns the feature off and level 7 is
the maximum setting.
Press MENU to access and use
SELto adjust the volume setting.
The level will appear in the display.
Setting the clock:Press MENU until SELECT HOUR or SELECT MINS
is displayed. Press
SELto manually decrease/increase the
hours/minutes. Press MENU again to disengage clock mode.
Note:The menu selections will remain in the display for approximately
10 seconds, at which time the display will return to the previous mode.
You may also exit the menu options by pressing any other audio control.
10.Memory presets:To set a
station: Select frequency band, tune
to a station, press and hold a preset
button until sound returns.
2006 Crown Victoria(cro)
Owners Guide (post-2002-fmt)
USA(fus)
Entertainment Systems
23
Page 24 of 272
11.On/Off/Volume:Push to turn
on/off; turn to adjust the volume
levels.
Note:With the ignition turned off,
you may press the volume control to
momentarily view the clock.
12.CD:Press to enter CD mode if a CD is already present in the system.
In radio mode, the CD icon will appear in the display if a CD is loaded
into the system.
13.AM:Press to select the AM
frequency.
14.FM:Press to select the FM
frequency. Press repeatedly to
toggle between FM1 and FM2.
15.SHUF (Shuffle):Press to play
all tracks on the current CD in
random order. Press again to stop.
16.SCAN:Press SCAN to hear a
brief sampling of radio stations or
CD tracks. Press again to stop.
2006 Crown Victoria(cro)
Owners Guide (post-2002-fmt)
USA(fus)
Entertainment Systems
24
Page 28 of 272
Dolby Laboratories Licensing Corporation. Dolby�and the double-D
symbol are registered trademarks of Dolby Laboratories Licensing
Corporation.
Setting the clock:Press MENU repeatedly until SELECT HOUR or
SELECT MINS is displayed. Press
SEL-TEXTto manually
decrease/increase the hours/minutes. Press MENU again to disengage
clock mode.
Note:The menu selections will remain in the display for approximately
10 seconds, at which time the display will return to the previous mode.
You may also exit the menu options by pressing any other audio control.
8.Cassette:Insert a cassette facing to the right.
9.TUNE:Press to manually go up
or down the radio frequency.
CAT:CAT is only available when equipped with Satellite Radio. Your
system may be equipped with Satellite ready capability. The kit to enable
Satellite reception is available through your dealer. Detailed Satellite
instructions are included with the dealer installed kit.
Dealer installed satellite kit not available in Canada.
10.Side 1–2:Press to access the
next side of the cassette tape. The
display will indicate whether TAPE
1orTAPE2isplaying.
11.SEEK:Press to access the
next/previous radio station, tape
selection or CD track.
12.REW (Rewind):Press to
rewind in tape or CD mode.
FF (Fast forward):Press to fast
forward in tape or CD mode.
13.SCAN:Press SCAN to hear a
brief sampling of radio stations,
selections or CD tracks. Press again
to stop.
REWFF34
2006 Crown Victoria(cro)
Owners Guide (post-2002-fmt)
USA(fus)
Entertainment Systems
28
Page 29 of 272
14.SHUF (Shuffle):Press to play
the tracks on the current CD in
random order. Press again to stop.
15.Memory presets:To set a
station: Select frequency band, tune
to a station, press and hold a preset
button until sound returns.
16.AM/FM:Press to toggle
between AM/FM1/FM2 modes.
17.Tape eject:Press to eject the
tape.
18.CD/TAPE:Press to toggle
between CD and TAPE mode. In
radio and tape mode, the CD icon
will appear in the display if a CD is loaded into the system.
19.SAT:Your system may be
equipped with Satellite Ready
capability. The kit to enable the
Satellite reception is available through your dealer. Detailed satellite
instructions are included with the dealer installed kit.
Dealer installed satellite kit not available in Canada.
20.On/Off/Volume:Push to turn
on/off; turn to adjust the volume
levels.Note:With the ignition
turned off, you may press the
volume control to momentarily view
the clock.
2006 Crown Victoria(cro)
Owners Guide (post-2002-fmt)
USA(fus)
Entertainment Systems
29
Page 33 of 272
Speed sensitive volume:Radio volume changes automatically and
slightly with vehicle speed to compensate for road and wind noise.
Recommended level is 1–3. Level 0 turns the feature off and level 7 is
the maximum setting.
Press MENU to access and use
SEL-TEXTto adjust the volume
setting. The level will appear in the display.
Setting the clock:Press MENU until SELECT HOUR or SELECT MINS
is displayed. Press
SEL-TEXTto increase/decrease the
hours/minutes. Press MENU again to disengage clock mode.
10.Memory presets:To set a
station: Select frequency band, tune
to a station, press and hold a preset
button until sound returns. In CD mode, press to select a specific CD to
play.
11.On/Off/Volume:Push to turn
on/off; turn to adjust the volume
levels.
Note:With the ignition off, you may
press the volume control to
momentarily view the clock.
12.LOAD:Press to load a CD.
Press LOAD and a specific preset to
load in that particular slot. Available
slots are indicated by small flashing indicators in the display. When the
system is ready to accept a disc, LOAD CD X will appear in the display.
Load the CD. Press and hold to autoload up to 6 discs.
Note:Ensure that the system is ready to accept the CD. Do not force
the disc into the CD slot as damage could result.
13.AM/FM:Press repeatedly to
toggle between AM/FM1/FM2 mode.
14.CD:Press to enter CD mode.
Press CD and a preset to select a
specific CD to play.
15.SAT:Your system may be equipped with Satellite Ready capability.
The kit to enable the Satellite reception is available through your
authorized dealer. Detailed satellite instructions are included with the
2006 Crown Victoria(cro)
Owners Guide (post-2002-fmt)
USA(fus)
Entertainment Systems
33
Page 40 of 272
HEADLAMP CONTROL
Turns the lamps off.
Turns on the parking
lamps, instrument panel lamps,
license plate lamps and tail lamps.
Turns the headlamps on.
Autolamp control
The autolamp system provides light
sensitive automatic on-off control of
the exterior lights normally
controlled by the headlamp control.
The autolamp system also keeps the
lights on for a predetermined period
of time after the ignition switch is
turned to OFF.
•To turn autolamps on, rotate the
control counterclockwise to the
next position from OFF.
•To turn autolamps off, rotate the control clockwise past OFF to the
parking lamp position
, then back to OFF.
The headlamps will turn on under the following conditions:
1. Headlamp switch is turned to the “headlamps on position”.
2. With the ignition in ON or START, wipers turned on and the headlamp
switch in the autolamp position.
2006 Crown Victoria(cro)
Owners Guide (post-2002-fmt)
USA(fus)
Lights
40
Page 47 of 272
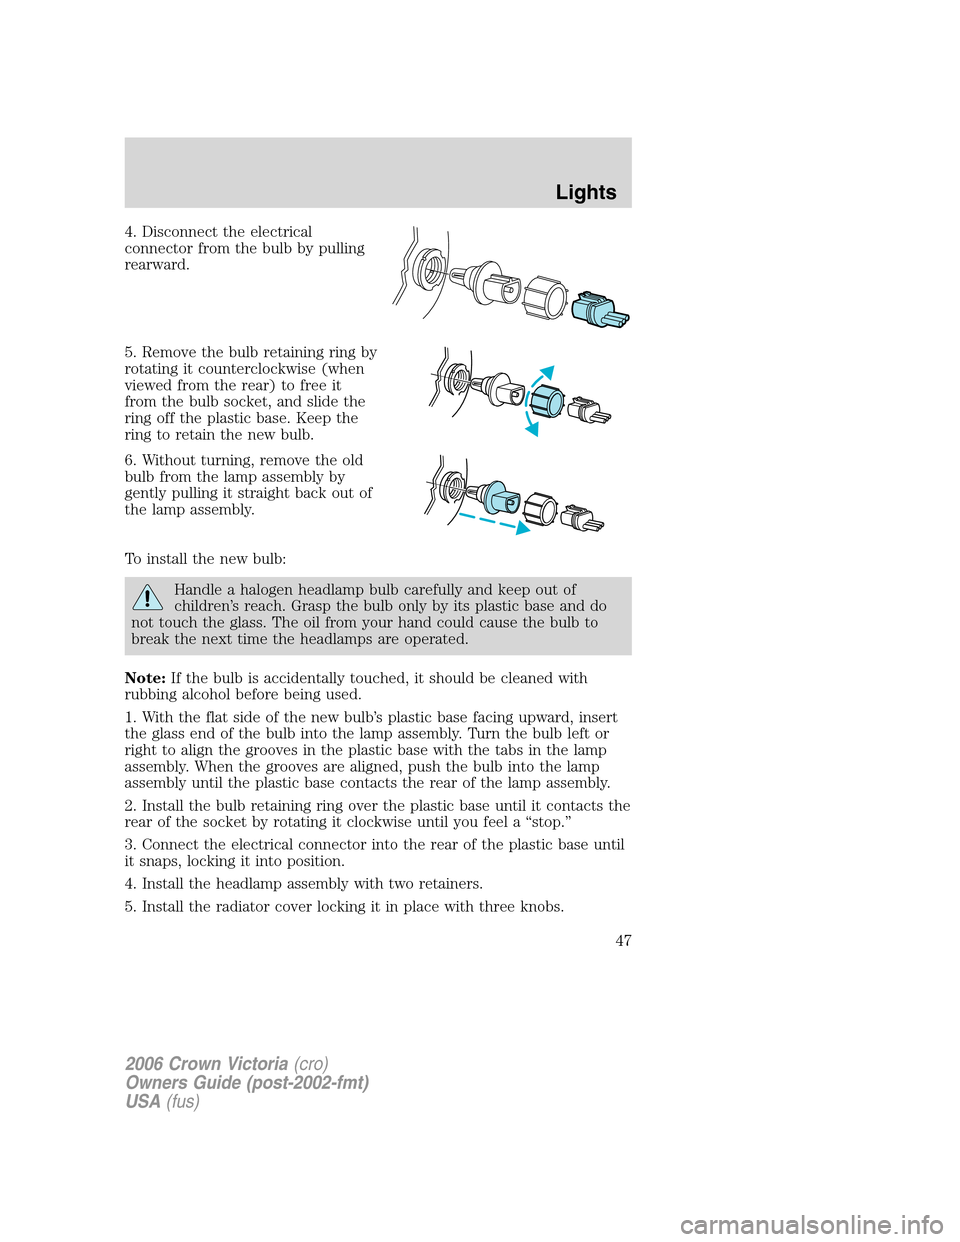
4. Disconnect the electrical
connector from the bulb by pulling
rearward.
5. Remove the bulb retaining ring by
rotating it counterclockwise (when
viewed from the rear) to free it
from the bulb socket, and slide the
ring off the plastic base. Keep the
ring to retain the new bulb.
6. Without turning, remove the old
bulb from the lamp assembly by
gently pulling it straight back out of
the lamp assembly.
To install the new bulb:
Handle a halogen headlamp bulb carefully and keep out of
children’s reach. Grasp the bulb only by its plastic base and do
not touch the glass. The oil from your hand could cause the bulb to
break the next time the headlamps are operated.
Note:If the bulb is accidentally touched, it should be cleaned with
rubbing alcohol before being used.
1. With the flat side of the new bulb’s plastic base facing upward, insert
the glass end of the bulb into the lamp assembly. Turn the bulb left or
right to align the grooves in the plastic base with the tabs in the lamp
assembly. When the grooves are aligned, push the bulb into the lamp
assembly until the plastic base contacts the rear of the lamp assembly.
2. Install the bulb retaining ring over the plastic base until it contacts the
rear of the socket by rotating it clockwise until you feel a “stop.”
3. Connect the electrical connector into the rear of the plastic base until
it snaps, locking it into position.
4. Install the headlamp assembly with two retainers.
5. Install the radiator cover locking it in place with three knobs.
2006 Crown Victoria(cro)
Owners Guide (post-2002-fmt)
USA(fus)
Lights
47