Page 397 of 536
WHAT TO DO IN EMERGENCIES
CONTENTS
�Hazard Warning Lights ..................398
� Jack Location ..........................399
▫ Removal (2500/3500/Mega Cab) ..........399
▫ Removal
(1500 Standard Cab/Quad Cab Vehicles) .....400
▫ Reinstalling The Scissors-Type Jack And Tools
(1500 Models) ........................401
� Changing A Flat Tire ....................403
▫ Removing The Spare Tire ................404 ▫
Tire Changing Procedure ................405
� Hoisting .............................416
� Jump-Starting .........................416
� Freeing A Stuck Vehicle ..................419
� Emergency Tow Hooks — If Equipped ........420
� Towing A Disabled Vehicle ................420
▫ 4-Wheel- Drive Vehicles .................421
▫ 2–Wheel- Drive Vehicles ................421
6
Page 404 of 536
Removing The Spare Tire
Remove the spare tire before attempting to jack the truck.
Attach the wheel wrench to the jack extension tube. Insert
the tube through the access hole between the lower
tailgate and the top of the bumper and into the winch
mechanism tube. Rotate the wheel wrench handle coun-
terclockwise until the spare tire is on the ground with
enough cable slack to allow you to pull it out from under
the vehicle. When the spare is clear, tilt the retainer at the
end of the cable and pull it through the center of the
wheel. It is recommended that you stow the flat or spare to
avoid tangling the loose cable.
NOTE: The winch mechanism is designed for use with
the jack extension tube only. Use of an air wrench or other
power tools is not recommended and can damage the
winch.
404 WHAT TO DO IN EMERGENCIES
Page 410 of 536
NOTE:If the 2500/3500 bottle jack will not lower by
turning the dial (thumb wheel) by hand, it may be
necessary to use the jack drive tube in order to lower the
jack.
4. By rotating the wheel wrench clockwise, raise the
vehicle until the wheel just clears the surface.
WARNING!
Raising the vehicle higher than necessary can make
the vehicle unstable and cause an accident. It could
slip off the jack and hurt someone near it. Raise the
vehicle only enough to remove the tire.
5. Remove the wheel nuts and pull the wheel off. Install
the spare wheel and wheel nuts with the cone shaped end
of the nuts toward the wheel on 1500/2500/3500 single
rear wheel (SRW) models. On 3500 dual rear wheel models (DRW) the lug nuts are a two piece assembly
with a flat face. Lightly tighten the nuts. To avoid risk of
forcing the vehicle off the jack, do not fully tighten the
nuts until the vehicle has been lowered.
6. Using the wheel wrench, finish tightening the nuts
using a crisscross pattern. Correct nut tightness is 135 ft.
lbs. (183 N·m) torque for 1500/2500/3500 single rear
wheel (SRW) models and 145 ft. lbs. (197 N·m) for 3500
dual rear wheel models. If in doubt about the correct
tightness, have them checked with a torque wrench by
your dealer or at a service station.
410 WHAT TO DO IN EMERGENCIES
Page 411 of 536
WARNING!
A loose tire or jack thrown forward in a collision or
hard stop could injure someone in the vehicle.
Always stow the jack parts and the extra tire and
wheel in the places provided.
7. Install wheel center cap and remove wheel blocks. Do
not install chrome or aluminum wheel center caps on the
spare wheel. This may result in cap damage.
8. Lower the jack to its fully closed position. If the bottle
jack will not lower by turning the dial (thumb wheel) by
hand, it may be necessary to use the jack drive tube in
order to lower the jack. Stow the replaced tire, jack, and
tools as previously described.
9. Adjust the tire pressure when possible. NOTE:
Do not oil wheel studs. For chrome wheels, do
not substitute with chrome plated wheel nuts.
Hub Caps/Wheel Covers
The hub caps must be removed before raising the vehicle
off the ground.
For 2500/3500 single rear wheel (SRW) models, use the
blade on the end of the lug wrench to pry the hub cap off.
Insert the blade end into the pryoff notch and carefully
pop off the hub cap with a back and forth motion.
On 3500 models with dual rear wheels (DRW), you must
first remove the hub caps. The jack handle driver has a
hook at one end that will fit in the pry off notch of the
rear hub caps. Position the hook and pull out on the
ratchet firmly. The hub cap should pop off. The wheel
skins can now be removed. For the front hub cap on 3500
models use the blade on the end of the lug wrench to pry
the caps off. The wheel skin can now be removed.
WHAT TO DO IN EMERGENCIES 411
6
Page 415 of 536
wheel. The nuts should then be tightened to recom-
mended torque. Tighten the nuts to final torque in
increments. Progress around the bolt circle, tightening
the nut opposite to the nut just previously tightened until
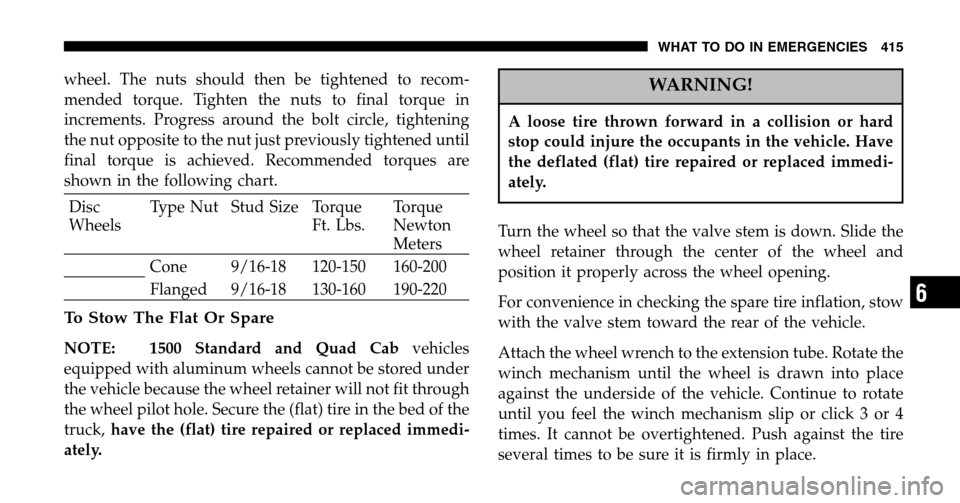
final torque is achieved. Recommended torques are
shown in the following chart.
Disc
Wheels Type Nut Stud Size Torque
Ft. Lbs. Torque
Newton
Meters
Cone 9/16-18 120-150 160-200
Flanged 9/16-18 130-160 190-220
To Stow The Flat Or Spare
NOTE: 1500 Standard and Quad Cab vehicles
equipped with aluminum wheels cannot be stored under
the vehicle because the wheel retainer will not fit through
the wheel pilot hole. Secure the (flat) tire in the bed of the
truck, have the (flat) tire repaired or replaced immedi-
ately.
WARNING!
A loose tire thrown forward in a collision or hard
stop could injure the occupants in the vehicle. Have
the deflated (flat) tire repaired or replaced immedi-
ately.
Turn the wheel so that the valve stem is down. Slide the
wheel retainer through the center of the wheel and
position it properly across the wheel opening.
For convenience in checking the spare tire inflation, stow
with the valve stem toward the rear of the vehicle.
Attach the wheel wrench to the extension tube. Rotate the
winch mechanism until the wheel is drawn into place
against the underside of the vehicle. Continue to rotate
until you feel the winch mechanism slip or click 3 or 4
times. It cannot be overtightened. Push against the tire
several times to be sure it is firmly in place.
WHAT TO DO IN EMERGENCIES 415
6
Page 416 of 536
HOISTING
A conventional floor jack may be used at the jacking
locations, refer to the graphics that show jacking loca-
tions. However, a floor jack or frame hoist must never be
used on any other parts or the underbody.
CAUTION!
Never use a floor jack directly under the differential
housing of a loaded truck or damage to your vehicle
may result.
JUMP-STARTING
You should not try to start your vehicle by pushing or
towing. Vehicles equipped with an automatic transmis-
sion cannot be started this way and pushing or towing a
vehicle equipped with a manual transmission may over-
heat and damage the catalytic converter. Also, there is a
greater risk of an accident when a vehicle is being pushed
or towed. If the vehicle has a discharged battery, booster
cables may be used to obtain a start from a booster
battery or the battery in another vehicle. This type of start
can be dangerous if done improperly, so follow this
procedure carefully.
416 WHAT TO DO IN EMERGENCIES
Page 420 of 536
EMERGENCY TOW HOOKS — IF EQUIPPED
Your vehicle may be equipped with emergency tow
hooks.
WARNING!
Chains are not recommended for freeing a stuck
vehicle. Chains may break, causing serious injury or
death.
WARNING!
Stand clear of vehicles when pulling with tow
hooks. Tow straps and chains may break, causing
serious injury.
CAUTION!
Tow hooks are for emergency use only, to rescue a
vehicle stranded off road. Do not use tow hooks for
tow truck hookup or highway towing. You could
damage your vehicle.
TOWING A DISABLED VEHICLE
Proper towing or lifting equipment is required to prevent
damage to your vehicle. Use only tow bars and other
equipment designed for the purpose, following equip-
ment manufacturer’s instructions. Use of safety chains is
mandatory. Attach a tow bar or other towing device to
the main structural members of the vehicle—not to
bumpers or associated brackets. State and local laws
applying to vehicles under tow must be observed.
420 WHAT TO DO IN EMERGENCIES
Page 421 of 536

4-Wheel- Drive Vehicles
CAUTION!
To avoid damage to the transfer case while towing,
always use one of the following methods.
NOTE: The Transfer Case must be in the neutral posi-
tion, and the transmission must be in Park (Automatic
Transmission), or in gear (Manual Transmission) to tow a
4WD vehicle with one end of the vehicle raised.
The manufacturer recommends towing with all wheels
OFF the ground. Acceptable methods are to tow vehicle
on a flatbed or with one end of vehicle raised and the
opposite end on a towing dolly.
2–Wheel- Drive Vehicles
Provided that the transmission is operable, tow with the
transmission in Neutral and the ignition key in the OFF
position along with the front wheels raised and the rear
wheels on the ground. Speed must not exceed 30 mph (50
km/h) and distance must not exceed 15 miles (25 km).
CAUTION!
Towing faster than 30 mph (50 km/h) or for more
than 15 miles (25 km) can cause severe damage to the
transmission.
If the vehicle is to be towed faster than 30 mph (50 km/h)
or more than 15 miles (25 km) the vehicle must be towed
with the rear wheels raised and the front wheels on the
ground. It may also be towed on a flatbed or with the
front wheels raised and the rear wheels on a dolly.
WHAT TO DO IN EMERGENCIES 421
6


