Page 190 of 296

Traction
When driving on wet or slushy roads, it is possible for a
wedge of water to build up between the tire and road
surface. This is hydroplaning and may cause partial or
complete loss of vehicle control and stopping ability. To
reduce this possibility, the following precautions should
be observed:
1. Slow down during rainstorms or when roads are
slushy.
2. Slow down if the road has standing water or puddles.
3. Replace tires when tread wear indicators first become
visible.
4. Keep tires properly inflated.
5. Maintain enough distance between your vehicle and
the vehicle in front to avoid a collision in a sudden stop.
FREEING A STUCK VEHICLE
In order to free a stuck vehicle you must turn off the
Electronic Stability Program (ESP) before attempting to
“rock” the vehicle.
If your vehicle becomes stuck in mud, sand or snow, it
can often be moved by a rocking motion. Turn your
steering wheel right and left to clear the area around the
front wheels. Then shift back and forth between Reverse
and Drive. Usually the least accelerator pedal pressure to
maintain the rocking motion without spinning the
wheels is most effective.
NOTE:ESP should be turned on again after freeing the
vehicle from a stuck condition.
CAUTION!
Racing the engine or spinning the wheels too fast
may lead to transmission/axle overheating and fail-
ure. It can also damage the tires. Do not spin the
wheels above 35 mph (55 km/h).
190 WHAT TO DO IN EMERGENCIES
Page 248 of 296

Check the battery every four to six weeks to ensure that
the voltage is above 12.40. Voltage will drop more rapidly
in hot temperatures. If battery voltage drops below 12.40,
follow the battery recharge procedure in the Service
Manual.
•Check that the radiator coolant level of protection is to
at least -20°F (-29°C).
•Block the wheels. Do not apply the parking brake.
•Make sure that all tires are inflated to the optimum
pressure.
•Cut blocks of plywood about the same size of the tires.
Cover each block with indoor/outdoor carpeting and
place them between the tires and concrete. This will
prevent tire flat spotting.
•For long term storage, remove the tires and put the
vehicle up on blocks. Stack the tires on plywood and
cover with a tarp to prevent flat spotting.
•Move the wiper blades away from the windshield.
NOTE:To help prevent the battery from discharging
during shorter periods of inactivity, perform the follow-
ing:
1. Make sure that the rear liftgate/decklid, hood, and
doors are completely closed.
2. Make sure that the remote transmitter is operating and
that the battery is good.
3. Make sure that the hood, rear liftgate and door
switches are in adjustment.
4. Use the remote transmitter to set the alarm.
248 MAINTAINING YOUR VEHICLE
Page 258 of 296

Your Flexible Service System (FSS) — see Understanding
Your Instrument Panel section — should give you an
exact indication of when your vehicle should be sched-
uled for service and which schedule to follow.
Additional Periodic Maintenanceitems should also be
performed beyond the items listed in the following charts
to assure the optimum performance of your Crossfire.
SCOPE OF WORK FOR “A” SCHEDULE
MAINTENANCE SERVICE
Oil Change
•Change oil and replace filter
Maintenance
•Lubricate hood hinges, latch, and secondary latch
•Reset FSS Display
Function Check
•Horn, hazard warning flashers, turn signals, and indi-
cator lamps
•Headlamps and exterior lighting
•Windshield wipers and washer system
Inspection
•Check front and rear brake pads for lining thickness
•Check tires for damage and general condition
•Check tire inflation pressures and correct if necessary
Fluid Levels
Check fluid levels for the following systems and correct if
necessary. Should there be a loss of fluid that cannot be
explained by regular use, trace and eliminate the cause.
•Engine cooling system (check corrosion inhibitor/
antifreeze)
•Hydraulic brake system
•Power steering system
•Windshield washer system
258 MAINTENANCE SCHEDULES
8
M
A
I
N
T
E
N
A
N
C
E
S
C
H
E
D
U
L
E
S
Page 259 of 296

SCOPE OF WORK FOR “B” SCHEDULE
MAINTENANCE SERVICE
Oil Change
•Change oil and replace filter
Maintenance
•Rotate tires
•Replace dust filter (if equipped)
•Lubricate hood hinges, latch, and secondary latch
•Reset FSS Display
Function Check
•Horn, hazard warning flashers, turn signals, and indi-
cator lamps
•Headlamps and exterior lighting
•Windshield wipers and washer system
•Check seat belts for damage and proper function
•Test hydraulic brakes and check parking brake func-
tionInspection
•Check front and rear brake pads for lining thickness
•Check condition of front and rear brake discs
•Check tires for damage and general condition
•Check tire inflation pressures and correct if necessary
•Check major underbody components for leakage or
damage (if there are signs of leakage, determine cause
and repair)
•Check condition of front axle ball joints and rubber
boots
•Check condition of steering components and rubber
boots
•Check underhood components for leakage or damage
(if there are signs of leakage determine cause and
repair)
•Check condition of accessory drive belt
•Check headlamp aiming, adjust if necessary
•Check windshield wiper blades, replace if necessary
MAINTENANCE SCHEDULES 259
8
M
A
I
N
T
E
N
A
N
C
E
S
C
H
E
D
U
L
E
S
Page 262 of 296

At Each Stop for Fuel
•
Check the engine oil level about 5 minutes after a fully
warmed engine is shut off. Checking the oil level while
the vehicle is on level ground will improve the accu-
racy of the oil level reading. See the procedure de-
scribed in Checking Your Engine Oil in the Under-
standing Your Instrument Panel section or under
Engine Oil in the Maintaining Your Vehicle section.
Add oil only when the level is at or below the ADD or
MIN mark.
•Check the windshield washer solvent and add if
required.
•Inspect wiper blade condition.
•Check operation of lighting systems.
•Inspect tires for unusual wear, damage, and pressure
(at least every 14 days).
•Mechanical assemblies (e.g., engine, transmission, etc.)
- check for leaks.
Once a Month
•
Inspect the battery and clean and tighten the terminals
as required.
•Check the fluid levels of coolant reservoir, brake
master cylinder and power steering and add as
needed.
•Check all lights and all other electrical items for correct
operation.
Additional Periodic Maintenance
The following maintenance items should be performed
during the scheduled maintenance nearest the time
elapsed and/or distance shown. Follow the interval that
occurs first.
Every 2 years:
•Inspect body for paint damage.
•Check chassis and supporting body parts for damage
and corrosion.
262 MAINTENANCE SCHEDULES
8
M
A
I
N
T
E
N
A
N
C
E
S
C
H
E
D
U
L
E
S
Page 271 of 296

TIRE SAFETY INFORMATION
Tire Markings
Tire Sizing Chart
NOTE:
P(Passenger)-Metric tire sizing is based on U.S.
design standards. P-Metric tires have the letter “P”
molded into the sidewall preceding the size designation.
Example: P215/65R15 95H.
NOTE:European Metric tire sizing is based on Euro-
pean design standards. Tires designed to this standard
have the tire size molded into the sidewall beginning
with the section width. The letter�P�is absent from this
tire size designation. Example: 215/65R15 96H.
NOTE:LT(Light Truck)-Metric tire sizing is based on
U.S. design standards. The size designation for LT-Metric
tires is the same as for P-Metric tires except for the letters
“LT” that are molded into the sidewall preceding the size
designation. Example: LT235/85R16.
NOTE:Temporary Spare tires are high pressure com-
pact spares designed for temporary emergency use only.
Tires designed to this standard have the letter “T”
molded into the sidewall preceding the size designation.
Example: T145/80D18 103M.
NOTE:High Flotation tire sizing is based on U.S.
design standards and begins with the tire diameter
molded into the sidewall. Example: 31x10.5 R15 LT.
IF YOU NEED CONSUMER ASSISTANCE 271
9
Page 274 of 296

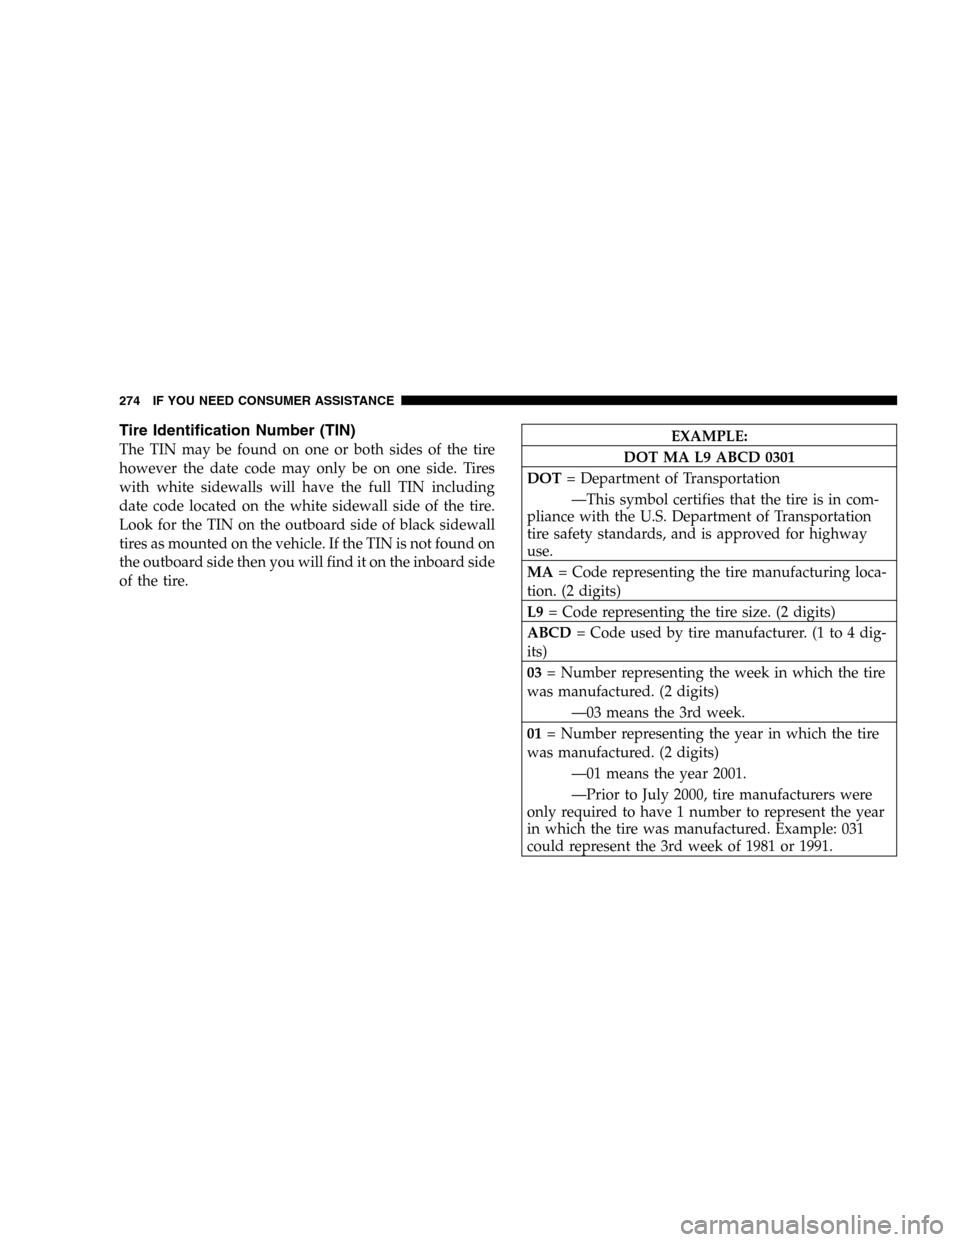
Tire Identification Number (TIN)
The TIN may be found on one or both sides of the tire
however the date code may only be on one side. Tires
with white sidewalls will have the full TIN including
date code located on the white sidewall side of the tire.
Look for the TIN on the outboard side of black sidewall
tires as mounted on the vehicle. If the TIN is not found on
the outboard side then you will find it on the inboard side
of the tire.EXAMPLE:
DOT MA L9 ABCD 0301
DOT= Department of Transportation
—This symbol certifies that the tire is in com-
pliance with the U.S. Department of Transportation
tire safety standards, and is approved for highway
use.
MA= Code representing the tire manufacturing loca-
tion. (2 digits)
L9= Code representing the tire size. (2 digits)
ABCD= Code used by tire manufacturer. (1 to 4 dig-
its)
03= Number representing the week in which the tire
was manufactured. (2 digits)
—03 means the 3rd week.
01= Number representing the year in which the tire
was manufactured. (2 digits)
—01 means the year 2001.
—Prior to July 2000, tire manufacturers were
only required to have 1 number to represent the year
in which the tire was manufactured. Example: 031
could represent the 3rd week of 1981 or 1991.
274 IF YOU NEED CONSUMER ASSISTANCE
Page 275 of 296
Tire Loading and Tire Pressure
Tire Placard Location
NOTE:
Some vehicles have a “Tire and Loading Infor-
mation” placard located on the driver’s side “B” pillar.
Tire and Loading Information Placard
This placard tells you important information about:
1. the number of people that can be carried in the vehicle
2. the total weight your vehicle can carry
3. the tire size designed for your vehicle
4. the cold tire inflation pressures for the front, rear and
spare tires.
IF YOU NEED CONSUMER ASSISTANCE 275
9