2006 CHEVROLET UPLANDER radio controls
[x] Cancel search: radio controlsPage 152 of 458

Engine Coolant Temperature Gage..................3-40
Malfunction Indicator Lamp.............................3-41
Oil Pressure Light.........................................3-44
Security Light...............................................3-45
Cruise Control Light......................................3-45
Highbeam On Light.......................................3-45
Fuel Gage...................................................3-45
Low Fuel Warning Light.................................3-46
Driver Information Center (DIC).......................3-46
DIC Operation and Displays...........................3-47
DIC Warnings and Messages.........................3-53
DIC Vehicle Personalization (Uplevel Only).......3-69Audio System(s).............................................3-77
Setting the Time...........................................3-78
Radio with CD..............................................3-79
Rear Seat Entertainment System....................3-98
Rear Seat Audio (RSA)................................3-111
Theft-Deterrent Feature................................3-113
Audio Steering Wheel Controls......................3-114
Radio Reception.........................................3-115
Care of Your CDs and DVDs........................3-115
Care of the CD and DVD Player...................3-116
Fixed Mast Antenna....................................3-116
XM™ Satellite Radio Antenna System............3-116
Chime Level Adjustment...............................3-116
Section 3 Instrument Panel
3-2
ProCarManuals.com
Page 172 of 458
If an object is detected at a REVERSE (R) speed of
less than 3 mph (5 km/h), one of the following will occur:
Description English Metric
amber light 5 ft 1.5 m
amber/amber lights 40 in 1.0 m
amber/amber/red lights &
continuous chime20 in 0.5 m
amber/amber/red lights
�ashing & continuous
chime1 ft 0.3 m
A chime will sound the �rst time an object is detected
between 20 inches (0.5 m) and 5 feet (1.5 m) away.
URPA cannot detect objects that are above liftgate level.
In order for the rear sensors to recognize an object, it
must be within detection range behind the vehicle.
When the System Does Not Seem to Work
Properly
The light may �ash red when the vehicle is in
REVERSE (R) if the ultrasonic sensors are not kept
clean. So be sure to keep your rear bumper free of mud,
dirt, snow, ice and slush. Other conditions that may affect
system performance include things like the vibrations
from a jackhammer or the compression of air brakes on a
very large truck. If after cleaning the rear bumper and
then driving forward at least 15 mph (25 km/h), the
display continues to �ash red, see your dealer.If a trailer was attached to your vehicle, or a bicycle or
an object was on the back of, or hanging out of your
liftgate during your last drive cycle, the light may
also �ash red. The light will continue to �ash whenever
in REVERSE (R) until your vehicle is driven forward
at least 15 mph (25 km/h) without any obstructions
behind the vehicle.
Accessory Power Outlet(s)
Your vehicle may be equipped with a front accessory
power outlet located below the climate controls on
the instrument panel. It can be used to plug in electrical
equipment such as a cellular telephone or CB radio.
Pull the cover down to use the accessory power outlet.
When not in use, keep the cover on.
The rear accessory power outlet is located on the rear
compartment on the driver’s side.
To remove the cover, pull the tab on the cover and pull
it off. To put the cover back on, line up the tabs at
the back of the cover and put the cover in place. Push
down the tab to secure the cover. When not in use,
always cover the rear accessory power outlet with the
protective cap.
3-22
ProCarManuals.com
Page 227 of 458
Exiting the Personal Program Menu
The personal program menu will be exited when any of
the following occurs:
The vehicle is shifted out of PARK (P).
The vehicle is no longer in RUN.
The end of the personal program menu is reached.
Audio System(s)
Determine which radio your vehicle has and then read
the pages following to familiarize yourself with its
features.
Driving without distraction is a necessity for a safer
driving experience. SeeDefensive Driving on page 4-2.
By taking a few moments to read this manual and
get familiar with your vehicle’s audio system, you can
use it with less effort, as well as take advantage of
its features. While your vehicle is parked, set up your
audio system by presetting your favorite radio stations,
setting the tone and adjusting the speakers. Then,
when driving conditions permit, you can tune to your
favorite stations using the presets and steering
wheel controls (if equipped).
{CAUTION:
This system provides you with a far greater
access to audio stations and song listings.
Giving extended attention to entertainment
tasks while driving can cause a crash and you
or others can be injured or killed. Always keep
your eyes on the road and your mind on the
drive — avoid engaging in extended searching
while driving.
Keeping your mind on the drive is important for safe
driving. For more information, seeDefensive Driving on
page 4-2. Get familiar with your vehicle’s audio
system so you can use it with less effort and take full
advantage of its features.
3-77
ProCarManuals.com
Page 228 of 458

Here are some ways in which you can help avoid
distraction while driving.
While your vehicle is parked:
Familiarize yourself with all of its controls.
Familiarize yourself with its operation.
Set up your audio system by presetting your
favorite radio stations, setting the tone, and
adjusting the speakers. Then, when driving
conditions permit, you can tune to your favorite
radio stations using the presets and steering wheel
controls (if equipped).
Notice:Before adding any sound equipment to
your vehicle, such as an audio system, CD player,
CB radio, mobile telephone, or two-way radio, make
sure that it can be added by checking with your
dealer. Also, check federal rules covering mobile
radio and telephone units. If sound equipment can
be added, it is very important to do it properly.
Added sound equipment may interfere with
the operation of your vehicle’s engine, radio, or
other systems, and even damage them. Your
vehicle’s systems may interfere with the operation
of sound equipment that has been added.Your vehicle has a feature called Retained Accessory
Power (RAP). With RAP, the audio system can be
played even after the ignition is turned off. SeeRetained
Accessory Power (RAP) on page 2-31for more
information.Setting the Time
Press the H or the M button to enter clock mode.
Press and hold H until the correct hour appears on the
display. Press and hold M until the correct minute
appears on the display.
To change the time default setting from 12 hour to
24 hour, press either the H or the M button to enter the
clock mode, then press the tune knob to select
between the 12 or 24 hour display format. The clock
mode will automatically time out with the changed
display format set as the current default setting.
3-78
ProCarManuals.com
Page 232 of 458
Setting the Tone (Bass/Treble)
e
(Bass/Treble/Midrange):Press this knob to select
BASS, MIDRANGE, or TREBLE. Turn the knob to
increase or to decrease. If a station is weak or noisy,
decrease the treble.
To adjust the bass, midrange, and treble to the middle
position, press and hold this knob when the tone
control is on the display. The level will change to the
middle position.
To adjust all tone and speaker controls to the middle
position, press and hold this knob when no tone
or speaker control is displayed. AUDIO SETTINGS
CENTERED will appear on the display.
AUTO EQ (Automatic Equalization):Press this button
to select customized equalization settings designed
for country/western, jazz, talk, pop, rock, and classical.
Selecting CUSTOM or changing bass or treble,
returns the EQ to the manual bass and treble settings.
The radio will save separate AUTO EQ settings for
each preset and source.
Adjusting the Speakers (Balance/Fade)
e
(Balance/Fade):To adjust the balance between
the right and the left speakers, press this knob until
BALANCE appears on the display. Turn the knob
to move the sound toward the right or the left speakers.
To adjust the fade between the front and the rear
speakers, press this knob until FADE appears on the
display. Turn the knob to move the sound toward
the front or the rear speakers.
To adjust the balance and fade to the middle position,
press and hold this knob when the speaker control is on
the display. The level will change to the middle
position.
To adjust all tone and speaker controls to the middle
position, press and hold this knob when no tone
or speaker control is displayed. AUDIO SETTINGS
CENTERED will appear on the display.
3-82
ProCarManuals.com
Page 253 of 458

DVD Player Buttons
cY(Stop/Eject):Press and release this button to
stop playing, rewinding, or fast forwarding.
Press this button twice to eject a disc. If the player is
already stopped, then only press this button once.
O(Power):Press this button to turn the DVD player
on and off.
AUX (Auxiliary):Press this button to switch the system
between the DVD player and an auxiliary device.
s(Play/Pause):Press this button to start play of a
disc. Press this button while a disc is playing to
pause it. Press it again to continue play of a disc.
tr/[u(Previous and Fast Reverse/Next
and Fast Forward):These controls can be used
to move forward or backward through a disc.
These buttons can also be used to modify RSA, rear
temperature, rear fan speed, and wired headphone
volume adjustment. See “Headphones” earlier in this
section,Rear Seat Audio (RSA) on page 3-111,
andRear Climate Control System on page 3-27for
more information.
When a DVD is playing in the DVD player and the RSA
system is on, the stop/eject and play/pause buttons
are the only buttons that will work.
Playing a Disc
To play a disc, gently insert the disc, with the label side
up, into the loading slot. The DVD player will continue
loading the disc and the player will automatically start if
the vehicle is in ACCESSORY, ON, or RAP.
If a disc is already in the player, make sure that the
DVD player is on, then press the play/pause button on
the player faceplate or on the remote control. You
can also, press the CD AUX button on the radio
faceplate, until RSE appears on the display, to start
playing a disc.
3-103
ProCarManuals.com
Page 261 of 458
DVD Distortion
There may be an experience with video distortion when
operating cellular phones, scanners, CB radios,
Global Position Systems (GPS)*, two-way radios, mobile
fax, or walkie talkies.
It may be necessary to turn off the DVD player when
operating one of these devices in or near the vehicle.
*Excludes the OnStar
®System.
Cleaning the DVD Player
When cleaning the outside DVD faceplate and buttons,
use only a clean cloth dampened with clean water.
Cleaning the Video Screen
When cleaning the video screen, use only a clean cloth
dampened with clean water. Use care when directly
touching or cleaning the screen, as damage may result.
Rear Seat Audio (RSA)
If your vehicle has rear seat audio (RSA), this feature
allows rear seat passengers to listen to and control any of
the following audio sources: AM/FM tuner, front CD
player, and XM™ Satellite Radio Service (if equipped).
However, the rear seat passengers can only control the
sources that the front seat passengers are not listening
to. For example, rear seat passengers may listen to a CD
in the front radio and control it while the driver listens to
the radio through the front speakers. The rear seat
passengers have control of the volume for each set of
headphones.
The front seat audio controls always have priority over
the RSA controls. If the front seat passengers switch
the source for the main radio to a remote source,
the RSA will not be able to control the remote source.
You can operate the RSA when the main radio is off.
The DVD or auxiliary device will always be available on
channel (CHA or CH1) of the wireless headphones.
All other RSA sources are available on CHB or CH2 of
the wireless headphones, as well as the wired
headphones. If the RSA is off, the wired headphones
will provide DVD or auxiliary device audio. The rear seat
passengers will not be able to listen to XM, on CHB
or CH2, if the front passenger is listening to a DVD or
auxiliary device.
3-111
ProCarManuals.com
Page 264 of 458
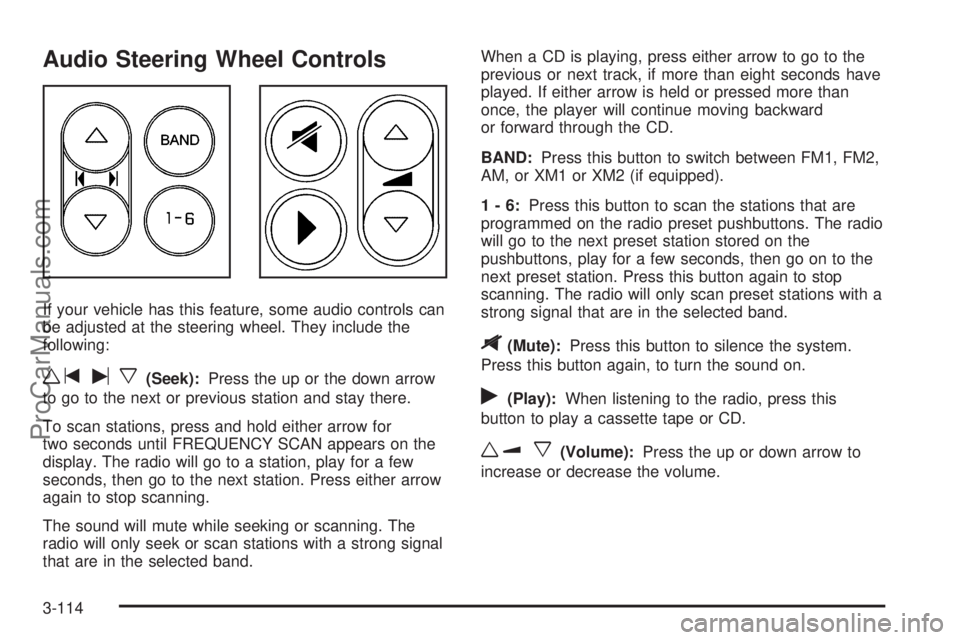
Audio Steering Wheel Controls
If your vehicle has this feature, some audio controls can
be adjusted at the steering wheel. They include the
following:
wtux(Seek):Press the up or the down arrow
to go to the next or previous station and stay there.
To scan stations, press and hold either arrow for
two seconds until FREQUENCY SCAN appears on the
display. The radio will go to a station, play for a few
seconds, then go to the next station. Press either arrow
again to stop scanning.
The sound will mute while seeking or scanning. The
radio will only seek or scan stations with a strong signal
that are in the selected band.When a CD is playing, press either arrow to go to the
previous or next track, if more than eight seconds have
played. If either arrow is held or pressed more than
once, the player will continue moving backward
or forward through the CD.
BAND:Press this button to switch between FM1, FM2,
AM, or XM1 or XM2 (if equipped).
1-6:Press this button to scan the stations that are
programmed on the radio preset pushbuttons. The radio
will go to the next preset station stored on the
pushbuttons, play for a few seconds, then go on to the
next preset station. Press this button again to stop
scanning. The radio will only scan preset stations with a
strong signal that are in the selected band.
$(Mute):Press this button to silence the system.
Press this button again, to turn the sound on.
r(Play):When listening to the radio, press this
button to play a cassette tape or CD.
wux(Volume):Press the up or down arrow to
increase or decrease the volume.
3-114
ProCarManuals.com