2006 CHEVROLET UPLANDER reset
[x] Cancel search: resetPage 231 of 458
Finding a Station
BAND:Press this button to switch between FM1, FM2,
AM, or XM1 or XM2 (if equipped). The display will
show the selection.
O/e(Tune):Turn this knob to select radio
stations.
tSEEKu:Press the right or the left arrow to go to
the next or to the previous station and stay there.
The radio will only seek stations with a strong signal
that are in the selected band.
tSCANu:Press and hold either arrow for
two seconds until FREQUENCY SCAN appears on
the display. The radio will go to a station, play for a
few seconds, then go on to the next station. Press
either arrow again to stop scanning.
To scan preset stations, press and hold either arrow
for four seconds until PRESET SCAN appears on
the display. The radio will go to the next preset station,
play for a few seconds, then go on to the next preset
station. Press either scan arrow again or one of
the pushbuttons to stop scanning presets.
The radio will only scan stations with a strong signal
that are in the selected band.
Setting Preset Stations
Up to 30 stations (six FM1, six FM2, and six AM,
six XM1 and six XM2 (if equipped)), can be programmed
on the six numbered pushbuttons, by performing the
following steps:
1. Turn the radio on.
2. Press BAND to select FM1, FM2, AM, or
XM1 or XM2.
3. Tune in the desired station.
4. Press AUTO EQ to select the equalization.
5. Press and hold one of the six numbered
pushbuttons until you hear a beep. Whenever that
numbered pushbutton is pressed, the station
that was set will return and the equalization that
was selected will be stored for that pushbutton.
6. Repeat the steps for each pushbutton.
3-81
ProCarManuals.com
Page 232 of 458
Setting the Tone (Bass/Treble)
e
(Bass/Treble/Midrange):Press this knob to select
BASS, MIDRANGE, or TREBLE. Turn the knob to
increase or to decrease. If a station is weak or noisy,
decrease the treble.
To adjust the bass, midrange, and treble to the middle
position, press and hold this knob when the tone
control is on the display. The level will change to the
middle position.
To adjust all tone and speaker controls to the middle
position, press and hold this knob when no tone
or speaker control is displayed. AUDIO SETTINGS
CENTERED will appear on the display.
AUTO EQ (Automatic Equalization):Press this button
to select customized equalization settings designed
for country/western, jazz, talk, pop, rock, and classical.
Selecting CUSTOM or changing bass or treble,
returns the EQ to the manual bass and treble settings.
The radio will save separate AUTO EQ settings for
each preset and source.
Adjusting the Speakers (Balance/Fade)
e
(Balance/Fade):To adjust the balance between
the right and the left speakers, press this knob until
BALANCE appears on the display. Turn the knob
to move the sound toward the right or the left speakers.
To adjust the fade between the front and the rear
speakers, press this knob until FADE appears on the
display. Turn the knob to move the sound toward
the front or the rear speakers.
To adjust the balance and fade to the middle position,
press and hold this knob when the speaker control is on
the display. The level will change to the middle
position.
To adjust all tone and speaker controls to the middle
position, press and hold this knob when no tone
or speaker control is displayed. AUDIO SETTINGS
CENTERED will appear on the display.
3-82
ProCarManuals.com
Page 236 of 458
XM™ Radio Messages (cont’d)
Radio Display
MessageCondition Action Required
CH Off Air Channel not in service This channel is not currently in service. Tune to another
channel.
CH Unavail Channel no longer
availableThis previously assigned channel is no longer assigned.
Tune to another station. If this station was one of the
presets, choose another station for that preset button.
No Info Artist Name/Feature not
availableNo artist information is available at this time on this
channel. The system is working properly.
No Info Song/Program Title not
availableNo song title information is available at this time on this
channel. The system is working properly.
No Info Category Name not
availableNo category information is available at this time on this
channel. The system is working properly.
No Info No Text/Informational
message availableNo text or informational messages are available at this
time on this channel. The system is working properly.
Not Found No channel available for
the chosen categoryThere are no channels available for the selected category.
The system is working properly.
XM Locked Theft lock active The XM™ receiver in the vehicle may have previously
been in another vehicle. For security purposes, XM™
receivers cannot be swapped between vehicles. If this
message is received after having your vehicle serviced,
check with your GM dealer.
3-86
ProCarManuals.com
Page 240 of 458
To insert multiple CDs, do the following:
1. Turn the ignition on.
2. Press and hold the load button for two seconds.
You will hear a beep and LOAD ALL DISC will
appear on the display.
3. When INSERT CD # appears on the display, load a
CD. Insert the CD partway into the slot, label side
up. The player will pull the CD in.
Once the CD is loaded, wait for INSERT CD # to
appear on the display, then load the next CD.
The CD player takes up to six CDs. Do not try to
load more than six.
To load more than one CD but less than six, complete
Steps 1 through 3. When �nished loading CDs,
press the load button to cancel the loading function.
The radio will begin to play the last CD loaded.
If more than one CD has been loaded, a number for
each CD will appear on the display.
Playing a Speci�c Loaded CD
For every CD loaded, a number will appear on the
display. To play a speci�c CD press the numbered
pushbutton that corresponds to the CD.
If an error appears on the display, see “CD Messages”
later in this section.
X(Eject):Press this button to eject CD(s).
To eject the CD that is currently playing, press and
release this button.
To eject multiple CDs, do the following:
1. Press and hold the eject button for two seconds.
You will hear a beep and EJECT ALL DISCS will
appear on the display.
2. When REMOVE DISC appears on the display, the
CD will eject and can be removed.
To stop ejecting the CDs, press the load or the
eject button.
If the CD is not removed, after 25 seconds, the CD will
be automatically pulled back into the player. If CD is
pushed back into the player, before the 25 second time
period is complete, the player will sense an error
and will try to eject the CD several times before
stopping.
Do not repeatedly press the eject button to eject a CD
after you have tried to push it in manually. The
player’s 25-second eject timer will reset at each press of
eject, causing the player to not eject the CD until the
25-second time period has elapsed.
O/e(Tune):Turn this knob to go to the next or
previous track.
3-90
ProCarManuals.com
Page 262 of 458

The remote control will not operate any of the RSA
features.
RSA
O(Power):Press this button to turn the RSA
system on or off. RSA CHB or RSA CH2 will appear on
the display when the system is on to indicate the
channel to receive audio for the wireless headphones.
Pressing this button will also silence the rear speakers.BAND:Press this button to switch between FM1, FM2,
AM, or XM1 or XM2 (if equipped). The selected radio
station will appear on the display. If the front passengers
are listening to the radio, the RSA will not switch
between the bands and cannot change the station.
tr/[u(Tune):When listening to the radio,
press the right or the left arrow to go to the next or the
previous station and stay there. This function is
inactive if the front seat passengers are listening to
the radio.
When a CD is playing, press the left arrow to go to the
start of the current track or to the previous track.
Press the right arrow to go to the next track on the CD.
This function is inactive if the front seat passengers
are listening to a CD.
PROG (Program):Press this button to select the next
preset station stored on the radio. Each press of
this button will take you to the next preset station. This
function is inactive if the front seat passengers are
listening to the radio.
3-112
ProCarManuals.com
Page 264 of 458
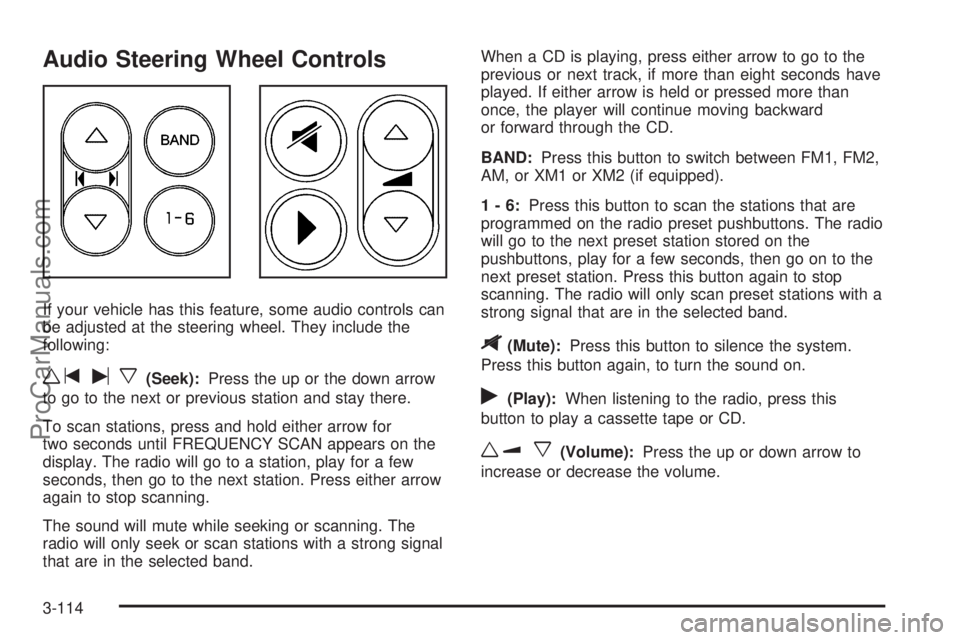
Audio Steering Wheel Controls
If your vehicle has this feature, some audio controls can
be adjusted at the steering wheel. They include the
following:
wtux(Seek):Press the up or the down arrow
to go to the next or previous station and stay there.
To scan stations, press and hold either arrow for
two seconds until FREQUENCY SCAN appears on the
display. The radio will go to a station, play for a few
seconds, then go to the next station. Press either arrow
again to stop scanning.
The sound will mute while seeking or scanning. The
radio will only seek or scan stations with a strong signal
that are in the selected band.When a CD is playing, press either arrow to go to the
previous or next track, if more than eight seconds have
played. If either arrow is held or pressed more than
once, the player will continue moving backward
or forward through the CD.
BAND:Press this button to switch between FM1, FM2,
AM, or XM1 or XM2 (if equipped).
1-6:Press this button to scan the stations that are
programmed on the radio preset pushbuttons. The radio
will go to the next preset station stored on the
pushbuttons, play for a few seconds, then go on to the
next preset station. Press this button again to stop
scanning. The radio will only scan preset stations with a
strong signal that are in the selected band.
$(Mute):Press this button to silence the system.
Press this button again, to turn the sound on.
r(Play):When listening to the radio, press this
button to play a cassette tape or CD.
wux(Volume):Press the up or down arrow to
increase or decrease the volume.
3-114
ProCarManuals.com
Page 330 of 458

If you are in an area of extreme cold, where the
temperature falls below−20°F (−29°C), it is
recommended that you use either an SAE 5W-30
synthetic oil or an SAE 0W-30 oil. Both will provide
easier cold starting and better protection for your engine
at extremely low temperatures.
Engine Oil Additives
Do not add anything to your oil. The recommended oils
with the starburst symbol meet GM Standard GM6094M
are all you will need for good performance and engine
protection.
Engine Oil Life System
When to Change Engine Oil
Your vehicle has a computer system that lets you know
when to change the engine oil and �lter. This is
based on engine revolutions and engine temperature,
and not on mileage. Based on driving conditions,
the mileage at which an oil change will be indicated can
vary considerably. For the oil life system to work
properly, you must reset the system every time the oil is
changed.When the system has calculated that oil life has been
diminished, it will indicate that an oil change is
necessary. A CHANGE OIL SOON message will come
on. SeeDIC Warnings and Messages on page 3-53.
Change your oil as soon as possible within the next
600 miles (1 000 km). It is possible that, if you are
driving under the best conditions, the oil life system may
not indicate that an oil change is necessary for over a
year. However, your engine oil and �lter must be
changed at least once a year and at this time the system
must be reset. Your dealer has GM-trained people
who will perform this work using genuine GM parts and
reset the system. It is also important to check your
oil regularly and keep it at the proper level.
If the system is ever reset accidentally, you must
change your oil at 3,000 miles (5 000 km) since your
last oil change. Remember to reset the oil life system
whenever the oil is changed.
5-18
ProCarManuals.com
Page 331 of 458
How to Reset the Engine Oil Life
System
The Engine Oil Life System calculates when to change
your engine oil and �lter based on vehicle use.
Anytime your oil is changed, reset the system so it can
calculate when the next oil change is required. If a
situation occurs where you change your oil prior to a
CHANGE OIL SOON message being turned on,
reset the system.
1. With the ignition key in RUN but the engine off,
repeatedly push the set/reset button until OIL is
displayed on the Driver Information Center (DIC).
2. Once OIL is displayed, push and hold the set/reset
button for �ve seconds. The number will disappear
and be replaced by 100 (indicating 100% oil life
remaining).
3. Turn the key to LOCK.
If the CHANGE OIL SOON message comes back on
when you start your vehicle, the engine oil life system
has not reset. Repeat the procedure.
What to Do with Used Oil
Used engine oil contains certain elements that may be
unhealthy for your skin and could even cause cancer.
Do not let used oil stay on your skin for very long. Clean
your skin and nails with soap and water, or a good
hand cleaner. Wash or properly dispose of clothing or
rags containing used engine oil. See the manufacturer’s
warnings about the use and disposal of oil products.
Used oil can be a threat to the environment. If you
change your own oil, be sure to drain all the oil from the
�lter before disposal. Never dispose of oil by putting it
in the trash, pouring it on the ground, into sewers, or into
streams or bodies of water. Instead, recycle it by
taking it to a place that collects used oil. If you have a
problem properly disposing of your used oil, ask
your dealer, a service station, or a local recycling center
for help.
5-19
ProCarManuals.com