Page 443 of 534

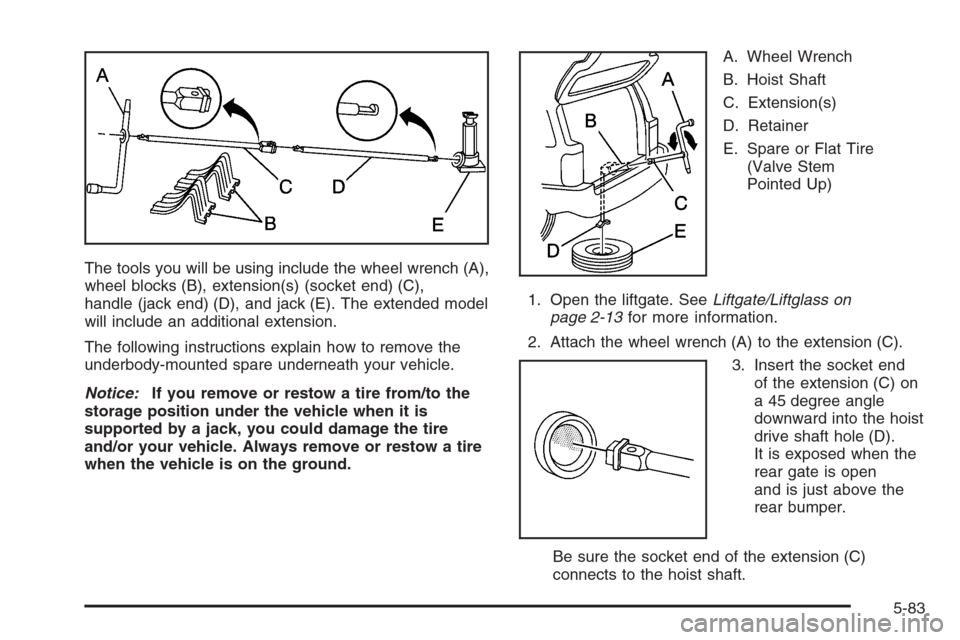
The tools you will be using include the wheel wrench (A),
wheel blocks (B), extension(s) (socket end) (C),
handle (jack end) (D), and jack (E). The extended model
will include an additional extension.
The following instructions explain how to remove the
underbody-mounted spare underneath your vehicle.
Notice:If you remove or restow a tire from/to the
storage position under the vehicle when it is
supported by a jack, you could damage the tire
and/or your vehicle. Always remove or restow a tire
when the vehicle is on the ground.A. Wheel Wrench
B. Hoist Shaft
C. Extension(s)
D. Retainer
E. Spare or Flat Tire
(Valve Stem
Pointed Up)
1. Open the liftgate. SeeLiftgate/Liftglass on
page 2-13for more information.
2. Attach the wheel wrench (A) to the extension (C).
3. Insert the socket end
of the extension (C) on
a 45 degree angle
downward into the hoist
drive shaft hole (D).
It is exposed when the
rear gate is open
and is just above the
rear bumper.
Be sure the socket end of the extension (C)
connects to the hoist shaft.
5-83
Page 444 of 534
4. Turn the wheel wrench counterclockwise to lower
the spare tire. Keep turning the wheel wrench until
the spare tire can be pulled out from under the
vehicle.
If the spare tire does not lower to the ground, the
secondary latch is engaged causing the tire
not to lower. SeeSecondary Latch System on
page 5-91for more information.5. Tilt the retainer at the end of the cable when the
tire has been completely lowered, and pull it
through the wheel opening.
6. Pull the tire out from under the vehicle.
Notice:If you drive away before the spare tire or
secondary latch system cable has been reinstalled,
you could damage your vehicle. Always reinstall
this cable before driving your vehicle.
7. Put the spare tire near the �at tire.
5-84
Page 445 of 534
Removing the Flat Tire and
Installing the Spare Tire
1. If your vehicle has a hubcap that covers the wheel
nuts, position the chisel end of the wheel wrench in
the notch and pry it off.2. Using the wheel
wrench, loosen all the
wheel nuts. Do not
remove them yet.
3. Turn the jack adjusting knob clockwise by hand to
raise the jack lift head.
4. Place the handle, extension and wheel wrench onto
the jack.
5-85
Page 447 of 534
{CAUTION:
Raising your vehicle with the jack improperly
positioned can damage the vehicle and even
make the vehicle fall. To help avoid personal
injury and vehicle damage, be sure to �t the
jack lift head into the proper location before
raising the vehicle.
6. Raise the vehicle by turning the jack handle
clockwise. Raise the vehicle far enough off the
ground so there is enough room for the spare
tire to �t.
5-87
Page 448 of 534
7. Remove all the wheel
nuts and take off the
�at tire.
{CAUTION:
Rust or dirt on the wheel, or on the parts to
which it is fastened, can make the wheel nuts
become loose after a time. The wheel could
come off and cause an accident. When you
change a wheel, remove any rust or dirt from
the places where the wheel attaches to the
vehicle. In an emergency, you can use a cloth
or a paper towel to do this; but be sure to use
a scraper or wire brush later, if needed, to get
all the rust or dirt off.
8. Remove any rust or dirt
from the wheel bolts,
mounting surfaces
and spare wheel.
5-88
Page 449 of 534
9. Place the spare tire on the wheel-mounting surface.
{CAUTION:
Never use oil or grease on studs or nuts. If
you do, the nuts might come loose. Your wheel
could fall off, causing a serious accident.
10. Put the nuts on by hand. Make sure the rounded
end is toward the wheel.
11. Tighten each nut by hand until the wheel is held
against the hub. If a nut cannot be turned by
hand, use the wheel wrench and see your dealer
as soon as possible.12. Lower the vehicle by turning the jack handle
counterclockwise. Lower the jack completely.
5-89
Page 451 of 534

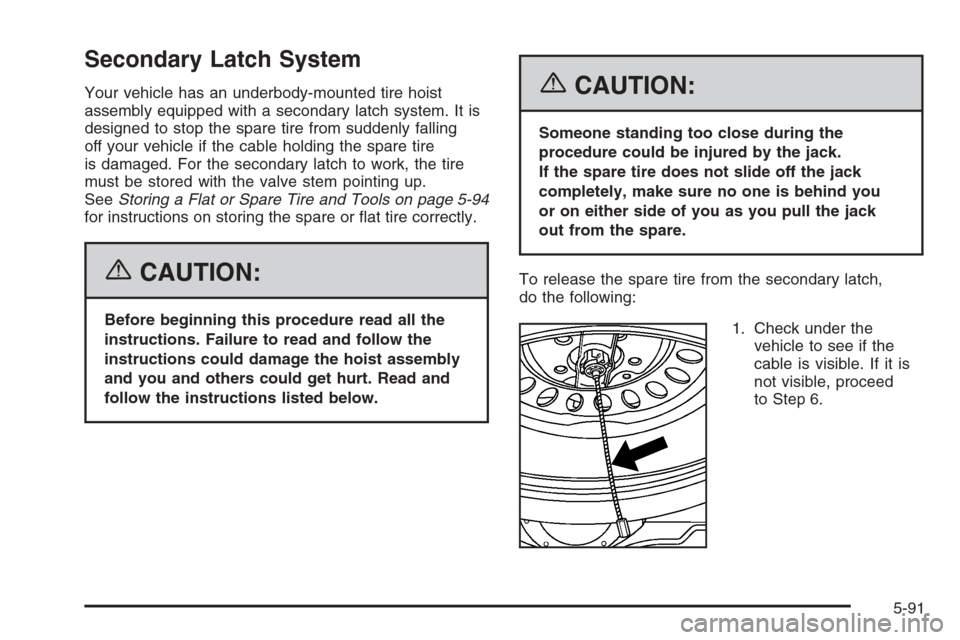
Secondary Latch System
Your vehicle has an underbody-mounted tire hoist
assembly equipped with a secondary latch system. It is
designed to stop the spare tire from suddenly falling
off your vehicle if the cable holding the spare tire
is damaged. For the secondary latch to work, the tire
must be stored with the valve stem pointing up.
SeeStoring a Flat or Spare Tire and Tools on page 5-94
for instructions on storing the spare or �at tire correctly.
{CAUTION:
Before beginning this procedure read all the
instructions. Failure to read and follow the
instructions could damage the hoist assembly
and you and others could get hurt. Read and
follow the instructions listed below.
{CAUTION:
Someone standing too close during the
procedure could be injured by the jack.
If the spare tire does not slide off the jack
completely, make sure no one is behind you
or on either side of you as you pull the jack
out from the spare.
To release the spare tire from the secondary latch,
do the following:
1. Check under the
vehicle to see if the
cable is visible. If it is
not visible, proceed
to Step 6.
5-91
Page 452 of 534
2. If visible, �rst try to tighten the cable by turning
the wheel wrench clockwise until you hear
two clicks or feel it skip twice. You cannot
overtighten the cable.
3. Loosen the cable by turning the wheel wrench
counterclockwise three or four turns.
4. Repeat this procedure at least two times.
If the spare tire lowers to the ground, continue with
Step 2 ofRemoving the Spare Tire and Tools on
page 5-82.
5. Turn the wrench counterclockwise until
approximately 6 inches (15 cm) of cable is exposed.
6. Attach the jack handle, extension(s) and the wheel
wrench to the jack and place it under the vehicle
towards the front of the rear bumper. Position
the center lift point of the jack under the center of
the spare tire.
7. Turn the wrench clockwise to raise the jack until it
lifts the end �tting.
5-92