2006 CHEVROLET TRAIL BLAZER radio
[x] Cancel search: radioPage 211 of 534
Audio System(s)
Determine which radio your vehicle has and then read
the pages following to familiarize yourself with its
features.
Driving without distraction is a necessity for a safer
driving experience. SeeDefensive Driving on page 4-2.
By taking a few moments to read this manual and
get familiar with your vehicle’s audio system, you can
use it with less effort, as well as take advantage of
its features. While your vehicle is parked, set up your
audio system by presetting your favorite radio stations,
setting the tone, and adjusting the speakers. Then,
when driving conditions permit, you can tune to
your favorite stations using the presets and steering
wheel controls if the vehicle has them.{CAUTION:
This system provides you with a far greater
access to audio stations and song listings.
Giving extended attention to entertainment
tasks while driving can cause a crash and you
or others can be injured or killed. Always keep
your eyes on the road and your mind on the
drive — avoid engaging in extended searching
while driving.
Keeping your mind on the drive is important for safe
driving. For more information, seeDefensive Driving on
page 4-2.
3-67
Page 212 of 534
Here are some ways in which you can help avoid
distraction while driving.
While your vehicle is parked:
Familiarize yourself with all of its controls.
Familiarize yourself with its operation.
Set up your audio system by presetting your
favorite radio stations, setting the tone, and
adjusting the speakers. Then, when driving
conditions permit, you can tune to your favorite
radio stations using the presets and steering wheel
controls if the vehicle has them.
Notice:Before adding any sound equipment to
your vehicle, such as an audio system, CD player,
CB radio, mobile telephone, or two-way radio, make
sure that it can be added by checking with your
dealer. Also, check federal rules covering mobile
radio and telephone units. If sound equipment can
be added, it is very important to do it properly.
Added sound equipment may interfere with
the operation of your vehicle’s engine, radio, or
other systems, and even damage them. Your
vehicle’s systems may interfere with the operation
of sound equipment that has been added.Notice:The chime signals related to safety belts,
parking brake, and other functions of your vehicle
operate through the radio/entertainment system.
If that equipment is replaced or additional equipment
is added to your vehicle, the chimes may not
work. Make sure that replacement or additional
equipment is compatible with your vehicle before
installing it. SeeAccessories and Modifications
on page 5-3.
Your vehicle has a feature called Retained Accessory
Power (RAP). With RAP, the audio system can be
played even after the ignition is turned off. SeeRetained
Accessory Power (RAP) on page 2-20for more
information.
3-68
Page 213 of 534
Setting the Time
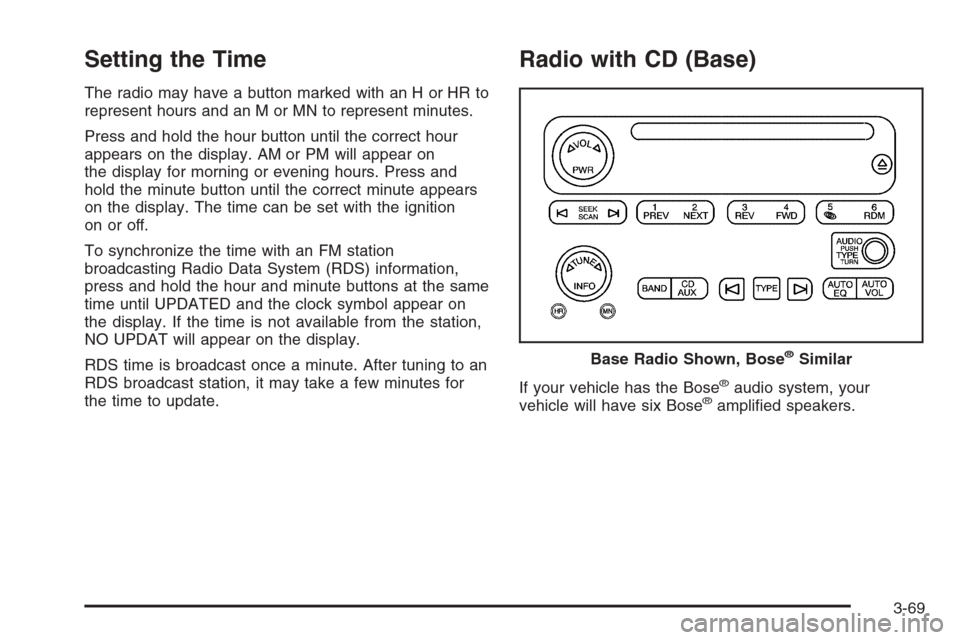
The radio may have a button marked with an H or HR to
represent hours and an M or MN to represent minutes.
Press and hold the hour button until the correct hour
appears on the display. AM or PM will appear on
the display for morning or evening hours. Press and
hold the minute button until the correct minute appears
on the display. The time can be set with the ignition
on or off.
To synchronize the time with an FM station
broadcasting Radio Data System (RDS) information,
press and hold the hour and minute buttons at the same
time until UPDATED and the clock symbol appear on
the display. If the time is not available from the station,
NO UPDAT will appear on the display.
RDS time is broadcast once a minute. After tuning to an
RDS broadcast station, it may take a few minutes for
the time to update.
Radio with CD (Base)
If your vehicle has the Bose®audio system, your
vehicle will have six Bose®ampli�ed speakers. Base Radio Shown, Bose
®Similar
3-69
Page 214 of 534
Radio Data System (RDS)
The audio system has a Radio Data System (RDS).
RDS features are available for use only on FM stations
that broadcast RDS information.
With RDS, the radio can do the following:
Seek to stations broadcasting the selected type of
programming
Receive announcements concerning local and
national emergencies
Display messages from radio stations
This system relies upon receiving speci�c information
from these stations and will only work when the
information is available. In rare cases, a radio station
may broadcast incorrect information that will cause
the radio features to work improperly. If this happens,
contact the radio station.
While the radio is tuned to an RDS station, the station
name or call letters will appear on the display instead of
the frequency. RDS stations may also provide the
time of day, a program type (PTY) for current
programming, and the name of the program being
broadcast.
XM™ Satellite Radio Service
XM™ is a satellite radio service that is based in the
48 contiguous Untied States and in Canada (if available).
XM™ offers over 100 coast to coast channels including
music, news, sports, talk, and children’s programming.
XM™ provides digital quality audio and text information
that includes song title and artist name. A service fee is
required in order to receive the XM™ service. For more
information, contact XM™ at www.xmradio.com or call
1-800-852-XMXM (9696).
Playing the Radio
PWR (Power):Press this knob to turn the system on
and off.
oVOLp(Volume):Turn this knob to increase or to
decrease the volume.
INFO (Information):When the ignition is off, press this
knob to display the time.
For RDS, press the INFO knob to change what appears
on the display while using RDS. The display options
are station name, RDS station frequency, PTY, and the
name of the program (if available).
3-70
Page 215 of 534
For XM™ (if equipped), press the INFO knob while
in XM™ mode to retrieve four different categories
of information related to the current song or channel:
Artist, Song Title, Category or PTY, Channel
Number/Channel Name.
To change the default on the display, press the INFO
knob until you see the display you want, then press and
hold the knob until you hear a beep. The selected
display will now be the default.
AUTO VOL (Automatic Volume):With automatic
volume, the audio system will adjust automatically to
make up for road and wind noise as you drive by
increasing the volume as vehicle speed increases.
Set the volume at the desired level. Press this button to
select LOW, MEDIUM, or HIGH. AVOL will appear
on the display. Each higher setting will provide more
volume compensation at faster vehicle speeds. To turn
automatic volume off, press this button until AVOL
OFF appears on the display.Finding a Station
BAND:Press this button to switch between FM1, FM2,
AM, or XM1 or XM2 (if equipped). The display will
show the selection.
TUNE:Turn this knob to select radio stations.
©SEEK¨:Press either the SEEK or the TYPE
arrows to go to the next or to the previous station and
stay there.
The radio will only seek stations with a strong signal
that are in the selected band.
©SCAN¨:Press and hold either the SCAN or the
TYPE arrows for two seconds until SCAN appears
on the display and you hear a beep. The radio will go to
a station, play for a few seconds, then go on to the
next station. Press either the SCAN or the TYPE arrows
again to stop scanning.
To scan preset stations, press and hold either the
SCAN or the TYPE arrows for more than four seconds.
PSCN will appear on the display and you will hear a
double beep. The radio will go to a preset station, play
for a few seconds, then go on to the next preset
station. Press either the SCAN or the TYPE arrows
again to stop scanning presets.
The radio will only scan stations with a strong signal
that are in the selected band.
3-71
Page 216 of 534
Setting Preset Stations
Up to 30 stations (six FM1, six FM2, and six AM,
six XM1 and six XM2 (if equipped), can be programed
on the six numbered pushbuttons, by performing
the following steps:
1. Turn the radio on.
2. Press BAND to select FM1, FM2, AM, or XM1
or XM2.
3. Tune in the desired station.
4. Press and hold one of the six numbered
pushbuttons until you hear a beep. Whenever that
numbered pushbutton is pressed, the station
that was set will return for that pushbutton.
5. Repeat the steps for each pushbutton.
To store an equalization setting to a preset station
perform the following:
1. Tune to the preset station.
2. Press and release the AUTO EQ button to select
the equalization setting.
Once the equalization no longer appears on
the display, the equalization will be set for that
preset station.
Setting the Tone
(Bass/Midrange/Treble)
AUDIO:Push and release the AUDIO knob until BASS,
MID (without Bose®), or TREB appears on the display.
Turn the knob to increase or to decrease. The display will
show the bass, midrange (without Bose
®), or treble level.
If a station is weak or noisy, decrease the treble.
To adjust the bass, midrange (without Bose
®), or treble to
the middle position while it is displayed, push and hold
the AUDIO knob. The radio will produce one beep and
adjust the display level to the middle position.
To adjust all tone and speaker controls to the middle
position, push and hold the AUDIO knob when no tone or
speaker control is displayed. ALL CENTERED will appear
on the display, you will hear a beep, and the display level
will be adjusted to the middle position.
AUTO EQ (Automatic Equalization):Press this button
to select customized equalization settings designed
for country/western, jazz, talk, pop, rock, and classical.
Selecting CUSTOM or adjusting the tone controls,
returns the EQ to the manual mode.
The radio will save separate AUTO EQ settings for each
preset and source.
If the radio is equipped with the Bose
®audio system,
the AUTO EQ settings are either CUSTOM or TALK.
3-72
Page 217 of 534
Adjusting the Speakers (Balance/Fade)
AUDIO:To adjust the balance between the right
and the left speakers, push and release the AUDIO
knob until BAL appears on the display. Turn the knob to
move the sound toward the right or the left speakers.
To adjust the fade between the front and the rear
speakers, push and release the AUDIO knob until FADE
appears on the display. Turn the knob to move the
sound toward the front or the rear speakers.
To adjust the balance or fade to the middle position
while it is displayed, push the AUDIO knob and hold it
until the radio produces one beep. The balance or
fade will be adjusted to the middle position.
To adjust all tone and speaker controls to the middle
position, push and hold the AUDIO knob when no tone
or speaker control is displayed. ALL CENTERED will
appear on the display, you will hear a beep, and
the display level will be adjusted to the middle position.
Finding a Program Type (PTY) Station
(RDS and XM™)
To select and �nd a desired PTY perform the following:
1. Press the TYPE button to activate program type
select mode. TYPE and a PTY will appear on the
display.
2. Turn the TYPE knob or press and release the
TYPE button to select a PTY.
3. Once the desired PTY is displayed, press and
release either the TYPE or the SEEK arrows to
select and to take you to the PTY’s �rst station.
4. To go to another station within that PTY, press the
TYPE button then, press either the TYPE or the
SEEK arrows once.
5. Press either the TYPE or the SEEK arrows twice to
exit program type select mode.
If the radio cannot �nd the desired program type, NONE
will appear on the display and the radio will return to
the last station you were listening to.
3-73
Page 218 of 534
SCAN:Scan the stations within a PTY by performing
the following:
1. Press the TYPE button to activate program type
select mode. TYPE and the last selected PTY will
appear on the display.
2. Turn the TYPE knob or press and release the
TYPE button to select a PTY.
3. Once the desired PTY is displayed, press and
hold either the TYPE or the SCAN arrows for
two seconds, and the radio will begin scanning
the stations in the PTY.
4. Press either the TYPE or the SCAN arrows to stop
scanning.
BAND (Alternate Frequency):Alternate frequency
allows the radio to switch to a stronger station with the
same program type. To turn alternate frequency on,
press and hold BAND for two seconds. AF ON will
appear on the display. The radio may switch to stations
with a stronger frequency.
To turn alternate frequency off, press and hold BAND
again for two seconds. AF OFF will appear on the
display. The radio will not switch to other stations.
This function does not apply for XM™ Satellite Radio
Service.Setting Preset PTYs (RDS Only)
These buttons have factory PTY presets. Up to
12 PTYs (six FM1 and six FM2), can be programmed on
the six numbered pushbuttons, by performing the
following steps:
1. Press BAND to select FM1 or FM2.
2. Press the TYPE button to activate program type
select mode. TYPE and the last selected PTY will
appear on the display.
3. Turn the TYPE knob or press and release the
TYPE button to select a PTY.
4. Press and hold one of the six numbered pushbuttons
until you hear a beep. Whenever that numbered
pushbutton is pressed (while in program type mode),
the PTY that was set will return.
5. Repeat the steps for each pushbutton.
3-74