Page 15 of 540
Rear Seats
Rear Seat Operation
Entering or Exiting the Third Row
Seats
Regular Models
If your vehicle has the 60/40 Split Bench seat in the
second row, you must �ip and fold the second row
seat following the instructions later in this section. See
60/40 Split Bench Seat (Second Row) on page 1-11.
To exit the third row seat with no assistance, do
the following:
1. Reach over the second
row seat and pull up on
the strap loop located
in the center of the
seat where the
seatback and the seat
cushion meet. Then
pull the seat cushion up
and push it forward.
2. Next, push the seatback forward until it is �at with
the �oor.
{CAUTION:
If the seatback is not locked, it could move
forward in a sudden stop or crash. That could
cause injury to the person sitting there. Always
push and pull on the seatback to be sure it is
locked.
Return the seat to the normal seating position when
�nished. Push and pull on the seatback to make sure it
is locked in place.
1-9
Page 16 of 540

Extended Models
The passenger’s side of both the second row 60/40 split
bench seat and the second row bucket seat has an
easy entry/exit feature. This makes it easy to get in and
out of the third row seat.
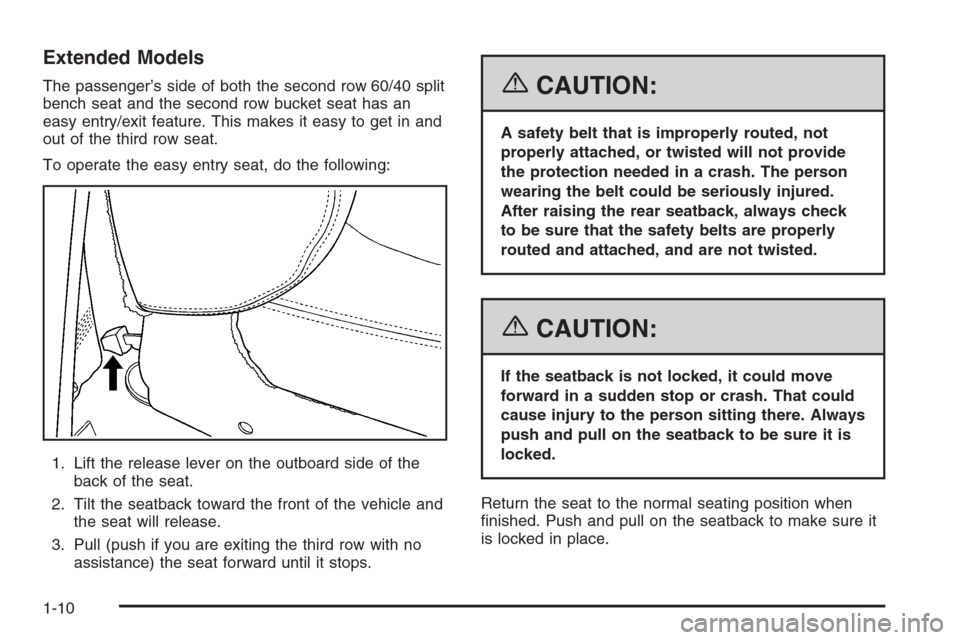
To operate the easy entry seat, do the following:
1. Lift the release lever on the outboard side of the
back of the seat.
2. Tilt the seatback toward the front of the vehicle and
the seat will release.
3. Pull (push if you are exiting the third row with no
assistance) the seat forward until it stops.{CAUTION:
A safety belt that is improperly routed, not
properly attached, or twisted will not provide
the protection needed in a crash. The person
wearing the belt could be seriously injured.
After raising the rear seatback, always check
to be sure that the safety belts are properly
routed and attached, and are not twisted.
{CAUTION:
If the seatback is not locked, it could move
forward in a sudden stop or crash. That could
cause injury to the person sitting there. Always
push and pull on the seatback to be sure it is
locked.
Return the seat to the normal seating position when
�nished. Push and pull on the seatback to make sure it
is locked in place.
1-10
Page 17 of 540
60/40 Split Bench Seat
(Second Row)
If your vehicle has a 60/40 split bench, the seats can be
�ipped and folded for additional cargo space.
Flip and Fold Feature
To �ip and fold the seat, do the following:
1. Make sure that there is nothing under or in front of
the seat.
2. Make sure that the headrests are completely
lowered or removed.
On regular models, the rear seatbacks may be
equipped with rearward folding headrests. When the
seatback is being folded forward, the head rest
will automatically fold rearward.On extended models, the headrests need to be
removed and stored. To do this, push the button at
the base of the head rest, and pull the head rest
out from the seatback. Slide the head rest pins into
the holes on the top of the seat cushion.
3. Pull up on the strap
loop located at the rear
of the seat cushion
and �ip the seat
cushion forward.
1-11
Page 31 of 540
{CAUTION:
If the seatback is not locked, it could move
forward in a sudden stop or crash. That could
cause injury to the person sitting there. Always
push and pull on the seatback to be sure it is
locked.
6. Push and pull on the seatback to make sure it
is locked.
Bucket Seats (Second Row)
If your vehicle has bucket seats, the seatbacks can be
reclined, and the seats can be �ipped and folded for
additional cargo space.
Reclining the Seatbacks
To recline the seatback, do the following:
1. Pull up on the lever
located under the
outboard side of the
seat cushion.
Regular Model Lever
shown, Extended Model
Lever similar
1-25
Page 67 of 540
i(Top Tether Anchor):
Seating positions with
top tether anchors.
j(Lower Anchor):
Seating positions with
two lower anchors.
i(Top Tether Anchor):
Seating positions with
top tether anchors.
i(Top Tether Anchor):
Seating positions with
top tether anchors.
For Regular models, see the information following for
installing a child restraint with a top tether in the
third row, if you vehicle has one. Never install two top
tethers using the same top tether anchor.
For models with a second row bench seat, the rear
right side passenger and center seating positions have
exposed metal anchors located in the crease between
the seatback and the seat cushion.
For models with second row bucket seats, both rear
seating positions have exposed metal anchors located in
the crease between the seatback and the seat cushion. Second Row — Bucket
Third Row — Regular
Model
Third Row — Extended
Model
1-61
Page 68 of 540
For Regular models, the top tether anchors are located
at the bottom rear of the seat cushion for each seating
position in the second row. Be sure to use an anchor
located on the same side of the vehicle as the seating
position where the child restraint will be placed.For Extended models with a bench or bucket second row
seating, the top tether anchors are located at the bottom
rear of the seat cushion for each seating position in the
second row. Be sure to use an anchor located on the
same side of the vehicle as the seating position where
the child restraint will be placed.
Second Row Seat — Regular Models
Second Row Seat (Bucket Similar) — Extended
Models
1-62
Page 104 of 540

Delayed Locking
When locking the doors with the power lock switch or
the keyless entry transmitter and a door or the liftgate
is open, the doors will lock �ve seconds after the
last door is closed. You will hear three chimes to signal
that the delayed locking feature is in use.
Pressing the power lock switch or the lock button on the
keyless entry transmitter twice will override the delayed
locking feature and immediately lock all the doors.
You can turn the delayed locking feature off or back on
again by doing the following:
1. Press and hold the power door lock switch in the
lock position.
2. Press unlock twice on the remote keyless entry
transmitter.
This feature will not operate if the key is in the ignition.
You can also program this feature using the Driver
Information Center (DIC). See “Door Lock Delay” under
DIC Vehicle Customization on page 3-66.
Programmable Automatic
Door Locks
Your vehicle is equipped with an automatic lock/unlock
feature which enables you to program your vehicle’s
power door locks. You can program this feature through
the Driver Information Center (DIC), or by the following
method.
Programmable Locking Feature
Following are the two available programming options:
Mode 1:All doors lock when the transmission is shifted
into gear.
Mode 2:All doors lock when the vehicle speed is
greater than 8 mph (13 km/h).
The automatic door locks were pre-programmed at the
factory to lock all the doors when the transmission
is shifted into gear. The following instructions detail how
to program your door locks differently than the factory
setting. Choose one of the two programming options
listed above before entering the program mode.
2-10
Page 105 of 540

To enter the program mode, do the following:
1. Begin with the ignition off. Then pull the turn
signal/multifunction lever toward you and hold
it there while you perform the next step.
2. Turn the key to RUN and LOCK twice. Then, with
the key in LOCK, release the turn
signal/multifunction lever. Once you do this, you
will hear the lock switch lock and unlock, the horn
will chirp twice, and a 30 second program timer
will begin. You are now ready to program the
automatic door locks.
3. Select one of the two programming options listed
previously, and press the lock side of the power door
lock switch to cycle through the lock options. You will
have 30 seconds to begin programming. If you
exceed the 30 second limit, the locks will
automatically lock and unlock and the horn will chirp
twice to indicate that you have left the program
mode. If this occurs, repeat the procedure beginning
with Step 1 to re-enter the programming mode.
You can exit the program mode any time by turning the
ignition to RUN (the locks will automatically lock and
unlock and the horn will chirp twice to indicate that you
are leaving the program mode). If the lock/unlock
switches are not pressed while in the programming
mode, the current auto lock/unlock setting will not
be modi�ed.
See your dealer for more information.Programmable Unlocking Feature
The following is the list of available programming
options:
Mode 1:Driver’s door unlocks when the transmission is
shifted into PARK (P).
Mode 2:All doors unlock when the transmission is
shifted into PARK (P).
Mode 3:All doors unlock when the key is removed
from the ignition.
Mode 4:No automatic door unlock.
The automatic door locks were pre-programmed at the
factory to unlock the driver’s door once the transmission
is shifted to PARK (P). The following instructions detail
how to program your door locks differently than the
factory setting. Choose one of the four programming
options listed above before entering the program mode.
To enter the program mode, do the following:
1. Begin with the ignition off. Then pull the turn
signal/multifunction lever toward you and hold
it there while you perform the next step.
2. Turn the key to RUN and LOCK twice. Then, with the
key in LOCK, release the turn signal/multifunction
lever. Once you do this, you will hear the lock switch
lock and unlock, the horn will chirp twice, and a
30-second program timer will begin.
2-11