2006 CHEVROLET TAHOE radio
[x] Cancel search: radioPage 284 of 540

Rear Seat Audio (RSA)
This feature allows rear seat passengers to listen to any
of the sources: radio, cassette tapes, CDs, or DVDs.
However, the rear seat passengers can only control
the sources that the front seat passengers are not
listening to. For example, rear seat passengers may
listen to and control cassette tapes, CDs, or DVDs
through the headphones while the driver listens to the
radio through the front speakers. The rear seat
passengers have control of the volume for each set of
headphones.
The front seat audio controls always have priority over
the RSA controls. If the front seat passengers switch the
source for the main radio to a remote source, the RSA will
not be able to control the source. You can operate the
rear seat audio when the main radio is off.
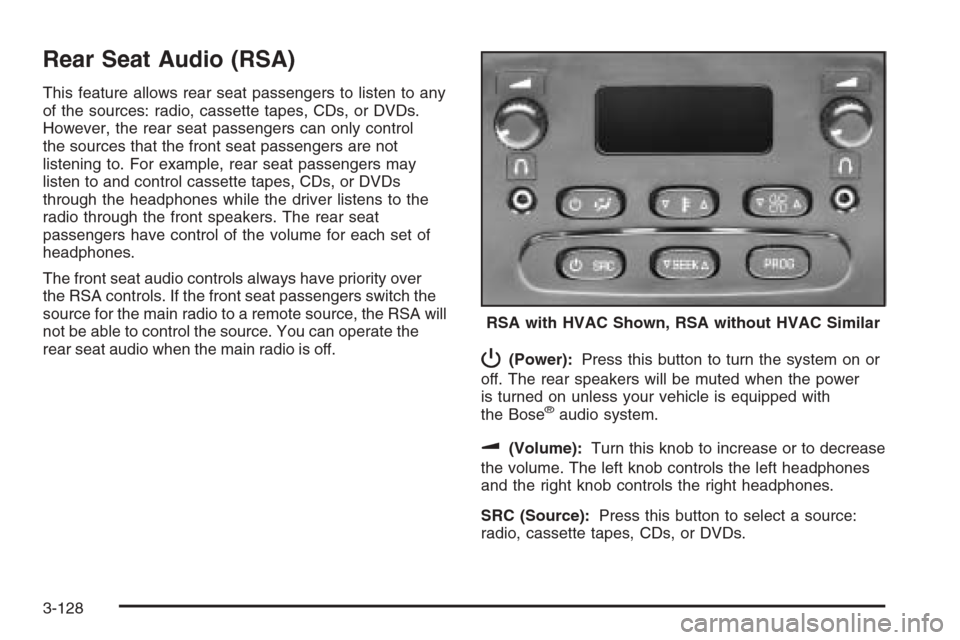
P(Power):Press this button to turn the system on or
off. The rear speakers will be muted when the power
is turned on unless your vehicle is equipped with
the Bose
®audio system.
u(Volume):Turn this knob to increase or to decrease
the volume. The left knob controls the left headphones
and the right knob controls the right headphones.
SRC (Source):Press this button to select a source:
radio, cassette tapes, CDs, or DVDs.RSA with HVAC Shown, RSA without HVAC Similar
3-128
Page 285 of 540

xSEEKw:When listening to FM1, FM2, or AM press
the up or the down arrow to go to the next or to the
previous station and stay there. This function is inactive
if the front seat passengers are listening to the radio.
When a cassette tape is playing, press the up or the
down arrow to go to the next or the previous selection.
This function is inactive if the front seat passengers are
listening to a cassette tape.
When a CD is playing, press the up arrow to go to the
next track on the CD. Press the down arrow to go to the
start of the current track if more than eight seconds have
played. This function is inactive if the front seat
passengers are listening to a CD.
PROG (Program):Press this button to go to the next
preset radio station set on the pushbuttons on the
main radio. This function is inactive if the front seat
passengers are listening to the radio.
When a cassette tape is playing, press this button to go to
the other side of the tape. This function is inactive if the
front seat passengers are listening to a cassette tape.When a CD is playing, press this button to go to the
beginning of the CD. This function is inactive if the front
seat passengers are listening to a CD.
When a CD is playing in the six-disc CD changer, press
this button to select the next CD, if multiple CDs are
loaded. This function is inactive if the front seat
passengers are listening to a CD.
Theft-Deterrent Feature
THEFTLOCK®is designed to discourage theft of your
vehicle’s radio. The feature works automatically by
learning a portion of the Vehicle Identi�cation Number
(VIN). If the radio is moved to a different vehicle, it
will not operate and LOCKED will appear on the display.
When the radio and vehicle are turned off, the blinking
red light indicates that THEFTLOCK
®is armed.
With THEFTLOCK
®activated, the radio will not operate
if stolen.
3-129
Page 286 of 540

Audio Steering Wheel Controls
If your vehicle has this feature, some audio controls can
be adjusted at the steering wheel. They include the
following:
g(OnStar®/Mute):If your vehicle has OnStar, press
this button to interact with the OnStar system. See
theOnStar
®System on page 2-50in this manual for
more information.
If your vehicle does not have OnStar, press this button
to silence the system. Press it again, or any other
radio button, to turn on the sound.PROG (Program):Press this button to play a station
you have programmed on the radio preset pushbuttons.
The radio will only seek preset stations with a strong
signal that are in the selected band.
When a cassette tape is playing, press this button to
play the other side of the tape.
When a CD is playing in the CD changer, press this
button to go to the next available CD, if multiple CDs
are loaded.
QSOURCER:Press this button to switch between
FM1, FM2, AM, or XM1 or XM2 (if equipped), or a
cassette tape or CD. The cassette or CD must be loaded
to play. Available loaded sources are shown on the
display as a tape or a CD symbol.
QSEEKR:Press the up or the down arrow to go to
the next or to the previous radio station and stay
there. The radio will only seek stations with a strong
signal that are in the selected band.
When a cassette tape or CD is playing, press the up or
the down arrow to fast forward or reverse.
QVOLR(Volume):Press the up or the down arrow
to increase or to decrease the volume.
3-130
Page 287 of 540

Radio Reception
You may experience frequency interference and static
during normal radio reception if items such as cellphone
chargers, vehicle convenience accessories, and
external electronic devices are plugged into the
accessory power outlet. If there is interference or static,
unplug the item from the accessory power outlet.
AM
The range for most AM stations is greater than for
FM, especially at night. The longer range can cause
station frequencies to interfere with each other.
For better radio reception, most AM radio stations will
boost the power levels during the day, and then reduce
these levels during the night. Static can also occur
when things like storms and power lines interfere with
radio reception. When this happens, try reducing
the treble on your radio.
FM Stereo
FM stereo will give the best sound, but FM signals
will reach only about 10 to 40 miles (16 to 65 km).
Tall buildings or hills can interfere with FM signals,
causing the sound to fade in and out.
XM™ Satellite Radio Service
XM™ Satellite Radio Service gives digital radio
reception from coast-to-coast in the 48 contiguous
United States, and in Canada (if available). Just as with
FM, tall buildings or hills can interfere with satellite
radio signals, causing the sound to fade in and out.
In addition, traveling or standing under heavy foliage,
bridges, garages, or tunnels may cause loss of the XM™
signal for a period of time. The radio may display
NO SIGNAL to indicate interference.
Care of the Cassette Tape Player
A tape player that is not cleaned regularly can cause
reduced sound quality, ruined cassettes, or a damaged
mechanism. Cassette tapes should be stored in their
cases away from contaminants, direct sunlight, and
extreme heat. If they are not, they may not operate
properly or may cause failure of the tape player.
The tape player should be cleaned regularly after every
50 hours of use. The radio may display CLEAN to
indicate that the tape player has been used for 50 hours
without resetting the tape clean timer. If this message
appears on the display, the cassette tape player needs to
be cleaned. It will still play tapes, but it should be cleaned
as soon as possible to prevent damage to the tapes
and player.
3-131
Page 288 of 540

If there is a reduction in sound quality, try a known good
cassette to see if the tape or the tape player is at fault. If
this other cassette has no improvement in sound quality,
clean the tape player.
For best results, use a scrubbing action, non-abrasive
cleaning cassette with pads which scrub the tape
head as the hubs of the cleaner cassette turn. The
recommended cleaning cassette is available through
your dealer.
When cleaning the cassette tape player with the
recommended non-abrasive cleaning cassette, it is
possible that the cassette may eject, because the cut
tape detection feature on the radio may recognize it as a
broken tape, in error. To prevent the cleaning cassette
from being ejected, use the following steps:
1. Turn the ignition on.
2. Turn the radio off.
3. Press and hold the TAPE DISC button for
�ve seconds. READY will appear on the display
and the cassette symbol will �ash for �ve seconds.
4. Insert the scrubbing action cleaning cassette.
5. Eject the cleaning cassette after the manufacturer’s
recommended cleaning time.
When the cleaning cassette has been ejected, the
cut tape detection feature will be active again.A non-scrubbing action, wet-type cleaner which uses
a cassette with a fabric belt to clean the tape head can
be used. This type of cleaning cassette will not eject
on its own. A non-scrubbing action cleaner may
not clean as thoroughly as the scrubbing type cleaner.
The use of a non-scrubbing action, dry-type cleaning
cassette is not recommended.
After the player is cleaned, press and hold the eject
button for �ve seconds to reset the CLEAN indicator.
The radio will display --- or CLEANED to show the
indicator was reset.
Cassettes are subject to wear and the sound quality
may degrade over time. Always make sure the cassette
tape is in good condition before the tape player is
serviced.
Care of Your CDs and DVDs
Handle CDs carefully. Store them in their original cases
or other protective cases and away from direct
sunlight and dust. The CD player scans the bottom
surface of the disc. If the surface of a CD is damaged,
such as cracked, broken, or scratched, the CD will
not play properly or not at all. If the surface of a CD is
soiled, take a soft, lint free cloth or dampen a clean, soft
cloth in a mild, neutral detergent solution mixed with
water, and clean it. Make sure the wiping process starts
from the center to the edge.
3-132
Page 289 of 540

Do not touch the bottom side of a CD while handling
it; this could damage the surface. Pick up CDs by
grasping the outer edges or the edge of the hole and
the outer edge.
Care of the CD and DVD Player
The use of CD lens cleaners for CDs is not advised,
due to the risk of contaminating the lens of the CD optics
with lubricants internal to the CD mechanism.
Fixed Mast Antenna
The �xed mast antenna can withstand most car washes
without being damaged. If the mast should ever
become slightly bent, straighten it out by hand. If the
mast is badly bent, replace it.
Check occasionally to make sure the mast is still
tightened to the cowl. If tightening is required, tighten
by hand, then with a wrench one quarter turn.
XM™ Satellite Radio Antenna
System
The XM™ Satellite Radio antenna is located on the roof
of your vehicle. Keep this antenna clear of snow and
ice build up for clear radio reception.
If your vehicle has a sunroof, the performance of the
XM™ system may be affected if the sunroof is open.
Loading items onto the roof of your vehicle can interfere
with the performance of the XM™ system. Make sure
the XM™ Satellite Radio antenna is not obstructed.
Chime Level Adjustment
The radio is used to adjust the vehicle’s chime level.
To change the volume level of the chime, press and hold
pushbutton 6 with the ignition on and the radio power
off. The volume level will change from the normal
level to loud, and LOUD will appear on the radio display.
To change back to the default or normal setting,
press and hold pushbutton 6 again. The volume level
will change from the loud level to normal, and NORMAL
will appear on the radio display. Each time the chime
volume is changed, three chimes will sound as an
example of the new volume selected. Removing the
radio and not replacing it with a factory radio or chime
module will disable vehicle chimes.
3-133
Page 413 of 540

Notice:If you leave your radio or other accessories
on during the jump starting procedure, they could
be damaged. The repairs would not be covered
by your warranty. Always turn off your radio and
other accessories when jump starting your vehicle.
3. Turn off the ignition on both vehicles. Unplug
unnecessary accessories plugged into the cigarette
lighter or the accessory power outlets. Turn off
the radio and all the lamps that are not needed.
This will avoid sparks and help save both batteries.
And it could save the radio!
4. Open the hood on the other vehicle and locate the
positive (+) and negative (−) terminal locations on
that vehicle.
Your vehicle has a remote positive (+) jump starting
terminal and a remote negative (−) jump starting
terminal. You should always use these remote
terminals instead of the terminals on the battery.The remote positive (+) terminal is located behind
a red plastic cover, if equipped, near the engine
accessory drive bracket. To uncover the remote
positive (+) terminal, open the red plastic cover,
if equipped.
The remote negative (−) terminal is located on the
engine drive bracket, or on the thermostat housing
on the 8.1L engine. It is marked GND (Ground).
SeeEngine Compartment Overview on page 5-12
for more information on the location of the
remote positive (+) and remote negative (−)
terminals.
{CAUTION:
An electric fan can start up even when the
engine is not running and can injure you.
Keep hands, clothing and tools away from
any underhood electric fan.
5-43
Page 436 of 540

A Tire and Loading Information label is attached to the
vehicle’s center pillar (B-pillar), below the driver’s
door lock post (striker). This label lists your vehicle’s
original equipment tires and their recommended cold tire
in�ation pressures. The recommended cold tire
in�ation pressure, shown on the label, is the minimum
amount of air pressure needed to support your vehicle’s
maximum load carrying capacity.
For additional information regarding how much weight
your vehicle can carry, and an example of the tire
and loading information label, seeLoading Your Vehicle
on page 4-48.
When to Check
Check your tires once a month or more. Do not forget
to check the spare tire. For additional information
regarding the spare tire, seeSpare Tire on page 5-99.
How to Check
Use a good quality pocket-type gage to check tire
pressure. You cannot tell if your tires are properly in�ated
simply by looking at them. Radial tires may look properly
in�ated even when they’re underin�ated. Check the tire’s
in�ation pressure when the tires are cold. Cold means
your vehicle has been sitting for at least three hours or
driven no more than 1 mile (1.6 km).Remove the valve cap from the tire valve stem. Press
the tire gage �rmly onto the valve to get a pressure
measurement. If the cold tire in�ation pressure matches
the recommended pressure on the Tire and Loading
Information label, no further adjustment is necessary.
If the in�ation pressure is low, add air until you reach the
recommended amount.
If you over�ll the tire, release air by pushing on the
metal stem in the center of the tire valve. Recheck the
tire pressure with the tire gage.
Be sure to put the valve caps back on the valve stems.
They help prevent leaks by keeping out dirt and
moisture.
Tire Pressure Monitor System
The Tire Pressure Monitor System (TPMS) uses radio
and sensor technology to check tire pressure levels.
If your vehicle has this feature, sensors are mounted on
each tire and wheel assembly, except the spare tire.
The TPMS sensors monitor the air pressure in your
vehicle’s tires and transmit tire pressure readings to a
receiver located in the vehicle.
The TPMS is designed to alert the driver, if a low tire
pressure condition exists. This system also allows
the driver to check tire pressure levels using the
Driver Information Center (DIC).
5-66