Page 425 of 540
2. Install a new bulb into
the socket and turn
clockwise until it locks
into place.
3. Reinstall the lens and tighten the screws.To replace a center roof marker lamp bulb, do the
following:
1. Remove the six screws from the center roof marker
lamp assembly.
2. Turn the old bulb counterclockwise to remove it
from the socket.
3. Reinstall the lens and tighten the screws.
5-55
Page 426 of 540
Taillamps, Turn Signal, Stoplamps
and Back-up Lamps
A. Turn Signal Lamp
B. Back-up Lamp
C. Stoplamp/TaillampTo replace one of these bulbs, do the following:
1. Remove the
two screws from
the taillamp
assembly.
2. Remove the taillamp assembly.
3. Press the release tab, if equipped, and turn the
socket counterclockwise to remove it from the
taillamp housing.
5-56
Page 427 of 540
4. Pull the old bulb
straight out from
the socket.
5. Press a new bulb into the socket, insert the socket
into the taillamp housing and turn the socket
clockwise into the taillamp housing until it clicks.
6. Reinstall the taillamp assembly.Replacement Bulbs
Exterior Lamp Bulb Number
Back-up Lamp 3157
Daytime Running Lamps (DRL) 4114K
Front Roof Marker Lamp
and Sidemarker194
Front Turn Signal Lamp 3157
Headlamps
High-Beam 9005
Low-Beam 9006
Rear Turn Signal Lamp,
Taillamp and Stoplamp3157
Side Identi�cation Marker Lamp —
For replacement bulbs not listed here, contact
your dealer.
5-57
Page 451 of 540

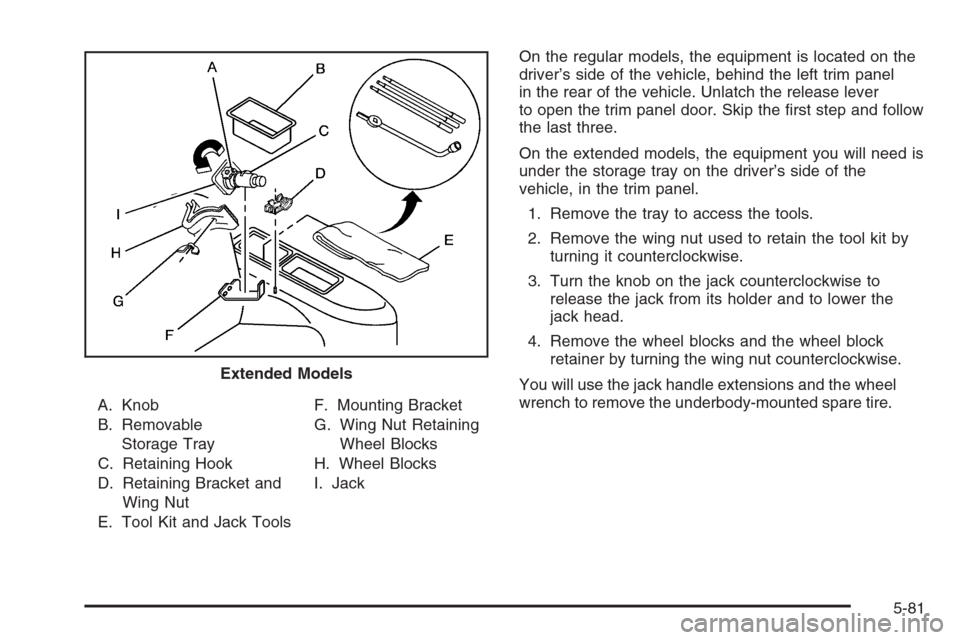
A. Knob
B. Removable
Storage Tray
C. Retaining Hook
D. Retaining Bracket and
Wing Nut
E. Tool Kit and Jack ToolsF. Mounting Bracket
G. Wing Nut Retaining
Wheel Blocks
H. Wheel Blocks
I. JackOn the regular models, the equipment is located on the
driver’s side of the vehicle, behind the left trim panel
in the rear of the vehicle. Unlatch the release lever
to open the trim panel door. Skip the �rst step and follow
the last three.
On the extended models, the equipment you will need is
under the storage tray on the driver’s side of the
vehicle, in the trim panel.
1. Remove the tray to access the tools.
2. Remove the wing nut used to retain the tool kit by
turning it counterclockwise.
3. Turn the knob on the jack counterclockwise to
release the jack from its holder and to lower the
jack head.
4. Remove the wheel blocks and the wheel block
retainer by turning the wing nut counterclockwise.
You will use the jack handle extensions and the wheel
wrench to remove the underbody-mounted spare tire. Extended Models
5-81
Page 453 of 540
3. Insert the spare tire
end (open end) (F)
of the extension
through the hole (G)
in the rear bumper.
Be sure the hoist end of the extension connects to
the hoist shaft (E). The ribbed square end of the
extension is used to lower the spare tire.4. Turn the wheel wrench (H) counterclockwise to
lower the spare tire to the ground. Continue to
turn the wheel wrench until the spare tire can be
pulled out from under the vehicle.
If the spare tire does not lower to the ground,
the secondary latch is engaged causing the tire
not to lower. SeeSecondary Latch System
on page 5-90.
5. Use the wheel wrench
hook that allows you to
pull the hoist cable
towards you to assist in
reaching the spare tire.
5-83
Page 455 of 540
1. Remove the center cap by placing the chisel end
of the wheel wrench in the slot on the wheel and
gently prying the cap out.
If the wheel has bolt-on wheel covers, loosen the
plastic nut caps by turning the wheel wrench
in a counterclockwise direction. If needed, �nish
loosening them by hand. The nut caps will not come
off. Using the �at end of the wheel wrench, pry
along the edge of the cover until it comes off.2. Use the wheel wrench to loosen all the wheel nuts.
Turn the wheel wrench counterclockwise to loosen
the wheel nuts. Do not remove the wheel nuts yet.
5-85
Page 457 of 540

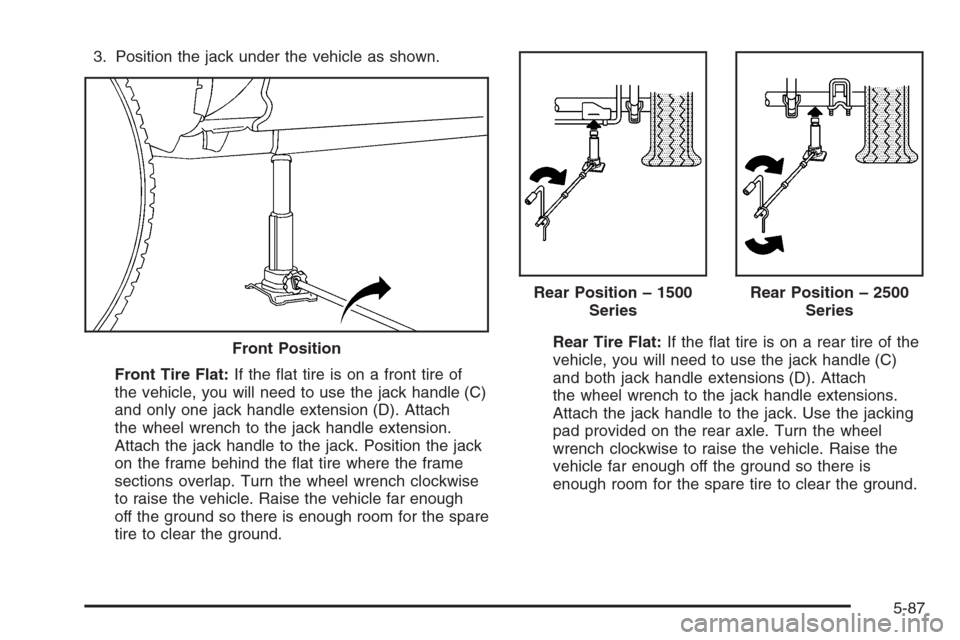
3. Position the jack under the vehicle as shown.
Front Tire Flat:If the �at tire is on a front tire of
the vehicle, you will need to use the jack handle (C)
and only one jack handle extension (D). Attach
the wheel wrench to the jack handle extension.
Attach the jack handle to the jack. Position the jack
on the frame behind the �at tire where the frame
sections overlap. Turn the wheel wrench clockwise
to raise the vehicle. Raise the vehicle far enough
off the ground so there is enough room for the spare
tire to clear the ground.Rear Tire Flat:If the �at tire is on a rear tire of the
vehicle, you will need to use the jack handle (C)
and both jack handle extensions (D). Attach
the wheel wrench to the jack handle extensions.
Attach the jack handle to the jack. Use the jacking
pad provided on the rear axle. Turn the wheel
wrench clockwise to raise the vehicle. Raise the
vehicle far enough off the ground so there is
enough room for the spare tire to clear the ground. Front Position
Rear Position – 1500
SeriesRear Position – 2500
Series
5-87
Page 459 of 540
6. Put the wheel nuts back
on with the rounded
end of the nuts toward
the wheel after
mounting the spare.
7. Tighten each wheel nut by hand. Then use the
wheel wrench to tighten the nuts until the wheel
is held against the hub.
8. Turn the wheel wrench counterclockwise to lower
the vehicle. Lower the jack completely.
{CAUTION:
Incorrect wheel nuts or improperly tightened
wheel nuts can cause the wheel to come loose
and even come off. This could lead to an
accident. Be sure to use the correct wheel
nuts. If you have to replace them, be sure to
get new GM original equipment wheel nuts.
Stop somewhere as soon as you can and have
the nuts tightened with a torque wrench to the
proper torque speci�cation. SeeCapacities
and Specifications on page 5-118for wheel
nut torque speci�cation.
5-89