2006 CHEVROLET SILVERADO spare wheel
[x] Cancel search: spare wheelPage 326 of 594
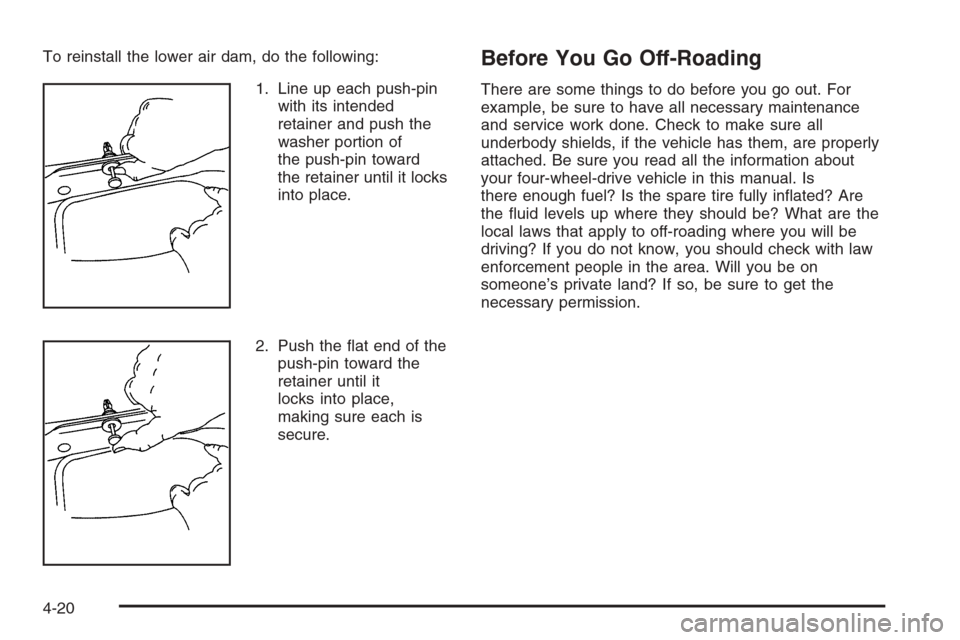
To reinstall the lower air dam, do the following:
1. Line up each push-pin
with its intended
retainer and push the
washer portion of
the push-pin toward
the retainer until it locks
into place.
2. Push the �at end of the
push-pin toward the
retainer until it
locks into place,
making sure each is
secure.Before You Go Off-Roading
There are some things to do before you go out. For
example, be sure to have all necessary maintenance
and service work done. Check to make sure all
underbody shields, if the vehicle has them, are properly
attached. Be sure you read all the information about
your four-wheel-drive vehicle in this manual. Is
there enough fuel? Is the spare tire fully in�ated? Are
the �uid levels up where they should be? What are the
local laws that apply to off-roading where you will be
driving? If you do not know, you should check with law
enforcement people in the area. Will you be on
someone’s private land? If so, be sure to get the
necessary permission.
4-20
Page 406 of 594
Bulb Replacement..........................................5-62
Halogen Bulbs..............................................5-62
Headlamps..................................................5-62
Front Turn Signal, Sidemarker and Daytime
Running Lamps.........................................5-64
Roof Marker Lamps......................................5-66
Center High-Mounted Stoplamp (CHMSL)
and Cargo Lamp.......................................5-67
Pickup Box Identi�cation and Fender
Marker Lamps...........................................5-69
Taillamps, Turn Signal, Stoplamps and
Back-up Lamps.........................................5-69
License Plate Lamp......................................5-71
Replacement Bulbs.......................................5-72
Windshield Wiper Blade Replacement..............5-73
Tires..............................................................5-74
Tire Sidewall Labeling...................................5-75
Tire Terminology and De�nitions.....................5-78
In�ation - Tire Pressure.................................5-81
Dual Tire Operation.......................................5-83
Tire Inspection and Rotation...........................5-83
When It Is Time for New Tires.......................5-86
Buying New Tires.........................................5-87Different Size Tires and Wheels......................5-88
Uniform Tire Quality Grading..........................5-89
Wheel Alignment and Tire Balance..................5-90
Wheel Replacement......................................5-90
Tire Chains..................................................5-92
If a Tire Goes Flat........................................5-93
Changing a Flat Tire.....................................5-94
Removing the Spare Tire and Tools................5-95
Removing the Flat Tire and Installing
the Spare Tire..........................................5-99
Secondary Latch System..............................5-109
Storing a Flat or Spare Tire and Tools...........5-112
Spare Tire.................................................5-116
Appearance Care..........................................5-116
Cleaning the Inside of Your Vehicle...............5-116
Fabric/Carpet..............................................5-118
Leather......................................................5-118
Instrument Panel, Vinyl, and Other
Plastic Surfaces.......................................5-119
Care of Safety Belts....................................5-119
Weatherstrips.............................................5-119
Washing Your Vehicle..................................5-120
Cleaning Exterior Lamps/Lenses....................5-120
Section 5 Service and Appearance Care
5-2
Page 487 of 594
Dual Tire Operation
When the vehicle is new, or whenever a wheel, wheel bolt
or wheel nut is replaced, check the wheel nut torque after
100, 1,000 and 6,000 miles (160, 1 600 and 10 000 km)
of driving. For proper torque and wheel nut tightening
information, seeRemoving the Spare Tire and Tools
on page 5-95.
The outer tire on a dual wheel setup generally wears
faster than the inner tire. Your tires will wear more
evenly and last longer if you rotate the tires periodically,
seeTire Inspection and Rotation on page 5-83.
Also seeScheduled Maintenance (Gasoline Engine)
on page 6-4.
{CAUTION:
If you operate your vehicle with a tire that is
badly underin�ated, the tire can overheat. An
overheated tire can lose air suddenly or catch
�re. You or others could be injured. Be sure all
tires (including the spare) are properly in�ated.
SeeIn�ation - Tire Pressure on page 5-81, for
information on proper tire in�ation.
Tire Inspection and Rotation
Tires should be rotated every 5,000 to 8,000 miles
(8 000 to 13 000 km).
Any time you notice unusual wear, rotate your tires as
soon as possible and check wheel alignment. Also
check for damaged tires or wheels. SeeWhen It Is Time
for New Tires on page 5-86andWheel Replacement
on page 5-90for more information.
Make sure the spare tire is stored securely. Push, pull,
and then try to rotate or turn the tire. If it moves,
use the wheel wrench/hoist shaft to tighten the cable.
SeeChanging a Flat Tire on page 5-94.
If your vehicle has dual rear wheels, also seeDual Tire
Operation on page 5-83.
The purpose of regular rotation is to achieve more
uniform wear for all tires on the vehicle. The �rst rotation
is the most important. SeeScheduled Maintenance
(Gasoline Engine) on page 6-4.
5-83
Page 491 of 594
Buying New Tires
GM has developed and matched speci�c tires for your
vehicle. The original equipment tires installed on
your vehicle, when it was new, were designed to meet
General Motors Tire Performance Criteria Speci�cation
(TPC spec) system rating. If you need replacement
tires, GM strongly recommends that you get tires with
the same TPC Spec rating. This way, your vehicle
will continue to have tires that are designed to give the
same performance and vehicle safety, during normal
use, as the original tires.
GM’s exclusive TPC Spec system considers over a
dozen critical speci�cations that impact the overall
performance of your vehicle, including brake system
performance, ride and handling, traction control, and tire
pressure monitoring performance. GM’s TPC Spec
number is molded onto the tire’s sidewall by the
tire manufacturer. If the tires have an all-season tread
design, the TPC spec number will be followed by an MS
for mud and snow. SeeTire Sidewall Labeling on
page 5-75for additional information.{CAUTION:
Mixing tires could cause you to lose control
while driving. If you mix tires of different sizes,
brands, or types (radial and bias-belted tires),
the vehicle may not handle properly, and you
could have a crash. Using tires of different
sizes, brands or types may also cause damage
to your vehicle. Be sure to use the same size,
brand, and type tires on all wheels.
Your vehicle may have a different size spare
than the road tires (those originally installed
on your vehicle). When new, your vehicle
included a spare tire and wheel assembly with
a similar overall diameter as your vehicle’s
road tires and wheels, so it is all right to drive
on it. Because this spare was developed for
use on your vehicle, it will not affect vehicle
handling.
5-87
Page 499 of 594
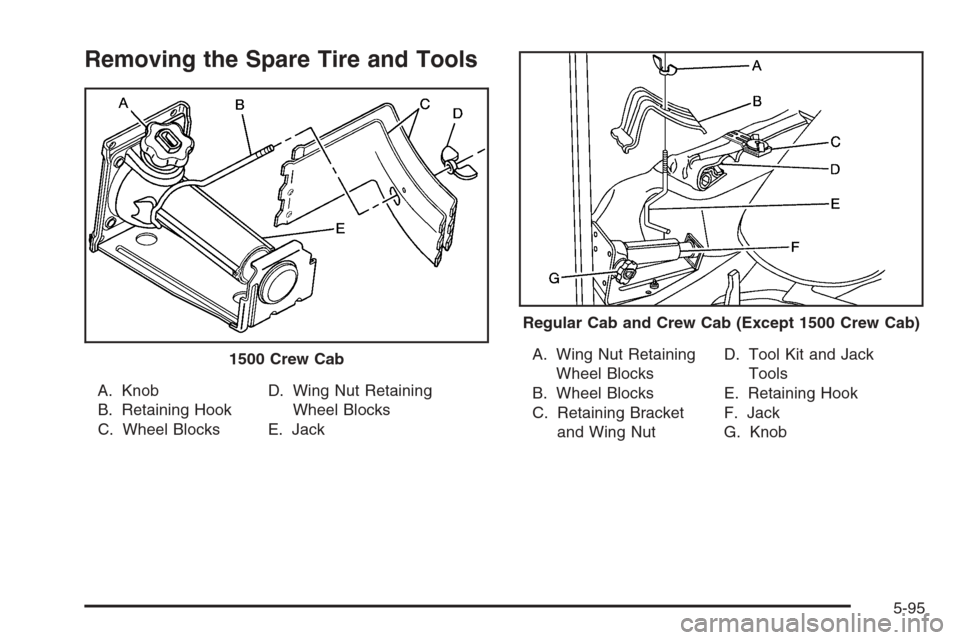
Removing the Spare Tire and Tools
A. Knob
B. Retaining Hook
C. Wheel BlocksD. Wing Nut Retaining
Wheel Blocks
E. JackA. Wing Nut Retaining
Wheel Blocks
B. Wheel Blocks
C. Retaining Bracket
and Wing NutD. Tool Kit and Jack
Tools
E. Retaining Hook
F. Jack
G. Knob 1500 Crew Cab
Regular Cab and Crew Cab (Except 1500 Crew Cab)
5-95
Page 501 of 594

For regular cab models, the equipment you will need is
behind the passenger’s seat. For extended and crew
cab models, the equipment is on the shelf behind
the passenger’s side second row seat.
1. If there is a cover, move the seats forward and turn
the wing nut on the cover counterclockwise to
remove it. For crew cab models, pull up the
second row seat with the loop at the base of the
seat cushion to access the tools.
2. Turn the knob on the jack counterclockwise to lower
the jack head to release the jack from its holder.
3. Remove the wheel blocks and the wheel block
retainer by turning the wing nut counterclockwise.
4. Remove the wing nut used to retain the storage
bag and tools by turning it counterclockwise.
You will use the jack handle extensions and the wheel
wrench to remove the underbody-mounted spare tire.A. Spare Tire (Valve
Stem Pointed Down)
B. Hoist Assembly
C. Hoist Cable
D. Tire/Wheel Retainer
E. Hoist ShaftF. Hoist End of
Extension Tool
G. Hoist Shaft Access Hole
H. Wheel Wrench
I. Jack Handle Extensions
J. Spare Tire Lock
(If Equipped)
1. Open the spare tire lock cover on the bumper and
use the ignition key to remove the lock, if equipped
with a spare tire lock (J). TO remove the spare tire
lock, insert the ignition key turn and pull straight out.
5-97
Page 502 of 594
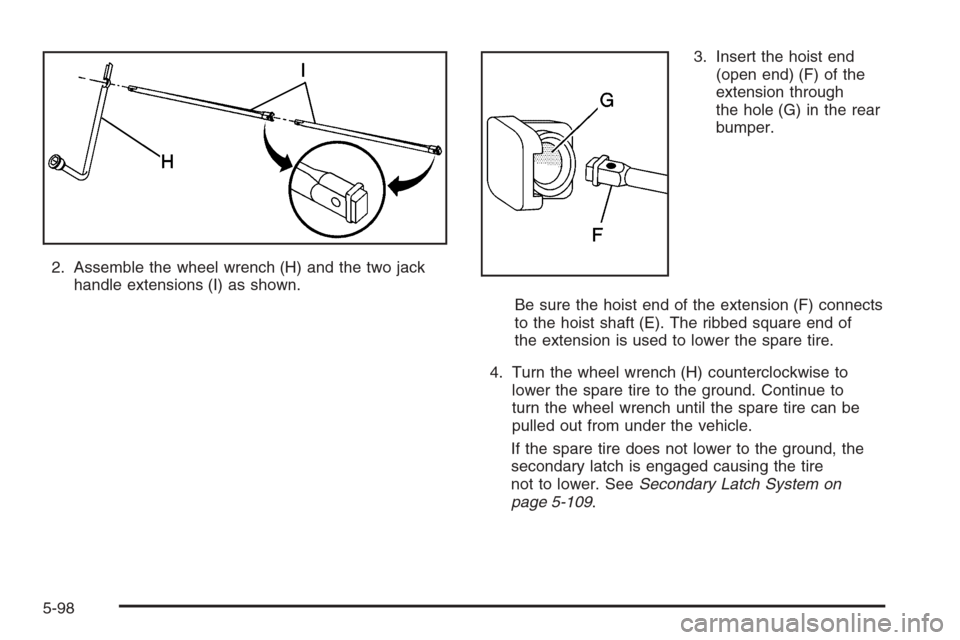
2. Assemble the wheel wrench (H) and the two jack
handle extensions (I) as shown.3. Insert the hoist end
(open end) (F) of the
extension through
the hole (G) in the rear
bumper.
Be sure the hoist end of the extension (F) connects
to the hoist shaft (E). The ribbed square end of
the extension is used to lower the spare tire.
4. Turn the wheel wrench (H) counterclockwise to
lower the spare tire to the ground. Continue to
turn the wheel wrench until the spare tire can be
pulled out from under the vehicle.
If the spare tire does not lower to the ground, the
secondary latch is engaged causing the tire
not to lower. SeeSecondary Latch System on
page 5-109.
5-98
Page 503 of 594
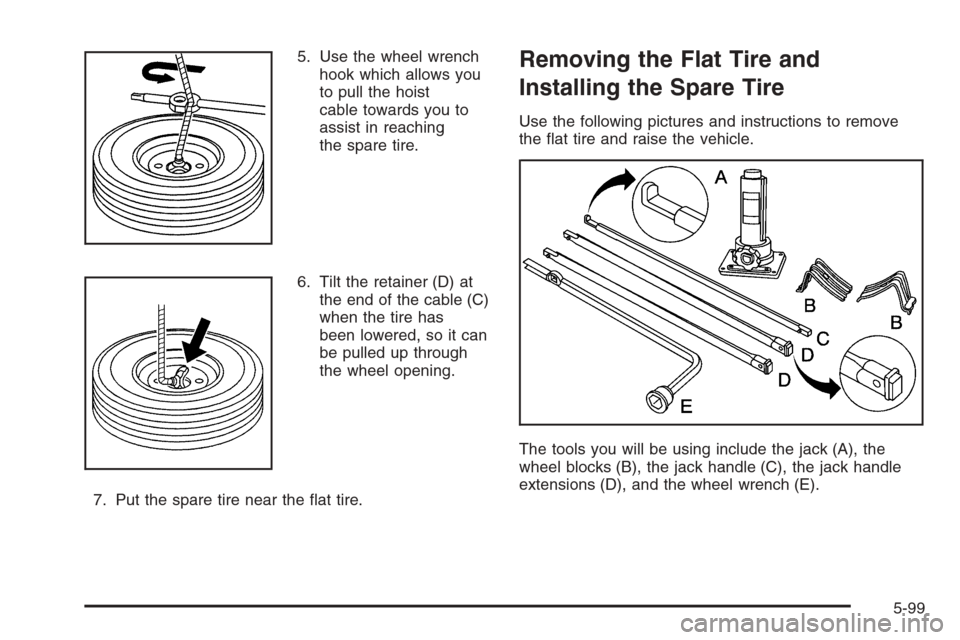
5. Use the wheel wrench
hook which allows you
to pull the hoist
cable towards you to
assist in reaching
the spare tire.
6. Tilt the retainer (D) at
the end of the cable (C)
when the tire has
been lowered, so it can
be pulled up through
the wheel opening.
7. Put the spare tire near the �at tire.Removing the Flat Tire and
Installing the Spare Tire
Use the following pictures and instructions to remove
the �at tire and raise the vehicle.
The tools you will be using include the jack (A), the
wheel blocks (B), the jack handle (C), the jack handle
extensions (D), and the wheel wrench (E).
5-99