2006 CHEVROLET SILVERADO power
[x] Cancel search: powerPage 132 of 594
Up-Shift Light
If you have a manual
transmission, you may
have a shift light. This light
will show you when to
shift to the next higher gear
for best fuel economy.
When this light comes on, you can shift to the next
higher gear if weather, road and traffic conditions allow.
For the best fuel economy, accelerate slowly and
shift when the light comes on.
While you accelerate, it is normal for the light to go on
and off if you quickly change the position of the
accelerator.
If your vehicle has four-wheel drive and is equipped with
a manual transmission, disregard the shift light when
the transfer case is in Four-Wheel Low.
Ignore the shift light when you downshift.
Four-Wheel Drive
If your vehicle has four-wheel drive, you can send your
engine’s driving power to all four wheels for extra
traction. To get the most satisfaction out of four-wheel
drive, you must be familiar with its operation. Read
the part that follows before using four-wheel drive. See
the appropriate text for the transfer case in your
vehicle.
Front Axle Locking Feature
The front axle locks and unlocks automatically when
you shift the transfer case. Some delay for the axle to
lock or unlock is normal.
2-36
Page 134 of 594
An indicator light near the lever shows you the transfer
case settings:
Notice:Driving on clean, dry pavement in
four-wheel drive for an extended period of time may
cause premature wear on your vehicle’s powertrain.
Do not drive on clean, dry pavement in four-wheel
drive for extended periods of time.
4L (Four-Wheel Low):This setting also engages your
front axle and delivers extra torque. You may never
need 4L. It sends maximum power to all four wheels.
You might choose 4L if you are driving off-road in deep
sand, deep mud, deep snow, and while climbing or
descending steep hills. When operating in Four-Wheel
Low, the gear ratio provides additional torque when
compared to four-wheel high. The transmission
gear shift feel will be exaggerated.
{CAUTION:
Shifting the transfer case to NEUTRAL
can cause your vehicle to roll even if the
transmission is in PARK (P), or if you have a
manual transmission, even if you are in gear.
CAUTION: (Continued)
CAUTION: (Continued)
You or someone else could be seriously
injured. Be sure to set the parking brake
before placing the transfer case in NEUTRAL.
SeeParking Brake on page 2-49.
N (Neutral):Shift to this setting only when your vehicle
needs to be towed. SeeRecreational Vehicle Towing
on page 4-62orTowing Your Vehicle on page 4-61.
2H (Two-Wheel High):This setting is used for driving
in most street and highway situations. Your front
axle is not engaged in two-wheel drive. This setting also
provides the best fuel economy.
4H (Four-Wheel High):Use this setting when you
need extra traction, such as on snowy or icy roads or in
most off-road situations. This setting also engages
your front axle to help drive your vehicle. This is the best
setting to use when plowing snow.
You can shift from 2H to 4H or 4H high to 2H while the
vehicle is moving. Your front axle will engage faster
if you take your foot off of the accelerator for a couple
of seconds after you shift. In extremely cold weather, it
may be necessary to stop or slow the vehicle to
shift into four-wheel high.
2-38
Page 136 of 594
Shifting In or Out of NEUTRAL
1. With the vehicle running and the engine at an idle
set the parking brake.
2. Place the transmission into NEUTRAL (N).
Shift the transfer case in one continuous motion into or
out of the NEUTRAL position.
Automatic Transfer Case
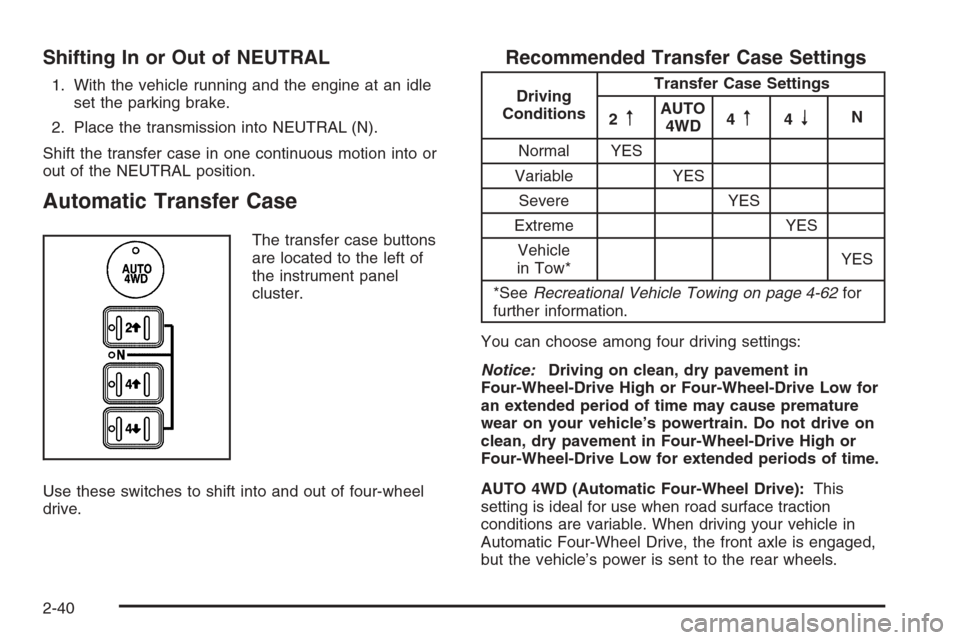
The transfer case buttons
are located to the left of
the instrument panel
cluster.
Use these switches to shift into and out of four-wheel
drive.
Recommended Transfer Case Settings
Driving
ConditionsTransfer Case Settings
2
mAUTO
4WD4m4nN
Normal YES
Variable YES
Severe YES
Extreme YES
Vehicle
in Tow*YES
*SeeRecreational Vehicle Towing on page 4-62for
further information.
You can choose among four driving settings:
Notice:Driving on clean, dry pavement in
Four-Wheel-Drive High or Four-Wheel-Drive Low for
an extended period of time may cause premature
wear on your vehicle’s powertrain. Do not drive on
clean, dry pavement in Four-Wheel-Drive High or
Four-Wheel-Drive Low for extended periods of time.
AUTO 4WD (Automatic Four-Wheel Drive):This
setting is ideal for use when road surface traction
conditions are variable. When driving your vehicle in
Automatic Four-Wheel Drive, the front axle is engaged,
but the vehicle’s power is sent to the rear wheels.
2-40
Page 137 of 594

When the vehicle detects a loss of traction, the system
will automatically engage four-wheel drive. Driving in
this mode results in slightly lower fuel economy
than Two-Wheel High.
2
m(Two-Wheel High):This setting is used for driving
in most street and highway situations. Your front axle
is not engaged in two-wheel drive. This setting also
provides the best fuel economy.
{CAUTION:
Shifting the transfer case to NEUTRAL
can cause your vehicle to roll even if the
transmission is in PARK (P). You or someone
else could be seriously injured. Be sure to set
the parking brake before placing the transfer
case in NEUTRAL. SeeParking Brake on
page 2-49.
N (NEUTRAL):Shift the vehicle’s transfer case to
N (NEUTRAL) only when towing your vehicle.
SeeRecreational Vehicle Towing on page 4-62or
Towing Your Vehicle on page 4-61for more information.4
m(Four-Wheel High):Use this setting when you
need extra traction, such a on snowy or icy roads or in
most off-road situations. This setting also engages
your front axle to help drive your vehicle. This is the best
setting to use when plowing snow.
4
n(Four-Wheel Low):This setting also engages
your front axle and delivers extra torque. You may never
need Four-Wheel Low. It sends maximum power to all
four wheels. You might choose Four-Wheel Low if
you are driving off-road in deep sand, deep mud, deep
snow, and while climbing or descending steep hills.
When operating in Four-Wheel Low, the gear ratio
provides additional torque when compared to
four-wheel high. The transmission gear shift feel will
be exaggerated.
Indicator lights in the switches show which setting your
transfer case is in. The indicator lights will come on
briey when you turn on the ignition and one will stay on.
If the lights do not come on, you should take your
vehicle to your dealer for service. An indicator light will
ash while the transfer case is being shifted. It will
stay on when the shift is complete. If for some reason
the transfer case cannot make a requested shift, it
will return to the last chosen setting.
If the SERVICE 4WD message stays on, you should
take your vehicle to your dealer for service. See
DIC Warnings and Messages on page 3-54for further
information.
2-41
Page 142 of 594

4m(Four-Wheel High):This setting engages your
front axle to help drive your vehicle. Use four-wheel high
when you need extra traction, such as on snowy or
icy roads, or in most off-road situations.
4
n(Four-Wheel Low):This setting also engages
your front axle to give you extra traction. You may never
need Four-Wheel Low. It sends the maximum power
to all four wheels. You might choose Four-Wheel Low if
you were driving off-road in sand, mud or deep snow
and while climbing or descending steep hills. When
operating in Four-Wheel Low, the gear ratio provides
additional torque when compared to Four-Wheel
High. The transmission gear shift feel will be
exaggerated.
Indicator lights in the switches show you which setting
you are in. The indicator lights will come on briey when
you turn on the ignition and the last chosen setting
will stay on. If the lights do not come on, you should take
your vehicle in for service. An indicator light will ash
while shifting. Fast ashing means the conditions
were not met to make the desired shift, typically the
vehicle was going too fast, the automatic transmission
was not in neutral, or the clutch pedal was not fully
pressed. Slow ashing means the shift is in progress.
It will stay on when the shift is completed. If for
some reason the transfer cannot make a requested
shift, it will return to the last chosen setting.
Shifting from Two-Wheel High to
Four-Wheel High
Press and release the Four-Wheel High switch. This
can be done at any speed, and the front axle will lock
automatically with some delay.
Shifting from Four-Wheel High to
Two-Wheel High
Press and release the Two-Wheel High switch. This can
be done at any speed, and the front axle will unlock
automatically with some delay.
It is normal to hear and feel your vehicle’s transfer case
shift into Four-Wheel Low. If you shift with the vehicle
stopped, the indicator light may remain ashing slowly. It
may be necessary to shift the transmission momentarily
into REVERSE (R) and DRIVE (D), for an automatic
transmission, or REVERSE (R) and FIRST (1) for
a manual transmission to have the light stop ashing.
2-46
Page 162 of 594
Outside West Coast-Type Mirrors
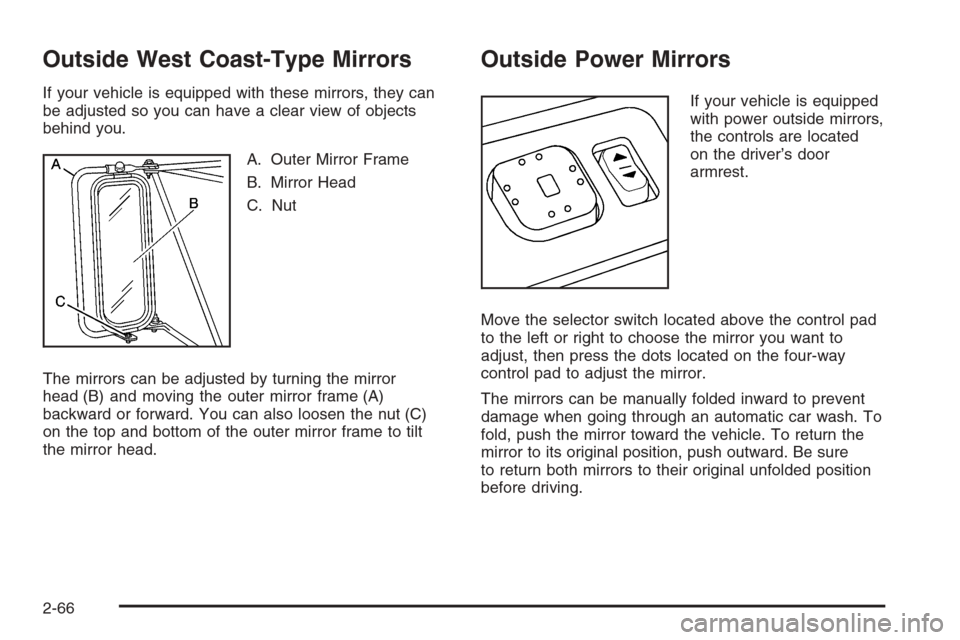
If your vehicle is equipped with these mirrors, they can
be adjusted so you can have a clear view of objects
behind you.
A. Outer Mirror Frame
B. Mirror Head
C. Nut
The mirrors can be adjusted by turning the mirror
head (B) and moving the outer mirror frame (A)
backward or forward. You can also loosen the nut (C)
on the top and bottom of the outer mirror frame to tilt
the mirror head.
Outside Power Mirrors
If your vehicle is equipped
with power outside mirrors,
the controls are located
on the driver’s door
armrest.
Move the selector switch located above the control pad
to the left or right to choose the mirror you want to
adjust, then press the dots located on the four-way
control pad to adjust the mirror.
The mirrors can be manually folded inward to prevent
damage when going through an automatic car wash. To
fold, push the mirror toward the vehicle. To return the
mirror to its original position, push outward. Be sure
to return both mirrors to their original unfolded position
before driving.
2-66
Page 163 of 594

Outside Power Foldaway Mirrors
If your vehicle is equipped
with this feature, the
controls are located on the
driver’s door armrest.
Move the upper selector switch to the left or right to
choose the mirror you want to adjust; then press
the dots located on the four-way control pad to adjust
the mirror.
The mirrors may also include a memory function which
works together with the memory seats. SeeMemory
Seat on page 2-79for more information.To fold or unfold the mirrors, move the selector switch,
located above the mirror control, to the middle
position. The mirror control will illuminate. Press the
right or left side of the mirror control to fold or unfold the
mirrors. You may notice the mirror glass adjust as the
mirrors fold in; this is normal. The mirror glass will
reposition itself once the mirrors are unfolded.
If the mirrors are accidentally folded/unfolded manually,
they may shake or utter at normal driving speeds
and may not stay in the unfolded position. If this
happens, you will need to reset the mirrors. See
“Resetting the Power Foldaway Mirrors” next.
Resetting the Power Foldaway Mirrors
You will need to reset the power foldaway mirrors if the
following occurs:
They are accidentally manually folded/unfolded.
The mirrors will not stay in the unfolded position.
The mirrors shake and utter at normal driving
speeds.
To reset the power foldaway mirrors, fold and unfold
them at least three times using the mirror controls. This
will reset them to their normal position.
2-67
Page 174 of 594

4. To add cargo to the
box, remove all bows
and the back rail
and stow them safely.
To clean the tonneau cover, use mild soap and water.
If necessary, use a soft bristle brush to remove dirt
trapped in the grain of the material.
Sunroof
The vehicle may be equipped with a power sliding
sunroof. To open or close your sunroof, the ignition must
be on or Retained Accessory Power (RAP) must be
active. SeeRetained Accessory Power (RAP) on
page 2-22for more information.The sunroof control is
located on the overhead
console. Press the
rear of the control to open
the sunroof to the vent
position, then press
the rear of the control
again to express-open
the sunroof.
To close the sunroof, press and hold the front of the
control. The control must be held until the glass
stops moving, so that the sunroof will be fully seated.
The sunroof also has a roller sunscreen that can
be used to block the rays of the sun. The roller
sunscreen can be manually operated with the sunroof in
an open or closed position. To open the sunscreen,
press up to unlatch it and roll it back. To close, pull it
forward and latch it to the close position.
If the battery has been recharged, disconnected, or not
working, the sunroof may need to be reprogrammed.
To do this, start the vehicle and press forward on
the sunroof control until it moves to a fully closed
position. This resets the sunroof memory, enabling the
sunroof to function properly.
2-78