2006 CHEVROLET SILVERADO display
[x] Cancel search: displayPage 98 of 594
Mirrors...........................................................2-56
Manual Rearview Mirror.................................2-56
Automatic Dimming Rearview Mirror with
OnStar
®and Compass...............................2-56
Automatic Dimming Rearview Mirror with
OnStar
®, Compass and Temperature
Display....................................................2-58
Automatic Dimming Rearview Mirror with
Compass.................................................2-60
Automatic Dimming Rearview Mirror with
Compass and Temperature Display..............2-62
Outside Manual Mirrors..................................2-64
Outside Camper-Type Mirrors.........................2-65
Outside West Coast-Type Mirrors....................2-66
Outside Power Mirrors...................................2-66
Outside Power Foldaway Mirrors.....................2-67
Outside Automatic Dimming Mirror..................2-68
Outside Curb View Assist Mirrors....................2-68Outside Convex Mirror...................................2-68
Outside Heated Mirrors..................................2-68
OnStar
®System.............................................2-69
Universal Home Remote System......................2-71
Universal Home Remote System Operation......2-72
Storage Areas................................................2-75
Glove Box...................................................2-75
Cupholder(s)................................................2-75
Coinholder(s)................................................2-75
Front Storage Area.......................................2-76
Center Console Storage Area.........................2-76
Tonneau Cover............................................2-76
Sunroof.........................................................2-78
Vehicle Personalization...................................2-79
Memory Seat...............................................2-79
Section 2 Features and Controls
2-2
Page 120 of 594

3. Plug it into a normal, grounded 110-volt AC outlet.
{CAUTION:
Plugging the cord into an ungrounded outlet
could cause an electrical shock. Also, the
wrong kind of extension cord could overheat
and cause a �re. You could be seriously
injured. Plug the cord into a properly grounded
three-prong 110-volt AC outlet. If the cord will
not reach, use a heavy-duty three-prong
extension cord rated for at least 15 amps.
4. Before starting the engine, be sure to unplug and
store the cord as it was before to keep it away
from moving engine parts. If you do not, it could be
damaged.
How long should you keep the coolant heater plugged
in? The answer depends on the outside temperature, the
kind of oil you have, and some other things. Instead
of trying to list everything here, we ask that you contact
your dealer in the area where you will be parking
your vehicle. The dealer can give you the best advice
for that particular area.
Automatic Transmission Operation
If your vehicle is has an automatic transmission, it
features an electronic shift position indicator within the
instrument panel cluster. This display must be powered
anytime the shift lever is moved out of PARK (P).
SeeFuses and Circuit Breakers on page 5-126.
There are several different positions for your shift lever.
See “Range Selection Mode” later in this section.Automatic Transmission
Allison Transmission®
2-24
Page 122 of 594
{CAUTION:
If you have four-wheel drive, your vehicle will
be free to roll — even if your shift lever is in
PARK (P) — if your transfer case is in
NEUTRAL. So, be sure the transfer case is in a
drive gear, two-wheel high (2H) or four-wheel
high (4H) or four-wheel low (4L) — not in
NEUTRAL. SeeShifting Into Park (P)
(Automatic Transmission) on page 2-50.
REVERSE (R):Use this gear to back up. If your vehicle
has the Allison Transmission
®, the R on the shift
display, may blink if the shift inhibitor is active.
Notice:Shifting to REVERSE (R) while your vehicle
is moving forward could damage the transmission.
The repairs would not be covered by your warranty.
Shift to REVERSE (R) only after your vehicle is
stopped.
To rock your vehicle back and forth to get out of snow,
ice, or sand without damaging your transmission,
seeIf Your Vehicle is Stuck in Sand, Mud, Ice, or Snow
on page 4-46.NEUTRAL (N):In this position, your engine does not
connect with the wheels. To restart when you are
already moving, use NEUTRAL (N) only. Also, use
NEUTRAL (N) when your vehicle is being towed.
{CAUTION:
Shifting into a drive gear while your engine is
running at high speed is dangerous. Unless
your foot is �rmly on the brake pedal, your
vehicle could move very rapidly. You could
lose control and hit people or objects. Do not
shift into a drive gear while your engine is
running at high speed.
Notice:Shifting out of PARK (P) or NEUTRAL (N)
with the engine running at high speed may damage
the transmission. The repairs would not be
covered by your warranty. Be sure the engine is not
running at high speed when shifting your vehicle.
DRIVE (D):This position is for normal driving. If
you need more power for passing, and you are:
Going less than about 35 mph (55 km/h), push your
accelerator pedal about halfway down.
Going about 35 mph (55 km/h) or more, push the
accelerator all the way down.
2-26
Page 125 of 594
To use this feature, do the following:
1. Move the shift lever to the MANUAL MODE (M).
When in the MANUAL MODE, the transmission’s
current gear range will be the highest attainable
range with all the lower gears available.
2. Press the plus/minus buttons to upshift or downshift
selecting the desired range of gears for your current
driving conditions.
The Range Selection Mode allows you to control the
vehicle’s engine and vehicle speed while driving
down hill by allowing you to select a desired gear.
The DIC shows the six available ranges with the highest
attainable range shown in brackets. SeeDriver
Information Center (DIC) on page 3-51andDIC
Operation and Displays on page 3-52for more
information.
While using the Range Selection mode feature, cruise
control and the Tow/Haul mode can be used.
Low Traction Mode
(Allison Transmission®)
If your vehicle has the DURAMAX®diesel engine and
the Allison Transmission®, it is equipped with a Low
Traction Mode that assists in vehicle acceleration when
road conditions are slippery, such as ice or snow.While at a stop, selecting the second gear range using
the Range Selection system, will allow the Allison
Transmission
®to limit torque to the wheels after it
detects wheel slip, preventing the tires from spinning.
Notice:Spinning the tires or holding the vehicle in
one place on a hill using only the accelerator
pedal may damage the transmission. If you are
stuck, do not spin the tires. When stopping on a hill,
use the brakes to hold the vehicle in place.
Cold Weather Operation
(Allison Transmission®)
On cold days, approximately 32°F (0°C) or colder, your
automatic transmission is designed to shift differently.
The transmission uses a warm-up mode shift schedule
until the engine reaches normal operating temperature.
While the transmission is in warm-up mode it is
normal for transmission upshifts to be delayed or held
longer. This feature improves heater performance
by giving quicker vehicle warm-ups.
When temperatures are below−13°F (−25°C), the
transmission will prevent certain operations to protect
against damage. When active the DIC will display
the message “Trans in Warm-up”.
SeeDIC Warnings and Messages on page 3-54for
more information.
2-29
Page 152 of 594
Mirrors
Manual Rearview Mirror
Pull or push the tab under the inside rearview mirror
to adjust it to the night or daytime setting. In the
nighttime setting, the glare from headlamps behind the
vehicle will be less intense.
Automatic Dimming Rearview Mirror
with OnStar
®and Compass
Your vehicle may have an automatic-dimming rearview
mirror with a compass and the OnStar®system.
There are three additional buttons for the OnStar
®
system. See your dealer for more information on the
system and how to subscribe to OnStar®. SeeOnStar®
System on page 2-69for more information about the
services OnStar®provides.
Mirror Operation
When turned on, this mirror automatically dims to the
proper level to minimize glare from any headlamps
behind you after dark.
O(On/Off): This is the on/off button for the automatic
dimming feature and compass. Press the far left button,
located below the mirror face, for up to three seconds
to turn the feature on and off. A light on the mirror will be
lit while the feature is turned on.
Compass Operation
Press the on/off button once to turn the compass on
or off.
There is a compass display in the window in the upper
right corner of the mirror face. The compass displays
a maximum of two characters. For example, “NE”
is displayed for north-east.
Compass Calibration
Press and hold the on/off button down for nine seconds
to activate the compass calibration mode. CAL will
be displayed in the compass window on the mirror.
The compass can be calibrated by driving the vehicle in
circles at 5 mph (8 km/h) or less until the display
reads a direction.
2-56
Page 153 of 594
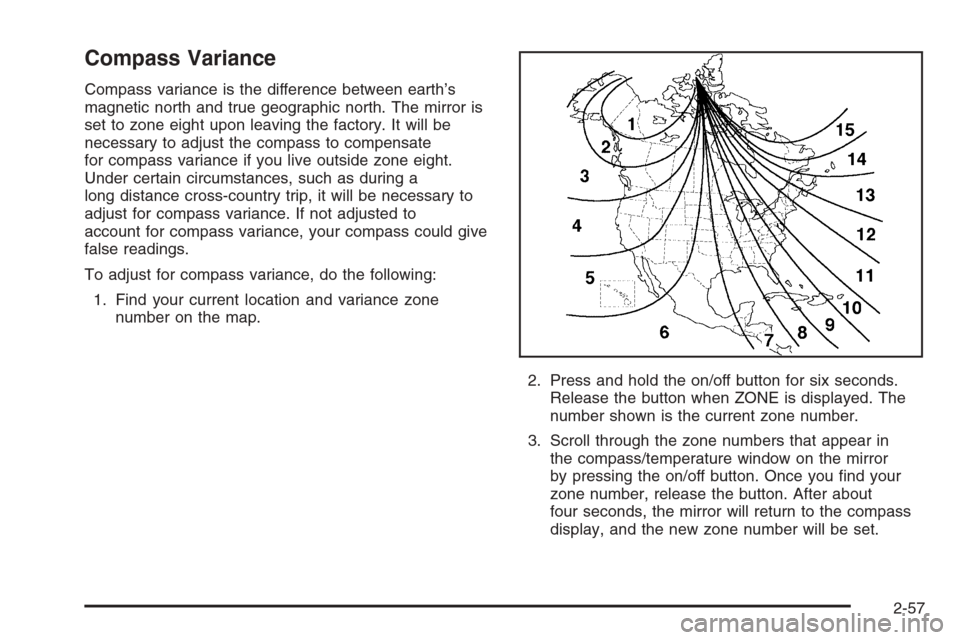
Compass Variance
Compass variance is the difference between earth’s
magnetic north and true geographic north. The mirror is
set to zone eight upon leaving the factory. It will be
necessary to adjust the compass to compensate
for compass variance if you live outside zone eight.
Under certain circumstances, such as during a
long distance cross-country trip, it will be necessary to
adjust for compass variance. If not adjusted to
account for compass variance, your compass could give
false readings.
To adjust for compass variance, do the following:
1. Find your current location and variance zone
number on the map.
2. Press and hold the on/off button for six seconds.
Release the button when ZONE is displayed. The
number shown is the current zone number.
3. Scroll through the zone numbers that appear in
the compass/temperature window on the mirror
by pressing the on/off button. Once you �nd your
zone number, release the button. After about
four seconds, the mirror will return to the compass
display, and the new zone number will be set.
2-57
Page 154 of 594

Automatic Dimming Rearview
Mirror with OnStar
®, Compass and
Temperature Display
Your vehicle may have this feature. When on, an
automatic dimming mirror automatically dims to the
proper level to minimize glare from lights behind
you after dark.
The mirror also includes a dual display in the upper
right corner of the mirror face. The compass reading and
the outside temperature will both appear in the display
at the same time.
P(On/Off):This is the on/off button.
Temperature and Compass Display
Press the on/off button, located to the far left, brie�y to
turn the compass/temperature display on or off.
If the display reads CAL, you will need to calibrate the
compass. For more information on calibration, see below.
To adjust between Fahrenheit and Celsius do the
following:
1. Press and hold the on/off button for
approximately four seconds until either a
�ashing F or C appears.2. Press the button again to change the display to the
desired unit of measurement. After approximately
four seconds of inactivity, the new unit will be locked
in and the compass/temperature display will return.
If an abnormal temperature reading is displayed for an
extended period of time, please consult your dealer.
Under certain circumstances, a delay in updating
the temperature is normal.
Automatic Dimming Mirror Operation
The automatic dimming mirror function is turned
on automatically each time the ignition is started. To
operate the automatic dimming mirror, do the following:
1. Make sure the green indicator light, located to the left
of the on/off button, is lit. If it’s not, press and hold the
on/off button for approximately six seconds until the
green light comes on, indicating that the mirror is in
automatic dimming mode.
2. Turn off the automatic dimming mirror function
by pressing and holding the on/off button for
approximately six seconds, until the green indicator
light turns off.
2-58
Page 155 of 594
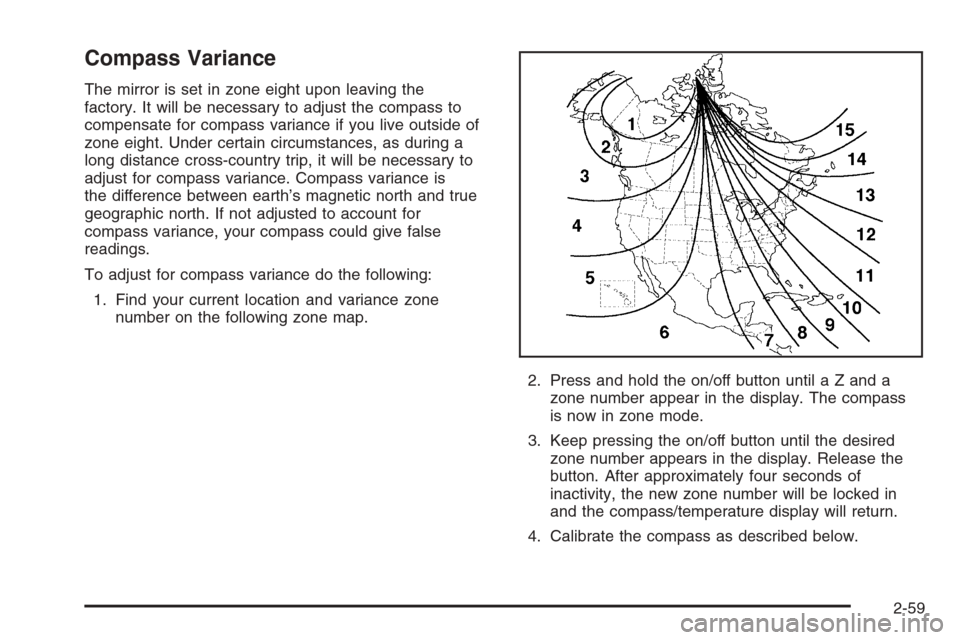
Compass Variance
The mirror is set in zone eight upon leaving the
factory. It will be necessary to adjust the compass to
compensate for compass variance if you live outside of
zone eight. Under certain circumstances, as during a
long distance cross-country trip, it will be necessary to
adjust for compass variance. Compass variance is
the difference between earth’s magnetic north and true
geographic north. If not adjusted to account for
compass variance, your compass could give false
readings.
To adjust for compass variance do the following:
1. Find your current location and variance zone
number on the following zone map.
2. Press and hold the on/off button until a Z and a
zone number appear in the display. The compass
is now in zone mode.
3. Keep pressing the on/off button until the desired
zone number appears in the display. Release the
button. After approximately four seconds of
inactivity, the new zone number will be locked in
and the compass/temperature display will return.
4. Calibrate the compass as described below.
2-59