2006 CHEVROLET IMPALA CD changer
[x] Cancel search: CD changerPage 121 of 394

Instrument Panel Overview...............................3-4
Hazard Warning Flashers................................3-6
Other Warning Devices...................................3-6
Horn .............................................................3-6
Tilt Wheel.....................................................3-6
Turn Signal/Multifunction Lever.........................3-7
Turn and Lane-Change Signals........................3-7
Headlamp High/Low-Beam Changer..................3-8
Flash-to-Pass.................................................3-8
Windshield Wipers..........................................3-8
Windshield Washer.........................................3-9
Cruise Control..............................................3-10
Exterior Lamps.............................................3-12
Delayed Headlamps......................................3-14
Daytime Running Lamps (DRL)/Automatic
Headlamp System......................................3-14
Fog Lamps ..................................................3-15
Instrument Panel Brightness...........................3-15
Courtesy Lamps...........................................3-15
Dome Lamp .................................................3-15
Entry Lighting...............................................3-16
Delayed Entry Lighting...................................3-16
Delayed Exit Lighting.....................................3-16
Parade Dimming...........................................3-17Reading Lamps............................................3-17
Battery Run-Down Protection..........................3-17
Accessory Power Outlet(s).............................3-17
Ashtray(s) and Cigarette Lighter......................3-18
Climate Controls............................................3-19
Climate Control System.................................3-19
Outlet Adjustment.........................................3-22
Passenger Compartment Air Filter...................3-23
Warning Lights, Gages, and Indicators............3-24
Instrument Panel Cluster................................3-25
Speedometer and Odometer...........................3-26
Tachometer.................................................3-26
Safety Belt Reminder Light.............................3-26
Passenger Safety Belt Reminder Light.............3-26
Airbag Readiness Light..................................3-27
Passenger Airbag Status Indicator...................3-28
Charging System Light..................................3-30
Brake System Warning Light..........................3-30
Anti-Lock Brake System Warning Light.............3-31
Traction Control System (TCS) Warning Light . . .3-32
Engine Coolant Temperature Warning Light......3-32
Engine Coolant Temperature Gage..................3-33
Tire Pressure Light.......................................3-33
Section 3 Instrument Panel
3-1
Page 127 of 394

Turn Signal/Multifunction Lever
The lever on the left side of the steering column
includes the following:
GTurn and Lane Change Signals. SeeTurn
and Lane-Change Signals on page 3-7.
2Headlamp High/Low-Beam Changer. See
Headlamp High/Low-Beam Changer on page 3-8.
Flash-to-Pass. SeeFlash-to-Pass on page 3-8.
NWindshield Wipers. SeeWindshield Wipers
on page 3-8.
LQWindshield Washer. SeeWindshield
Washer on page 3-9.
For information on the headlamps, seeExterior Lamps
on page 3-12.
Turn and Lane-Change Signals
The turn signal has two upward (for right) and two
downward (for left) positions. These positions allow you
to signal a turn or a lane change.
To signal a turn, move the lever all the way up or down.
When the turn is �nished, the lever will return
automatically.
An arrow on the instrument
panel cluster will �ash in
the direction of the
turn or lane change.
To signal a lane change, just raise or lower the lever
until the arrow starts to �ash. Hold it there until you
complete your lane change. The lever will return by itself
when you release it. If you momentarily press and
release the lever, the turn signal will �ash three times.
If the arrow �ashes faster than normal as you signal
a turn or a lane change, a signal bulb may be burned out
and other drivers won’t see your turn signal.
If a bulb is burned out, replace it to help avoid an
accident. If the arrows don’t go on at all when you signal
a turn, check for burned-out bulbs and then check the
fuse. SeeFuses and Circuit Breakers on page 5-94.
3-7
Page 128 of 394

Turn Signal On Chime
If you leave either one of your turn signals on and drive
more than 3/4 mile (1.2 km), a chime will sound to
alert you.
Headlamp High/Low-Beam Changer
To change the headlamps from low beam to high beam,
push the turn signal/multifunction lever away from you.
When the high beams are
on, a light on the
instrument panel cluster
also will be on if the
ignition is on.
To change the headlamps from high beam to low beam,
pull the turn signal lever toward you.
Flash-to-Pass
With the turn signal lever in the low-beam position, pull
the lever toward you momentarily to switch to
high-beams (to signal that you are going to pass).
If you have the headlamps on, they will return to
low-beams when you release the lever.
This feature operates even when the headlamps are off.
Windshield Wipers
Be sure to clear ice and snow from the wiper blades
before using them. If they are frozen to the windshield,
gently loosen or thaw them. Damaged wiper blades may
not clear the windshield well, making it harder to see and
drive safely. If the blades do become damaged, install
new blades or blade inserts. For more information, see
Windshield Wiper Blade Replacement on page 5-52.
Heavy snow or ice can overload the wiper motor. A
circuit breaker will stop the motor until it cools down.
Clear away snow or ice to prevent an overload.
You control the windshield wipers by turning the band
with the wiper symbol on it.
8(Mist):For a single wiping cycle, turn the band to
mist. Hold it there until the wipers start. Then let go.
The wipers will stop after one wipe. If you want
more wipe cycles, hold the band on mist longer.
3-8
Page 158 of 394

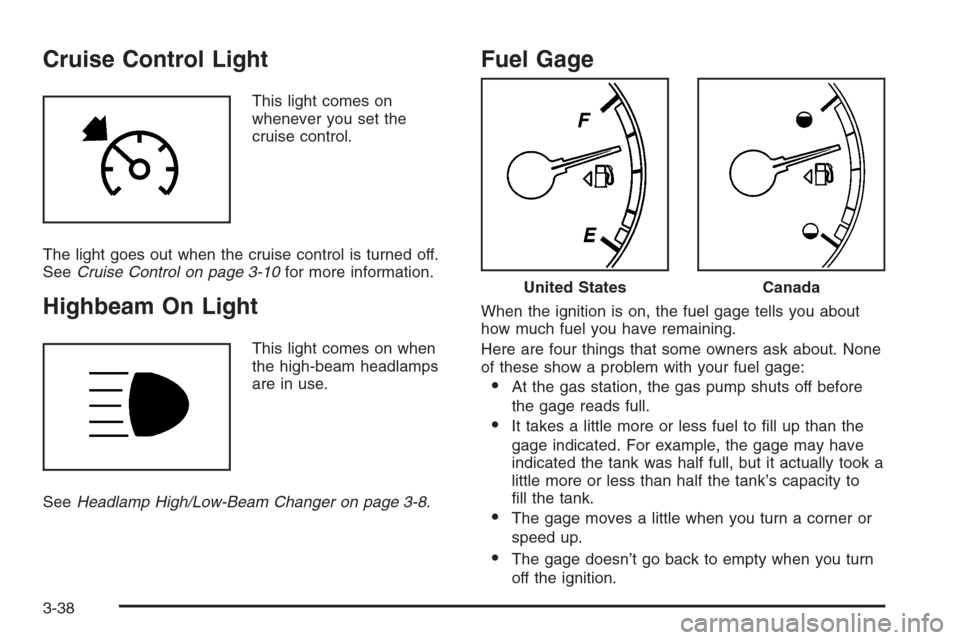
Cruise Control Light
This light comes on
whenever you set the
cruise control.
The light goes out when the cruise control is turned off.
SeeCruise Control on page 3-10for more information.
Highbeam On Light
This light comes on when
the high-beam headlamps
are in use.
SeeHeadlamp High/Low-Beam Changer on page 3-8.
Fuel Gage
When the ignition is on, the fuel gage tells you about
how much fuel you have remaining.
Here are four things that some owners ask about. None
of these show a problem with your fuel gage:
At the gas station, the gas pump shuts off before
the gage reads full.
It takes a little more or less fuel to �ll up than the
gage indicated. For example, the gage may have
indicated the tank was half full, but it actually took a
little more or less than half the tank’s capacity to
�ll the tank.
The gage moves a little when you turn a corner or
speed up.
The gage doesn’t go back to empty when you turn
off the ignition.
United StatesCanada
3-38
Page 186 of 394

The air is very humid. If so, wait about an hour and
try again.
There may have been a problem while burning
the CD-R.
The label may be caught in the CD player.
If the CD is not playing correctly, for any other reason,
try a known good CD.
If any error occurs repeatedly or if an error cannot be
corrected, contact your dealer. If the radio displays
an error message, write it down and provide it to your
dealer while reporting the problem.
Using the Auxiliary Input Jack
Your radio system has an auxiliary input jack located
on the lower right side of the faceplate. This is not
an audio output; do not plug the headphone set into
the front auxiliary input jack. You can however, connect
an external audio device such as an iPod, laptop
computer, MP3 player, CD changer, or cassette tape
player, etc. to the auxiliary input jack for use as another
source for audio listening.Drivers are encouraged to set up any auxiliary device
while the vehicle is in park (P). SeeDefensive Driving on
page 4-2for more information on driver distraction.
To use a portable audio player, connect a 3.5 mm
(1/8 inch) cable to the radio’s front auxiliary input jack.
When a device is connected, press the radio CD/AUX
button to begin playing audio from the device over
the car speakers.
O(Power/Volume):Turn this knob clockwise or
counterclockwise to increase or decrease the volume of
the portable player. You may need to do additional
volume adjustments from the portable device if
the volume does not go loud or soft enough.
BAND:Press this button to listen to the radio while a
portable audio device is playing. The portable audio
device continues playing, so you may want to stop it or
turn it off.
CD/AUX (CD/Auxiliary):Press this button to play a CD
while a portable audio device is playing. Press this
button again and the system begins playing audio from
the connected portable audio player. If a portable
audio player is not connected, “No Aux” displays.
3-66
Page 202 of 394

CD Messages
CHECK DISC:If this message appears on the display
and/or the CD comes out, it could be for one of the
following reasons:
It is very hot. When the temperature returns to
normal, the CD should play.
You are driving on a very rough road. When the
road becomes smoother, the CD should play.
The CD is dirty, scratched, wet, or upside down.
The air is very humid. If so, wait about an hour and
try again.
There may have been a problem while burning
the CD.
The label may be caught in the CD player.
If the CD is not playing correctly, for any other reason,
try a known good CD.
If any error occurs repeatedly or if an error cannot be
corrected, contact your dealer. If the radio displays
an error message, write it down and provide it to your
dealer while reporting the problem.
Using the Auxiliary Input Jack
Your radio system has an auxiliary input jack located on
the lower right side of the faceplate. This is not an
audio output; do not plug the headphone set into the
front auxiliary input jack. You can however, connect an
external audio device such as an iPod, laptop
computer, MP3 player, CD changer, or cassette tape
player, etc. to the auxiliary input jack for use as another
source for audio listening.
To use a portable audio player, connect a 3.5 mm
(1/8 inch) cable to the radio’s front auxiliary input jack.
When a device is connected, press the radio CD/AUX
button to begin playing audio from the device over
the car speakers.
O(Power/Volume):Turn this knob clockwise or
counterclockwise to increase or decrease the volume of
the portable player. You may need to do additional
volume adjustments from the portable device if
the volume does not go loud or soft enough.
BAND:Press this button to listen to the radio while a
portable audio device is playing. The portable audio
device will continue playing, so you may want to stop it
or turn it off.
3-82
Page 386 of 394

Fuel (cont.)
E85 (85% Ethanol)........................................ 5-6
Filling a Portable Fuel Container....................5-10
Filling Your Tank........................................... 5-8
Fuels in Foreign Countries.............................. 5-7
Gage .........................................................3-38
Gasoline Octane........................................... 5-5
Gasoline Speci�cations.................................. 5-5
Fuses
Fuses and Circuit Breakers...........................5-94
Instrument Panel Fuse Block.........................5-94
Underhood Fuse Block.................................5-96
Windshield Wiper.........................................5-93
G
Gage
Engine Coolant Temperature.........................3-33
Fuel..........................................................3-38
Speedometer..............................................3-26
Tachometer.................................................3-26
Garage Door Opener.......................................2-38
Gasoline
Octane........................................................ 5-5
Speci�cations............................................... 5-5
Glove Box.....................................................2-42
GM Mobility Reimbursement Program.................. 7-5
H
Hazard Warning Flashers................................... 3-6
Head Restraints............................................... 1-8
Headlamp
Aiming .......................................................5-47
Headlamp Wiring............................................5-93
Headlamps
Bulb Replacement.......................................5-48
Daytime Running Lamps/Automatic
Headlamp System....................................3-14
Delayed.....................................................3-14
Flash-to-Pass............................................... 3-8
Halogen Bulbs............................................5-48
Headlamps, Front Turn Signal, Sidemarker,
and Parking Lamps..................................5-48
High/Low Beam Changer................................ 3-8
Heated Seats................................................... 1-4
Heater...........................................................3-19
Highbeam On Light.........................................3-38
Highway Hypnosis...........................................4-21
Hill and Mountain Roads..................................4-22
Hood
Checking Things Under................................5-10
Release.....................................................5-11
Horn ............................................................... 3-6
How to Use This Manual...................................... ii
How to Wear Safety Belts Properly...................1-16
6