Page 115 of 394

Read the instructions completely before attempting to
program the Universal Home Remote. Because of
the steps involved, it may be helpful to have another
person available to assist you in the programming steps.
Keep the original hand-held transmitter for use in
other vehicles as well as for future Universal Home
Remote programming. It is also recommended that upon
the sale of the vehicle, the programmed Universal
Home Remote buttons should be erased for security
purposes. See “Erasing Universal Home Remote
Buttons” later in this section or, for assistance, see
Customer Assistance Offices on page 7-4.
Be sure that people and objects are clear of the garage
door or gate operator you are programming. When
programming a garage door, it is advised to park outside
of the garage.
It is recommended that a new battery be installed in
your hand-held transmitter for quicker and more
accurate transmission of the radio-frequency signal.Programming Universal Home Remote
Follow these steps to program up to three channels:
1. Press and hold down the two outside Universal
Home Remote buttons, releasing only when the
Universal Home Remote indicator light begins
to �ash, after 20 seconds. Do not hold down the
buttons for longer than 30 seconds and do not
repeat this step to program a second and/or third
hand-held transmitter to the remaining two Universal
Home Remote buttons.
2. Position the end of your hand-held transmitter
about 1 to 3 inches (3 to 8 cm) away from the
Universal Home Remote buttons while keeping the
indicator light in view.
3. Simultaneously press and hold both the desired
Universal Home Remote button and the hand-held
transmitter button. Do not release the buttons
until Step 4 has been completed.
Some entry gates and garage door openers may
require you to substitute Step 3 with the procedure
noted in “Gate Operator and Canadian
Programming” later in this section.
4. The indicator light will �ash slowly at �rst and then
rapidly after Universal Home Remote successfully
receives the frequency signal from the hand-held
transmitter. Release both buttons.
2-39
Page 118 of 394

Reprogramming a Single Universal
Home Remote Button
To program a device to Universal Home Remote using
a Universal Home Remote button previously trained,
follow these steps:
1. Press and hold the desired Universal Home
Remote button. Do not release the button.
2. The indicator light will begin to �ash after
20 seconds. While still holding the Universal Home
Remote button, proceed with Step 2 under
“Programming Universal Home Remote” shown
earlier in this section.
For additional information on Universal Home Remote,
seeCustomer Assistance Offices on page 7-4.
Storage Areas
Glove Box
To open the glove box, lift up on the lever.
Cupholder(s)
Your vehicle may have cupholders built into the front
center console, front portion of the front center seat and
rear armrest. To access the front cupholders, on the
�ve-passenger model, pull out the divider in front of
the front center console to separate the opening into
two cupholders. To access the front cupholders, on the
six-passenger model, fold the front portion of the
front center seat forward.
2-42
Page 122 of 394

Malfunction Indicator Lamp.............................3-34
Oil Pressure Light.........................................3-36
Security Light...............................................3-37
Fog Lamp Light............................................3-37
Cruise Control Light......................................3-38
Highbeam On Light.......................................3-38
Fuel Gage...................................................3-38
Driver Information Center (DIC).......................3-39
DIC Operation and Displays...........................3-39
DIC Compass..............................................3-44
DIC Warnings and Messages.........................3-45
DIC Vehicle Customization.............................3-52Audio System(s).............................................3-58
Setting the Time (Without Date Display)...........3-60
Setting the Time (With Date Display)...............3-60
Radio with CD (Base)...................................3-62
Radio with CD (MP3)....................................3-67
Theft-Deterrent Feature..................................3-83
Audio Steering Wheel Controls.......................3-83
Radio Reception...........................................3-84
Care of Your CDs.........................................3-85
Care of the CD Player...................................3-85
Backglass Antenna.......................................3-85
XM™ Satellite Radio Antenna System.............3-86
Section 3 Instrument Panel
3-2
Page 149 of 394

{CAUTION:
Even though the passenger sensing system is
designed to turn off the passenger’s frontal
airbag if the system detects a rear-facing child
restraint, no system is failsafe, and no one can
guarantee that an airbag will not deploy under
some unusual circumstance, even though it is
turned off. We recommend that rear-facing
child restraints be secured in the rear seat,
even if the airbag is off.
If the word OFF or the off symbol is lit on the airbag
status indicator, it means that the passenger sensing
system has turned off the right front passenger’s frontal
airbag. SeePassenger Sensing System on page 1-63
for more on this, including important safety information.If, after several seconds, all status indicator lights
remain on, or if there are no lights at all, there may be
a problem with the lights or the passenger sensing
system. See your dealer for service.
{CAUTION:
If the off indicator and the airbag readiness
light ever come on together, it means that
something may be wrong with the airbag
system. If this ever happens, have the vehicle
serviced promptly, because an adult-size
person sitting in the right front passenger
seat may not have the protection of the
frontal airbag. SeeAirbag Readiness Light
on page 3-27.
3-29
Page 157 of 394
This light tells you there
could be a problem with
the engine oil pressure.
The light goes on when you turn your key to RUN or
START. It goes off once you start your engine. That is a
check to be sure the light works. If it does not come
on, be sure to have it �xed so it will be there to warn you
if something goes wrong.
When the light comes on and stays on, it means that oil is
not �owing through your engine properly. You could be
low on oil and you might have some other system
problem.Security Light
For information
regarding this light, see
Theft-Deterrent Systems
on page 2-17.
Fog Lamp Light
The fog lamp light will
come on when the fog
lamps are in use.
The light will go out when the fog lamps are turned off.
SeeFog Lamps on page 3-15for more information.
3-37
Page 193 of 394

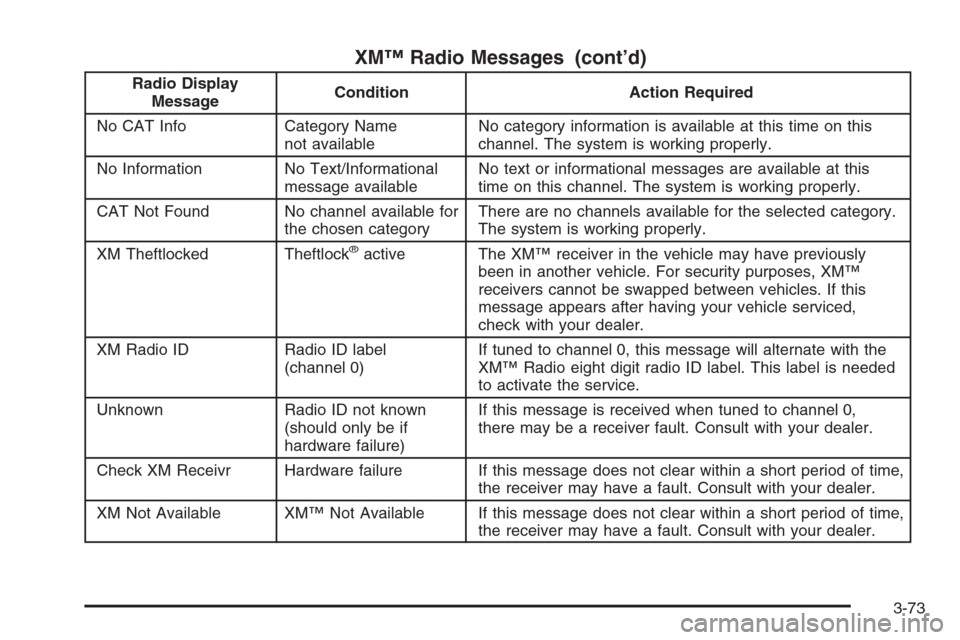
XM™ Radio Messages (cont’d)
Radio Display
MessageCondition Action Required
No CAT Info Category Name
not availableNo category information is available at this time on this
channel. The system is working properly.
No Information No Text/Informational
message availableNo text or informational messages are available at this
time on this channel. The system is working properly.
CAT Not Found No channel available for
the chosen categoryThere are no channels available for the selected category.
The system is working properly.
XM Theftlocked Theftlock
®active The XM™ receiver in the vehicle may have previously
been in another vehicle. For security purposes, XM™
receivers cannot be swapped between vehicles. If this
message appears after having your vehicle serviced,
check with your dealer.
XM Radio ID Radio ID label
(channel 0)If tuned to channel 0, this message will alternate with the
XM™ Radio eight digit radio ID label. This label is needed
to activate the service.
Unknown Radio ID not known
(should only be if
hardware failure)If this message is received when tuned to channel 0,
there may be a receiver fault. Consult with your dealer.
Check XM Receivr Hardware failure If this message does not clear within a short period of time,
the receiver may have a fault. Consult with your dealer.
XM Not Available XM™ Not Available If this message does not clear within a short period of time,
the receiver may have a fault. Consult with your dealer.
3-73
Page 230 of 394
Winter Driving
Here are some tips for winter driving:
Have your vehicle in good shape for winter.
You may want to put winter emergency supplies
in your trunk.
Also seeTires on page 5-54.Include an ice scraper, a small brush or broom, a
supply of windshield washer �uid, a rag, some winter
outer clothing, a small shovel, a �ashlight, a red
cloth, and a couple of re�ective warning triangles.
And, if you will be driving under severe conditions,
include a small bag of sand, a piece of old carpet, or
a couple of burlap bags to help provide traction. Be sure
you properly secure these items in your vehicle.
4-24
Page 240 of 394

If things like suitcases, tools, packages, or anything
else are put inside the vehicle, they will go as fast as the
vehicle goes. If you have to stop or turn quickly, or if
there is a crash, they will keep going.
{CAUTION:
Things you put inside your vehicle can strike
and injure people in a sudden stop or turn,
or in a crash.
Put things in the trunk of your vehicle.
In a trunk, put them as far forward as
you can. Try to spread the weight evenly.
Never stack heavier things, like suitcases,
inside the vehicle so that some of them
are above the tops of the seats.
Do not leave an unsecured child restraint
in your vehicle.
When you carry something inside the
vehicle, secure it whenever you can.
Do not leave a seat folded down unless
you need to.
Towing
Towing Your Vehicle
Consult your dealer or a professional towing service
if you need to have your disabled vehicle towed.
SeeRoadside Assistance Program on page 7-6.
If you want to tow your vehicle behind another vehicle
for recreational purposes (such as behind a motorhome),
see “Recreational Vehicle Towing” following.
Recreational Vehicle Towing
Recreational vehicle towing means towing your vehicle
behind another vehicle – such as behind a motorhome.
The two most common types of recreational vehicle
towing are known as “dinghy towing” (towing your
vehicle with all four wheels on the ground) and
“dolly towing” (towing your vehicle with two wheels
on the ground and two wheels up on a device known as
a “dolly”).
With the proper preparation and equipment, many
vehicles can be towed in these ways. See “Dinghy
Towing” and “Dolly Towing,” following.
4-34