Page 87 of 394

At times you may notice a decrease in operating range.
This is normal for any remote keyless entry system.
If the transmitter does not work or if you have to stand
closer to your vehicle for the transmitter to work, try this:
Check the distance. You may be too far from your
vehicle. You may need to stand closer during rainy
or snowy weather.
Check the location. Other vehicles or objects may
be blocking the signal. Take a few steps to the left
or right, hold the transmitter higher, and try again.
Check to determine if battery replacement is
necessary. See “Battery Replacement” under
Remote Keyless Entry System Operation on
page 2-5.
If you are still having trouble, see your dealer or
a quali�ed technician for service.
Remote Keyless Entry System
Operation
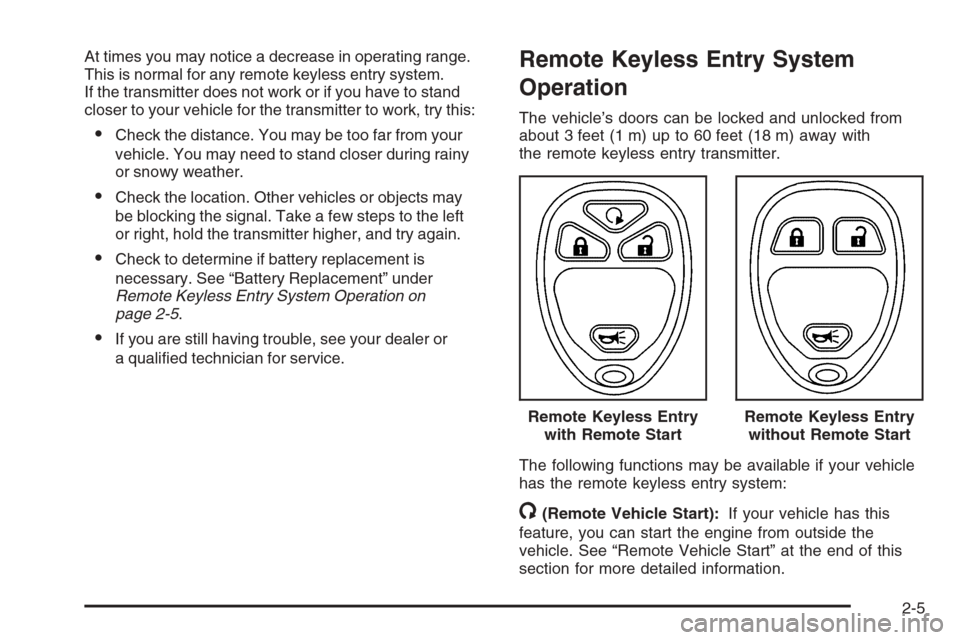
The vehicle’s doors can be locked and unlocked from
about 3 feet (1 m) up to 60 feet (18 m) away with
the remote keyless entry transmitter.
The following functions may be available if your vehicle
has the remote keyless entry system:
/(Remote Vehicle Start):If your vehicle has this
feature, you can start the engine from outside the
vehicle. See “Remote Vehicle Start” at the end of this
section for more detailed information.Remote Keyless Entry
with Remote Start
Remote Keyless Entry
without Remote Start
2-5
Page 89 of 394

Battery Replacement
Under normal use, the battery in your remote keyless
entry transmitter should last about four years.
You can tell the battery is weak if the transmitter will not
work at the normal range in any location. If you have
to get close to your vehicle before the transmitter works,
it is probably time to change the battery.
The KEY FOB BATT LOW message in the vehicle’s
DIC will display if the remote keyless entry transmitter
battery is low.
Notice:When replacing the battery, use care not to
touch any of the circuitry. Static from your body
transferred to these surfaces may damage the
transmitter.
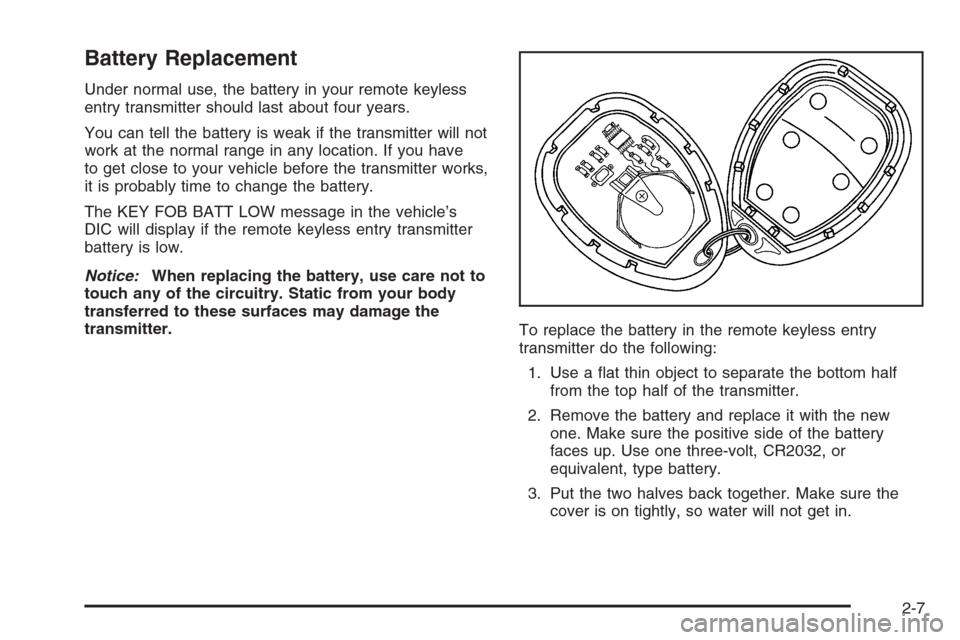
To replace the battery in the remote keyless entry
transmitter do the following:
1. Use a �at thin object to separate the bottom half
from the top half of the transmitter.
2. Remove the battery and replace it with the new
one. Make sure the positive side of the battery
faces up. Use one three-volt, CR2032, or
equivalent, type battery.
3. Put the two halves back together. Make sure the
cover is on tightly, so water will not get in.
2-7
Page 294 of 394
4. Open the hood on the other vehicle and locate the
positive (+) and negative (−) terminal locations on
that vehicle.
You will not see the battery of your vehicle under
the hood. It is located in the trunk. You will not need
to access your battery for jump starting. Your
vehicle has a remote positive (+) and a remote
negative (−) jump starting terminal.
The remote positive
terminal is located under
a red tethered cap on
the engine compartment
fuse block. Remove
the cap to access the
terminal.The remote negative (−)
ground terminal, marked
GND (−), is located at
the front of the engine
compartment on the
driver’s side of the vehicle.
{CAUTION:
An electric fan can start up even when the
engine is not running and can injure you.
Keep hands, clothing and tools away from
any underhood electric fan.
5-34
Page 296 of 394

6. Connect the red positive (+) cable to the positive (+)
terminal location on the vehicle with the dead
battery. Use a remote positive (+) terminal if the
vehicle has one.
7. Do not let the other end touch metal. Connect it
to the positive (+) terminal of the good battery.
Use a remote positive (+) terminal if the vehicle
has one.
8. Now connect the black negative (−) cable to the
negative (−) terminal of the good battery. Use a
remote negative (−) terminal if the vehicle has one.
Do not let the other end touch anything until the
next step. The other end of the negative (−) cable
does not go to the dead battery. It goes to a
heavy, unpainted metal engine part or to a remote
negative (−) terminal on the vehicle with the
dead battery.9. Connect the other end of the negative (−) cable to
the negative (−) terminal location on the vehicle with
the dead battery. Your vehicle has a remote
negative (−) ground terminal marked GND (−).
10. Now start the vehicle with the good battery and run
the engine for a while.
11. Try to start the vehicle that had the dead battery.
If it will not start after a few tries, it probably needs
service.
Notice:If the jumper cables are connected or
removed in the wrong order, electrical shorting may
occur and damage the vehicle. The repairs would
not be covered by your warranty. Always connect
and remove the jumper cables in the correct
order, making sure that the cables do not touch
each other or other metal.
5-36
Page 370 of 394

Roadside Assistance Program
As the owner of a new Chevrolet vehicle, you are
automatically enrolled in the Chevrolet Roadside
Assistance program. This value-added service is
intended to provide you with peace of mind as
you drive in the city or travel the open road. Call
Chevrolet’s Roadside Assistance at1-800-CHEV-USA,
(1-800-243-8872)24 hours a day, 365 days a year
to speak with a Chevrolet Roadside Assistance
representative.
We will provide the following services during the
Bumper-to-Bumper warranty period, at no expense
to you:
Fuel Delivery:Delivery of enough fuel
($5 maximum) for the customer to get to the
nearest service station.
Lock-out Service (identi�cation required):
Replacement keys or locksmith service will
be covered at no charge if you are unable to gain
entry into your vehicle. Delivery of the replacement
key will be covered within 10 miles (16 km).
Emergency Tow:Tow to the nearest dealership
for warranty service or in the event of a
vehicle-disabling accident. Assistance provided
when the vehicle is mired in sand, mud, or snow.
Flat Tire Change:Installation of a spare tire will be
covered at no charge. The customer is responsible
for the repair or replacement of the tire if not
covered by a warrantable failure.
Jump Start:No-start occurrences which require a
battery jump start will be covered at no charge.
Dealer Locator Service
In many instances, mechanical failures are covered
under Chevrolet’s Bumper-to-Bumper warranty.
However, when other services are utilized, our Roadside
Assistance Representatives will explain any payment
obligations you might incur.
For prompt and efficient assistance when calling, please
provide the following to the Roadside Assistance
Representative:
Your name, home address, and home
telephone number.
Telephone number of your location.
Location of the vehicle.
Model, year, color, and license plate number.
Mileage, Vehicle Identi�cation Number (VIN),
and delivery date of the vehicle.
Description of the problem.
7-6