Page 240 of 394

Remember, unless your vehicle has ABS, if you brake
so hard that your wheels stop rolling, you will just
slide. Brake so the wheels always keep rolling and you
can still steer.
Whatever your vehicle’s braking system, allow
greater following distance on any slippery road.
Watch for slippery spots. The road might be �ne
until you hit a spot that is covered with ice.
On an otherwise clear road, ice patches may appear
in shaded areas where the sun cannot reach,
such as around clumps of trees, behind buildings,
or under bridges. Sometimes the surface of a
curve or an overpass may remain icy when the
surrounding roads are clear. If you see a patch of
ice ahead of you, brake before you are on it. Try not
to brake while you are actually on the ice, and
avoid sudden steering maneuvers.
If You Are Caught in a Blizzard
If you are stopped by heavy snow, you could be in a
serious situation. You should probably stay with
your vehicle unless you know for sure that you are near
help and you can hike through the snow. Here are
some things to do to summon help and keep yourself
and your passengers safe:
Turn on the hazard �ashers.
Tie a red cloth to your vehicle to alert police that
you have been stopped by the snow.
Put on extra clothing or wrap a blanket around you.
If you do not have blankets or extra clothing, make
body insulators from newspapers, burlap bags,
rags, �oor mats — anything you can wrap around
yourself or tuck under your clothing to keep warm.
4-28
Page 243 of 394

{CAUTION:
If you let your tires spin at high speed, they
can explode, and you or others could be
injured. And, the transaxle or other parts of the
vehicle can overheat. That could cause an
engine compartment �re or other damage.
When you are stuck, spin the wheels as little
as possible. Do not spin the wheels above
35 mph (55 km/h) as shown on the
speedometer.
Notice:Spinning your wheels can destroy parts of
your vehicle as well as the tires. If you spin the
wheels too fast while shifting your transaxle back
and forth, you can destroy your transaxle. See
Rocking Your Vehicle to Get It Out on page 4-31.
For information about using tire chains on your vehicle,
seeTire Chains on page 5-60.
Rocking Your Vehicle to Get It Out
First, turn your steering wheel left and right. That will
clear the area around your front wheels. If your vehicle
has the Enhanced Traction System (ETS), turn the
ETS off. SeeEnhanced Traction System (ETS)
on page 4-10. Then shift back and forth between
REVERSE (R) and a forward gear, spinning the wheels
as little as possible. Release the accelerator pedal
while you shift, and press lightly on the accelerator pedal
when the transaxle is in gear. By slowly spinning your
wheels in the forward and reverse directions, you
will cause a rocking motion that may free your vehicle.
If that does not get you out after a few tries, you
may need to be towed out. If you do need to be towed
out, seeTowing Your Vehicle on page 4-37.
4-31
Page 250 of 394

Dinghy Towing
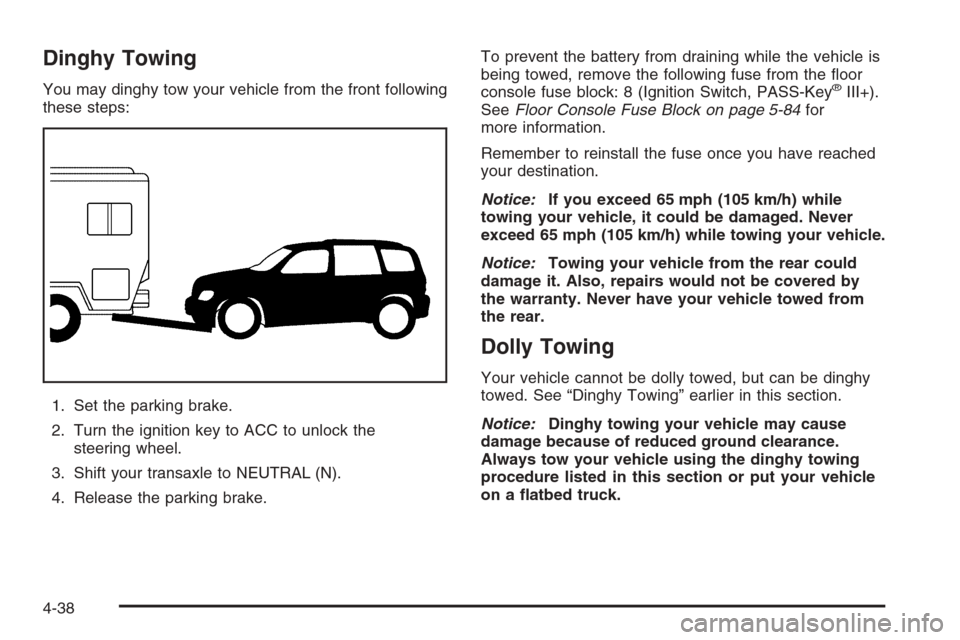
You may dinghy tow your vehicle from the front following
these steps:
1. Set the parking brake.
2. Turn the ignition key to ACC to unlock the
steering wheel.
3. Shift your transaxle to NEUTRAL (N).
4. Release the parking brake.To prevent the battery from draining while the vehicle is
being towed, remove the following fuse from the �oor
console fuse block: 8 (Ignition Switch, PASS-Key®III+).
SeeFloor Console Fuse Block on page 5-84for
more information.
Remember to reinstall the fuse once you have reached
your destination.
Notice:If you exceed 65 mph (105 km/h) while
towing your vehicle, it could be damaged. Never
exceed 65 mph (105 km/h) while towing your vehicle.
Notice:Towing your vehicle from the rear could
damage it. Also, repairs would not be covered by
the warranty. Never have your vehicle towed from
the rear.
Dolly Towing
Your vehicle cannot be dolly towed, but can be dinghy
towed. See “Dinghy Towing” earlier in this section.
Notice:Dinghy towing your vehicle may cause
damage because of reduced ground clearance.
Always tow your vehicle using the dinghy towing
procedure listed in this section or put your vehicle
on a �atbed truck.
4-38
Page 257 of 394

Following Distance
Stay at least twice as far behind the vehicle ahead as
you would when driving your vehicle without a trailer.
This can help you avoid situations that require
heavy braking and sudden turns.
Passing
You will need more passing distance up ahead when
you are towing a trailer. And, because the vehicle
is a good deal longer, you will need to go much farther
beyond the passed vehicle before you can return to
your lane.
Backing Up
Hold the bottom of the steering wheel with one hand.
Then, to move the trailer to the left, just move that hand
to the left. To move the trailer to the right, move your
hand to the right. Always back up slowly and, if possible,
have someone guide you.
Making Turns
Notice:Making very sharp turns while trailering
could cause the trailer to come in contact with the
vehicle. Your vehicle could be damaged. Avoid
making very sharp turns while trailering.
When you are turning with a trailer, make wider turns
than normal. Do this so your trailer will not strike
soft shoulders, curbs, road signs, trees or other objects.
Avoid jerky or sudden maneuvers. Signal well in
advance.
Turn Signals When Towing a Trailer
When you tow a trailer, your vehicle may need a
different turn signal �asher and/or extra wiring.
Check with your dealer. The arrows on your instrument
panel will �ash whenever you signal a turn or lane
change. Properly hooked up, the trailer lamps will also
�ash, telling other drivers you are about to turn,
change lanes or stop.
When towing a trailer, the arrows on your instrument
panel will �ash for turns even if the bulbs on the trailer
are burned out. Thus, you may think drivers behind
you are seeing your signal when they are not. It is
important to check occasionally to be sure the trailer
bulbs are still working.
4-45
Page 309 of 394

Tire Size
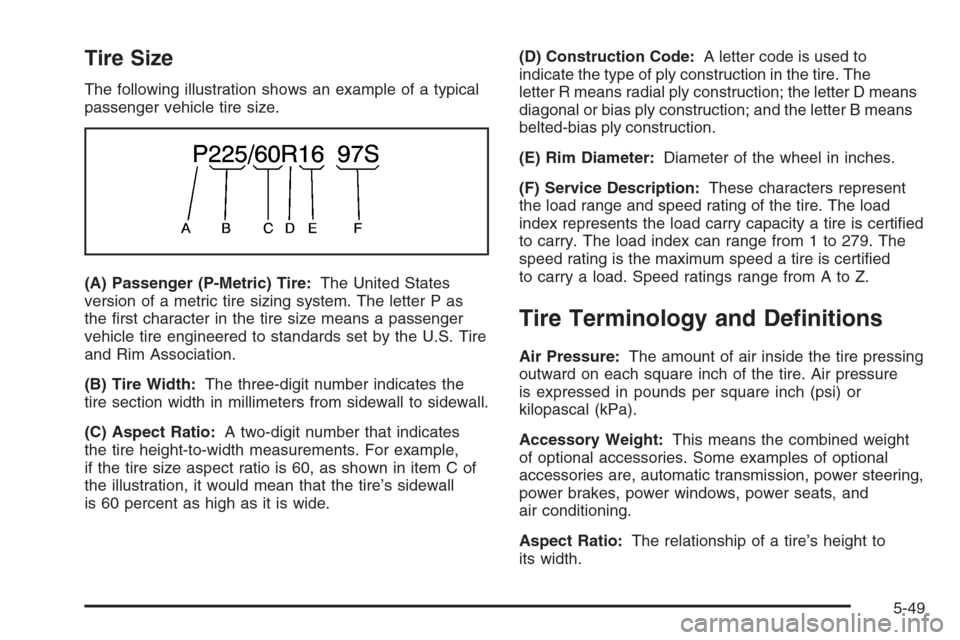
The following illustration shows an example of a typical
passenger vehicle tire size.
(A) Passenger (P-Metric) Tire:The United States
version of a metric tire sizing system. The letter P as
the �rst character in the tire size means a passenger
vehicle tire engineered to standards set by the U.S. Tire
and Rim Association.
(B) Tire Width:The three-digit number indicates the
tire section width in millimeters from sidewall to sidewall.
(C) Aspect Ratio:A two-digit number that indicates
the tire height-to-width measurements. For example,
if the tire size aspect ratio is 60, as shown in item C of
the illustration, it would mean that the tire’s sidewall
is 60 percent as high as it is wide.(D) Construction Code:A letter code is used to
indicate the type of ply construction in the tire. The
letter R means radial ply construction; the letter D means
diagonal or bias ply construction; and the letter B means
belted-bias ply construction.
(E) Rim Diameter:Diameter of the wheel in inches.
(F) Service Description:These characters represent
the load range and speed rating of the tire. The load
index represents the load carry capacity a tire is certi�ed
to carry. The load index can range from 1 to 279. The
speed rating is the maximum speed a tire is certi�ed
to carry a load. Speed ratings range from A to Z.
Tire Terminology and De�nitions
Air Pressure:The amount of air inside the tire pressing
outward on each square inch of the tire. Air pressure
is expressed in pounds per square inch (psi) or
kilopascal (kPa).
Accessory Weight:This means the combined weight
of optional accessories. Some examples of optional
accessories are, automatic transmission, power steering,
power brakes, power windows, power seats, and
air conditioning.
Aspect Ratio:The relationship of a tire’s height to
its width.
5-49
Page 321 of 394

If a Tire Goes Flat
It is unusual for a tire to blowout while you are driving,
especially if you maintain your vehicle’s tires properly.
If air goes out of a tire, it is much more likely to leak out
slowly. But if you should ever have a blowout, here
are a few tips about what to expect and what to do:
If a front tire fails, the �at tire will create a drag that
pulls the vehicle toward that side. Take your foot off the
accelerator pedal and grip the steering wheel �rmly.
Steer to maintain lane position, and then gently brake
to a stop well out of the traffic lane.
A rear blowout, particularly on a curve, acts much like a
skid and may require the same correction you would
use in a skid. In any rear blowout remove your foot from
the accelerator pedal. Get the vehicle under control
by steering the way you want the vehicle to go. It may
be very bumpy and noisy, but you can still steer.
Gently brake to a stop, well off the road if possible.{CAUTION:
Lifting a vehicle and getting under it to do
maintenance or repairs is dangerous without
the appropriate safety equipment and training.
The jack provided with your vehicle is designed
only for changing a �at tire. If it is used for
anything else, you or others could be badly
injured or killed if the vehicle slips off the jack.
Use the jack provided with your vehicle only for
changing a �at tire.
If a tire goes �at, the next part shows how to use the
jacking equipment to change a �at tire safely.
5-61
Page 345 of 394
Fuses Usage
19Electric Power Steering,
Steering Wheel Controls
20 Sunroof
21 Spare
22 Blank
23 Radio
24 Sensing and Diagnostic Module
25Engine Control Module,
Transmission Control Module
26 Door Locks
27 Interior Lamps
28 Blank
29 Power Windows
Relays Usage
30 Climate Control System
31 Blank
32 Retained Accessory Power
Engine Compartment Fuse Block
The underhood fuse block is located on the driver’s side
of the engine compartment. Lift the cover to access
the fuse/relay block.
Fuses Usage
1 Electric Power Steering
2 Rear Defogger
3 Empty
5-85
Page 353 of 394

Scheduled Maintenance
Service MaintenanceIMaintenanceII
Change engine oil and �lter. SeeEngine Oil on page 5-13. Reset oil life system.
SeeEngine Oil Life System on page 5-16.An Emission Control Service.••
Visually check for any leaks or damage.See footnote (j).••
Inspect engine air cleaner �lter. If necessary, replace �lter. SeeEngine
Air Cleaner/Filter on page 5-18.See footnote (k).•
Rotate tires and check in�ation pressures and wear. SeeTire Inspection and
Rotation on page 5-53and “Tire Wear Inspection” inAt Least Once a Month
on page 6-9.••
Inspect brake system.See footnote (a).••
Check engine coolant and windshield washer �uid levels and add �uid as
needed.••
Perform any needed additional services. See “Additional Required Services”
in this section.••
Inspect suspension and steering components.See footnote (b).•
Inspect engine cooling system.See footnote (c).•
Inspect wiper blades.See footnote (d).•
Inspect restraint system components.See footnote (e).•
Lubricate body components.See footnote (f).•
Replace passenger compartment air �lter.See footnote (l).•
Inspect throttle system.See footnote (g).•
6-5