2006 CHEVROLET EXPRESS PASSANGER audio
[x] Cancel search: audioPage 1 of 406

Seats and Restraint Systems........................... 1-1
Front Seats
............................................... 1-3
Rear Seats
............................................... 1-7
Safety Belts
.............................................1-10
Child Restraints
.......................................1-31
Airbag System
.........................................1-66
Restraint System Check
............................1-83
Features and Controls..................................... 2-1
Keys
........................................................ 2-2
Doors and Locks
....................................... 2-7
Windows
.................................................2-14
Theft-Deterrent Systems
............................2-17
Starting and Operating Your Vehicle
...........2-18
Mirrors
....................................................2-29
Storage Areas
.........................................2-34
Instrument Panel............................................. 3-1
Instrument Panel Overview
.......................... 3-4
Climate Controls
......................................3-18
Warning Lights, Gages, and Indicators
........3-23
Audio System(s)
.......................................3-44
Driving Your Vehicle....................................... 4-1
Your Driving, the Road, and Your Vehicle
..... 4-2
Towing
...................................................4-35Service and Appearance Care.......................... 5-1
Service
..................................................... 5-3
Fuel
......................................................... 5-5
Checking Things Under the Hood
...............5-10
All-Wheel Drive
........................................5-43
Rear Axle
...............................................5-44
Front Axle
...............................................5-44
Noise Control System
...............................5-45
Bulb Replacement
....................................5-46
Windshield Wiper Blade Replacement
.........5-52
Tires
......................................................5-53
Appearance Care
.....................................5-84
Vehicle Identification
.................................5-93
Electrical System
......................................5-94
Capacities and Specifications
.....................5-99
Maintenance Schedule..................................... 6-1
Maintenance Schedule
................................ 6-2
Customer Assistance and Information.............. 7-1
Customer Assistance and Information
........... 7-2
Reporting Safety Defects
...........................7-15
Index................................................................ 1
2006 Chevrolet Express Owner ManualM
Page 4 of 406

Vehicle Damage Warnings
Also, in this manual you will find these notices:
Notice:These mean there is something that could
damage your vehicle.
A notice tells about something that can damage the
vehicle. Many times, this damage would not be covered
by your vehicle’s warranty, and it could be costly. But
the notice will tell what to do to help avoid the damage.
When you read other manuals, you might see
CAUTION and NOTICE warnings in different colors or in
different words.
There are also warning labels on the vehicle. They use
the same words, CAUTION or NOTICE.
Vehicle Symbols
The vehicle has components and labels that use
symbols instead of text. Symbols are shown along
with the text describing the operation or information
relating to a specific component, control, message, gage,
or indicator.
If you need help figuring out a specific name of a
component, gage, or indicator, reference the
following topics:
•Seats and Restraint Systems in Section 1
•Features and Controls in Section 2
•Instrument Panel Overview in Section 3
•Climate Controls in Section 3
•Warning Lights, Gages, and Indicators in Section 3
•Audio System(s) in Section 3
•Engine Compartment Overview in Section 5
iv
Page 126 of 406

Oil Pressure Gage........................................3-39
Change Engine Oil Light................................3-40
Security Light...............................................3-40
Cruise Control Light......................................3-41
Reduced Engine Power Light.........................3-41
Highbeam On Light.......................................3-42
Daytime Running Lamps (DRL)
Indicator Light...........................................3-42
Tow/Haul Mode Light....................................3-42
Check Gages Warning Light...........................3-42
Fuel Gage...................................................3-43
Audio System(s).............................................3-44
Setting the Time for Radios without
Radio Data Systems (RDS)........................3-45
Setting the Time for Radios with
Radio Data Systems (RDS)........................3-45AM-FM Radio...............................................3-46
Radio with CD..............................................3-48
Radio with Cassette and CD..........................3-53
Radio with Six-Disc CD.................................3-65
Theft-Deterrent Feature (Non-RDS Radios).......3-76
Theft-Deterrent Feature (RDS Radios).............3-76
Radio Reception...........................................3-77
Care of the Cassette Tape Player...................3-77
Care of Your CDs.........................................3-78
Care of the CD Player...................................3-79
Fixed Mast Antenna......................................3-79
Chime Level Adjustment................................3-79
Section 3 Instrument Panel
3-2
Page 129 of 406

The main components of your instrument panel are the following:
A. Air Outlets. SeeOutlet Adjustment on page 3-20.
B. Turn Signal/Multifunction Lever. SeeTurn
Signal/Multifunction Lever on page 3-7.
C. Instrument Panel Cluster. SeeInstrument Panel
Cluster on page 3-24.
D. Shift Lever. SeeStarting the Engine on page 2-19.
E. Climate Control System. SeeClimate Control System
on page 3-18.
F. Audio System(s). SeeAudio System(s) on
page 3-44.
G. Exterior Lamp Controls. SeeExterior Lamps on
page 3-13.
H. Tow/Haul Mode Button. See “Tow/Haul Mode” under
Towing a Trailer on page 4-37.I. Rear Heating System (If Equipped). SeeRear
Heating System on page 3-21.
J. Accessory Power Outlets/Cigarette Lighter.
SeeAccessory Power Outlet(s) on page 3-16and
Ashtray(s) and Cigarette Lighter on page 3-17.
K. Airbag Off Switch. SeeAirbag Off Switch on
page 1-73.
L. Storage Compartment. SeeStorage Areas on
page 2-34.
M. StabiliTrak
®Button (If Equipped), Passenger Airbag
Status Indicator, and High-Idle System (If Equipped).
SeeStabiliTrak
®System on page 4-9orPassenger
Airbag Status Indicator on page 3-29.
3-5
Page 145 of 406

Rear Heating System
Your vehicle may have a rear heating system that
allows you to adjust the amount of air flowing into the
rear of the vehicle, from the front-seating area. This
feature works with the main climate-control system in
your vehicle.
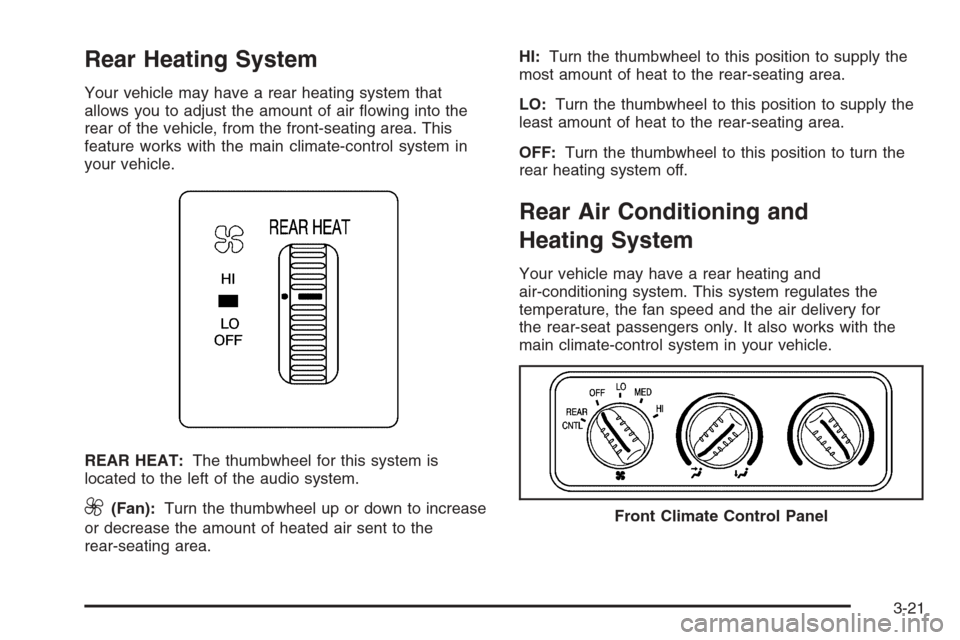
REAR HEAT:The thumbwheel for this system is
located to the left of the audio system.
9(Fan):Turn the thumbwheel up or down to increase
or decrease the amount of heated air sent to the
rear-seating area.HI:Turn the thumbwheel to this position to supply the
most amount of heat to the rear-seating area.
LO:Turn the thumbwheel to this position to supply the
least amount of heat to the rear-seating area.
OFF:Turn the thumbwheel to this position to turn the
rear heating system off.
Rear Air Conditioning and
Heating System
Your vehicle may have a rear heating and
air-conditioning system. This system regulates the
temperature, the fan speed and the air delivery for
the rear-seat passengers only. It also works with the
main climate-control system in your vehicle.
Front Climate Control Panel
3-21
Page 168 of 406

Audio System(s)
If your vehicle came without a radio, the wiring
provisions for a radio and an antenna were installed at
the assembly plant, so that if you want, a radio can
be installed at the dealer.
Determine which radio your vehicle has and then read
the pages following to familiarize yourself with its
features.
Driving without distraction is a necessity for a safer
driving experience. SeeDefensive Driving on page 4-2.
By taking a few moments to read this manual and
get familiar with your vehicle’s audio system, you can
use it with less effort, as well as take advantage of
its features. While your vehicle is parked, set up your
audio system by presetting your favorite radio stations,
setting the tone and adjusting the speakers. Then,
when driving conditions permit, you can tune to your
favorite stations using the presets and steering
wheel controls if the vehicle has them.{CAUTION:
This system provides you with a far greater
access to audio stations and song listings.
Giving extended attention to entertainment
tasks while driving can cause a crash and you
or others can be injured or killed. Always keep
your eyes on the road and your mind on the
drive — avoid engaging in extended searching
while driving.
Keeping your mind on the drive is important for safe
driving. For more information, seeDefensive Driving
on page 4-2.
Here are some ways in which you can help avoid
distraction while driving.
3-44
Page 169 of 406

While your vehicle is parked:
•Familiarize yourself with all of its controls.
•Familiarize yourself with its operation.
•Set up your audio system by presetting your
favorite radio stations, setting the tone, and
adjusting the speakers. Then, when driving
conditions permit, you can tune to your favorite
radio stations using the presets and steering wheel
controls if the vehicle has them.
Notice:Before adding any sound equipment to
your vehicle, such as an audio system, CD player,
CB radio, mobile telephone, or two-way radio, make
sure that it can be added by checking with your
dealer. Also, check federal rules covering mobile
radio and telephone units. If sound equipment can
be added, it is very important to do it properly.
Added sound equipment may interfere with
the operation of your vehicle’s engine, radio,
or other systems, and even damage them. Your
vehicle’s systems may interfere with the operation
of sound equipment that has been added.
Your vehicle may have a feature called Retained
Accessory Power (RAP). With RAP, the audio system
can be played even after the ignition is turned off.
SeeRetained Accessory Power (RAP) on page 2-19
for more information.
Setting the Time for Radios without
Radio Data Systems (RDS)
Press and hold the HR or MIN arrow for two seconds.
Then press HR until the correct hour appears on the
display. Press and hold MIN until the correct minute
appears on the display. The time may be set with the
ignition on or off.
Setting the Time for Radios with
Radio Data Systems (RDS)
The radio may have a button marked with an H or HR to
represent hours and an M or MN to represent minutes.
Press and hold the hour button until the correct hour
appears on the display. Press and hold the minute button
until the correct minute appears on the display. The time
can be set with the ignition on or off.
To synchronize the time with an FM station broadcasting
Radio Data System (RDS) information, press and hold
the hour and minute buttons at the same time until RDS
TIME appears on the display. To accept this time, press
and hold the hour and minute buttons, at the same time,
for another two seconds. If the time is not available from
the station, NO UPDAT will appear on the display.
RDS time is broadcast once a minute. After tuning to an
RDS broadcast station, it may take a few minutes for
the time to update.
3-45
Page 171 of 406

Setting Preset Stations
Up to 18 stations (six FM1, six FM2, and six AM) can
be programmed on the six numbered pushbuttons,
by performing the following steps:
1. Turn the radio on.
2. Press AM FM to select FM1, FM2, or AM.
3. Tune in the desired station.
4. Press and hold one of the six numbered
pushbuttons until you hear a beep. Whenever that
numbered pushbutton is pressed, the station
that was set will return.
5. Repeat the steps for each pushbutton.
Setting the Tone (Bass/Treble)
AUDIO:To adjust the bass and the treble, press and
release AUDIO until BAS or TRE appears on the
display. Then press and hold the up or the down arrow
to increase or to decrease. If a station is weak or
noisy, decrease the treble.
To adjust bass or treble to the middle position, select
BAS or TRE. Then press and hold AUDIO for more
than two seconds until you hear a beep. B and a zero
or T and a zero will appear on the display.To adjust both tone controls and both speaker controls to
the middle position, first end out of audio mode by
pressing another button, causing the radio to perform that
function, or by waiting five seconds for the display to
return to time of day. Then press and hold AUDIO for
more than two seconds until you hear a beep. CEN will
appear on the display.
Adjusting the Speakers (Balance/Fade)
AUDIO:To adjust the balance between the right
and the left speakers, press and release the AUDIO
button until BAL appears on the display. Then press and
hold the up or the down arrow to move the sound
toward the right or the left speakers.
To adjust the fade between the front and the rear
speakers, press and release AUDIO until FAD appears
on the display. Then press and hold the up or the
down arrow to move the sound toward the front or the
rear speakers.
The fade feature may not be available on all radio
systems.
To adjust balance or fade to the middle position, select
BAL or FAD. Then press and hold AUDIO for more
than two seconds until you hear a beep. L and a zero
or F and a zero will appear on the display.
3-47