2006 CHEVROLET EXPRESS CARGO VAN manual transmission
[x] Cancel search: manual transmissionPage 91 of 406
Keys...............................................................2-2
Remote Keyless Entry System.........................2-3
Remote Keyless Entry System Operation...........2-4
Doors and Locks.............................................2-7
Door Locks....................................................2-7
Power Door Locks..........................................2-8
Cargo Door Relocking.....................................2-8
Rear Door Security Locks................................2-8
Lockout Protection..........................................2-9
Sliding Side Door..........................................2-10
60/40 Swing-Out Side Door............................2-11
Rear Doors..................................................2-12
Windows........................................................2-14
Manual Windows..........................................2-15
Power Windows............................................2-15
Swing-Out Windows......................................2-16
Sun Visors...................................................2-17
Theft-Deterrent Systems..................................2-17
Passlock
®....................................................2-17
Starting and Operating Your Vehicle................2-18
New Vehicle Break-In....................................2-18
Ignition Positions..........................................2-18Retained Accessory Power (RAP)...................2-19
Starting the Engine.......................................2-19
Fuel Regulator.............................................2-20
Engine Coolant Heater..................................2-20
Automatic Transmission Operation...................2-22
Parking Brake..............................................2-24
Shifting Into Park (P).....................................2-25
Shifting Out of Park (P).................................2-26
Parking Over Things That Burn.......................2-27
Engine Exhaust............................................2-27
Running the Engine While Parked...................2-28
Mirrors...........................................................2-29
Manual Rearview Mirror.................................2-29
Automatic Dimming Rearview Mirror with
Compass and Temperature Display..............2-29
Outside Manual Mirror...................................2-31
Outside Camper-Type Mirrors.........................2-32
Outside Power Mirrors...................................2-33
Outside Convex Mirror...................................2-33
Outside Heated Mirrors..................................2-34
Storage Areas................................................2-34
Section 2 Features and Controls
2-1
Page 114 of 406
SECOND (2):This position gives you more power but
lower fuel economy than THIRD (3). You can use
SECOND (2) on hills. It can help control your speed as
you go down steep mountain roads, but then you would
also want to use your brakes off and on. If you manually
select SECOND (2), the transmission will drive in
SECOND (2). You may use this feature for reducing
torque to the rear wheels when you are trying to start your
vehicle from a stop on slippery road surfaces.
FIRST (1):This position gives you even more power
but lower fuel economy than SECOND (2). You can
use it on very steep hills, or in deep snow or mud.
If the shift lever is put in FIRST (1), the transmission
will not shift into first gear until the vehicle is going
slowly enough.
Notice:Spinning the tires or holding the vehicle
in one place on a hill using only the accelerator
pedal may damage the transmission. If you
are stuck, do not spin the tires. When stopping on
a hill, use the brakes to hold the vehicle in place.Parking Brake
To set the parking brake, hold the regular brake pedal
down with your right foot. Push down the parking
brake pedal with your left foot.
If the ignition is on, the brake system warning light will
come on.
To release the parking brake, hold the regular brake
pedal down. Pull the handle, located just above
the parking brake pedal, marked BRAKE RELEASE
to release the parking brake.
If the ignition is on when the parking brake is released,
the brake system warning light will go off.
Notice:Driving with the parking brake on can
overheat the brake system and cause premature
wear or damage to brake system parts. Verify that
the parking brake is fully released and the brake
warning light is off before driving.
If you are towing a trailer and are parking on any hill,
seeTowing a Trailer on page 4-37. That section shows
what to do first to keep the trailer from moving.
2-24
Page 255 of 406
Parking on Hills
{CAUTION:
You really should not park your vehicle, with a
trailer attached, on a hill. If something goes
wrong, your rig could start to move. People
can be injured, and both your vehicle and the
trailer can be damaged.
But if you ever have to park your rig on a hill, here’s
how to do it:
1. Apply your regular brakes, but don’t shift into
PARK (P) yet. Then turn your wheels into the curb
if facing downhill or into traffic if facing uphill.
2. Have someone place chocks under the trailer
wheels.
3. When the wheel chocks are in place, release the
regular brakes until the chocks absorb the load.
4. Reapply the regular brakes. Then apply your
parking brake and then shift to PARK (P).
5. Release the regular brakes.
When You Are Ready to Leave After
Parking on a Hill
1. Apply your regular brakes and hold the pedal down
while you:
•start your engine,
•shift into a gear, and
•release the parking brake.
2. Let up on the brake pedal.
3. Drive slowly until the trailer is clear of the chocks.
4. Stop and have someone pick up and store
the chocks.
Maintenance When Trailer Towing
Your vehicle will need service more often when you’re
pulling a trailer. See the Maintenance Schedule for more
on this. Things that are especially important in trailer
operation are automatic transmission fluid (don’t overfill),
engine oil, axle lubricant, belt, cooling system and
brake system. Each of these is covered in this manual,
and the Index will help you find them quickly. If you’re
trailering, it’s a good idea to review these sections
before you start your trip.
Check periodically to see that all hitch nuts and bolts
are tight.
4-51
Page 295 of 406
Jump Starting
If your vehicle’s battery has run down, you may want to
use another vehicle and some jumper cables to start
your vehicle. Be sure to use the following steps to
do it safely.
{CAUTION:
Batteries can hurt you. They can be dangerous
because:
They contain acid that can burn you.
They contain gas that can explode or
ignite.
They contain enough electricity to
burn you.
If you do not follow these steps exactly, some
or all of these things can hurt you.Notice:Ignoring these steps could result in costly
damage to your vehicle that would not be covered
by your warranty.
Trying to start your vehicle by pushing or pulling it
will not work, and it could damage your vehicle.
1. Check the other vehicle. It must have a 12-volt
battery with a negative ground system.
Notice:If the other vehicle’s system is not a 12-volt
system with a negative ground, both vehicles can
be damaged. Only use vehicles with 12-volt systems
with negative grounds to jump start your vehicle.
2. Get the vehicles close enough so the jumper cables
can reach, but be sure the vehicles are not touching
each other. If they are, it could cause a ground
connection you do not want. You would not be able
to start your vehicle, and the bad grounding
could damage the electrical systems.
To avoid the possibility of the vehicles rolling, set the
parking brake firmly on both vehicles involved in the
jump start procedure. Put an automatic transmission
in PARK (P) or a manual transmission in NEUTRAL
before setting the parking brake.
5-39
Page 356 of 406
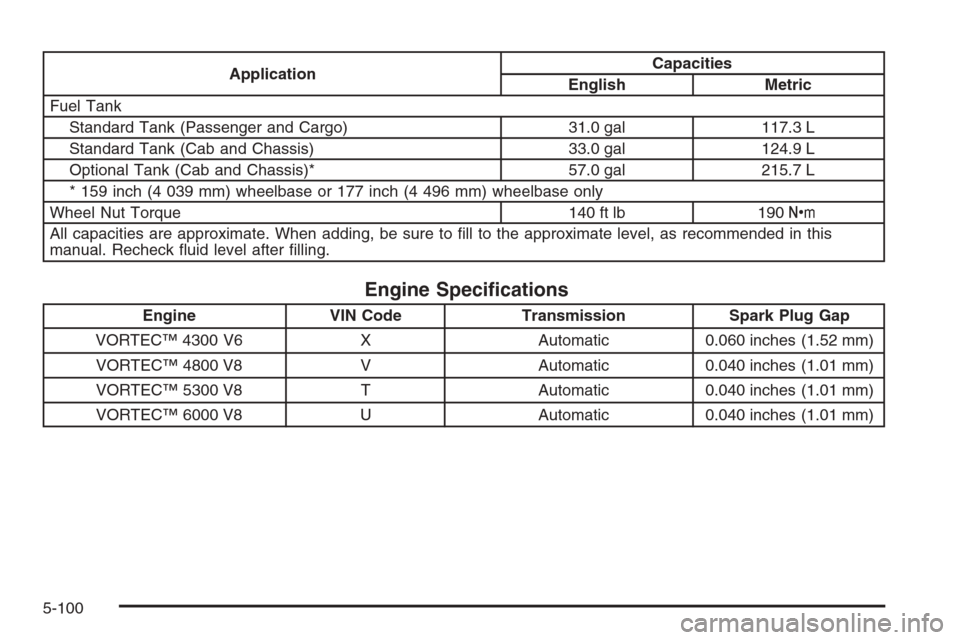
ApplicationCapacities
English Metric
Fuel Tank
Standard Tank (Passenger and Cargo) 31.0 gal 117.3 L
Standard Tank (Cab and Chassis) 33.0 gal 124.9 L
Optional Tank (Cab and Chassis)* 57.0 gal 215.7 L
* 159 inch (4 039 mm) wheelbase or 177 inch (4 496 mm) wheelbase only
Wheel Nut Torque 140 ft lb 190Y
All capacities are approximate. When adding, be sure to fill to the approximate level, as recommended in this
manual. Recheck fluid level after filling.
Engine Speci�cations
Engine VIN Code Transmission Spark Plug Gap
VORTEC™ 4300 V6 X Automatic 0.060 inches (1.52 mm)
VORTEC™ 4800 V8 V Automatic 0.040 inches (1.01 mm)
VORTEC™ 5300 V8 T Automatic 0.040 inches (1.01 mm)
VORTEC™ 6000 V8 U Automatic 0.040 inches (1.01 mm)
5-100
Page 390 of 406
Reporting Safety Defects to the
Canadian Government
If you live in Canada, and you believe that your vehicle
has a safety defect, you should immediately notify
Transport Canada, in addition to notifying General
Motors of Canada Limited. You may call them at
1-800-333-0510 or write to:
Transport Canada
Place de Ville Tower C
330 Sparks Street
Ottawa, Ontario K1A 0N5
Reporting Safety Defects to
General Motors
In addition to notifying NHTSA (or Transport Canada) in
a situation like this, we certainly hope you will notify
General Motors. Please call the Chevrolet Customer
Assistance Center at 1-800-222-1020, or write:
Chevrolet Motor Division
Chevrolet Customer Assistance Center
P.O. Box 33170
Detroit, MI 48232-5170In Canada, please call us at 1-800-263-3777 (English)
or 1-800-263-7854 (French). Or, write:
General Motors of Canada Limited
Customer Communication Centre, 163-005
1908 Colonel Sam Drive
Oshawa, Ontario L1H 8P7
Service Publications Ordering
Information
Service Manuals
Service Manuals have the diagnosis and repair
information on engines, transmission, axle suspension,
brakes, electrical, steering, body, etc.
Transmission, Transaxle, Transfer
Case Unit Repair Manual
This manual provides information on unit repair service
procedures, adjustments, and specifications for GM
transmissions, transaxles, and transfer cases.
7-16