2006 CHEVROLET EXPRESS CARGO VAN drain
[x] Cancel search: drainPage 109 of 406
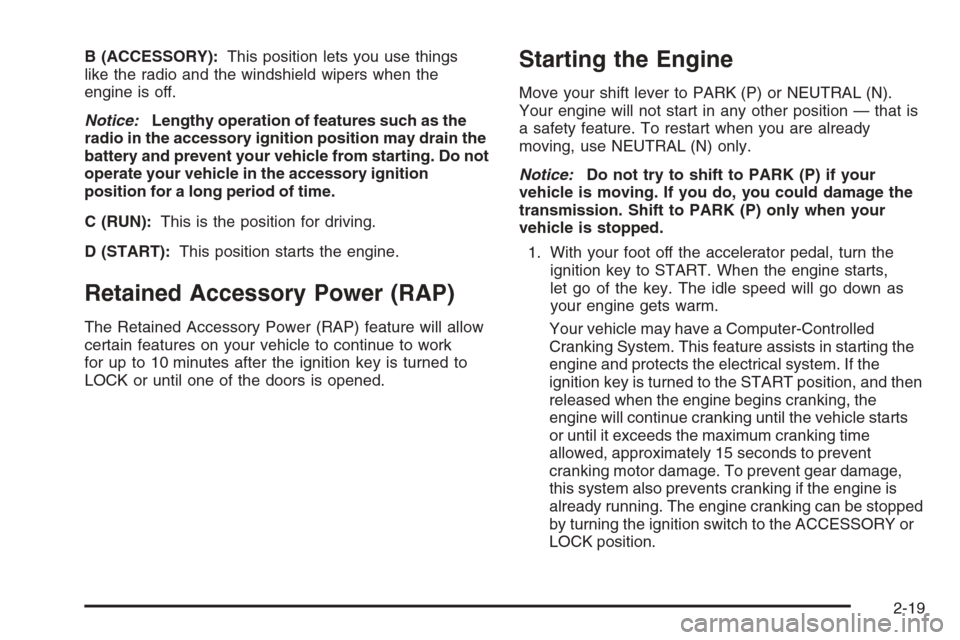
B (ACCESSORY):This position lets you use things
like the radio and the windshield wipers when the
engine is off.
Notice:Lengthy operation of features such as the
radio in the accessory ignition position may drain the
battery and prevent your vehicle from starting. Do not
operate your vehicle in the accessory ignition
position for a long period of time.
C (RUN):This is the position for driving.
D (START):This position starts the engine.
Retained Accessory Power (RAP)
The Retained Accessory Power (RAP) feature will allow
certain features on your vehicle to continue to work
for up to 10 minutes after the ignition key is turned to
LOCK or until one of the doors is opened.
Starting the Engine
Move your shift lever to PARK (P) or NEUTRAL (N).
Your engine will not start in any other position — that is
a safety feature. To restart when you are already
moving, use NEUTRAL (N) only.
Notice:Do not try to shift to PARK (P) if your
vehicle is moving. If you do, you could damage the
transmission. Shift to PARK (P) only when your
vehicle is stopped.
1. With your foot off the accelerator pedal, turn the
ignition key to START. When the engine starts,
let go of the key. The idle speed will go down as
your engine gets warm.
Your vehicle may have a Computer-Controlled
Cranking System. This feature assists in starting the
engine and protects the electrical system. If the
ignition key is turned to the START position, and then
released when the engine begins cranking, the
engine will continue cranking until the vehicle starts
or until it exceeds the maximum cranking time
allowed, approximately 15 seconds to prevent
cranking motor damage. To prevent gear damage,
this system also prevents cranking if the engine is
already running. The engine cranking can be stopped
by turning the ignition switch to the ACCESSORY or
LOCK position.
2-19
Page 110 of 406
Notice:Holding your key in START for longer than
15 seconds at a time will cause your battery to
be drained much sooner. And the excessive heat
can damage your starter motor. Wait about
15 seconds between each try to help avoid draining
your battery or damaging your starter.
2. If it does not start within 10 seconds, push the
accelerator pedal all the way to the floor, while you
hold the ignition key in START. When the engine
starts, let go of the key and let up on the accelerator
pedal. Wait about 15 seconds between each try.
When starting your engine in very cold weather
(below 0°F or−18°C), do this:
1. With your foot off the accelerator pedal, turn the
ignition key to START and hold it there up to
15 seconds. When the engine starts, let go of
the key.
2. If your engine still will not start, or starts but then
stops, it could be flooded with too much gasoline.
Try pushing your accelerator pedal all the way to the
floor and holding it there as you hold the key in
START for about three seconds. When the engine
starts, let go of the key and accelerator. If the
vehicle starts briefly but then stops again, do the
same thing, but this time keep the pedal down
for five or six seconds. This clears the extra
gasoline from the engine.Notice:Your engine is designed to work with the
electronics in your vehicle. If you add electrical
parts or accessories, you could change the way the
engine operates. Before adding electrical equipment,
check with your dealer. If you do not, your engine
might not perform properly. Any resulting damage
would not be covered by your vehicle’s warranty.
Fuel Regulator
Your vehicle has a fuel regulator that shuts the fuel off
when the engine reaches 5,600 rpm.
Engine Coolant Heater
In very cold weather, 0°F (−18°C) or colder, the engine
coolant heater can help. You will get easier starting
and better fuel economy during engine warm-up.
Usually, the coolant heater should be plugged in a
minimum of four hours prior to starting your vehicle.
At temperatures above 32°F (0°C), use of the coolant
heater is not required. Your vehicle may also have
an internal thermostat in the plug end of the cord. This
will prevent operation of the engine coolant heater
when the temperature is at or above 0°F (−18°C) as
noted on the cord.
2-20
Page 156 of 406
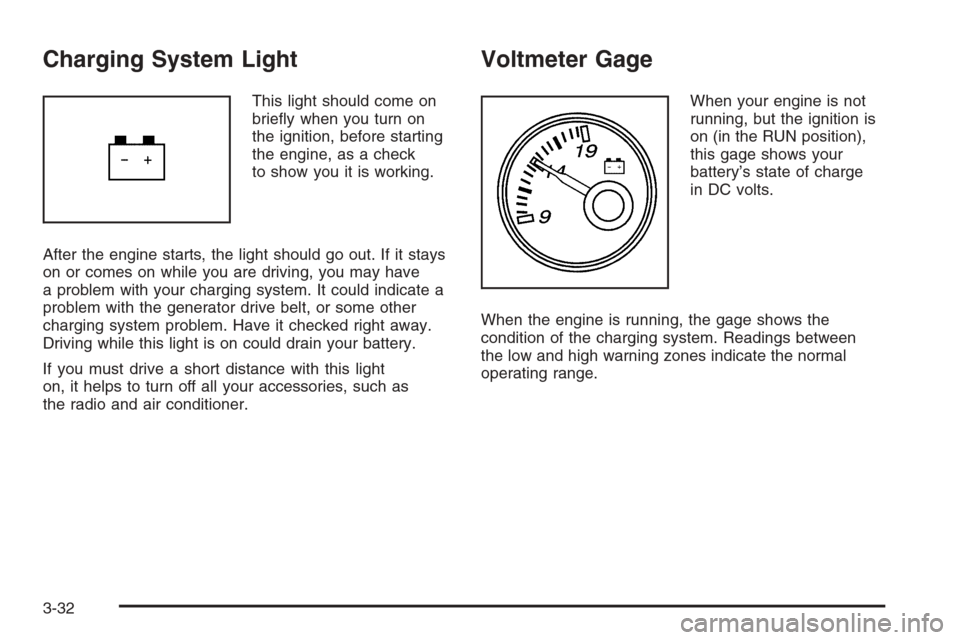
Charging System Light
This light should come on
briefly when you turn on
the ignition, before starting
the engine, as a check
to show you it is working.
After the engine starts, the light should go out. If it stays
on or comes on while you are driving, you may have
a problem with your charging system. It could indicate a
problem with the generator drive belt, or some other
charging system problem. Have it checked right away.
Driving while this light is on could drain your battery.
If you must drive a short distance with this light
on, it helps to turn off all your accessories, such as
the radio and air conditioner.
Voltmeter Gage
When your engine is not
running, but the ignition is
on (in the RUN position),
this gage shows your
battery’s state of charge
in DC volts.
When the engine is running, the gage shows the
condition of the charging system. Readings between
the low and high warning zones indicate the normal
operating range.
3-32
Page 241 of 406
4. Follow the dolly manufacturer’s instructions to
attach and secure the vehicle being towed to
the dolly and then the loaded dolly to the tow
vehicle. Make sure the wheels are straight
before towing.
Use an adequate clamping device to ensure that
the front wheels are locked into the straight position.
5. Release the parking brake only after the vehicle
being towed is firmly attached to the tow vehicle.
6. Turn the ignition to LOCK.
If the tow vehicle will not be started or driven for
six weeks or more, remove the battery cable
from the negative terminal (post) of the battery to
prevent your battery from draining while towing.
All-Wheel-Drive Vehicles
Your vehicle was not designed to be towed with
two wheels on the ground. To properly tow these
vehicles, they should be placed on a platform trailer
with all four wheels off the ground.
Notice:Towing an all-wheel-drive vehicle with all
four wheels on the ground, or even with only two of
its wheels on the ground, will damage drivetrain
components. Do not tow an all-wheel-drive vehicle if
any of its wheels will be on the ground.
Towing a Trailer
{CAUTION:
If you do not use the correct equipment and
drive properly, you can lose control when you
pull a trailer. For example, if the trailer is too
heavy, the brakes may not work well — or even
at all. You and your passengers could be
seriously injured. Pull a trailer only if you have
followed all the steps in this section. Ask your
dealer for advice and information about towing
a trailer with your vehicle.
Notice:Pulling a trailer improperly can damage
your vehicle and result in costly repairs that would
not be covered by your warranty. Always follow
the instructions in this section and check with your
dealer for more information about towing a trailer
with your vehicle.
To identify the trailering capacity of your vehicle, you
should read the information in “Weight of the Trailer” that
appears later in this section.
4-37
Page 269 of 406
A. Battery. SeeBattery on page 5-38.
B. Radiator Pressure Cap. SeeRadiator Pressure Cap
on page 5-25.
C. Coolant Recovery Tank. SeeCooling System on
page 5-26.
D. Automatic Transmission Fluid Dipstick. See
“Checking the Fluid Level” underAutomatic
Transmission Fluid on page 5-19.
E. Engine Oil Fill Cap. See “When to Add Engine Oil”
underEngine Oil (Gasoline Engine) on page 5-13.
F. Engine Oil Dipstick. See “Checking Engine Oil” under
Engine Oil (Gasoline Engine) on page 5-13.
G. Engine Air Cleaner/Filter. SeeEngine Air
Cleaner/Filter on page 5-18.
H. Power Steering Fluid Reservoir. SeePower Steering
Fluid on page 5-32.
I. Brake Master Cylinder Reservoir. See “Brake Fluid”
underBrakes on page 5-34.
J. Windshield Washer Fluid Reservoir. See “Adding
Washer Fluid” underWindshield Washer Fluid
on page 5-33.Engine Oil (Gasoline Engine)
If your vehicle has a diesel engine, see “Engine Oil” in
the DURAMAX®Diesel Engine Supplement.
Checking Engine Oil
It is a good idea to check your engine oil every time you
get fuel. In order to get an accurate reading, the oil
must be warm and the vehicle must be on level ground.
The engine oil dipstick handle is a yellow loop.
SeeEngine Compartment Overview on page 5-12
for the location of the engine oil dipstick.
1. Turn off the engine and give the oil several minutes
to drain back into the oil pan. If you do not do this,
the oil dipstick might not show the actual level.
2. Pull out the dipstick and clean it with a paper towel
or cloth, then push it back in all the way. Remove it
again, keeping the tip down, and check the level.
5-13
Page 273 of 406
How to Reset the Engine Oil Life
System
The Engine Oil Life System calculates when to change
your engine oil and filter based on vehicle use. Anytime
your oil is changed, reset the system so it can calculate
when the next oil change is required. If a situation occurs
where you change your oil prior to a change engine oil
light being turned on, reset the system.
To reset the change engine oil light, do the following:
1. Turn the ignition key to RUN with the engine off.
2. Fully press and release the accelerator pedal slowly
three times within five seconds.
3. If the Change Engine Oil light flashes for
five seconds, the system is reset.
4. Turn the key to LOCK.
If the change engine oil light comes back on when you
start your vehicle, the engine oil life system has not
reset. Repeat the procedure. If it still does not reset, see
your dealer for service. SeeChange Engine Oil Light
on page 3-40.
What to Do with Used Oil
Used engine oil contains certain elements that may be
unhealthy for your skin and could even cause cancer.
Do not let used oil stay on your skin for very long. Clean
your skin and nails with soap and water, or a good
hand cleaner. Wash or properly dispose of clothing or
rags containing used engine oil. See the manufacturer’s
warnings about the use and disposal of oil products.
Used oil can be a threat to the environment. If you
change your own oil, be sure to drain all the oil from the
filter before disposal. Never dispose of oil by putting it in
the trash, pouring it on the ground, into sewers, or into
streams or bodies of water. Instead, recycle it by taking it
to a place that collects used oil. If you have a problem
properly disposing of your used oil, ask your dealer, a
service station, or a local recycling center for help.
5-17
Page 365 of 406
(i)Drain, �ush, and re�ll cooling system. This service
can be complex; you should have your dealer perform
this service. See Engine Coolant on page 5-22 for
what to use. Inspect hoses. Clean radiator, condenser,
pressure cap, and �ller neck. Pressure test the
cooling system and pressure cap.
(j)A �uid loss in any vehicle system could indicate a
problem. Have the system inspected and repaired and
the �uid level checked. Add �uid if needed.
(k)Inspect system. Check all fuel and vapor lines and
hoses for proper hook-up, routing, and condition. Check
that the purge valve works properly, if equipped.
Replace as needed.
(l)If you drive regularly under dusty conditions, inspect
the �lter at each engine oil change.
(m)Check system for interference or binding and for
damaged or missing parts. Replace parts as needed.
Replace any components that have high effort or
excessive wear. Do not lubricate accelerator or cruise
control cables.
(n)Visually inspect belt for fraying, excessive cracks,
or obvious damage. Replace belt if necessary.Owner Checks and Services
These owner checks and services should be performed
at the intervals specified to help ensure the safety,
dependability, and emission control performance of your
vehicle. Your GM Goodwrench
®dealer can assist you
with these checks and services.
Be sure any necessary repairs are completed at once.
Whenever any fluids or lubricants are added to your
vehicle, make sure they are the proper ones, as shown
inRecommended Fluids and Lubricants (Gasoline
Engine) on page 6-13.
At the First 100, 1,000 and 6,000 Miles
(160, 1 600 and 10 000 km)
For vehicles with dual wheels, check dual wheel nut
torque. For proper torque, seeCapacities and
Speci�cations on page 5-99.
6-9