2006 CHEVROLET EQUINOX All wheel drive
[x] Cancel search: All wheel drivePage 279 of 382
Brake Wear
Your vehicle has front disc brakes and rear drum
brakes.
Disc brake pads have built-in wear indicators that make a
high-pitched warning sound when the brake pads are
worn and new pads are needed. The sound may come
and go or be heard all the time your vehicle is moving,
except when you are pushing on the brake pedal �rmly.
{CAUTION:
The brake wear warning sound means that
soon your brakes will not work well. That
could lead to an accident. When you hear the
brake wear warning sound, have your vehicle
serviced.
Notice:Continuing to drive with worn-out brake
pads could result in costly brake repair.
Some driving conditions or climates may cause a brake
squeal when the brakes are �rst applied or lightly
applied. This does not mean something is wrong with
your brakes.Properly torqued wheel nuts are necessary to help
prevent brake pulsation. When tires are rotated, inspect
brake pads for wear and evenly tighten wheel nuts in
the proper sequence to GM torque speci�cations.
Your rear drum brakes do not have wear indicators, but
if you ever hear a rear brake rubbing noise, have the
rear brake linings inspected immediately. Also, the rear
brake drums should be removed and inspected each
time the tires are removed for rotation or changing.
When you have the front brake pads replaced, have
the rear brakes inspected, too.
Brake linings should always be replaced as complete
axle sets.Brake Pedal Travel
See your dealer if the brake pedal does not return
to normal height, or if there is a rapid increase in pedal
travel. This could be a sign of brake trouble.
Brake Adjustment
Every time you apply the brakes, with or without the
vehicle moving, your brakes adjust for wear.
5-33
Page 285 of 382
Notice:If the jumper cables are connected or
removed in the wrong order, electrical shorting may
occur and damage the vehicle. The repairs would
not be covered by your warranty. Always connect
and remove the jumper cables in the correct
order, making sure that the cables do not touch
each other or other metal.
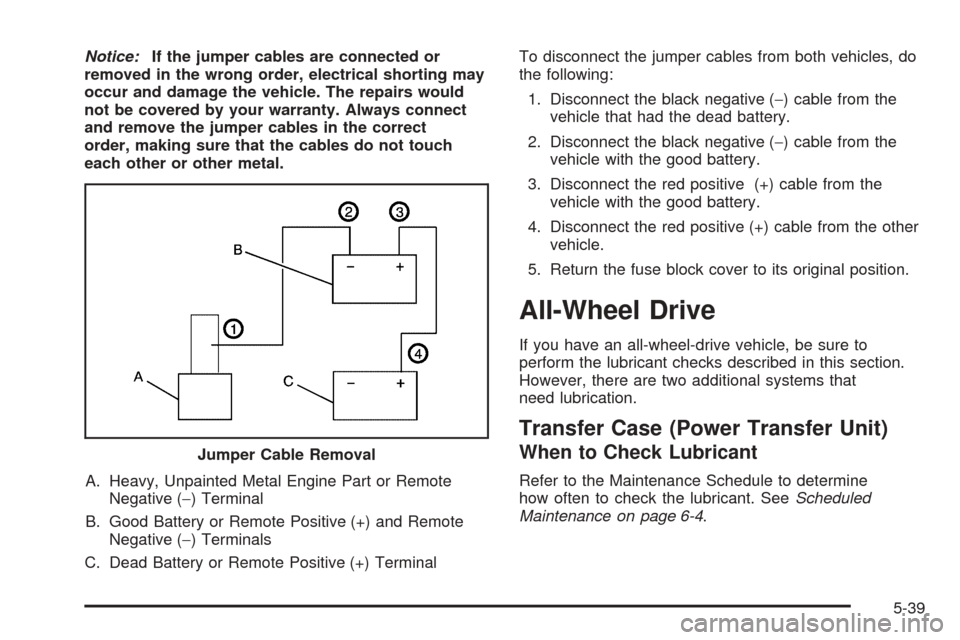
A. Heavy, Unpainted Metal Engine Part or Remote
Negative (−) Terminal
B. Good Battery or Remote Positive (+) and Remote
Negative (−) Terminals
C. Dead Battery or Remote Positive (+) TerminalTo disconnect the jumper cables from both vehicles, do
the following:
1. Disconnect the black negative (−) cable from the
vehicle that had the dead battery.
2. Disconnect the black negative (−) cable from the
vehicle with the good battery.
3. Disconnect the red positive (+) cable from the
vehicle with the good battery.
4. Disconnect the red positive (+) cable from the other
vehicle.
5. Return the fuse block cover to its original position.
All-Wheel Drive
If you have an all-wheel-drive vehicle, be sure to
perform the lubricant checks described in this section.
However, there are two additional systems that
need lubrication.
Transfer Case (Power Transfer Unit)
When to Check Lubricant
Refer to the Maintenance Schedule to determine
how often to check the lubricant. SeeScheduled
Maintenance on page 6-4. Jumper Cable Removal
5-39
Page 300 of 382
How to Check
Use a good quality pocket-type gage to check tire
pressure. You cannot tell if your tires are properly
in�ated simply by looking at them. Radial tires may look
properly in�ated even when they are under-in�ated.
Check the tire’s in�ation pressure when the tires
are cold. Cold means your vehicle has been sitting
for at least three hours or driven no more than
1 mile (1.6 km).
Remove the valve cap from the tire valve stem. Press
the tire gage �rmly onto the valve to get a pressure
measurement. If the cold tire in�ation pressure matches
the recommended pressure on the Tire and Loading
Information label, no further adjustment is necessary.
If the in�ation pressure is low, add air until you reach the
recommended amount.
If you over�ll the tire, release air by pushing on the
metal stem in the center of the tire valve. Re-check the
tire pressure with the tire gage.
Be sure to put the valve caps back on the valve stems.
They help prevent leaks by keeping out dirt and moisture.
Tire Inspection and Rotation
Tires should be rotated every 5,000 to 8,000 miles
(8 000 to 13 000 km).
Any time you notice unusual wear, rotate your tires as
soon as possible and check wheel alignment. Also check
for damaged tires or wheels. SeeWhen It Is Time for
New Tires on page 5-55andWheel Replacement on
page 5-60for more information.
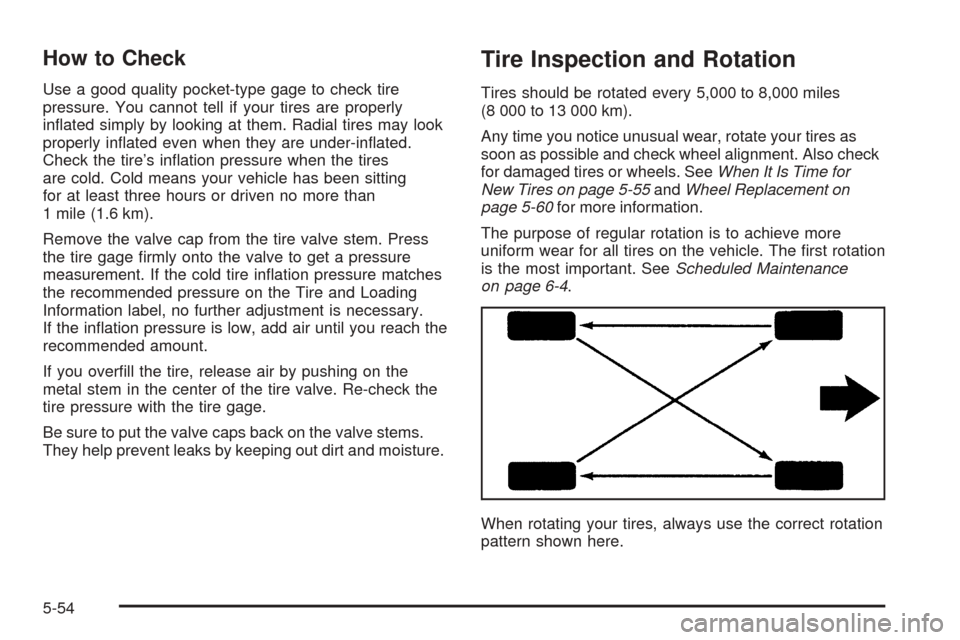
The purpose of regular rotation is to achieve more
uniform wear for all tires on the vehicle. The �rst rotation
is the most important. SeeScheduled Maintenance
on page 6-4.
When rotating your tires, always use the correct rotation
pattern shown here.
5-54
Page 302 of 382
Buying New Tires
GM has developed and matched speci�c tires for your
vehicle. The original equipment tires installed on
your vehicle, when it was new, were designed to meet
General Motors Tire Performance Criteria Speci�cation
(TPC spec) system rating. If you need replacement
tires, GM strongly recommends that you get tires with
the same TPC Spec rating. This way, your vehicle
will continue to have tires that are designed to give the
same performance and vehicle safety, during normal
use, as the original tires.
GM’s exclusive TPC Spec system considers over a
dozen critical speci�cations that impact the overall
performance of your vehicle, including brake system
performance, ride and handling, traction control, and tire
pressure monitoring performance. GM’s TPC Spec
number is molded onto the tire’s sidewall by the
tire manufacturer. If the tires have an all-season tread
design, the TPC spec number will be followed by an
MS for mud and snow. SeeTire Sidewall Labeling
on page 5-48for additional information.{CAUTION:
Mixing tires could cause you to lose control
while driving. If you mix tires of different sizes,
brands, or types (radial and bias-belted tires),
the vehicle may not handle properly, and you
could have a crash. Using tires of different
sizes, brands, or types may also cause damage
to your vehicle. Be sure to use the correct size,
brand, and type of tires on all wheels. It is
all right to drive with your compact spare
temporarily, as it was developed for use on your
vehicle. SeeCompact Spare Tire on page 5-73.
5-56
Page 307 of 382
Used Replacement Wheels
{CAUTION:
Putting a used wheel on your vehicle is
dangerous. You cannot know how it has been
used or how far it has been driven. It could fail
suddenly and cause a crash. If you have to
replace a wheel, use a new GM original
equipment wheel.
Tire Chains
{CAUTION:
Do not use tire chains. There is not enough
clearance. Tire chains used on a vehicle
without the proper amount of clearance can
cause damage to the brakes, suspension or
other vehicle parts. The area damaged by the
tire chains could cause you to lose control of
your vehicle and you or others may be injured
in a crash.
Use another type of traction device only if its
manufacturer recommends it for use on your
vehicle and tire size combination and road
conditions. Follow that manufacturer’s
instructions. To help avoid damage to your
vehicle, drive slowly, readjust or remove the
device if it is contacting your vehicle, and do
not spin your vehicle’s wheels. If you do �nd
traction devices that will �t, install them on the
front tires.
5-61
Page 326 of 382
Aluminum Wheels
Notice:If you use strong soaps, chemicals,
abrasive polishes, cleaners, brushes, or cleaners
that contain acid on aluminum or chrome-plated
wheels, you could damage the surface of the
wheel(s). The repairs would not be covered by your
warranty. Use only GM-approved cleaners on
aluminum or chrome-plated wheels.
Keep the wheels clean using a soft clean cloth with mild
soap and water. Rinse with clean water. After rinsing
thoroughly, dry with a soft clean towel. A wax may then
be applied.
Notice:Using chrome polish on aluminum wheels
could damage the wheels. The repairs would not
be covered by your warranty. Use chrome polish on
chrome wheels only.
The surface of these wheels is similar to the painted
surface of the vehicle. Do not use strong soaps,
chemicals, abrasive polishes, abrasive cleaners,
cleaners with acid, or abrasive cleaning brushes on
them because the surface could be damaged. Do not
use chrome polish on aluminum wheels.Notice:If you drive your vehicle through an
automatic car wash that has silicone carbide tire
cleaning brushes, you could damage the aluminum
or chrome-plated wheels. The repairs would not
be covered by your warranty. Never drive a vehicle
equipped with aluminum or chrome-plated wheels
through an automatic car wash that uses silicone
carbide tire cleaning brushes.
Do not take the vehicle through an automatic car wash
that has silicone carbide tire cleaning brushes. These
brushes can also damage the surface of these wheels.
Tires
To clean the tires, use a stiff brush with tire cleaner.
Notice:Using petroleum-based tire dressing
products on your vehicle may damage the paint
�nish and/or tires. When applying a tire dressing,
always wipe off any overspray from all painted
surfaces on your vehicle.
5-80
Page 343 of 382
Maintenance Footnotes
(a)Visually inspect brake lines and hoses for proper
hook-up, binding, leaks, cracks, cha�ng, etc. Inspect disc
brake pads for wear and rotors for surface condition.
Inspect drum brake linings/shoes for wear or cracks.
Inspect other brake parts, including drums, wheel
cylinders, calipers, parking brake, etc. Check parking
brake adjustment.
(b)Visually inspect front and rear suspension and
steering system for damaged, loose, or missing parts,
signs of wear. Inspect power steering cables for
proper hook-up, binding, cracks, cha�ng, etc.
(c)Visually inspect hoses and have them replaced if they
are cracked, swollen, or deteriorated. Inspect all pipes,
�ttings and clamps; replace with genuine GM parts as
needed. To help ensure proper operation, a pressure test
of the cooling system and pressure cap and cleaning the
outside of the radiator and air conditioning condenser is
recommended at least once a year.
(d)Visually inspect wiper blades for wear or cracking.
Replace wiper blades that appear worn or damaged
or that streak or miss areas of the windshield.(e)Make sure the safety belt reminder light and all your
belts, buckles, latch plates, retractors, and anchorages
are working properly. Look for any other loose or
damaged safety belt system parts. If you see anything
that might keep a safety belt system from doing its
job, have it repaired. Have any torn or frayed safety belts
replaced. Also look for any opened or broken airbag
coverings, and have them repaired or replaced.
The airbag system does not need regular maintenance.
(f)Lubricate all key lock cylinders, hood latch
assemblies, secondary latches, pivots, spring anchor
and release pawl, hood and door hinges, rear folding
seats, and liftgate hinges. More frequent lubrication may
be required when exposed to a corrosive environment.
Applying silicone grease on weatherstrips with a
clean cloth will make them last longer, seal better,
and not stick or squeak.
(g)If you drive regularly under dusty conditions, the
�lter may require replacement more often.
6-7
Page 357 of 382
Overseas — Customer Assistance
Please contact the local General Motors Business Unit.
Mexico, Central America and
Caribbean Islands/Countries
(Except Puerto Rico and U.S. Virgin
Islands) — Customer Assistance
General Motors de Mexico, S. de R.L. de C.V.
Customer Assistance Center
Paseo de la Reforma # 2740
Col. Lomas de Bezares
C.P. 11910, Mexico, D.F.
01-800-508-0000
Long Distance: 011-52-53 29 0 800
GM Mobility Reimbursement
Program
This program, available to quali�ed applicants, can
reimburse you up to $1,000 of the cost of eligible
aftermarket adaptive equipment required for your vehicle,
such as hand controls or a wheelchair/scooter lift.
The offer is available for a very limited period of time
from the date of vehicle purchase/lease. For more
details, or to determine your vehicle’s eligibility, visit
gmmobility.com or call the GM Mobility Assistance
Center at 1-800-323-9935. Text telephone (TTY) users,
call 1-800-833-9935.
GM of Canada also has a Mobility Program.
Call 1-800-GM-DRIVE (463-7483) for details.
TTY users call 1-800-263-3830.
7-5