2006 CHEVROLET EQUINOX roof
[x] Cancel search: roofPage 72 of 382
Restraint System Check
Checking the Restraint Systems
Now and then, make sure the safety belt reminder light
and all your belts, buckles, latch plates, retractors and
anchorages are working properly. Look for any other
loose or damaged safety belt system parts. If you see
anything that might keep a safety belt system from doing
its job, have it repaired. SeeCare of Safety Belts on
page 5-78for more information.
Torn or frayed safety belts may not protect you in a
crash. They can rip apart under impact forces. If a
belt is torn or frayed, get a new one right away.
Also look for any opened or broken airbag covers, and
have them repaired or replaced. The airbag system
does not need regular maintenance.
Notice:If you damage the covering for the driver’s
or the right front passenger’s airbag, or the side
impact airbag covering (if equipped) on the ceiling
near the side windows, the airbag may not work
properly. You may have to replace the airbag
module in the steering wheel, both the airbag
module and the instrument panel for the right front
passenger’s airbag, or side impact airbag module
and ceiling covering for roof-mounted side impact
airbags (if equipped.) Do not open or break the
airbag coverings.
Replacing Restraint System Parts
After a Crash
{CAUTION:
A crash can damage the restraint systems in
your vehicle. A damaged restraint system
may not properly protect the person using it,
resulting in serious injury or even death in
a crash. To help make sure your restraint
systems are working properly after a crash,
have them inspected and any necessary
replacements made as soon as possible.
If you have had a crash, do you need new belts or
LATCH system parts?
After a very minor collision, nothing may be necessary.
But if the belts were stretched, as they would be if worn
during a more severe crash, then you need new parts.
1-66
Page 75 of 382
Keys...............................................................2-2
Remote Keyless Entry System.........................2-3
Remote Keyless Entry System Operation...........2-4
Doors and Locks.............................................2-6
Door Locks....................................................2-6
Power Door Locks..........................................2-7
Delayed Locking.............................................2-7
Automatic Door Lock.......................................2-8
Programmable Automatic Door Unlock...............2-8
Rear Door Security Locks................................2-8
Lockout Protection..........................................2-9
Liftgate........................................................2-10
Windows........................................................2-11
Power Windows............................................2-12
Sun Visors...................................................2-12
Theft-Deterrent Systems..................................2-13
Content Theft-Deterrent.................................2-13
Passlock
®....................................................2-15
Starting and Operating Your Vehicle................2-15
New Vehicle Break-In....................................2-15
Ignition Positions..........................................2-16
Retained Accessory Power (RAP)...................2-16
Starting the Engine.......................................2-17
Engine Coolant Heater..................................2-18
Automatic Transaxle Operation.......................2-19
Parking Brake..............................................2-22Shifting Into Park (P).....................................2-23
Shifting Out of Park (P).................................2-24
Parking Over Things That Burn.......................2-25
Engine Exhaust............................................2-25
Running the Engine While Parked...................2-26
Mirrors...........................................................2-27
Manual Rearview Mirror.................................2-27
Automatic Dimming Rearview Mirror with
OnStar
®, Compass and Temperature
Display....................................................2-27
Automatic Dimming Rearview Mirror with
Compass and Temperature Display..............2-29
Outside Power Mirrors...................................2-31
Outside Convex Mirrors.................................2-32
OnStar
®System.............................................2-32
Storage Areas................................................2-34
Glove Box...................................................2-34
Cupholder(s)................................................2-34
Coinholder(s)................................................2-35
Center Console Storage Area.........................2-35
Garment Hooks............................................2-35
Luggage Carrier...........................................2-35
Rear Compartment Storage Panel/Cover..........2-38
Table..........................................................2-40
Convenience Net..........................................2-41
Sunroof.........................................................2-41
Section 2 Features and Controls
2-1
Page 109 of 382
Coinholder(s)
Your vehicle may be equipped with a coinholder on the
center console.
Center Console Storage Area
Your vehicle may have a center console armrest with
storage area. Use the lever on the front of the console
to open it.
Garment Hooks
Your vehicle has garment hooks located on rear
headliner of the vehicle that can be pulled down for
hanging garments.
Luggage Carrier
{CAUTION:
If you try to carry something on top of your
vehicle that is longer or wider than the luggage
carrier — like paneling, plywood, a mattress
and so forth — the wind can catch it as you
drive along. This can cause you to lose
control. What you are carrying could be
violently torn off, and this could cause you or
other drivers to have a collision, and of course
damage your vehicle. You may be able to carry
something like this inside. But, never carry
something longer or wider than the luggage
carrier on top of your vehicle.
A luggage carrier allows you to load things on top of
your vehicle. The luggage carrier has side rails attached
to the roof, sliding crossrails, if equipped, and places
to use for tying things down. These let you load
some things on top of your vehicle, as long as they
are not wider or longer than the luggage carrier.
2-35
Page 110 of 382
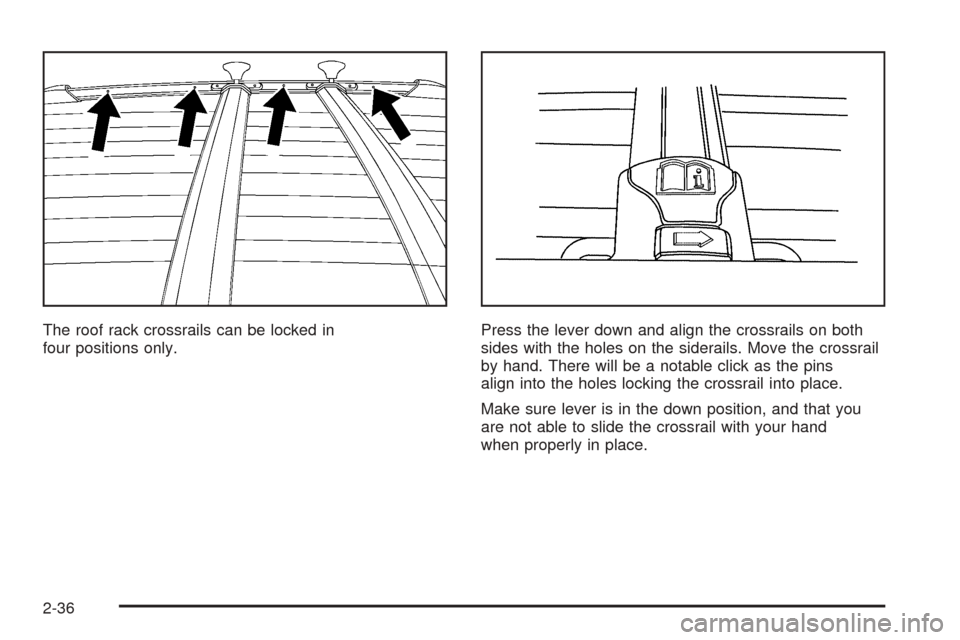
The roof rack crossrails can be locked in
four positions only.Press the lever down and align the crossrails on both
sides with the holes on the siderails. Move the crossrail
by hand. There will be a notable click as the pins
align into the holes locking the crossrail into place.
Make sure lever is in the down position, and that you
are not able to slide the crossrail with your hand
when properly in place.
2-36
Page 115 of 382
Convenience Net
Your vehicle may have a rear compartment net to
prevent items from rolling under the rear seat.
Your vehicle is also equipped with four tie-down
anchors. Two anchors are located on the side trim,
just behind the rear seat, and the other two are located
on the �oor at the rear of the cargo area.
Sunroof
If the vehicle has an express-open sunroof, the controls
to operate it are located on the headliner above the
rearview mirror. The ignition must be in RUN or ACC to
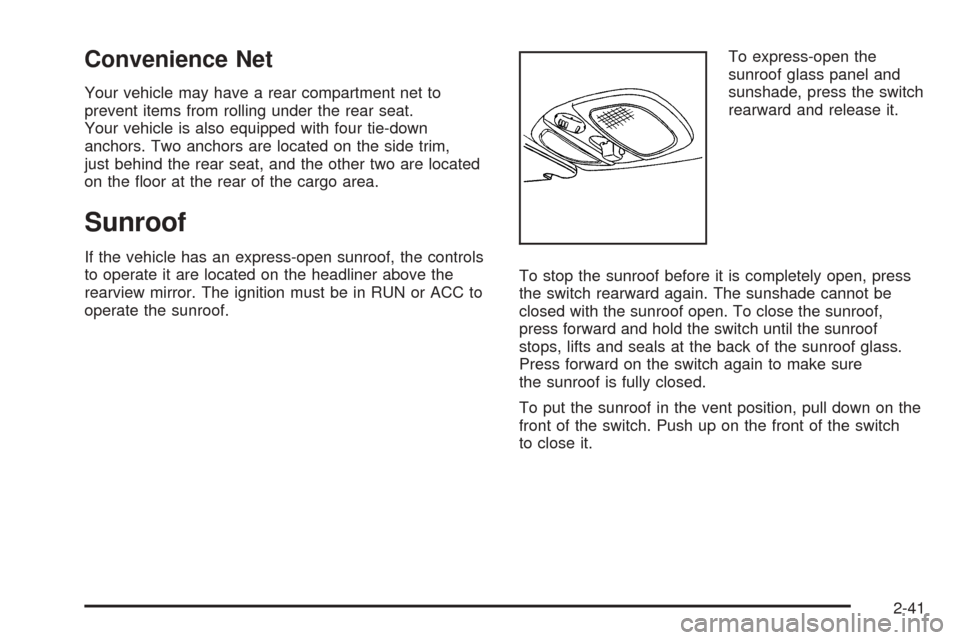
operate the sunroof.To express-open the
sunroof glass panel and
sunshade, press the switch
rearward and release it.
To stop the sunroof before it is completely open, press
the switch rearward again. The sunshade cannot be
closed with the sunroof open. To close the sunroof,
press forward and hold the switch until the sunroof
stops, lifts and seals at the back of the sunroof glass.
Press forward on the switch again to make sure
the sunroof is fully closed.
To put the sunroof in the vent position, pull down on the
front of the switch. Push up on the front of the switch
to close it.
2-41
Page 200 of 382
XM™ Satellite Radio Antenna
System
The XM™ Satellite Radio antenna is located on the roof
of your vehicle. Keep this antenna clear of snow and
ice build up for clear radio reception.
If your vehicle has a sunroof, the performance of the
XM™ system may be affected if the sunroof is open.
If the rear roof rack rail is too close to the XM™ antenna
or if objects stored on the roof rack cover or block the
XM™ antenna, the performance of the XM™ system
may be affected.
Chime Level Adjustment
Chime level adjustment is only available on RDS radios.
The radio is used to adjust the vehicle’s chime level.
To change the volume level of the chime, press and hold
pushbutton 6 with the ignition on and the radio power
off. The volume level will change from the normal
level to loud, and LOUD will appear on the radio display.
To change back to the default or normal setting,
press and hold pushbutton 6 again. The volume level
will change from the loud level to normal, and NORMAL
will appear on the radio display. Each time the chime
volume is changed, three chimes will sound as an
example of the new volume selected. Removing the
radio and not replacing it with a factory radio or chime
module will disable vehicle chimes.
3-84
Page 333 of 382
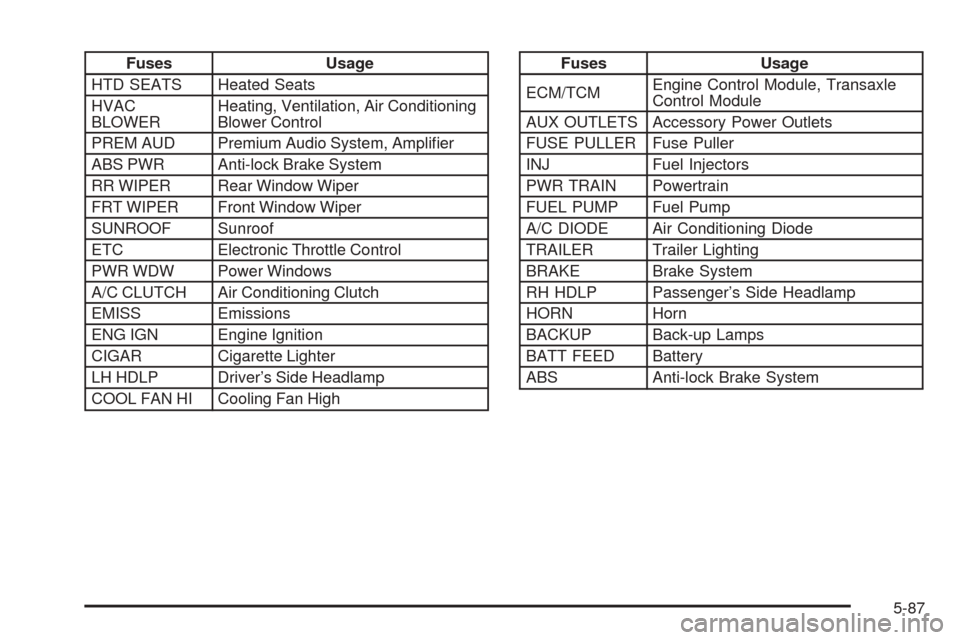
Fuses Usage
HTD SEATS Heated Seats
HVAC
BLOWERHeating, Ventilation, Air Conditioning
Blower Control
PREM AUD Premium Audio System, Ampli�er
ABS PWR Anti-lock Brake System
RR WIPER Rear Window Wiper
FRT WIPER Front Window Wiper
SUNROOF Sunroof
ETC Electronic Throttle Control
PWR WDW Power Windows
A/C CLUTCH Air Conditioning Clutch
EMISS Emissions
ENG IGN Engine Ignition
CIGAR Cigarette Lighter
LH HDLP Driver’s Side Headlamp
COOL FAN HI Cooling Fan HighFuses Usage
ECM/TCMEngine Control Module, Transaxle
Control Module
AUX OUTLETS Accessory Power Outlets
FUSE PULLER Fuse Puller
INJ Fuel Injectors
PWR TRAIN Powertrain
FUEL PUMP Fuel Pump
A/C DIODE Air Conditioning Diode
TRAILER Trailer Lighting
BRAKE Brake System
RH HDLP Passenger’s Side Headlamp
HORN Horn
BACKUP Back-up Lamps
BATT FEED Battery
ABS Anti-lock Brake System
5-87
Page 380 of 382
Storage Areas
Center Console Storage Area........................2-35
Coinholder(s)..............................................2-35
Convenience Net.........................................2-41
Cupholder(s)...............................................2-34
Glove Box..................................................2-34
Luggage Carrier..........................................2-35
Rear Compartment Storage Panel/Cover.........2-38
Table.........................................................2-40
Stuck in Sand, Mud, Ice, or Snow.....................4-30
Sun Visors.....................................................2-12
Sunroof.........................................................2-41
T
Table............................................................2-40
Tachometer....................................................3-25
Taillamps
Turn Signal, Stoplamps and Back-up Lamps....5-44
TCS Warning Light..........................................3-29
Theft-Deterrent, Radio.....................................3-81
Theft-Deterrent Systems...................................2-13
Content Theft-Deterrent................................2-13
Passlock
®...................................................2-15Tilt Wheel........................................................ 3-6
Tires.............................................................5-47
Aluminum Wheels, Cleaning..........................5-80
Buying New Tires........................................5-56
Chains.......................................................5-61
Changing a Flat Tire....................................5-63
Cleaning....................................................5-80
Compact Spare Tire.....................................5-73
Different Size..............................................5-57
If a Tire Goes Flat.......................................5-62
In�ation - Tire Pressure................................5-53
Inspection and Rotation................................5-54
Installing the Spare Tire................................5-65
Removing the Flat Tire.................................5-65
Removing the Spare Tire and Tools...............5-64
Storing a Flat or Spare Tire and Tools............5-72
Tire Sidewall Labeling..................................5-48
Tire Terminology and De�nitions....................5-50
Uniform Tire Quality Grading.........................5-58
Wheel Alignment and Tire Balance.................5-59
Wheel Replacement.....................................5-60
When It Is Time for New Tires......................5-55
12