Page 275 of 382

{CAUTION:
Adding only plain water to your cooling
system can be dangerous. Plain water, or
some other liquid such as alcohol, can boil
before the proper coolant mixture will. Your
vehicle’s coolant warning system is set for the
proper coolant mixture. With plain water or the
wrong mixture, your engine could get too hot
but you would not get the overheat warning.
Your engine could catch �re and you or others
could be burned. Use a 50/50 mixture of clean,
drinkable water and DEX-COOL
®coolant.
Notice:In cold weather, water can freeze and crack
the engine, radiator, heater core and other parts.
Use the recommended coolant and the proper
coolant mixture.
{CAUTION:
You can be burned if you spill coolant on hot
engine parts. Coolant contains ethylene glycol
and it will burn if the engine parts are hot
enough. Do not spill coolant on a hot engine.
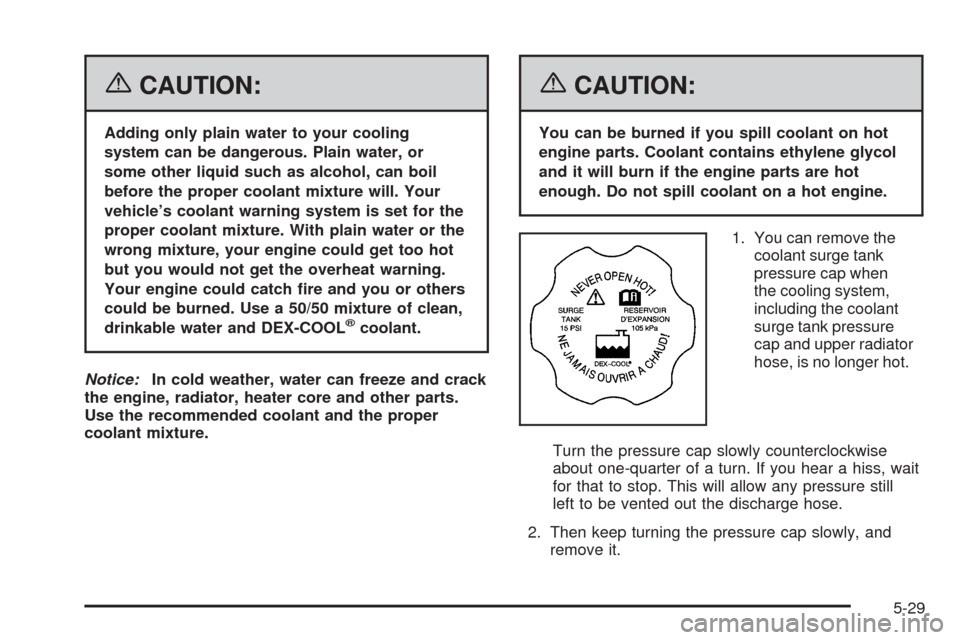
1. You can remove the
coolant surge tank
pressure cap when
the cooling system,
including the coolant
surge tank pressure
cap and upper radiator
hose, is no longer hot.
Turn the pressure cap slowly counterclockwise
about one-quarter of a turn. If you hear a hiss, wait
for that to stop. This will allow any pressure still
left to be vented out the discharge hose.
2. Then keep turning the pressure cap slowly, and
remove it.
5-29
Page 289 of 382

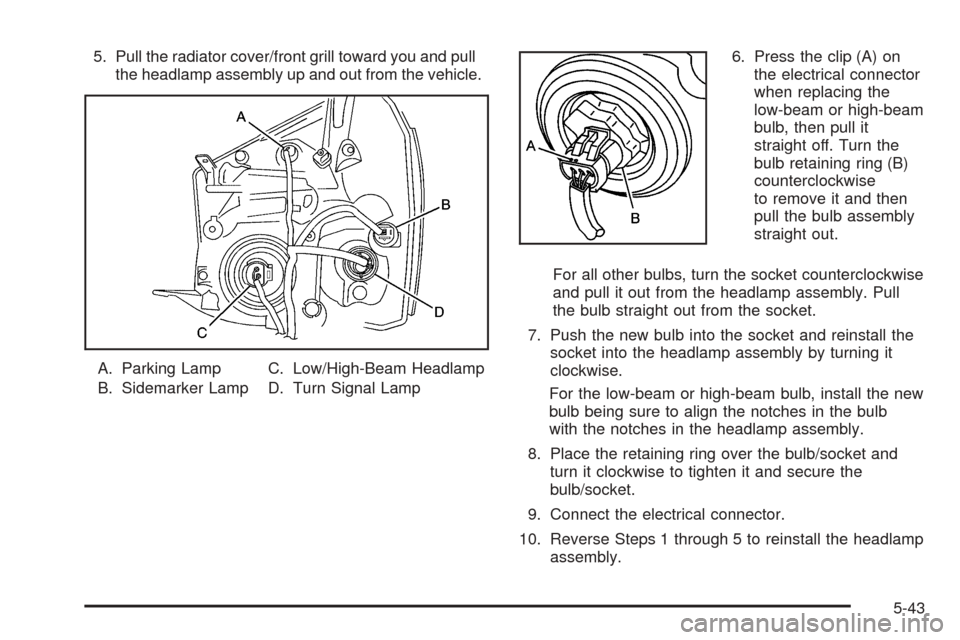
5. Pull the radiator cover/front grill toward you and pull
the headlamp assembly up and out from the vehicle.
A. Parking Lamp
B. Sidemarker LampC. Low/High-Beam Headlamp
D. Turn Signal Lamp6. Press the clip (A) on
the electrical connector
when replacing the
low-beam or high-beam
bulb, then pull it
straight off. Turn the
bulb retaining ring (B)
counterclockwise
to remove it and then
pull the bulb assembly
straight out.
For all other bulbs, turn the socket counterclockwise
and pull it out from the headlamp assembly. Pull
the bulb straight out from the socket.
7. Push the new bulb into the socket and reinstall the
socket into the headlamp assembly by turning it
clockwise.
For the low-beam or high-beam bulb, install the new
bulb being sure to align the notches in the bulb
with the notches in the headlamp assembly.
8. Place the retaining ring over the bulb/socket and
turn it clockwise to tighten it and secure the
bulb/socket.
9. Connect the electrical connector.
10. Reverse Steps 1 through 5 to reinstall the headlamp
assembly.
5-43
Page 290 of 382
Taillamps, Turn Signal, Stoplamps
and Back-up Lamps
A. Turn Signal
Lamp/Taillamp
B. Stoplamp/Taillamp
C. Sidemarker Lamp
D. Back-Up Lamp
To replace one of these bulbs, do the following:
1. Open the liftgate. SeeLiftgate on page 2-10for
more information.
2. Remove the taillamp
screw covers and
then remove the
two screws.3. Carefully slide the
taillamp assembly
outward to clear the
stud (see arrow)
and then rearward and
away from the body
of the vehicle.
4. Turn the bulb socket counterclockwise to disconnect
it from the taillamp assembly.
5. Pull the bulb out of the bulb socket.
6. Push the new bulb into the bulb socket.
7. Insert the bulb socket into the taillamp housing and
turn it clockwise to secure.
8. Reverse Steps 2 and 3 to reinstall the taillamp
assembly.
5-44
Page 311 of 382
5. Remove the wing-bolt
on the jack and then
remove it.
6. Remove the hook and loop fastener straps holding
the bag containing the wheel wrench. Remove the
wheel wrench from the bag.
7. Fold out the socket portion of the wrench from the
handle.Removing the Flat Tire and
Installing the Spare Tire
You must take off the wheel cover or hubcap,
if equipped, to reach the wheel bolts.
1. Loosen all
�ve hex-shaped
plastic caps by turning
the wheel wrench
counterclockwise.
Do not try to remove
plastic caps from
the cover or
center cap.
2. Pull the cover or center cap away from the wheel.
3. Use the wheel wrench to loosen all the wheel
nuts. Do not remove them yet.
5-65
Page 312 of 382
4. Attach the wheel wrench to the jack bolt head and
rotate the wheel wrench clockwise. That will raise
the lift head a little.
5. Place the jack near the �at tire.
Notice:Make sure that the jack lift head is in the
correct position or you may damage your vehicle.
The repairs would not be covered by your warranty.
6. Find the arrow on the plastic lower body panel.
Position the jack head under the metal jacking
�ange and not the plastic lower body panel.
5-66
Page 314 of 382
{CAUTION:
Raising your vehicle with the jack improperly
positioned can damage the vehicle and even
make the vehicle fall. To help avoid personal
injury and vehicle damage, be sure to �t the
jack lift head into the proper location before
raising the vehicle.
{CAUTION:
Lifting a vehicle and getting under it to do
maintenance or repairs is dangerous without
the appropriate safety equipment and training.
The jack provided with your vehicle is
designed only for changing a �at tire. If it is
used for anything else, you or others could be
badly injured or killed if the vehicle slips off
the jack. Use the jack provided with your
vehicle only for changing a �at tire.8. Raise the vehicle by turning the jack handle
clockwise. Raise the vehicle far enough off the
ground so there is enough room for the road tire to
clear the ground.
5-68
Page 316 of 382
12. Place the compact spare tire on the wheel-mounting
surface.
{CAUTION:
Never use oil or grease on studs or nuts. If you
do, the nuts might come loose. Your wheel
could fall off, causing a serious accident.
13. Reinstall the wheel nuts. Tighten each nut by hand
until the wheel is held against the hub.
14. Lower the vehicle by turning the jack handle
counterclockwise.
5-70