2006 CHEVROLET EPICA spare wheel
[x] Cancel search: spare wheelPage 226 of 368
Wheel Alignment and Tire Balance..................5-58
Wheel Replacement......................................5-58
Tire Chains..................................................5-59
If a Tire Goes Flat........................................5-60
Changing a Flat Tire.....................................5-61
Removing the Spare Tire and Tools................5-62
Removing the Flat Tire and Installing
the Spare Tire..........................................5-63
Storing a Flat or Spare Tire and Tools............5-66
Compact Spare Tire......................................5-67
Appearance Care............................................5-68
Cleaning the Inside of Your Vehicle.................5-68
Fabric/Carpet...............................................5-69
Leather.......................................................5-70
Instrument Panel, Vinyl, and
Other Plastic Surfaces................................5-70
Weatherstrips...............................................5-70
Washing Your Vehicle...................................5-70
Cleaning Exterior Lamps/Lenses.....................5-71
Finish Care..................................................5-71
Windshield and Wiper Blades.........................5-72Aluminum Wheels.........................................5-72
Tires...........................................................5-73
Sheet Metal Damage.....................................5-73
Finish Damage.............................................5-73
Underbody Maintenance................................5-73
Chemical Paint Spotting.................................5-73
Vehicle Care/Appearance Materials..................5-74
Vehicle Identi�cation......................................5-75
Vehicle Identification Number (VIN).................5-75
Service Parts Identification Label.....................5-75
Electrical System............................................5-76
Add-On Electrical Equipment..........................5-76
Headlamp Wiring..........................................5-76
Windshield Wiper Fuses................................5-76
Power Windows and Other Power Options.......5-76
Fuses and Circuit Breakers............................5-77
Instrument Panel Fuse Block..........................5-77
Engine Compartment Fuse Block....................5-79
Capacities and Speci�cations..........................5-83
Normal Maintenance Replacement Parts..........5-84
Section 5 Service and Appearance Care
5-2
Page 277 of 368
How to Check
Use a good quality pocket-type gage to check tire
pressure. You cannot tell if your tires are properly
inflated simply by looking at them. Radial tires may look
properly inflated even when they are under-inflated.
Check the tire’s inflation pressure when the tires
are cold. Cold means your vehicle has been sitting
for at least three hours or driven no more than
1 mile (1.6 km).
Remove the valve cap from the tire valve stem. Press
the tire gage firmly onto the valve to get a pressure
measurement. If the cold tire inflation pressure matches
the recommended pressure on the Tire and Loading
Information label, no further adjustment is necessary.
If the inflation pressure is low, add air until you reach
the recommended amount.
If you overfill the tire, release air by pushing on the
metal stem in the center of the tire valve. Re-check
the tire pressure with the tire gage.
Be sure to put the valve caps back on the valve stems.
They help prevent leaks by keeping out dirt and
moisture.
Tire Inspection and Rotation
Tires should be rotated every 5,000 to 8,000 miles
(8 000 to 13 000 km).
Any time you notice unusual wear, rotate your tires as
soon as possible and check wheel alignment. Also
check for damaged tires or wheels. SeeWhen It Is Time
for New Tires on page 5-54andWheel Replacement
on page 5-58for more information.
The purpose of regular rotation is to achieve more
uniform wear for all tires on the vehicle. The first rotation
is the most important. SeePart A: Scheduled
Maintenance Services on page 6-4.
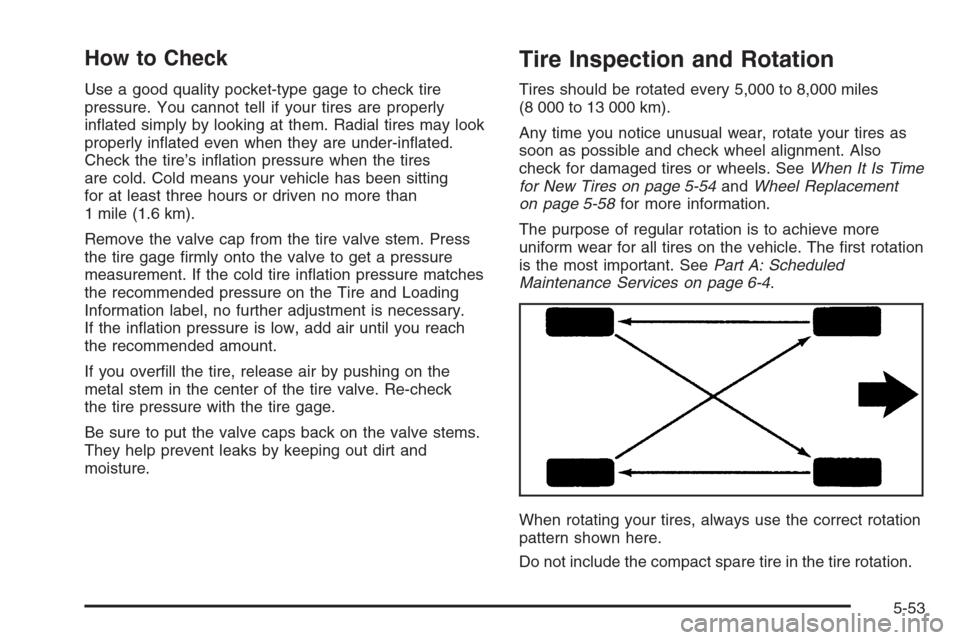
When rotating your tires, always use the correct rotation
pattern shown here.
Do not include the compact spare tire in the tire rotation.
5-53
Page 279 of 368
Buying New Tires
To find out what kind and size of tires you need, look
at the tire and loading information label attached to your
vehicle. SeeLoading Your Vehicle on page 4-29for a
label example and where it is attached to your vehicle.
Make sure the replacements are the same size,
load range, speed rating and construction type
(bias, bias-belted or radial) as your original tires.
{CAUTION:
Mixing tires could cause you to lose control
while driving. If you mix tires of different sizes,
brands, or types (radial and bias-belted tires),
the vehicle may not handle properly, and
you could have a crash. Using tires of
different sizes, brands, or types may also
cause damage to your vehicle. Be sure to
use the correct size, brand, and type of
tires on all wheels. It is all right to drive
with your compact spare temporarily, as
it was developed for use on your vehicle.
SeeCompact Spare Tire on page 5-67.
{CAUTION:
If you use bias-ply tires on your vehicle, the
wheel rim �anges could develop cracks after
many miles of driving. A tire and/or wheel
could fail suddenly, causing a crash. Use only
radial-ply tires with the wheels on your vehicle.
5-55
Page 280 of 368
Different Size Tires and Wheels
If you add wheels or tires that are a different size than
your original equipment wheels and tires, this may
affect the way your vehicle performs, including its
braking, ride and handling characteristics, stability and
resistance to rollover. Additionally, if your vehicle
has electronic systems such as, anti-lock brakes,
traction control, and electronic stability control, the
performance of these systems can be affected.
{CAUTION:
If you add different sized wheels, your
vehicle may not provide an acceptable level
of performance and safety if tires not
recommended for those wheels are selected.
You may increase the chance that you will
crash and suffer serious injury. Only use
GM speci�c wheel and tire systems developed
for your vehicle, and have them properly
installed by a GM certi�ed technician.
SeeBuying New Tires on page 5-55andAccessories
and Modifications on page 5-3for additional information.
Uniform Tire Quality Grading
Quality grades can be found where applicable on the
tire sidewall between tread shoulder and maximum
selection width. For example:
Treadwear 200 Traction AA Temperature A
The following information relates to the system
developed by the Unites States National Highway Traffic
Safety Administration, which grades tires by treadwear,
traction and temperature performance. (This applies
only to vehicles sold in the United States.) The grades
are molded on the sidewalls of most passenger car
tires. The Uniform Tire Quality Grading system does not
apply to deep tread, winter-type snow tires, space-saver
or temporary use spare tires, tires with nominal rim
diameters of 10 to 12 inches (25 to 30 cm), or to some
limited-production tires.
While the tires available on General Motors passenger
cars and light trucks may vary with respect to these
grades, they must also conform to federal safety
requirements.
5-56
Page 286 of 368
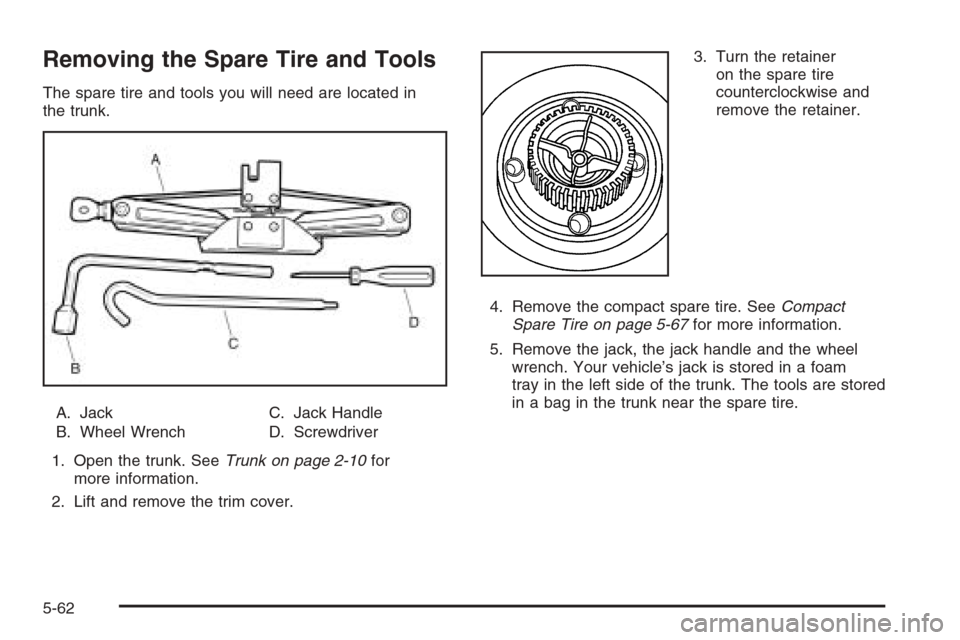
Removing the Spare Tire and Tools
The spare tire and tools you will need are located in
the trunk.
A. Jack
B. Wheel WrenchC. Jack Handle
D. Screwdriver
1. Open the trunk. SeeTrunk on page 2-10for
more information.
2. Lift and remove the trim cover.3. Turn the retainer
on the spare tire
counterclockwise and
remove the retainer.
4. Remove the compact spare tire. SeeCompact
Spare Tire on page 5-67for more information.
5. Remove the jack, the jack handle and the wheel
wrench. Your vehicle’s jack is stored in a foam
tray in the left side of the trunk. The tools are stored
in a bag in the trunk near the spare tire.
5-62
Page 287 of 368
Removing the Flat Tire and
Installing the Spare Tire
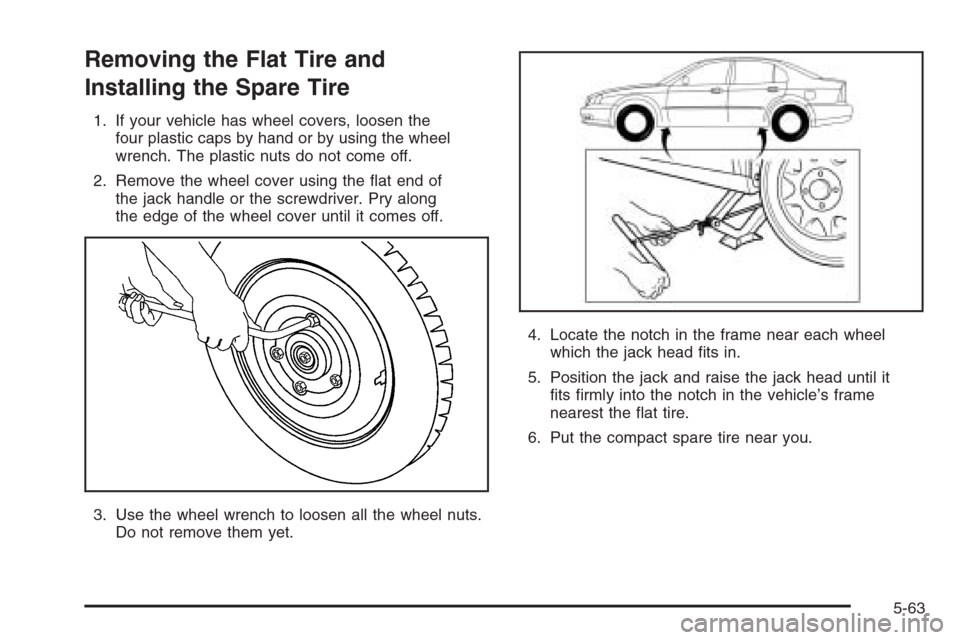
1. If your vehicle has wheel covers, loosen the
four plastic caps by hand or by using the wheel
wrench. The plastic nuts do not come off.
2. Remove the wheel cover using the flat end of
the jack handle or the screwdriver. Pry along
the edge of the wheel cover until it comes off.
3. Use the wheel wrench to loosen all the wheel nuts.
Do not remove them yet.4. Locate the notch in the frame near each wheel
which the jack head fits in.
5. Position the jack and raise the jack head until it
fits firmly into the notch in the vehicle’s frame
nearest the flat tire.
6. Put the compact spare tire near you.
5-63
Page 288 of 368
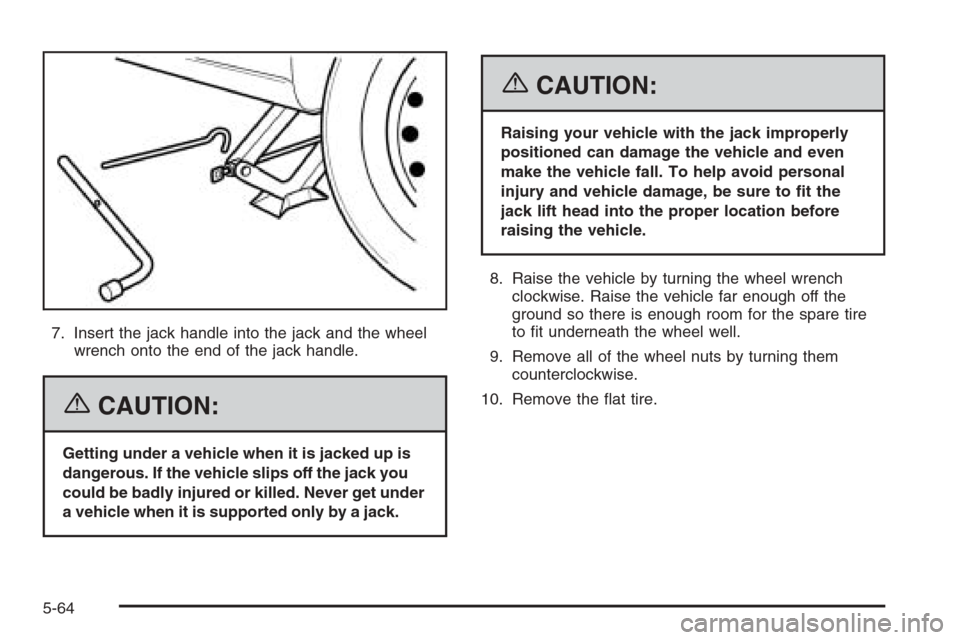
7. Insert the jack handle into the jack and the wheel
wrench onto the end of the jack handle.
{CAUTION:
Getting under a vehicle when it is jacked up is
dangerous. If the vehicle slips off the jack you
could be badly injured or killed. Never get under
a vehicle when it is supported only by a jack.
{CAUTION:
Raising your vehicle with the jack improperly
positioned can damage the vehicle and even
make the vehicle fall. To help avoid personal
injury and vehicle damage, be sure to �t the
jack lift head into the proper location before
raising the vehicle.
8. Raise the vehicle by turning the wheel wrench
clockwise. Raise the vehicle far enough off the
ground so there is enough room for the spare tire
to fit underneath the wheel well.
9. Remove all of the wheel nuts by turning them
counterclockwise.
10. Remove the flat tire.
5-64
Page 289 of 368
{CAUTION:
Rust or dirt on the wheel, or on the parts to
which it is fastened, can make the wheel nuts
become loose after a time. The wheel could
come off and cause an accident. When you
change a wheel, remove any rust or dirt from
the places where the wheel attaches to the
vehicle. In an emergency, you can use a cloth
or a paper towel to do this; but be sure to use
a scraper or wire brush later, if needed, to get
all the rust or dirt off.
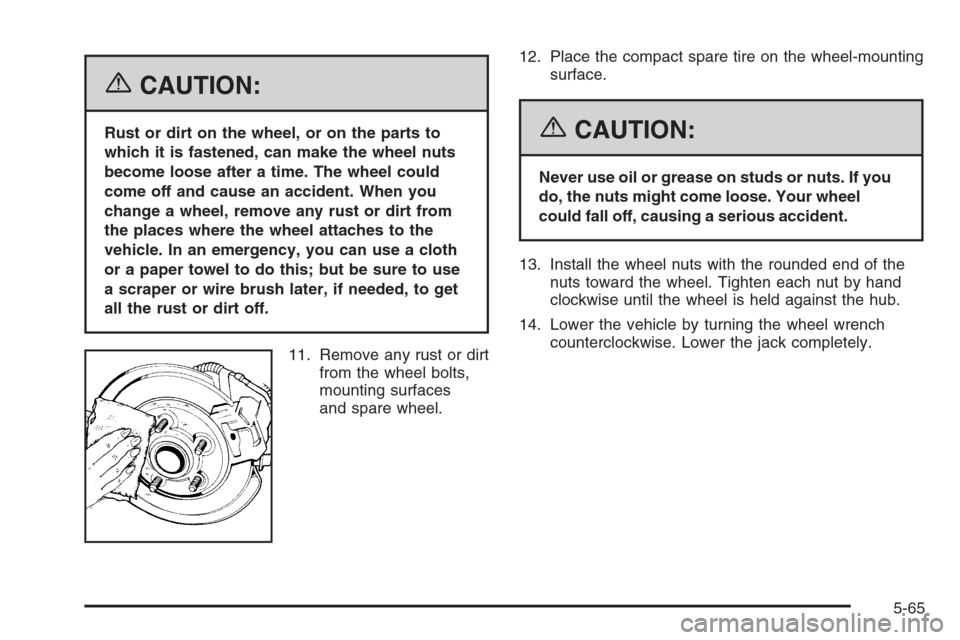
11. Remove any rust or dirt
from the wheel bolts,
mounting surfaces
and spare wheel.12. Place the compact spare tire on the wheel-mounting
surface.{CAUTION:
Never use oil or grease on studs or nuts. If you
do, the nuts might come loose. Your wheel
could fall off, causing a serious accident.
13. Install the wheel nuts with the rounded end of the
nuts toward the wheel. Tighten each nut by hand
clockwise until the wheel is held against the hub.
14. Lower the vehicle by turning the wheel wrench
counterclockwise. Lower the jack completely.
5-65