Page 108 of 368
Traction Control System
Active Light..............................................3-38
Traction Off Light..........................................3-39
Hold Mode Light...........................................3-39
Engine Coolant Temperature Gage..................3-40
Malfunction Indicator Lamp.............................3-40
Oil Pressure Light.........................................3-43
Cruise Control Light......................................3-43
Highbeam On Light.......................................3-44
Daytime Running Lamps (DRL)
Indicator Light...........................................3-44
Door Ajar Light.............................................3-44
Trunk Ajar Light............................................3-44
Fuel Gage...................................................3-45
Low Fuel Warning Light.................................3-46Audio System(s).............................................3-46
Radio with CD
(Single Display, Base Level).......................3-48
Radio with CD
(Single Display, MP3).................................3-52
Radio with CD
(Double Display, MP3/WMA).......................3-59
Radio with Six-Disc CD
(Double Display, MP3/WMA).......................3-67
Trunk-Mounted CD Changer...........................3-75
Audio Steering Wheel Controls.......................3-78
Radio Reception...........................................3-79
Care of Your CDs.........................................3-80
Care of the CD Player...................................3-80
Backglass Antenna (Sedan Models).................3-80
Integrated Windshield Antenna
(Hatchback and Wagon Models)..................3-81
Section 3 Instrument Panel
3-2
Page 209 of 368
When you want to leave the freeway, move to the
proper lane well in advance. If you miss your exit,
do not, under any circumstances, stop and back up.
Drive on to the next exit.
The exit ramp can be curved, sometimes quite sharply.
The exit speed is usually posted. Reduce your speed
according to your speedometer, not to your sense
of motion. After driving for any distance at higher
speeds, you may tend to think you are going slower
than you actually are.
Before Leaving on a Long Trip
Make sure you are ready. Try to be well rested. If you
must start when you are not fresh — such as after
a day’s work — do not plan to make too many miles
that first part of the journey. Wear comfortable clothing
and shoes you can easily drive in.
Is your vehicle ready for a long trip? If you keep it
serviced and maintained, it is ready to go. If it needs
service, have it done before starting out. Of course,
you will find experienced and able service experts in
GM dealerships all across North America. They will
be ready and willing to help if you need it.Here are some things you can check before a trip:
•Windshield Washer Fluid:Is the reservoir full?
Are all windows clean inside and outside?
•Wiper Blades:Are they in good shape?
•Fuel, Engine Oil, Other Fluids:Have you checked
all levels?
•Lamps:Are they all working? Are the lenses clean?
•Tires:They are vitally important to a safe,
trouble-free trip. Is the tread good enough for
long-distance driving? Are the tires all inflated to
the recommended pressure?
•Weather Forecasts:What is the weather outlook
along your route? Should you delay your trip a
short time to avoid a major storm system?
•Maps:Do you have up-to-date maps?
4-21
Page 237 of 368
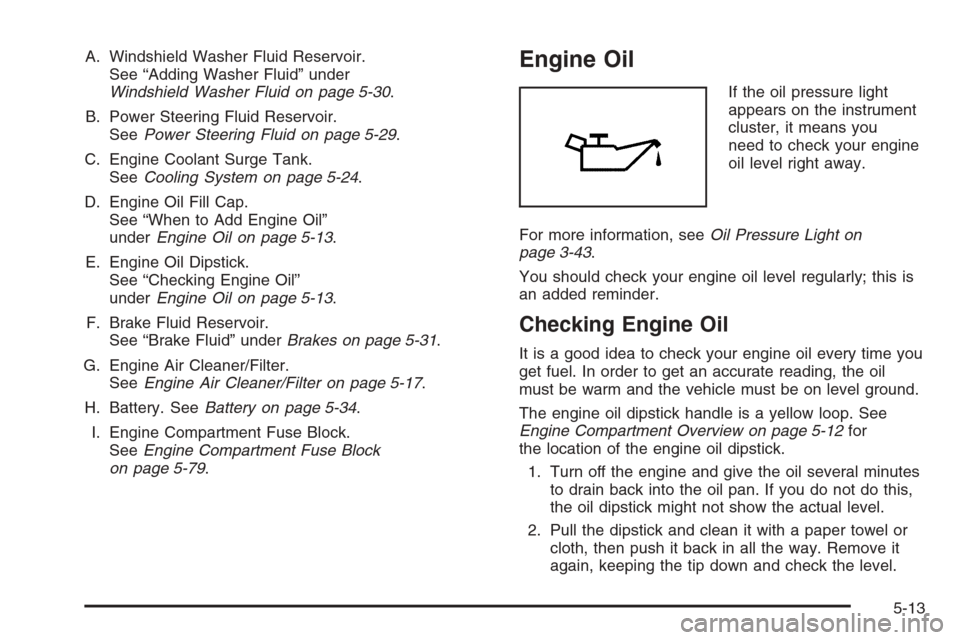
A. Windshield Washer Fluid Reservoir.
See “Adding Washer Fluid” under
Windshield Washer Fluid on page 5-30.
B. Power Steering Fluid Reservoir.
SeePower Steering Fluid on page 5-29.
C. Engine Coolant Surge Tank.
SeeCooling System on page 5-24.
D. Engine Oil Fill Cap.
See “When to Add Engine Oil”
underEngine Oil on page 5-13.
E. Engine Oil Dipstick.
See “Checking Engine Oil”
underEngine Oil on page 5-13.
F. Brake Fluid Reservoir.
See “Brake Fluid” underBrakes on page 5-31.
G. Engine Air Cleaner/Filter.
SeeEngine Air Cleaner/Filter on page 5-17.
H. Battery. SeeBattery on page 5-34.
I. Engine Compartment Fuse Block.
SeeEngine Compartment Fuse Block
on page 5-79.Engine Oil
If the oil pressure light
appears on the instrument
cluster, it means you
need to check your engine
oil level right away.
For more information, seeOil Pressure Light on
page 3-43.
You should check your engine oil level regularly; this is
an added reminder.
Checking Engine Oil
It is a good idea to check your engine oil every time you
get fuel. In order to get an accurate reading, the oil
must be warm and the vehicle must be on level ground.
The engine oil dipstick handle is a yellow loop. See
Engine Compartment Overview on page 5-12for
the location of the engine oil dipstick.
1. Turn off the engine and give the oil several minutes
to drain back into the oil pan. If you do not do this,
the oil dipstick might not show the actual level.
2. Pull the dipstick and clean it with a paper towel or
cloth, then push it back in all the way. Remove it
again, keeping the tip down and check the level.
5-13
Page 238 of 368
When to Add Engine Oil
If the oil is below the lower hole at the tip of the
dipstick (B), you will need to add at least one quart/liter
of oil. But you must use the right kind. This section
explains what kind of oil to use. For engine oil
crankcase capacity, seeCapacities and Specifications
on page 5-83.
Notice:Do not add too much oil. If your engine has
so much oil that the oil level gets above the upper
hole (A) that shows the proper operating range,
your engine could be damaged.
SeeEngine Compartment Overview on page 5-12
for the location of the engine oil fill cap.
Be sure to add enough oil to put the level somewhere
in the proper operating range, between the holes on
the dipstick. Push the dipstick all the way back in
when you are through.
What Kind of Engine Oil to Use
Look for two things:
•GM6094M
Your vehicle’s engine requires oil meeting GM
Standard GM6094M. You should look for and use
only an oil that meets GM Standard GM6094M.
5-14
Page 243 of 368
Automatic Transaxle Fluid
It is not necessary to check the transaxle fluid level. If a
leak occurs, take the vehicle to the dealership service
department and have it repaired as soon as possible.
Have your dealer or service center change both the fluid
and filter every 50,000 miles (83 000 km) if the vehicle
is mainly driven under one or more of these conditions:
•In heavy city traffic where the outside temperature
regularly reaches 90°F (32°C) or higher.
•In hilly or mountainous terrain.
•Uses such as found in taxi, police or delivery
service.
If you do not use your vehicle under any of these
conditions, the fluid and filter do not require changing.
Notice:Use of automatic transaxle �uid labeled
other than ESSO LT71141 or TOTAL ATF H50235
may damage your vehicle, and the damages may
not be covered by your warranty. Always use
ESSO LT71141 or TOTAL ATF H50235 labeled
automatic transaxle �uid.
Engine Coolant
The following explains your cooling system and how
to add coolant when it is low. If you have a problem
with engine overheating, seeEngine Overheating
on page 5-22.
A 50/50 mixture of clean, drinkable water and proper
coolant will:
•Give freezing protection down to−34°F (−37°C).
•Give boiling protection up to 265°F (129°C).
•Protect against rust and corrosion.
•Help keep the proper engine temperature.
•Let the warning lights and gages work as
they should.
5-19
Page 248 of 368
Cooling System
When you decide it is safe to lift the hood, here is what
you will see:
A. Coolant Surge Tank with Pressure Cap
B. Electric Engine Cooling Fan{CAUTION:
An electric engine cooling fan under the hood
can start up even when the engine is not
running and can injure you. Keep hands,
clothing and tools away from any underhood
electric fan.
If the coolant inside the coolant surge tank is boiling,
do not do anything else until it cools down. The vehicle
should be parked on a level surface. Make sure that
the air conditioning is turned off.
The coolant level should be between the Minimum and
Maximum marks on the coolant surge tank when the
engine is cool.
If it is not, you may have a leak at the pressure cap
or in the radiator hoses, heater hoses, radiator, water
pump, or somewhere else in the cooling system.
5-24
Page 307 of 368
Capacities and Speci�cations
The following approximate capacities are given in English and metric conversions. SeePart D: Recommended Fluids
and Lubricants on page 6-25for more information.
ApplicationCapacities
English Metric
Air Conditioning Refrigerant 1.61 lbs 0.73 kg
Brake Fluid 0.53 qt 0.5 L
Cooling System 8.7 qt 8.2 L
Engine Oil with Filter 6.8 qt 6.4 L
Fuel Tank 16.6 gal 63.0 L
Transaxle, Automatic 7.8 qt 7.4 L
Wheel Nut Torque 81 lb ft 110Y
All capacities are approximate. When adding, be sure to fill to the appropriate level, as recommended in this
manual. Recheck fluid level after filling.
Engine Speci�cations
Engine VIN Code Transaxle Spark Plug Gap
2.5L L6 (DOHC) L Automatic 0.030 inch (0.80 mm)
5-83
Page 310 of 368
Maintenance Schedule
Introduction
Important: Keep engine oil at the proper level and
change as recommended.
Have you purchased the GM Protection Plan? The Plan
supplements your new vehicle warranties. See your
Warranty and Owner Assistance booklet or your dealer
for details.
Maintenance Requirements
Maintenance intervals, checks, inspections and
recommended fluids and lubricants as prescribed in
this manual are necessary to keep your vehicle in good
working condition. Any damage caused by failure to
follow scheduled maintenance may not be covered
by warranty.
Your Vehicle and the Environment
Proper vehicle maintenance not only helps to keep your
vehicle in good working condition, but also helps the
environment. Improper vehicle maintenance can
even affect the quality of the air we breathe. Improper
fluid levels or the wrong tire inflation can increase
the level of emissions from your vehicle. To help protect
our environment, and to keep your vehicle in good
condition, be sure to maintain your vehicle properly.
6-2