2006 CHEVROLET COLORADO tailgate
[x] Cancel search: tailgatePage 89 of 434

Keys...............................................................2-2
Remote Keyless Entry System.........................2-3
Remote Keyless Entry System Operation...........2-4
Doors and Locks.............................................2-7
Door Locks....................................................2-7
Power Door Locks..........................................2-8
Programmable Automatic Door Locks................2-8
Rear Door Security Locks (Crew Cab)...............2-9
Lockout Protection..........................................2-9
Rear Doors (Extended Cab).............................2-9
Tailgate.......................................................2-10
Windows........................................................2-12
Manual Windows..........................................2-12
Power Windows............................................2-13
Sliding Rear Window.....................................2-14
Sun Visors...................................................2-14
Theft-Deterrent Systems..................................2-15
Content Theft-Deterrent.................................2-15
Passlock
®....................................................2-16
Starting and Operating Your Vehicle................2-17
New Vehicle Break-In....................................2-17
Ignition Positions..........................................2-17
Retained Accessory Power (RAP)...................2-18
Starting the Engine.......................................2-19
Engine Coolant Heater..................................2-20
Automatic Transmission Operation...................2-21
Manual Transmission Operation......................2-24Four-Wheel Drive..........................................2-26
Parking Brake..............................................2-30
Shifting Into Park (P)
(Automatic Transmission)............................2-31
Shifting Out of Park (P)
(Automatic Transmission)............................2-33
Parking Your Vehicle (Manual Transmission).....2-33
Parking Over Things That Burn.......................2-34
Engine Exhaust............................................2-34
Running the Engine While Parked...................2-35
Mirrors...........................................................2-36
Manual Rearview Mirror.................................2-36
Manual Rearview Mirror with OnStar
®..............2-37
Automatic Dimming Rearview
Mirror with Compass and Temperature
Display....................................................2-37
Outside Manual Mirrors..................................2-39
Outside Power Mirrors...................................2-40
Outside Convex Mirror...................................2-40
OnStar
®System.............................................2-41
Storage Areas................................................2-42
Glove Box...................................................2-42
Cupholder(s)................................................2-42
Front Armrest Storage Area...........................2-43
Assist Handles.............................................2-43
Rear Storage Area........................................2-44
Sunroof.........................................................2-45
Section 2 Features and Controls
2-1
Page 91 of 434

There is a double-sided
key that can be used for
the ignition, all door
locks, and the tailgate.
When a new vehicle is delivered, the dealer provides
the owner with a pair of identical keys and a key
code number.
The key code number tells your dealer or a quali�ed
locksmith how to make extra keys. Keep this number
in a safe place. If you lose your keys, you will be able
to have new ones made easily using this number.
Your dealer should also have this number.
Notice:If you ever lock your keys in your vehicle,
you may have to damage the vehicle to get in.
Be sure you have spare keys.
If you ever do get locked out of your vehicle call the
GM Roadside Assistance Center. SeeRoadside
Assistance Program on page 7-6.Remote Keyless Entry System
If the vehicle has the keyless entry system, it operates
on a radio frequency subject to Federal Communications
Commission (FCC) Rules and with Industry Canada.
This device complies with Part 15 of the FCC Rules.
Operation is subject to the following two conditions:
1. This device may not cause interference.
2. This device must accept any interference received,
including interference that may cause undesired
operation of the device.
This device complies with RSS-210 of Industry Canada.
Operation is subject to the following two conditions:
1. This device may not cause interference.
2. This device must accept any interference received,
including interference that may cause undesired
operation of the device.
Changes or modi�cations to this system by other than
an authorized service facility could void authorization to
use this equipment.
2-3
Page 98 of 434
Tailgate
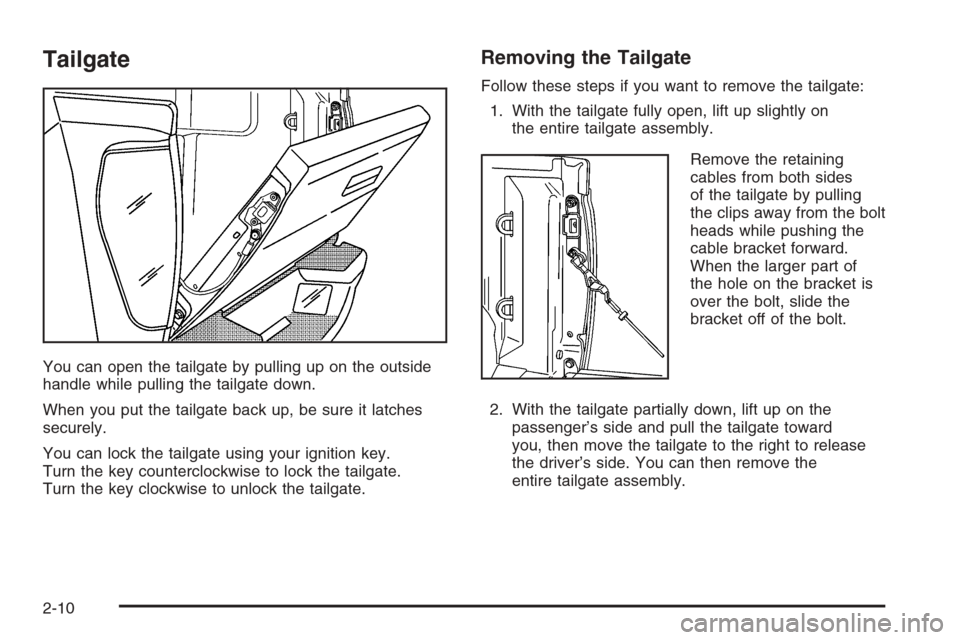
You can open the tailgate by pulling up on the outside
handle while pulling the tailgate down.
When you put the tailgate back up, be sure it latches
securely.
You can lock the tailgate using your ignition key.
Turn the key counterclockwise to lock the tailgate.
Turn the key clockwise to unlock the tailgate.
Removing the Tailgate
Follow these steps if you want to remove the tailgate:
1. With the tailgate fully open, lift up slightly on
the entire tailgate assembly.
Remove the retaining
cables from both sides
of the tailgate by pulling
the clips away from the bolt
heads while pushing the
cable bracket forward.
When the larger part of
the hole on the bracket is
over the bolt, slide the
bracket off of the bolt.
2. With the tailgate partially down, lift up on the
passenger’s side and pull the tailgate toward
you, then move the tailgate to the right to release
the driver’s side. You can then remove the
entire tailgate assembly.
2-10
Page 99 of 434
Reverse the procedure to reinstall the tailgate.
Make sure it is secure.
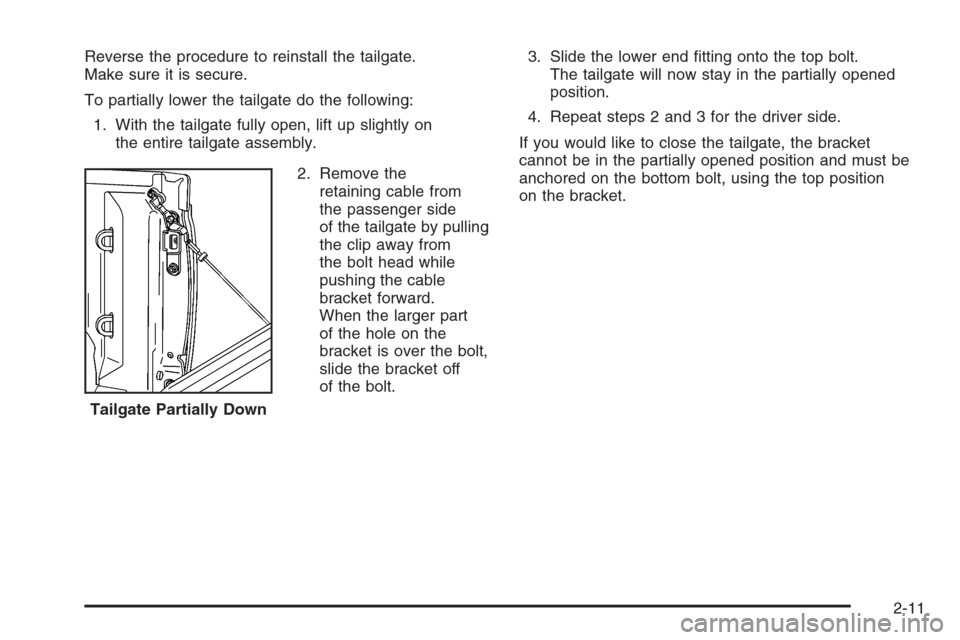
To partially lower the tailgate do the following:
1. With the tailgate fully open, lift up slightly on
the entire tailgate assembly.
2. Remove the
retaining cable from
the passenger side
of the tailgate by pulling
the clip away from
the bolt head while
pushing the cable
bracket forward.
When the larger part
of the hole on the
bracket is over the bolt,
slide the bracket off
of the bolt.3. Slide the lower end �tting onto the top bolt.
The tailgate will now stay in the partially opened
position.
4. Repeat steps 2 and 3 for the driver side.
If you would like to close the tailgate, the bracket
cannot be in the partially opened position and must be
anchored on the bottom bolt, using the top position
on the bracket.
Tailgate Partially Down
2-11
Page 331 of 434
Taillamps, Turn Signal, Stoplamps
and Back-up Lamps
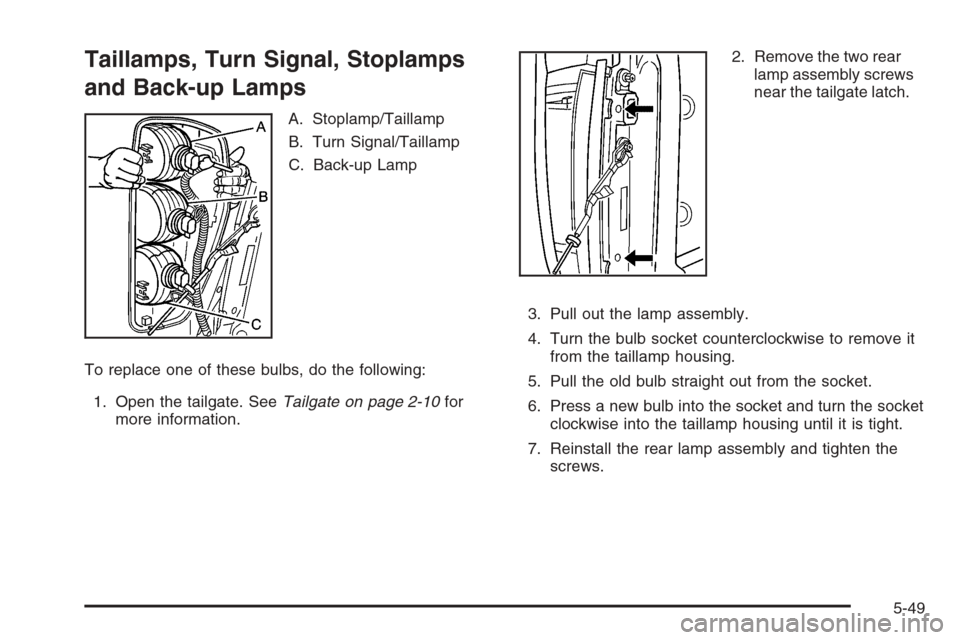
A. Stoplamp/Taillamp
B. Turn Signal/Taillamp
C. Back-up Lamp
To replace one of these bulbs, do the following:
1. Open the tailgate. SeeTailgate on page 2-10for
more information.2. Remove the two rear
lamp assembly screws
near the tailgate latch.
3. Pull out the lamp assembly.
4. Turn the bulb socket counterclockwise to remove it
from the taillamp housing.
5. Pull the old bulb straight out from the socket.
6. Press a new bulb into the socket and turn the socket
clockwise into the taillamp housing until it is tight.
7. Reinstall the rear lamp assembly and tighten the
screws.
5-49
Page 393 of 434

Maintenance Footnotes
†The U.S. Environmental Protection Agency or the
California Air Resources Board has determined that the
failure to perform this maintenance item will not nullify
the emission warranty or limit recall liability prior to
the completion of the vehicle’s useful life. We, however,
urge that all recommended maintenance services be
performed at the indicated intervals and the
maintenance be recorded.
(a)Visually inspect brake lines and hoses for proper
hook-up, binding, leaks, cracks, cha�ng, etc. Inspect
disc brake pads for wear and rotors for surface
condition. Inspect drum brake linings/shoes for wear or
cracks. Inspect other brake parts, including drums,
wheel cylinders, calipers, parking brake, etc. Check
parking brake adjustment.
(b)Visually inspect front and rear suspension and
steering system for damaged, loose, or missing parts or
signs of wear. Inspect power steering lines and hoses
for proper hook-up, binding, leaks, cracks, cha�ng,
etc. Visually check constant velocity joints, rubber boots,
and axle seals for leaks.
(c)Visually inspect hoses and have them replaced if they
are cracked, swollen, or deteriorated. Inspect all pipes,
�ttings, and clamps; replace with genuine GM parts as
needed. To help ensure proper operation, a pressure testof the cooling system and pressure cap and cleaning the
outside of the radiator and air conditioning condenser is
recommended at least once a year.
(d)Visually inspect wiper blades for wear or cracking.
Replace wiper blades that appear worn or damaged
or that streak or miss areas of the windshield.
(e)Make sure the safety belt reminder light and all your
belts, buckles, latch plates, retractors, and anchorages
are working properly. Look for any other loose or
damaged safety belt system parts. If you see anything
that might keep a safety belt system from doing its
job, have it repaired. Have any torn or frayed safety belts
replaced. Also look for any opened or broken airbag
coverings, and have them repaired or replaced.
The airbag system does not need regular maintenance.
(f)Lubricate all key lock cylinders, body door and
fuel door hinges, latches and locks (including glove box
and console doors), hood latch assembly, secondary
latch, pivots, spring anchor, release pawl, and any
moving seat hardware. Lubricate hood safety lever pivot
and prop rod pivot and tailgate latch bolt, handle
assembly pivot points, and hinges. More frequent
lubrication may be required when exposed to a corrosive
environment. Applying silicone grease on weatherstrips
with a clean cloth will make them last longer, seal
better, and not stick or squeak.
6-7
Page 399 of 434
Usage Fluid/Lubricant
Front and
Rear AxleSAE 75W-90 Synthetic
Axle Lubricant
(GM Part No. U.S. 12378261, in
Canada 10953455) meeting
GM Speci�cation 9986115.
Transfer CaseSynchromesh Transmission Fluid
(GM Part No. U.S. 12345349, in
Canada 10953465).
Rear Driveline
Center Spline
and Universal
JointsChassis Lubricant
(GM Part No. U.S. 12377985, in
Canada 88901242) or lubricant
meeting requirements of NLGI #2,
Category LB or GC-LB.
Constant
Velocity
Universal JointChassis Lubricant
(GM Part No. U.S. 12377985, in
Canada 88901242) or lubricant
meeting requirements of NLGI #2,
Category LB or GC-LB.
Hood Latch
Assembly,
Secondary
Latch,
Pivots, Spring
Anchor, and
Release PawlLubriplate Lubricant Aerosol
(GM Part No. U.S. 12346293, in
Canada 992723) or lubricant
meeting requirements of NLGI #2,
Category LB or GC-LB.Usage Fluid/Lubricant
Hood and Door
Hinges, Body
Door Hinge
Pins, Liftgate
Hinge and
Linkage,
Folding Seats,
and Fuel
Door HingeMulti-Purpose Lubricant, Superlube
(GM Part No. U.S. 12346241, in
Canada 10953474).
Outer Tailgate
Handle Pivot
Points and
HingesMulti-Purpose Lubricant, Superlube
(GM Part No. U.S. 12346241, in
Canada 10953474).
Weatherstrip
ConditioningDielectric Silicone Grease
(GM Part No. U.S. 12345579, in
Canada 992887).
Weatherstrip
SqueaksSynthetic Grease with
Te�on, Superlube
(GM Part No. U.S. 12371287, in
Canada 10953437).
6-13
Page 433 of 434
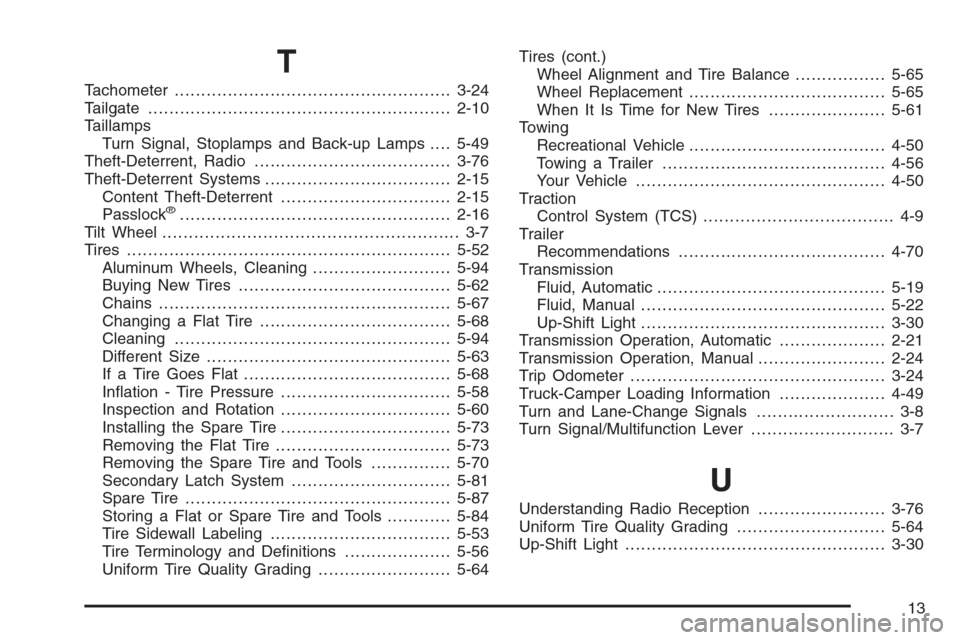
T
Tachometer....................................................3-24
Tailgate.........................................................2-10
Taillamps
Turn Signal, Stoplamps and Back-up Lamps....5-49
Theft-Deterrent, Radio.....................................3-76
Theft-Deterrent Systems...................................2-15
Content Theft-Deterrent................................2-15
Passlock
®...................................................2-16
Tilt Wheel........................................................ 3-7
Tires.............................................................5-52
Aluminum Wheels, Cleaning..........................5-94
Buying New Tires........................................5-62
Chains.......................................................5-67
Changing a Flat Tire....................................5-68
Cleaning....................................................5-94
Different Size..............................................5-63
If a Tire Goes Flat.......................................5-68
In�ation - Tire Pressure................................5-58
Inspection and Rotation................................5-60
Installing the Spare Tire................................5-73
Removing the Flat Tire.................................5-73
Removing the Spare Tire and Tools...............5-70
Secondary Latch System..............................5-81
Spare Tire..................................................5-87
Storing a Flat or Spare Tire and Tools............5-84
Tire Sidewall Labeling..................................5-53
Tire Terminology and De�nitions....................5-56
Uniform Tire Quality Grading.........................5-64Tires (cont.)
Wheel Alignment and Tire Balance.................5-65
Wheel Replacement.....................................5-65
When It Is Time for New Tires......................5-61
Towing
Recreational Vehicle.....................................4-50
Towing a Trailer..........................................4-56
Your Vehicle...............................................4-50
Traction
Control System (TCS).................................... 4-9
Trailer
Recommendations.......................................4-70
Transmission
Fluid, Automatic...........................................5-19
Fluid, Manual..............................................5-22
Up-Shift Light..............................................3-30
Transmission Operation, Automatic....................2-21
Transmission Operation, Manual........................2-24
Trip Odometer................................................3-24
Truck-Camper Loading Information....................4-49
Turn and Lane-Change Signals.......................... 3-8
Turn Signal/Multifunction Lever........................... 3-7
U
Understanding Radio Reception........................3-76
Uniform Tire Quality Grading............................5-64
Up-Shift Light.................................................3-30
13