2006 CHEVROLET AVEO steering
[x] Cancel search: steeringPage 221 of 362
Dolly Towing
Notice:Towing your vehicle from the rear with the
front wheels on the ground could cause transaxle
damage. Do not tow the vehicle from the rear
with the front wheels on the road.
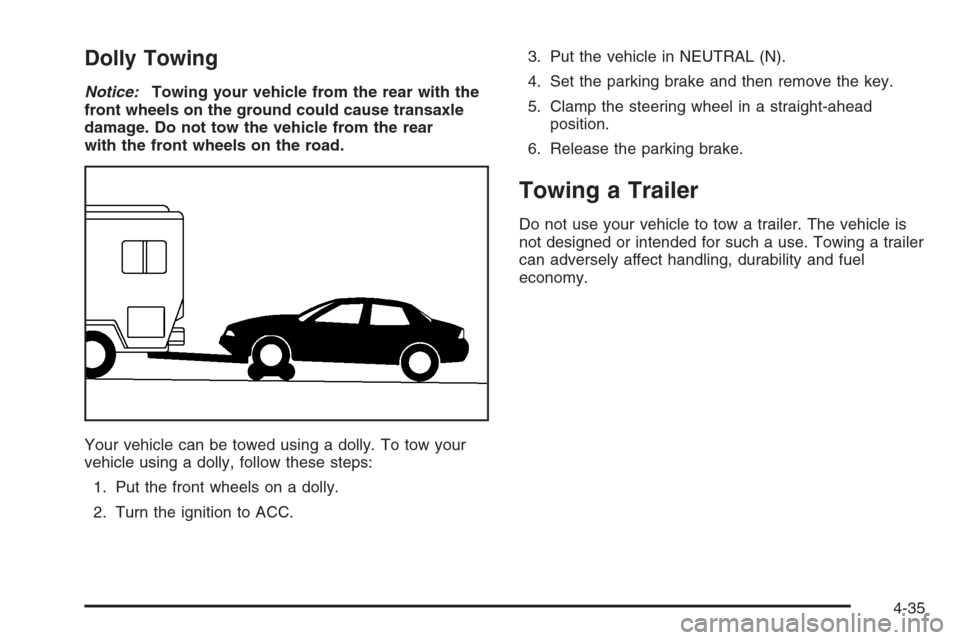
Your vehicle can be towed using a dolly. To tow your
vehicle using a dolly, follow these steps:
1. Put the front wheels on a dolly.
2. Turn the ignition to ACC.3. Put the vehicle in NEUTRAL (N).
4. Set the parking brake and then remove the key.
5. Clamp the steering wheel in a straight-ahead
position.
6. Release the parking brake.
Towing a Trailer
Do not use your vehicle to tow a trailer. The vehicle is
not designed or intended for such a use. Towing a trailer
can adversely affect handling, durability and fuel
economy.
4-35
Page 223 of 362
Service............................................................5-3
Accessories and Modifications..........................5-3
California Proposition 65 Warning.....................5-3
Doing Your Own Service Work.........................5-4
Adding Equipment to the Outside of Your
Vehicle......................................................5-4
Fuel................................................................5-5
Gasoline Octane............................................5-5
Gasoline Specifications....................................5-5
California Fuel...............................................5-5
Additives.......................................................5-6
Fuels in Foreign Countries...............................5-6
Filling the Tank..............................................5-7
Filling a Portable Fuel Container.......................5-9
Checking Things Under the Hood....................5-10
Hood Release..............................................5-10
Engine Compartment Overview.......................5-12
Engine Oil...................................................5-13
Engine Air Cleaner/Filter................................5-17
Automatic Transaxle Fluid..............................5-19
Manual Transaxle Fluid..................................5-21
Hydraulic Clutch...........................................5-21
Engine Coolant.............................................5-22
Coolant Surge Tank Pressure Cap..................5-24
Engine Overheating.......................................5-24
Cooling System............................................5-26Power Steering Fluid.....................................5-30
Windshield Washer Fluid................................5-31
Brakes........................................................5-32
Battery........................................................5-35
Jump Starting...............................................5-36
Headlamp Aiming...........................................5-39
Bulb Replacement..........................................5-40
Halogen Bulbs..............................................5-40
Headlamps..................................................5-40
Front Turn Signal and Parking Lamps..............5-42
Turn Signal Lamps (Side)..............................5-42
Taillamps, Turn Signal, Stoplamps and
Back-up Lamps.........................................5-43
Replacement Bulbs.......................................5-44
Windshield Wiper Blade Replacement..............5-44
Tires..............................................................5-45
Tire Sidewall Labeling...................................5-46
Tire Terminology and Definitions.....................5-48
Inflation - Tire Pressure.................................5-51
Tire Inspection and Rotation...........................5-52
When It Is Time for New Tires.......................5-53
Buying New Tires.........................................5-54
Different Size Tires and Wheels......................5-54
Uniform Tire Quality Grading..........................5-55
Wheel Alignment and Tire Balance..................5-56
Wheel Replacement......................................5-56
Section 5 Service and Appearance Care
5-1
Page 235 of 362
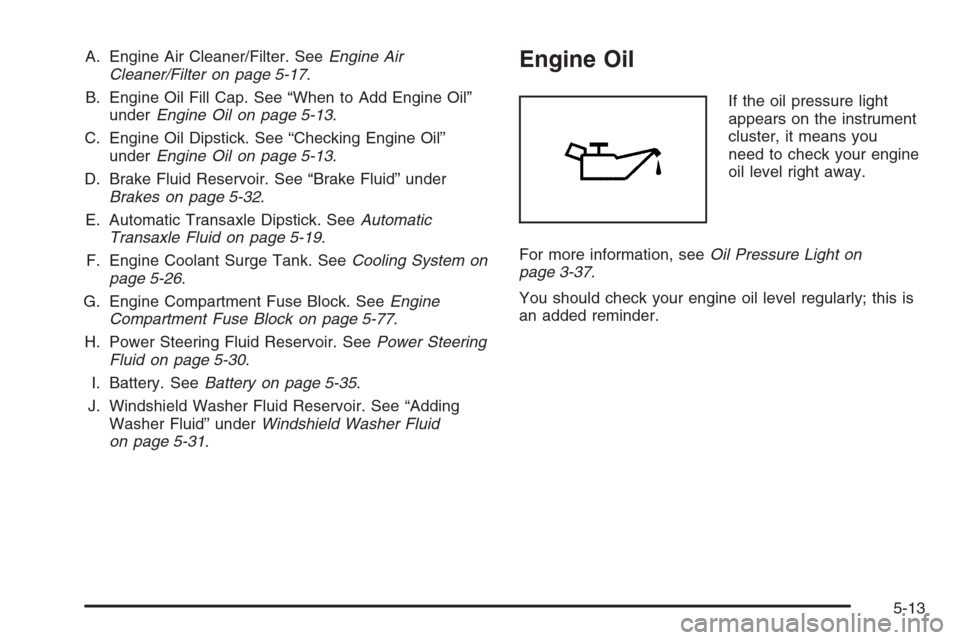
A. Engine Air Cleaner/Filter. SeeEngine Air
Cleaner/Filter on page 5-17.
B. Engine Oil Fill Cap. See “When to Add Engine Oil”
underEngine Oil on page 5-13.
C. Engine Oil Dipstick. See “Checking Engine Oil”
underEngine Oil on page 5-13.
D. Brake Fluid Reservoir. See “Brake Fluid” under
Brakes on page 5-32.
E. Automatic Transaxle Dipstick. SeeAutomatic
Transaxle Fluid on page 5-19.
F. Engine Coolant Surge Tank. SeeCooling System on
page 5-26.
G. Engine Compartment Fuse Block. SeeEngine
Compartment Fuse Block on page 5-77.
H. Power Steering Fluid Reservoir. SeePower Steering
Fluid on page 5-30.
I. Battery. SeeBattery on page 5-35.
J. Windshield Washer Fluid Reservoir. See “Adding
Washer Fluid” underWindshield Washer Fluid
on page 5-31.Engine Oil
If the oil pressure light
appears on the instrument
cluster, it means you
need to check your engine
oil level right away.
For more information, seeOil Pressure Light on
page 3-37.
You should check your engine oil level regularly; this is
an added reminder.
5-13
Page 242 of 362
Then, without shutting off the engine, follow these steps:
The automatic transaxle dipstick is located toward the
front of the engine compartment, near the power
steering fluid reservoir. SeeEngine Compartment
Overview on page 5-12for more information on location.
1. Pull out the dipstick and wipe it with a clean rag
or paper towel.
2. Push the dipstick back in all the way, wait three
seconds and then pull it back out again.
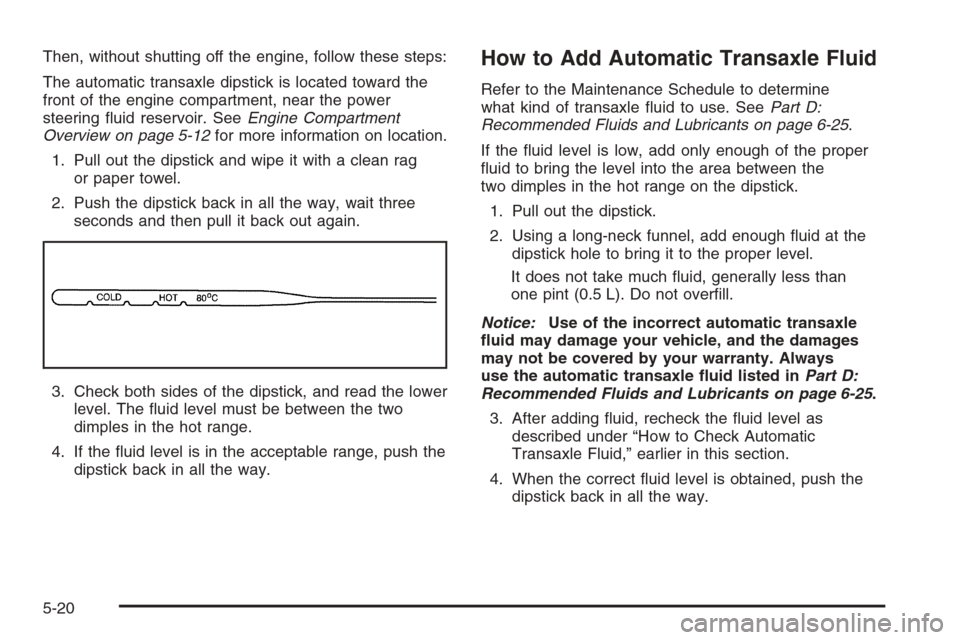
3. Check both sides of the dipstick, and read the lower
level. The fluid level must be between the two
dimples in the hot range.
4. If the fluid level is in the acceptable range, push the
dipstick back in all the way.How to Add Automatic Transaxle Fluid
Refer to the Maintenance Schedule to determine
what kind of transaxle fluid to use. SeePart D:
Recommended Fluids and Lubricants on page 6-25.
If the fluid level is low, add only enough of the proper
fluid to bring the level into the area between the
two dimples in the hot range on the dipstick.
1. Pull out the dipstick.
2. Using a long-neck funnel, add enough fluid at the
dipstick hole to bring it to the proper level.
It does not take much fluid, generally less than
one pint (0.5 L). Do not overfill.
Notice:Use of the incorrect automatic transaxle
�uid may damage your vehicle, and the damages
may not be covered by your warranty. Always
use the automatic transaxle �uid listed inPart D:
Recommended Fluids and Lubricants on page 6-25.
3. After adding fluid, recheck the fluid level as
described under “How to Check Automatic
Transaxle Fluid,” earlier in this section.
4. When the correct fluid level is obtained, push the
dipstick back in all the way.
5-20
Page 252 of 362
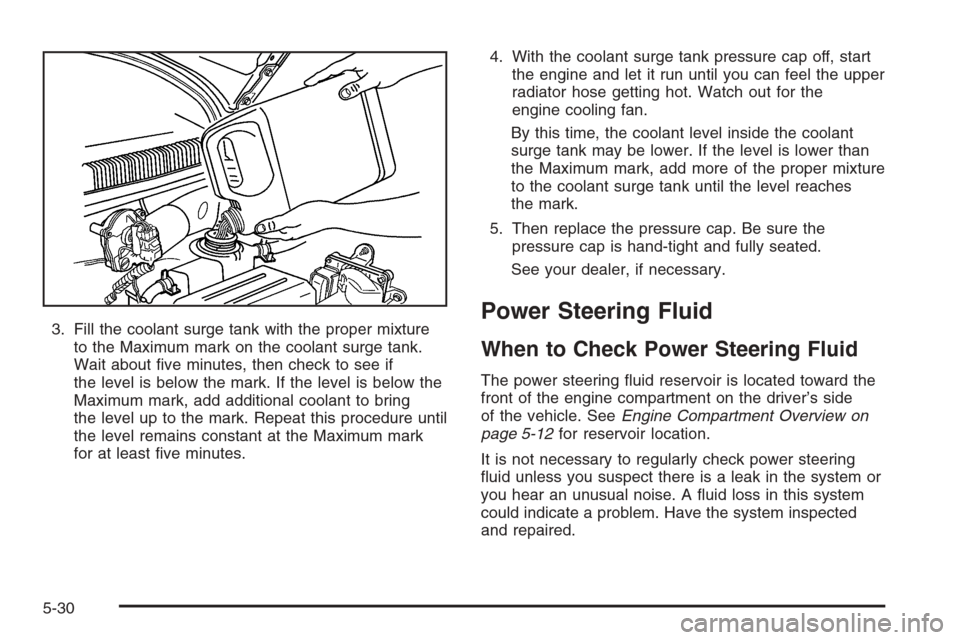
3. Fill the coolant surge tank with the proper mixture
to the Maximum mark on the coolant surge tank.
Wait about five minutes, then check to see if
the level is below the mark. If the level is below the
Maximum mark, add additional coolant to bring
the level up to the mark. Repeat this procedure until
the level remains constant at the Maximum mark
for at least five minutes.4. With the coolant surge tank pressure cap off, start
the engine and let it run until you can feel the upper
radiator hose getting hot. Watch out for the
engine cooling fan.
By this time, the coolant level inside the coolant
surge tank may be lower. If the level is lower than
the Maximum mark, add more of the proper mixture
to the coolant surge tank until the level reaches
the mark.
5. Then replace the pressure cap. Be sure the
pressure cap is hand-tight and fully seated.
See your dealer, if necessary.Power Steering Fluid
When to Check Power Steering Fluid
The power steering fluid reservoir is located toward the
front of the engine compartment on the driver’s side
of the vehicle. SeeEngine Compartment Overview on
page 5-12for reservoir location.
It is not necessary to regularly check power steering
fluid unless you suspect there is a leak in the system or
you hear an unusual noise. A fluid loss in this system
could indicate a problem. Have the system inspected
and repaired.
5-30
Page 253 of 362
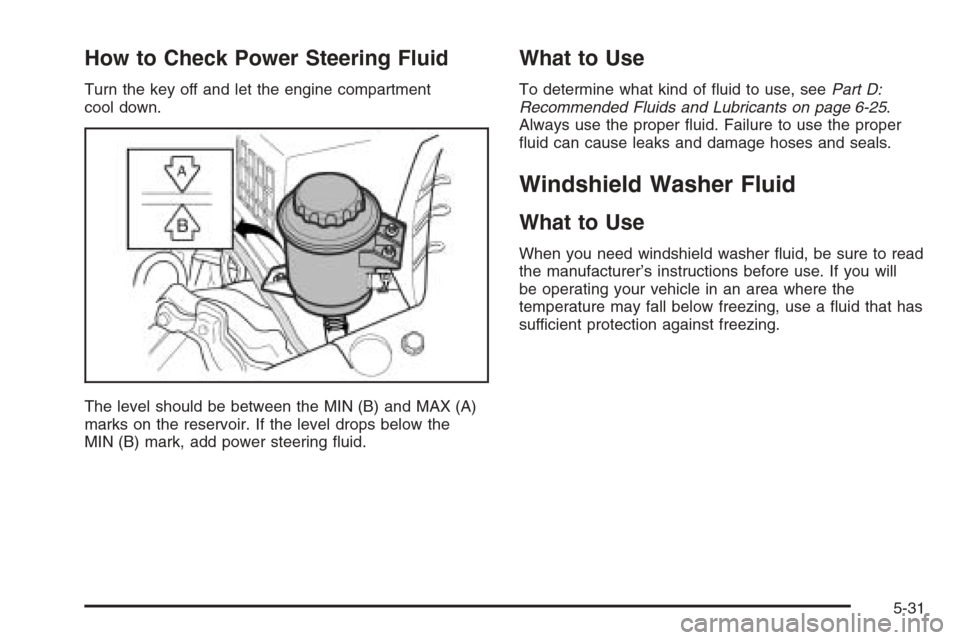
How to Check Power Steering Fluid
Turn the key off and let the engine compartment
cool down.
The level should be between the MIN (B) and MAX (A)
marks on the reservoir. If the level drops below the
MIN (B) mark, add power steering fluid.
What to Use
To determine what kind of fluid to use, seePart D:
Recommended Fluids and Lubricants on page 6-25.
Always use the proper fluid. Failure to use the proper
fluid can cause leaks and damage hoses and seals.
Windshield Washer Fluid
What to Use
When you need windshield washer fluid, be sure to read
the manufacturer’s instructions before use. If you will
be operating your vehicle in an area where the
temperature may fall below freezing, use a fluid that has
sufficient protection against freezing.
5-31
Page 270 of 362
Tire Size
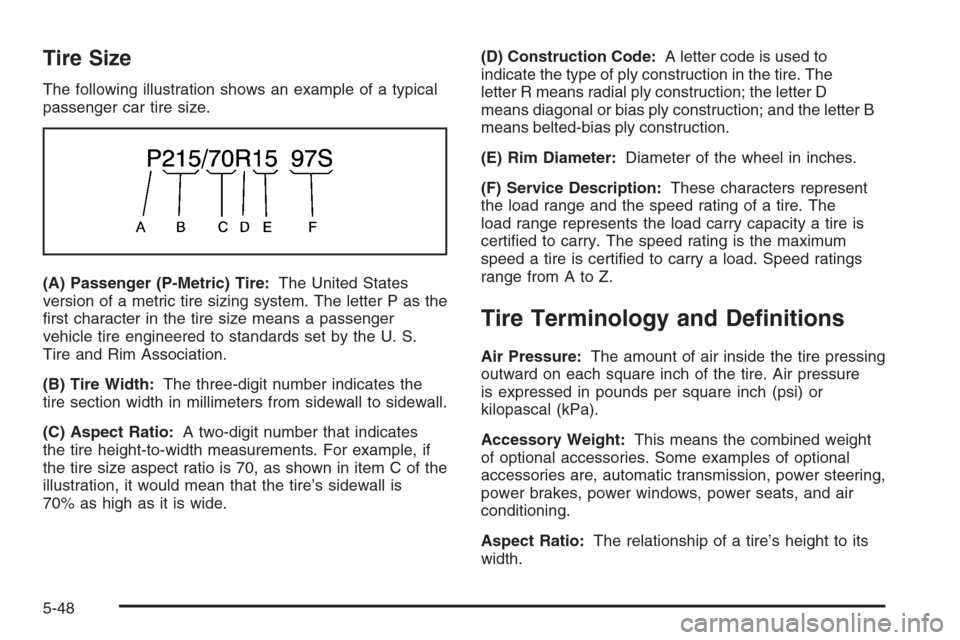
The following illustration shows an example of a typical
passenger car tire size.
(A) Passenger (P-Metric) Tire:The United States
version of a metric tire sizing system. The letter P as the
first character in the tire size means a passenger
vehicle tire engineered to standards set by the U. S.
Tire and Rim Association.
(B) Tire Width:The three-digit number indicates the
tire section width in millimeters from sidewall to sidewall.
(C) Aspect Ratio:A two-digit number that indicates
the tire height-to-width measurements. For example, if
the tire size aspect ratio is 70, as shown in item C of the
illustration, it would mean that the tire’s sidewall is
70% as high as it is wide.(D) Construction Code:A letter code is used to
indicate the type of ply construction in the tire. The
letter R means radial ply construction; the letter D
means diagonal or bias ply construction; and the letter B
means belted-bias ply construction.
(E) Rim Diameter:Diameter of the wheel in inches.
(F) Service Description:These characters represent
the load range and the speed rating of a tire. The
load range represents the load carry capacity a tire is
certified to carry. The speed rating is the maximum
speed a tire is certified to carry a load. Speed ratings
range from A to Z.
Tire Terminology and De�nitions
Air Pressure:The amount of air inside the tire pressing
outward on each square inch of the tire. Air pressure
is expressed in pounds per square inch (psi) or
kilopascal (kPa).
Accessory Weight:This means the combined weight
of optional accessories. Some examples of optional
accessories are, automatic transmission, power steering,
power brakes, power windows, power seats, and air
conditioning.
Aspect Ratio:The relationship of a tire’s height to its
width.
5-48
Page 280 of 362
If a Tire Goes Flat
It is unusual for a tire to blowout while you are driving,
especially if you maintain your vehicle’s tires properly.
If air goes out of a tire, it is much more likely to leak out
slowly. But if you should ever have a blowout, here
are a few tips about what to expect and what to do:
If a front tire fails, the flat tire will create a drag that pulls
the vehicle toward that side. Take your foot off the
accelerator pedal and grip the steering wheel firmly.
Steer to maintain lane position, and then gently brake to
a stop well out of the traffic lane.
A rear blowout, particularly on a curve, acts much like a
skid and may require the same correction you would
use in a skid. In any rear blowout remove your foot from
the accelerator pedal. Get the vehicle under control
by steering the way you want the vehicle to go. It may
be very bumpy and noisy, but you can still steer. Gently
brake to a stop, well off the road if possible.{CAUTION:
Lifting a vehicle and getting under it to do
maintenance or repairs is dangerous without
the appropriate safety equipment and training.
The jack provided with your vehicle is
designed only for changing a �at tire. If it is
used for anything else, you or others could be
badly injured or killed if the vehicle slips off
the jack. Use the jack provided with your
vehicle only for changing a �at tire.
If a tire goes flat, the next part shows how to use the
jacking equipment to change a flat tire safely.
Changing a Flat Tire
If a tire goes flat, avoid further tire and wheel damage
by driving slowly to a level place. Turn on your
hazard warning flashers.
5-58