2006 CHEVROLET AVEO seats
[x] Cancel search: seatsPage 99 of 362

Automatic Transaxle Operation
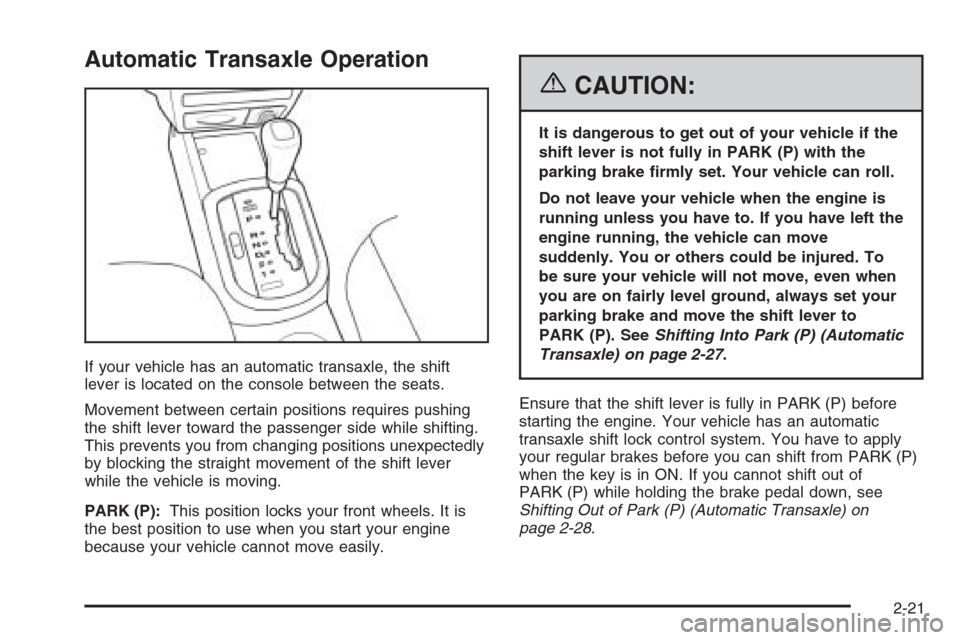
If your vehicle has an automatic transaxle, the shift
lever is located on the console between the seats.
Movement between certain positions requires pushing
the shift lever toward the passenger side while shifting.
This prevents you from changing positions unexpectedly
by blocking the straight movement of the shift lever
while the vehicle is moving.
PARK (P):This position locks your front wheels. It is
the best position to use when you start your engine
because your vehicle cannot move easily.
{CAUTION:
It is dangerous to get out of your vehicle if the
shift lever is not fully in PARK (P) with the
parking brake �rmly set. Your vehicle can roll.
Do not leave your vehicle when the engine is
running unless you have to. If you have left the
engine running, the vehicle can move
suddenly. You or others could be injured. To
be sure your vehicle will not move, even when
you are on fairly level ground, always set your
parking brake and move the shift lever to
PARK (P). SeeShifting Into Park (P) (Automatic
Transaxle) on page 2-27.
Ensure that the shift lever is fully in PARK (P) before
starting the engine. Your vehicle has an automatic
transaxle shift lock control system. You have to apply
your regular brakes before you can shift from PARK (P)
when the key is in ON. If you cannot shift out of
PARK (P) while holding the brake pedal down, see
Shifting Out of Park (P) (Automatic Transaxle) on
page 2-28.
2-21
Page 104 of 362

Shift Speeds
{CAUTION:
If you skip a gear when you downshift, you could
lose control of your vehicle. You could injure
yourself or others. Do not shift down more than
one gear at a time when you downshift.
Parking Brake
The parking brake lever is located between the
bucket seats.To set the parking brake, hold the brake pedal down
and pull up on the parking brake lever. If the ignition is
on, the brake system warning light will come on.
SeeBrake System Warning Light on page 3-27.
To release the parking brake, hold the brake pedal
down. Pull the parking brake lever up until you can press
the release button. Hold the release button in as you
move the brake lever all the way down.
Notice:Driving with the parking brake on can
overheat the brake system and cause premature
wear or damage to brake system parts. Verify that
the parking brake is fully released and the brake
warning light is off before driving.
2-26
Page 132 of 362

Climate Controls
Climate Control System
With this system you can control the heating, cooling
and ventilation for your vehicle.
Temperature Control:Turn the left knob clockwise or
counterclockwise to manually increase or decrease
the temperature inside your vehicle. Turn the knob to the
blue area for cool air and to the red area for warm air.
9(Fan):Turn the middle knob clockwise or
counterclockwise to increase or decrease the fan speed.
In any setting other than off, the fan will run continuously
with the ignition on. The fan must be on in order for
the air conditioning compressor to run.To change the current mode, select one of the following
from the right knob:
Y(Vent):This mode directs air to the instrument panel
outlets.
\(Bi-Level):This mode directs about half of the air
to the instrument panel outlets, and then directs the
remaining air to the floor outlets.
[(Floor):This mode directs most of the air to the
floor outlets. Some of the air will also be directed to the
rear outlets. Be sure to keep the area under the front
seats clear to allow the flow of air to the rear
compartment.
The right knob can also be used to select the defog and
defrost modes. Information on defogging and defrosting
can be found later in this section.
?(Recirculation):This mode keeps outside air
from coming into the vehicle. It can be used to prevent
outside air and odors from entering your vehicle or
to help heat or cool the air inside your vehicle more
quickly.
If your vehicle has a recirculation button (uplevel
model), press the button to turn the recirculation mode
on. When the button is pressed, an indicator light in
the button will come on. Press the button again to return
to outside air mode. Uplevel shown, Base similar
3-18
Page 135 of 362

If your vehicle has air conditioning, the rear window
defogger will turn off about 10 minutes after the button
is pressed. The defogger can also be turned off by
pressing the button again or by turning the engine off.
Notice:Do not use anything sharp on the inside of
the rear window. If you do, you could cut or
damage the warming grid, and the repairs would not
be covered by your warranty. Do not attach a
temporary vehicle license, tape, a decal or anything
similar to the defogger grid.
Outlet Adjustment
Use the knob located in the center of each outlet to
change the direction of the airflow.
Operation Tips
•
Clear away any ice, snow or leaves from the air
inlets at the base of the windshield that may
block the flow of air into your vehicle.
•Use of non-GM approved hood deflectors may
adversely affect the performance of the system.
•Keep the path under the front seats clear of objects
to help circulate the air inside of your vehicle more
effectively.
Passenger Compartment Air Filter
Your vehicle may have a passenger compartment
air filter. It is located behind the glove box and can be
accessed after removing the glove box from its housing.
The filter traps most of the pollen from air entering
the module. Like your engine’s air cleaner/filter, it may
need to be changed periodically.
To change the passenger compartment air filter, use the
following steps:
1. Open the glove box halfway down.
2. Grip the glove box by both the upper and lower
sides and pull it out of its housing.
3-21
Page 219 of 362

A vehicle specific Certification label is attached to the
center pillar (B-pillar), below the driver’s door latch. This
label tells you the gross weight capacity of your vehicle,
called the Gross Vehicle Weight Rating (GVWR). The
GVWR includes the weight of the vehicle, all occupants,
fuel and cargo. Never exceed the GVWR for your vehicle,
or the Gross Axle Weight Rating (GAWR) for either the
front or rear axle.
And, if you do have a heavy load, you should spread it
out. See “Steps for Determining Correct Load Limit”
earlier in this section.
{CAUTION:
Do not load your vehicle any heavier than the
Gross Vehicle Weight Rating (GVWR), or either
the maximum front or rear Gross Axle Weight
Rating (GAWR). If you do, parts on your
vehicle can break, and it can change the way
your vehicle handles. These could cause you
to lose control and crash. Also, overloading
can shorten the life of your vehicle.
Notice:Overloading your vehicle may cause
damage. Repairs would not be covered by your
warranty. Do not overload your vehicle.If you put things inside your vehicle — like suitcases,
tools, packages, or anything else — they will go as fast
as the vehicle goes. If you have to stop or turn
quickly, or if there is a crash, they will keep going.
{CAUTION:
Things you put inside your vehicle can strike
and injure people in a sudden stop or turn, or
in a crash.
Put things in the cargo area of your
vehicle. Try to spread the weight evenly.
Never stack heavier things, like suitcases,
inside the vehicle so that some of them
are above the tops of the seats.
Do not leave an unsecured child restraint
in your vehicle.
When you carry something inside the
vehicle, secure it whenever you can.
Do not leave a seat folded down unless
you need to.
4-33
Page 270 of 362

Tire Size
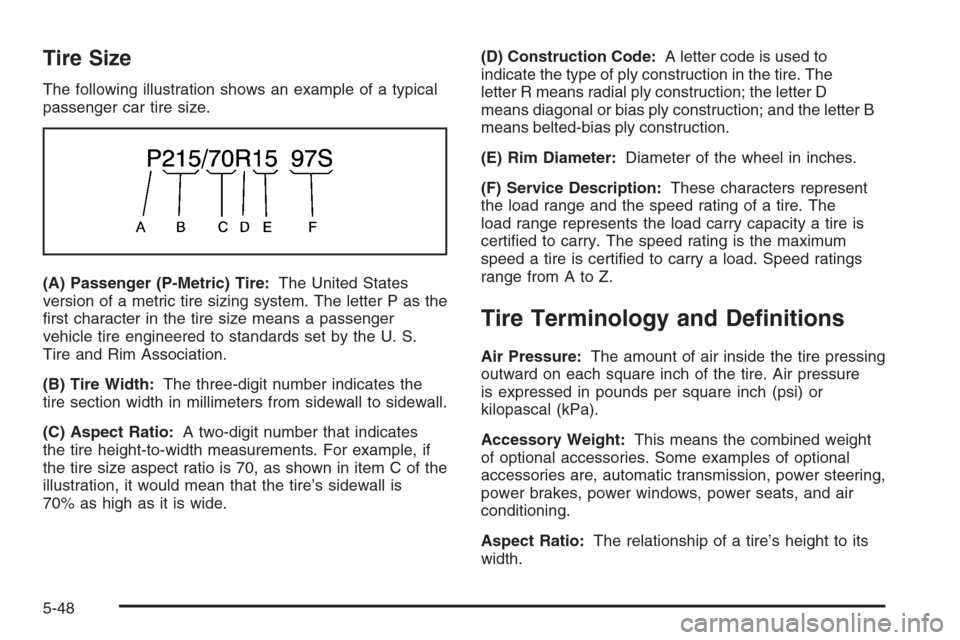
The following illustration shows an example of a typical
passenger car tire size.
(A) Passenger (P-Metric) Tire:The United States
version of a metric tire sizing system. The letter P as the
first character in the tire size means a passenger
vehicle tire engineered to standards set by the U. S.
Tire and Rim Association.
(B) Tire Width:The three-digit number indicates the
tire section width in millimeters from sidewall to sidewall.
(C) Aspect Ratio:A two-digit number that indicates
the tire height-to-width measurements. For example, if
the tire size aspect ratio is 70, as shown in item C of the
illustration, it would mean that the tire’s sidewall is
70% as high as it is wide.(D) Construction Code:A letter code is used to
indicate the type of ply construction in the tire. The
letter R means radial ply construction; the letter D
means diagonal or bias ply construction; and the letter B
means belted-bias ply construction.
(E) Rim Diameter:Diameter of the wheel in inches.
(F) Service Description:These characters represent
the load range and the speed rating of a tire. The
load range represents the load carry capacity a tire is
certified to carry. The speed rating is the maximum
speed a tire is certified to carry a load. Speed ratings
range from A to Z.
Tire Terminology and De�nitions
Air Pressure:The amount of air inside the tire pressing
outward on each square inch of the tire. Air pressure
is expressed in pounds per square inch (psi) or
kilopascal (kPa).
Accessory Weight:This means the combined weight
of optional accessories. Some examples of optional
accessories are, automatic transmission, power steering,
power brakes, power windows, power seats, and air
conditioning.
Aspect Ratio:The relationship of a tire’s height to its
width.
5-48
Page 357 of 362

Light (cont.)
Malfunction Indicator....................................3-34
Oil Pressure...............................................3-37
Passenger Airbag Status Indicator..................3-26
Safety Belt Reminder...................................3-32
Safety Belt Reminder Tone...........................3-25
Loading Your Vehicle.......................................4-27
Lockout Protection............................................ 2-9
Locks
Central Door Unlocking System....................... 2-7
Door ........................................................... 2-7
Lockout Protection......................................... 2-9
Rear Door Security Locks............................... 2-8
Long Trip/Highway Scheduled Maintenance........6-13
Loss of Control...............................................4-13
Low Fuel Warning Light...................................3-30
M
Maintenance, Normal Replacement Parts............5-81
Maintenance Schedule
At Each Fuel Fill.........................................6-18
At Least Once a Month................................6-18
At Least Once a Year..................................6-20
At Least Twice a Year..................................6-19
Brake System Inspection..............................6-24
Engine Cooling System Inspection.................6-24
Exhaust System Inspection...........................6-23
Fuel System Inspection................................6-23Maintenance Schedule (cont.)
How This Section is Organized....................... 6-3
Introduction.................................................. 6-2
Long Trip/Highway Scheduled Maintenance.....6-13
Maintenance Requirements............................. 6-2
Part A - Scheduled Maintenance Services......... 6-4
Part B - Owner Checks and Services.............6-18
Part C - Periodic Maintenance Inspections......6-23
PartD-Recommended Fluids and Lubricants....6-25
PartE-Maintenance Record........................6-27
Selecting the Right Schedule.......................... 6-5
Short Trip/City Scheduled Maintenance............. 6-6
Steering, Suspension and Front Drive Axle
Boot and Seal Inspection..........................6-23
Using.......................................................... 6-4
Your Vehicle and the Environment................... 6-2
Malfunction Indicator Light................................3-34
Manual Seats................................................... 1-2
Manual Transaxle
Fluid..........................................................5-21
Operation...................................................2-25
Manual Windows............................................2-12
Mirrors
Manual Rearview Mirror................................2-32
Outside Convex Mirror.................................2-33
Outside Heated Mirrors................................2-33
Outside Manual Mirrors................................2-32
Outside Power Mirror...................................2-33
MyGMLink.com................................................ 7-4
7
Page 360 of 362

Safety Belts (cont.)
Questions and Answers About Safety Belts.....1-17
Rear Seat Passengers.................................1-25
Right Front Passenger Position......................1-25
Safety Belt Extender....................................1-29
Safety Belt Use During Pregnancy.................1-25
Safety Belts Are for Everyone.......................1-12
Shoulder Belt Height Adjuster........................1-24
Safety Warnings and Symbols.............................. iii
Seats
Driver Seat Height Adjuster............................. 1-3
Head Restraints............................................ 1-5
Manual........................................................ 1-2
Rear Seat Operation...............................1-6, 1-9
Reclining Seatbacks...................................... 1-3
Secondary Information Center (SIC)...................3-31
Securing a Child Restraint
Rear Seat Position......................................1-49
Right Front Seat Position..............................1-51
Selecting the Right Schedule, Maintenance.......... 6-5
Service........................................................... 5-3
Accessories and Modifications......................... 5-3
Adding Equipment to the Outside of Your
Vehicle..................................................... 5-4
California Proposition 65 Warning.................... 5-3
Doing Your Own Work................................... 5-4
Engine Soon Light.......................................3-34
Publications Ordering Information...................7-15Servicing Your Airbag-Equipped Vehicle..............1-69
Sheet Metal Damage.......................................5-72
Shifting Into Park (P).......................................2-27
Shifting Out of Park (P)...................................2-28
Short Trip/City Scheduled Maintenance................ 6-6
Shoulder Belt Height Adjuster...........................1-24
Signals, Turn and Lane-Change.......................... 3-7
Spare Tire
Compact....................................................5-66
Installing....................................................5-61
Removing...................................................5-60
Storing.......................................................5-65
Specifications, Capacities.................................5-80
Speedometer..................................................3-25
Starting Your Engine.......................................2-19
Steering.......................................................... 4-9
Steering, Suspension and Front Drive
Axle Boot and Seal Inspection.......................6-23
Steering Wheel, Tilt Wheel................................. 3-6
Storage Areas................................................2-34
Cupholder(s)...............................................2-34
Glove Box..................................................2-34
Sunglasses Storage Compartment..................2-35
Stuck in Sand, Mud, Ice, or Snow.....................4-26
Sun Visors.....................................................2-13
Sunroof.........................................................2-35
10