2006 CHEVROLET AVEO maintenance
[x] Cancel search: maintenancePage 227 of 362
Fuel
Use of the recommended fuel is an important part of the
proper maintenance of your vehicle.
Gasoline Octane
Use regular unleaded gasoline with a posted octane
rating of 87 or higher. If the octane rating is less than 87,
you may notice an audible knocking noise when you
drive, commonly referred to as spark knock. If this
occurs, use a gasoline rated at 87 octane or higher as
soon as possible. If you are using gasoline rated at
87 octane or higher and you hear heavy knocking, your
engine needs service.
Gasoline Speci�cations
At a minimum, gasoline should meet ASTM specification
D 4814 in the United States or CAN/CGSB-3.5 in
Canada. Some gasolines may contain an
octane-enhancing additive called methylcyclopentadienyl
manganese tricarbonyl (MMT). General Motors
recommends against the use of gasolines containing
MMT. SeeAdditives on page 5-6for additional
information.
California Fuel
If your vehicle is certified to meet California Emissions
Standards, it is designed to operate on fuels that
meet California specifications. See the underhood
emission control label. If this fuel is not available
in states adopting California emissions standards, your
vehicle will operate satisfactorily on fuels meeting
federal specifications, but emission control system
performance may be affected. The malfunction indicator
lamp may turn on and your vehicle may fail a
smog-check test. SeeMalfunction Indicator Lamp on
page 3-34. If this occurs, return to your authorized GM
dealer for diagnosis. If it is determined that the
condition is caused by the type of fuel used, repairs
may not be covered by your warranty.
5-5
Page 238 of 362
If you are in an area of extreme cold, where the
temperature falls below−20°F (−29°C), it is
recommended that you use either an SAE 5W-30
synthetic oil or an SAE 0W-30 oil. Both will provide
easier cold starting and better protection for your engine
at extremely low temperatures.
Engine Oil Additives
Do not add anything to your oil. The recommended oils
with the starburst symbol that meet GM Standard
GM6094M are all you will need for good performance
and engine protection.
When to Change Engine Oil
If any one of these is true for you, use the short trip/city
maintenance schedule:
•Most trips are less than 5 miles (8 km). This is
particularly important when outside temperatures
are below freezing.
•Most trips include extensive idling, such as frequent
driving in stop-and-go traffic.
•You frequently use a carrier on top of your vehicle.
•The vehicle is used for delivery service, police,
taxi, or other commercial application.
Driving under these conditions causes engine oil to
break down sooner. If any one of these is true for your
vehicle, then you need to change your oil and filter
every 3,000 miles (5 000 km) or 3 months — whichever
occurs first.
If none of them is true, use the long trip/highway
maintenance schedule. Change oil and filter every
7,500 miles (12 500 km) or 12 months — whichever
occurs first. Driving a vehicle with a fully warmed engine
under highway conditions will cause engine oil to
break down slower.
5-16
Page 240 of 362

When to Inspect the Engine Air
Cleaner/Filter
Inspect the engine air cleaner/filter every 15,000 miles
(25 000 km) and replace it every 30,000 miles
(50 000 km). If you are driving in dusty/dirty conditions,
inspect the filter at each engine oil change.
How to Inspect the Engine Air
Cleaner/Filter
To inspect the engine air cleaner/filter remove the filter
from the vehicle and lightly shake the filter to release
loose dust and dirt. If the filter remains caked with dirt, a
new filter is required.
To inspect or replace the filter, do the following:
1. Remove the screws and lift off the cover.
2. Inspect or replace the engine air cleaner/filter.
3. Put the cover back on tightly and tighten the screws.SeePart A: Scheduled Maintenance Services on
page 6-4for replacement intervals.
{CAUTION:
Operating the engine with the air cleaner/�lter
off can cause you or others to be burned.
The air cleaner not only cleans the air; it helps
to stop �ames if the engine back�res. If it is
not there and the engine back�res, you could
be burned. Do not drive with it off, and be
careful working on the engine with the air
cleaner/�lter off.
Notice:If the air cleaner/�lter is off, a back�re can
cause a damaging engine �re. And, dirt can
easily get into your engine, which will damage it.
Always have the air cleaner/�lter in place when you
are driving.
5-18
Page 242 of 362
Then, without shutting off the engine, follow these steps:
The automatic transaxle dipstick is located toward the
front of the engine compartment, near the power
steering fluid reservoir. SeeEngine Compartment
Overview on page 5-12for more information on location.
1. Pull out the dipstick and wipe it with a clean rag
or paper towel.
2. Push the dipstick back in all the way, wait three
seconds and then pull it back out again.
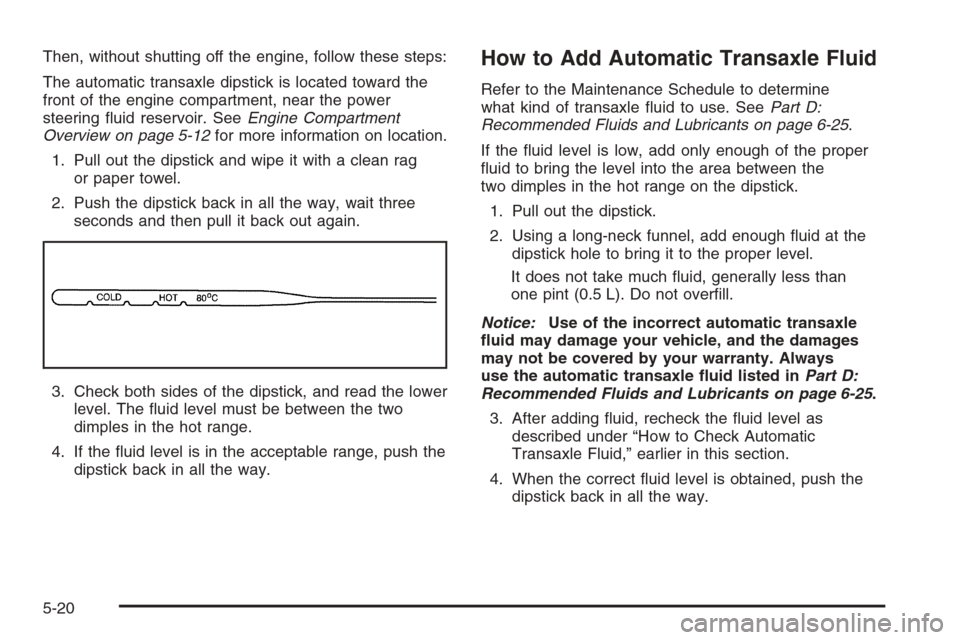
3. Check both sides of the dipstick, and read the lower
level. The fluid level must be between the two
dimples in the hot range.
4. If the fluid level is in the acceptable range, push the
dipstick back in all the way.How to Add Automatic Transaxle Fluid
Refer to the Maintenance Schedule to determine
what kind of transaxle fluid to use. SeePart D:
Recommended Fluids and Lubricants on page 6-25.
If the fluid level is low, add only enough of the proper
fluid to bring the level into the area between the
two dimples in the hot range on the dipstick.
1. Pull out the dipstick.
2. Using a long-neck funnel, add enough fluid at the
dipstick hole to bring it to the proper level.
It does not take much fluid, generally less than
one pint (0.5 L). Do not overfill.
Notice:Use of the incorrect automatic transaxle
�uid may damage your vehicle, and the damages
may not be covered by your warranty. Always
use the automatic transaxle �uid listed inPart D:
Recommended Fluids and Lubricants on page 6-25.
3. After adding fluid, recheck the fluid level as
described under “How to Check Automatic
Transaxle Fluid,” earlier in this section.
4. When the correct fluid level is obtained, push the
dipstick back in all the way.
5-20
Page 243 of 362

Manual Transaxle Fluid
It is not necessary to check the transaxle fluid level.
A transaxle fluid leak is the only reason for fluid loss.
If a leak occurs, take the vehicle to the dealership
service department and have it repaired as soon as
possible. SeePart D: Recommended Fluids and
Lubricants on page 6-25for the proper fluid to use.
Hydraulic Clutch
There is one reservoir for both the brake and the
hydraulic clutch fluid. SeeBrakes on page 5-32for more
information.
The hydraulic clutch linkage in your vehicle is
self-adjusting. The master cylinder reservoir is filled with
hydraulic fluid.
A fluid loss in this system could indicate a problem.
Have the system inspected and repaired.
When to Check and What to Use
Refer to the Maintenance Schedule to determine how
often you should check the fluid level in your master
cylinder reservoir and for the proper fluid. SeePart B:
Owner Checks and Services on page 6-18andPart D:
Recommended Fluids and Lubricants on page 6-25.
How to Check and Add Fluid
To check the fluid level, look on the side of the reservoir.
If the fluid reaches the MAX (A) mark on the reservoir,
the fluid level is correct. The reservoir is located
near the back of the engine compartment on the driver’s
side of the vehicle. SeeEngine Compartment Overview
on page 5-12for more information on location.
5-21
Page 257 of 362
Replacing Brake System Parts
The braking system on a vehicle is complex. Its many
parts have to be of top quality and work well together if
the vehicle is to have really good braking. Your
vehicle was designed and tested with top-quality GM
brake parts. When you replace parts of your braking
system — for example, when your brake linings
wear down and you need new ones put in — be sure
you get new approved GM replacement parts. If you do
not, your brakes may no longer work properly. For
example, if someone puts in brake linings that are wrong
for your vehicle, the balance between your front and
rear brakes can change — for the worse. The braking
performance you have come to expect can change
in many other ways if someone puts in the wrong
replacement brake parts.
Battery
Your vehicle has a maintenance free battery. When it is
time for a new battery, get one that has the replacement
number shown on the original battery’s label. SeeEngine
Compartment Overview on page 5-12for battery location.
Warning:Battery posts, terminals, and related
accessories contain lead and lead compounds,
chemicals known to the State of California to cause
cancer and reproductive harm. Wash hands after
handling.
Vehicle Storage
If you are not going to drive your vehicle for 25 days
or more, remove the black, negative (−) cable from
the battery. This will help keep your battery from
running down.
{CAUTION:
Batteries have acid that can burn you and gas
that can explode. You can be badly hurt if you
are not careful. SeeJump Starting on
page 5-36for tips on working around a battery
without getting hurt.
5-35
Page 274 of 362
Remove the valve cap from the tire valve stem. Press
the tire gage firmly onto the valve to get a pressure
measurement. If the cold tire inflation pressure matches
the recommended pressure on the Tire and Loading
Information label, no further adjustment is necessary. If
the inflation pressure is low, add air until you reach
the recommended amount.
If you overfill the tire, release air by pushing on the
metal stem in the center of the tire valve. Re-check the
tire pressure with the tire gage.
Be sure to put the valve caps back on the valve stems.
They help prevent leaks by keeping out dirt and
moisture.
Tire Inspection and Rotation
Tires should be rotated every 5,000 to 8,000 miles
(8 000 to 13 000 km).
Any time you notice unusual wear, rotate your tires as
soon as possible and check wheel alignment. Also
check for damaged tires or wheels. SeeWhen It Is Time
for New Tires on page 5-53andWheel Replacement
on page 5-56for more information.The purpose of regular rotation is to achieve more
uniform wear for all tires on the vehicle. The first rotation
is the most important. SeePart A: Scheduled
Maintenance Services on page 6-4.
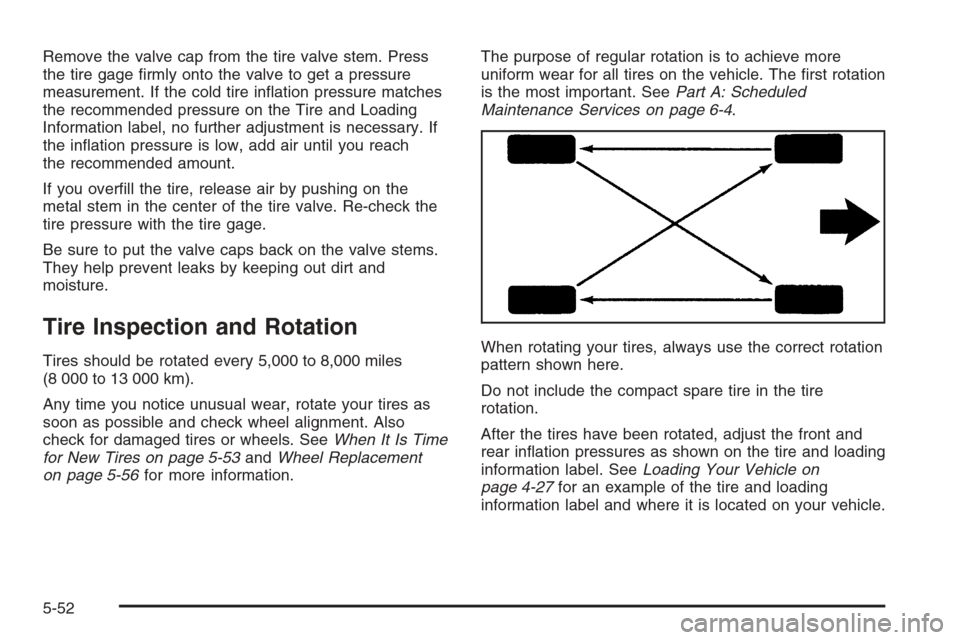
When rotating your tires, always use the correct rotation
pattern shown here.
Do not include the compact spare tire in the tire
rotation.
After the tires have been rotated, adjust the front and
rear inflation pressures as shown on the tire and loading
information label. SeeLoading Your Vehicle on
page 4-27for an example of the tire and loading
information label and where it is located on your vehicle.
5-52
Page 280 of 362
If a Tire Goes Flat
It is unusual for a tire to blowout while you are driving,
especially if you maintain your vehicle’s tires properly.
If air goes out of a tire, it is much more likely to leak out
slowly. But if you should ever have a blowout, here
are a few tips about what to expect and what to do:
If a front tire fails, the flat tire will create a drag that pulls
the vehicle toward that side. Take your foot off the
accelerator pedal and grip the steering wheel firmly.
Steer to maintain lane position, and then gently brake to
a stop well out of the traffic lane.
A rear blowout, particularly on a curve, acts much like a
skid and may require the same correction you would
use in a skid. In any rear blowout remove your foot from
the accelerator pedal. Get the vehicle under control
by steering the way you want the vehicle to go. It may
be very bumpy and noisy, but you can still steer. Gently
brake to a stop, well off the road if possible.{CAUTION:
Lifting a vehicle and getting under it to do
maintenance or repairs is dangerous without
the appropriate safety equipment and training.
The jack provided with your vehicle is
designed only for changing a �at tire. If it is
used for anything else, you or others could be
badly injured or killed if the vehicle slips off
the jack. Use the jack provided with your
vehicle only for changing a �at tire.
If a tire goes flat, the next part shows how to use the
jacking equipment to change a flat tire safely.
Changing a Flat Tire
If a tire goes flat, avoid further tire and wheel damage
by driving slowly to a level place. Turn on your
hazard warning flashers.
5-58