2006 CHEVROLET AVEO ECO mode
[x] Cancel search: ECO modePage 53 of 362

{CAUTION:
Children can be seriously injured or strangled
if a shoulder belt is wrapped around their neck
and the safety belt continues to tighten.
Secure any unused safety belts behind the
child restraint so children cannot reach them.
Pull the shoulder belt all the way out of the
retractor to set the lock, if your vehicle has
one, after the child restraint has been installed.
Be sure to follow the instructions of the child
restraint manufacturer.
Notice:Contact between the child restraint or the
LATCH attachment parts and the vehicle’s safety
belt assembly may cause damage to these parts.
Make sure when securing unused safety belts
behind the child restraint that there is no contact
between the child restraint or the LATCH attachment
parts and the vehicle’s safety belt assembly.
Folding an empty rear seat with the safety belts
secured, may cause damage to the safety belt or the
seat. When removing the child restraint, always
remember to return the safety belts to their normal
position before folding the rear seat.1. Attach and tighten the lower attachments to the
lower anchors. If the child restraint does not have
lower attachments or the desired seating position
does not have lower anchors, secure the child
restraint with the top tether and the safety belts.
Refer to your child restraint manufacturer
instructions and the instructions in this manual.
1.1. Find the lower anchors for the desired
seating position.
1.2. Put the child restraint on the seat.
1.3. Attach and tighten the lower attachments on
the child restraint to the lower anchors.
2. If the child restraint manufacturer recommends that
the top tether be attached, attach and tighten the
top tether to the top tether anchor, if equipped.
Refer to the child restraint instructions and
the following steps:
2.1. Find the top tether anchor.
2.2. Squeeze and pull the front part of the plastic
cover to access the top tether anchors.
2.3. For hatchback models, remove the cargo
shade before installing the top tether. The
cargo shade should remain off while the top
tether is in use.
1-47
Page 93 of 362

To avoid activating the alarm by accident, do one of the
following:
•Unlock the driver’s or passenger’s front door using
the key.
•Press the unlock button on the remote keyless
entry transmitter.
Unlocking a door any other way will activate the alarm
when a door or the trunk or liftgate is opened.
If you do not want to arm the theft-deterrent system,
lock the vehicle using the key or the manual door locks.
Disarming the System
To disarm the system, do one of the following:
•Unlock the driver’s or passenger’s front door using
the key.
•Press the unlock button on the remote keyless
entry transmitter.
- The LED light on the transmitter will
flash once.
- All of the doors will unlock.
- The hazard warning lamps will flash twice.
If the door is not opened or if the engine is not started
within 30 seconds after disarming the system using
the transmitter, all of the doors will automatically lock
and the theft-deterrent mode will rearm.
How the System Alarm is Activated
If a door or the trunk or liftgate is opened without using
the key or the remote keyless entry transmitter, the
horn will sound and the lamps will flash for up to
30 seconds.
How to Turn Off the System Alarm
If the system alarm is active, it can be deactivated using
one of the following methods:
•Press the lock or unlock buttons on the remote
keyless entry transmitter.
•Unlock the driver’s or passenger’s front door using
the key.
Otherwise, the alarm will automatically stop after
30 seconds. The system will then lock the doors and
rearm the theft-deterrent system.
How to Detect a Tamper Condition
If the hazard warning lamps flash once when you press
the lock or unlock buttons on the remote keyless
entry transmitter, the theft-deterrent system alarm was
activated while you were away.
2-15
Page 101 of 362

AUTOMATIC OVERDRIVE (D4):This position is for
normal driving.
When operating your vehicle in severe cold conditions,
the transaxle may be prevented from shifting into
D4 gear until the transaxle fluid has warmed up to it’s
operational temperature.
Notice:Driving your vehicle if you notice that it is
moving slowly or not shifting gears as you
increase speed may damage the transaxle. Have
your vehicle serviced right away. You can drive in
SECOND (2) when you are driving less than 35 mph
(55 km/h) and AUTOMATIC OVERDRIVE (D4) for
higher speeds until then.
SECOND (2):This position gives you more power but
lower fuel economy. You can use SECOND (2) on
hills. It can help control your speed as you go down
steep mountain roads, but then you would also want to
use your brakes off and on.
Notice:Do not drive in SECOND (2) at speeds over
65 mph (105 km/h), or you can damage the transaxle.
Use AUTOMATIC OVERDRIVE (D4) as much as
possible. Do not shift into SECOND (2) unless you
are going slower than 65 mph (105 km/h) or you can
damage your engine.FIRST (1):This position gives you even more power
but lower fuel economy than SECOND (2). You can use
it on very steep hills, or in deep snow or mud. If the
shift lever is put in FIRST (1), the transaxle will not shift
into first gear until the vehicle is going slowly enough.
Notice:Spinning the tires or holding the vehicle in
one place on a hill using only the accelerator
pedal may damage the transaxle. If you are stuck,
do not spin the tires. When stopping on a hill,
use the brakes, or parking brake to hold the vehicle
in place.
If there is a malfunction with the automatic transaxle,
the malfunction indicator lamp (MIL) or the HOLD
indicator light will turn on or flash. SeeMalfunction
Indicator Lamp on page 3-34orHold Mode Light
on page 3-34.
Have your vehicle fixed as soon as possible.
2-23
Page 102 of 362

Hold Mode
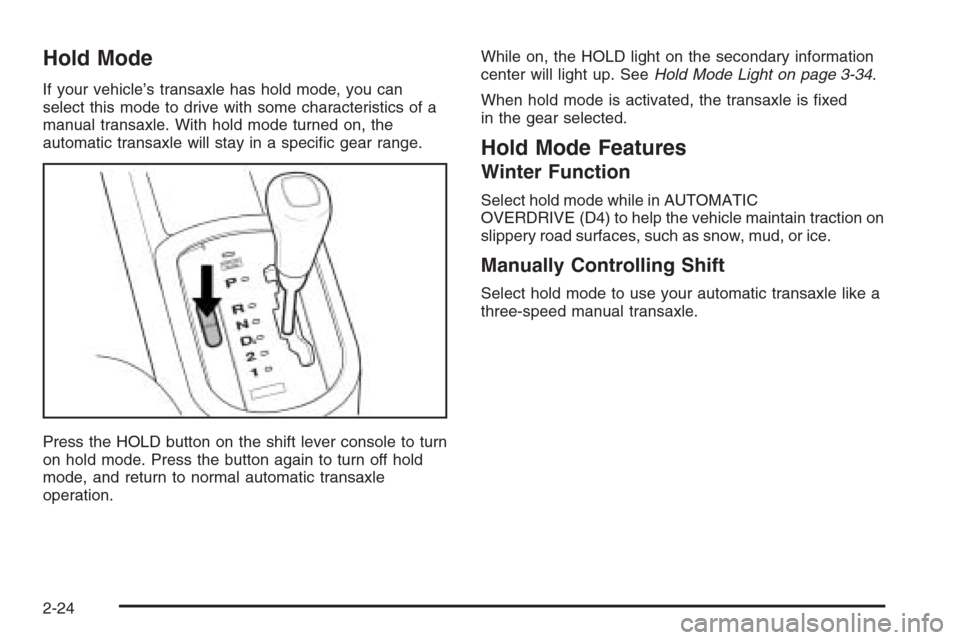
If your vehicle’s transaxle has hold mode, you can
select this mode to drive with some characteristics of a
manual transaxle. With hold mode turned on, the
automatic transaxle will stay in a specific gear range.
Press the HOLD button on the shift lever console to turn
on hold mode. Press the button again to turn off hold
mode, and return to normal automatic transaxle
operation.While on, the HOLD light on the secondary information
center will light up. SeeHold Mode Light on page 3-34.
When hold mode is activated, the transaxle is fixed
in the gear selected.
Hold Mode Features
Winter Function
Select hold mode while in AUTOMATIC
OVERDRIVE (D4) to help the vehicle maintain traction on
slippery road surfaces, such as snow, mud, or ice.
Manually Controlling Shift
Select hold mode to use your automatic transaxle like a
three-speed manual transaxle.
2-24
Page 115 of 362

Instrument Panel Overview...............................3-4
Hazard Warning Flashers................................3-6
Other Warning Devices...................................3-6
Horn .............................................................3-6
Tilt Wheel.....................................................3-6
Turn Signal/Multifunction Lever.........................3-7
Turn and Lane-Change Signals........................3-7
Headlamp High/Low-Beam Changer..................3-8
Flash-to-Pass.................................................3-8
Windshield Wipers..........................................3-8
Windshield Washer.........................................3-9
Rear Window Wiper/Washer...........................3-10
Cruise Control..............................................3-10
Exterior Lamps.............................................3-13
Headlamps on Reminder................................3-13
Daytime Running Lamps (DRL).......................3-14
Fog Lamps ..................................................3-15
Instrument Panel Brightness...........................3-15
Dome Lamp .................................................3-16
Accessory Power Outlet(s).............................3-16
Ashtray(s) and Cigarette Lighter......................3-17
Climate Controls............................................3-18
Climate Control System.................................3-18
Outlet Adjustment.........................................3-21
Passenger Compartment Air Filter...................3-21Warning Lights, Gages, and Indicators............3-23
Instrument Panel Cluster................................3-24
Speedometer and Odometer...........................3-25
Trip Odometer..............................................3-25
Tachometer.................................................3-25
Safety Belt Reminder Tone............................3-25
Passenger Airbag Status Indicator...................3-26
Brake System Warning Light..........................3-27
Engine Coolant Temperature Gage..................3-28
Cruise Control Light......................................3-29
Highbeam On Light.......................................3-29
Daytime Running Lamps (DRL) Indicator Light.....3-29
Fuel Gage...................................................3-30
Low Fuel Warning Light.................................3-30
Secondary Information Center (SIC).................3-31
Clock..........................................................3-32
Safety Belt Reminder Light.............................3-32
Airbag Readiness Light..................................3-32
Charging System Light..................................3-33
Anti-Lock Brake System Warning Light.............3-34
Hold Mode Light...........................................3-34
Malfunction Indicator Lamp.............................3-34
Oil Pressure Light.........................................3-37
Fog Lamp Light............................................3-38
Door Ajar Light.............................................3-38
Section 3 Instrument Panel
3-1
Page 133 of 362

If your vehicle has a lever (base model), move the lever
to choose the recirculation mode.
Using the recirculation mode for extended periods may
cause your windows to fog. If this happens, select
the defrost mode.
:(Outside Air):This mode brings outside air into
the vehicle.
If your vehicle has a recirculation button (uplevel
model), press the button until the recirculation mode is
turned off. Your vehicle will then return to outside
air mode.
If your vehicle has a lever (base model), move the lever
to choose the outside air mode.
A/C (Air Conditioning):If your vehicle has air
conditioning, follow these steps to use the system. Start
the engine and set the fan control knob to the desired
speed. The air conditioning compressor does not
operate when the fan control knob is in the off position.
Press the A/C button to turn the air conditioning
compressor on and off. When the A/C button is pressed,
an indicator light in the button will come on to let you
know that air conditioning is activated.On hot days, open the windows to let hot inside air
escape; then close them. This helps to reduce the time
it takes for your vehicle to cool down. It also helps
the system to operate more efficiently.
For quick cool down on hot days, do the following:
1. Select the vent mode.
2. Select the highest fan speed.
3. Press the A/C button.
4. Select the recirculation mode.
5. Select the coolest temperature.
Using these settings together for long periods of time
may cause the air inside of your vehicle to become too
dry. To prevent this from happening, after the air in
your vehicle has cooled, turn the recirculation mode off.
The air conditioning system removes moisture from
the air, so you may sometimes notice a small amount of
water dripping underneath your vehicle while idling or
after turning off the engine. This is normal.
3-19
Page 148 of 362

Anti-Lock Brake System Warning
Light
If your vehicle has an
anti-lock brake system, this
light will come on when the
ignition is turned to ON and
may stay on for several
seconds. That is normal.
If the light stays on, turn the ignition to LOCK. Or, if the
light comes on, stop as soon as possible and turn
the ignition off. Then start the engine again to reset the
system. If the light still stays on, or comes on again
while you are driving, your vehicle needs service. See
your GM dealer. If the regular brake system warning
light is not on, you still have brakes, but you do not have
anti-lock brakes. If the regular brake system warning
light is also on, you do not have anti-lock brakes
and there is a problem with your regular brakes. See
Brake System Warning Light on page 3-27.
The anti-lock brake system warning light will come on
briefly when you turn the ignition to ON. This is normal.
If the light does not come on then, have it fixed so it
will be ready to warn you if there is a problem.
Hold Mode Light
If your vehicle has this
feature, this light will come
on when the hold mode
is active.
If the HOLD mode light flashes, have your vehicle
checked. See “Hold Mode” underAutomatic Transaxle
Operation on page 2-21for additional information
on this feature.
Malfunction Indicator Lamp
Check Engine Light
Your vehicle has a
computer which monitors
operation of the fuel,
ignition, and emission
control systems.
3-34
Page 173 of 362

The CD player can play the smaller 3 inch (8 cm) single
CDs with an adapter ring. Full-size CDs and the
smaller CDs are loaded in the same manner.
If playing a CD-R, the sound quality may be reduced
due to CD-R quality, the method of recording, the quality
of the music that has been recorded, and the way the
CD-R has been handled. There may be an increase
in skipping, difficulty in finding tracks, and/or difficulty in
loading and ejecting. If these problems occur, check
the bottom surface of the CD. If the surface of the CD is
damaged, such as cracked, broken, or scratched, the
CD will not play properly. If the surface of the CD
is soiled, seeCare of Your CDs on page 3-71for more
information.
If there is no apparent damage, try a known good CD.
Do not add any label to a CD, it could get caught in the
CD player. If a CD is recorded on a personal computer
and a description label is needed, try labeling the top of
the recorded CD with a marking pen instead.
Notice:If you add any label to a CD, insert more
than one CD into the slot at a time, or attempt
to play scratched or damaged CDs, you could
damage the CD player. When using the CD player,
use only CDs in good condition without any
label, load one CD at a time, and keep the CD player
and the loading slot free of foreign materials,
liquids, and debris.If an error appears on the display, see “CD Messages”
later in this section.
All of the CD functions work the same while playing an
MP3/WMA, except for those listed here. See “Playing
a CD” earlier for more information.
SCROLL (MP3/WMA Mode Only):Press the SOUND
button for longer than two seconds. The song title or
other available information of a song will scroll on/off.
The offset is scroll on. The scroll mode can be changed
only when the SOUND button is pressed for longer
than two seconds.
DIR (Directory):Press this button to repeat the tracks
in the current directory. DIR will appear on the
display.
Press this button again to repeat the tracks in all of the
directories. ALL will appear on the display.
Press this button again to turn off repeat play.
¦¥SEEK (Previous/Next Folder) (in MP3/WMA
Mode):Press the up or down arrows to change
the folder. If CD-R don’t have any folder, “ROOT” will
flash on display for a short time.
3-59