2006 CHEVROLET AVALANCHE spare wheel
[x] Cancel search: spare wheelPage 301 of 532
Off-Road Driving
This off-road guide is for vehicles that have four-wheel
drive. Also, seeBraking on page 4-6. If your vehicle
does not have four-wheel drive, you should not
drive off-road unless you are on a level, solid surface.
Off-road driving can be great fun. But it does have some
de�nite hazards. The greatest of these is the terrain
itself.
“Off-roading” means you have left the great North
American road system behind. Traffic lanes are not
marked. Curves are not banked. There are no
road signs. Surfaces can be slippery, rough, uphill, or
downhill. In short, you have gone right back to nature.
Off-road driving involves some new skills. And that
is why it is very important that you read this guide. You
will �nd many driving tips and suggestions. These
will help make your off-road driving safer and more
enjoyable.
Before You Go Off-Roading
There are some things to do before you go out. For
example, be sure to have all necessary maintenance
and service work done. Check to make sure all
underbody shields, if the vehicle has them, are properly
attached. Be sure you read all the information about
your four-wheel-drive vehicle in this manual. Is
there enough fuel? Is the spare tire fully in�ated? Are
the �uid levels up where they should be? What are the
local laws that apply to off-roading where you will be
driving? If you do not know, you should check with law
enforcement people in the area. Will you be on
someone’s private land? If so, be sure to get the
necessary permission.
4-17
Page 362 of 532
Tires..............................................................5-64
Tire Sidewall Labeling...................................5-65
Tire Terminology and De�nitions.....................5-68
In�ation - Tire Pressure.................................5-71
Tire Pressure Monitor System.........................5-72
Tire Inspection and Rotation...........................5-76
When It Is Time for New Tires.......................5-77
Buying New Tires.........................................5-78
Different Size Tires and Wheels......................5-79
Uniform Tire Quality Grading..........................5-80
Wheel Alignment and Tire Balance..................5-81
Wheel Replacement......................................5-81
Tire Chains..................................................5-83
If a Tire Goes Flat........................................5-84
Changing a Flat Tire.....................................5-84
Removing the Spare Tire and Tools................5-86
Removing the Flat Tire and Installing the
Spare Tire................................................5-89
Secondary Latch System...............................5-96
Storing a Flat or Spare Tire and Tools...........5-100
Spare Tire.................................................5-102
Appearance Care..........................................5-103
Cleaning the Inside of Your Vehicle...............5-103
Fabric/Carpet..............................................5-105
Leather......................................................5-105Instrument Panel, Vinyl, and Other
Plastic Surfaces.......................................5-106
Care of Safety Belts....................................5-106
Weatherstrips.............................................5-106
Washing Your Vehicle..................................5-107
Cleaning Exterior Lamps/Lenses....................5-107
Finish Care................................................5-107
Windshield and Wiper Blades.......................5-108
Aluminum or Chrome-Plated Wheels..............5-109
Tires.........................................................5-109
Sheet Metal Damage...................................5-110
Finish Damage...........................................5-110
Underbody Maintenance...............................5-110
Chemical Paint Spotting...............................5-110
Vehicle Care/Appearance Materials................5-111
Vehicle Identi�cation.....................................5-112
Vehicle Identi�cation Number (VIN)................5-112
Service Parts Identi�cation Label...................5-112
Electrical System..........................................5-113
Windshield Wiper Fuses...............................5-113
Power Windows and Other Power Options......5-113
Fuses and Circuit Breakers..........................5-113
Instrument Panel Fuse Block........................5-114
Center Instrument Panel Fuse Block..............5-116
Underhood Fuse Block................................5-117
Capacities and Speci�cations........................5-122
Section 5 Service and Appearance Care
5-2
Page 432 of 532

How to Check
Use a good quality pocket-type gage to check tire
pressure. You cannot tell if your tires are properly
in�ated simply by looking at them. Radial tires may look
properly in�ated even when they’re underin�ated.
Check the tire’s in�ation pressure when the tires are
cold. Cold means your vehicle has been sitting
for at least three hours or driven no more than
1 mile (1.6 km).
Remove the valve cap from the tire valve stem. Press
the tire gage �rmly onto the valve to get a pressure
measurement. If the cold tire in�ation pressure matches
the recommended pressure on the Tire and Loading
Information label, no further adjustment is necessary.
If the in�ation pressure is low, add air until you reach the
recommended amount.
If you over�ll the tire, release air by pushing on the
metal stem in the center of the tire valve. Recheck the
tire pressure with the tire gage.
Be sure to put the valve caps back on the valve stems.
They help prevent leaks by keeping out dirt and
moisture.
Tire Pressure Monitor System
The Tire Pressure Monitor System (TPMS) uses radio
and sensor technology to check tire pressure levels.
If your vehicle has this feature, sensors are mounted on
each tire and wheel assembly, except the spare tire.
The TPMS sensors monitor the air pressure in your
vehicle’s tires and transmit tire pressure readings to a
receiver located in the vehicle.
The TPMS is designed to alert the driver, if a low tire
pressure condition exists. This system also allows
the driver to check tire pressure levels using the Driver
Information Center (DIC).
When a low tire pressure condition is detected, the
TPMS displays the CHECK TIRE PRESSURE warning
message on the DIC, and at the same time illuminates
the low tire pressure warning symbol. For additional
information and details about the DIC operation
and displays seeDIC Operation and Displays on
page 3-50andDIC Warnings and Messages on
page 3-53.
You may notice, during cooler weather conditions,
that the tire pressure monitor light, located on the
instrument panel cluster, and the CHECK TIRE
PRESSURE message will appear when the vehicle is
�rst started and then turn off as you start to drive
the vehicle. This could be an early indicator that the tire
pressures are getting low and need to be in�ated to
the proper pressure.
5-72
Page 436 of 532

Tire Inspection and Rotation
Tires should be rotated every 5,000 to 8,000 miles
(8 000 to 13 000 km).
Any time you notice unusual wear, rotate your tires as
soon as possible and check wheel alignment. Also
check for damaged tires or wheels. SeeWhen It Is Time
for New Tires on page 5-77andWheel Replacement
on page 5-81for more information.
Make sure the spare tire is stored securely. Push, pull,
and then try to rotate or turn the tire. If it moves,
use the ratchet/wheel wrench to tighten the cable. See
Changing a Flat Tire on page 5-84.
The purpose of regular rotation is to achieve more
uniform wear for all tires on the vehicle. The �rst rotation
is the most important. SeeScheduled Maintenance
on page 6-4.When rotating your vehicle’s tires, always use the
correct rotation pattern shown here.
Do not include the spare tire in the tire rotation.
After the tires have been rotated, adjust the front and
rear in�ation pressures as shown on the tire and loading
information label. SeeLoading Your Vehicle on
page 4-46andIn�ation - Tire Pressure on page 5-71,
for more information.
Vehicles that have the Tire Pressure Monitor System
(TPMS) will need to have the TPMS sensors reset
after a tire rotation. See “TPMS Sensor Identi�cation
Codes” underTire Pressure Monitor System on
page 5-72.
5-76
Page 438 of 532
Buying New Tires
GM has developed and matched speci�c tires for your
vehicle. The original equipment tires installed on
your vehicle, when it was new, were designed to meet
General Motors Tire Performance Criteria Speci�cation
(TPC spec) system rating. If you need replacement
tires, GM strongly recommends that you get tires with
the same TPC Spec rating. This way, your vehicle
will continue to have tires that are designed to give the
same performance and vehicle safety, during normal
use, as the original tires.
GM’s exclusive TPC Spec system considers over a
dozen critical speci�cations that impact the overall
performance of your vehicle, including brake system
performance, ride and handling, traction control, and tire
pressure monitoring performance. GM’s TPC Spec
number is molded onto the tire’s sidewall by the
tire manufacturer. If the tires have an all-season tread
design, the TPC spec number will be followed by an MS
for mud and snow. SeeTire Sidewall Labeling on
page 5-65for additional information.{CAUTION:
Mixing tires could cause you to lose control
while driving. If you mix tires of different sizes,
brands, or types (radial and bias-belted tires),
the vehicle may not handle properly, and you
could have a crash. Using tires of different
sizes, brands or types may also cause damage
to your vehicle. Be sure to use the same size,
brand, and type tires on all wheels.
Your vehicle may have a different size spare
than the road tires (those originally installed
on your vehicle). When new, your vehicle
included a spare tire and wheel assembly with
a similar overall diameter as your vehicle’s
road tires and wheels, so it is all right to drive
on it. Because this spare was developed for
use on your vehicle, it will not affect vehicle
handling.
5-78
Page 446 of 532
Removing the Spare Tire and Tools
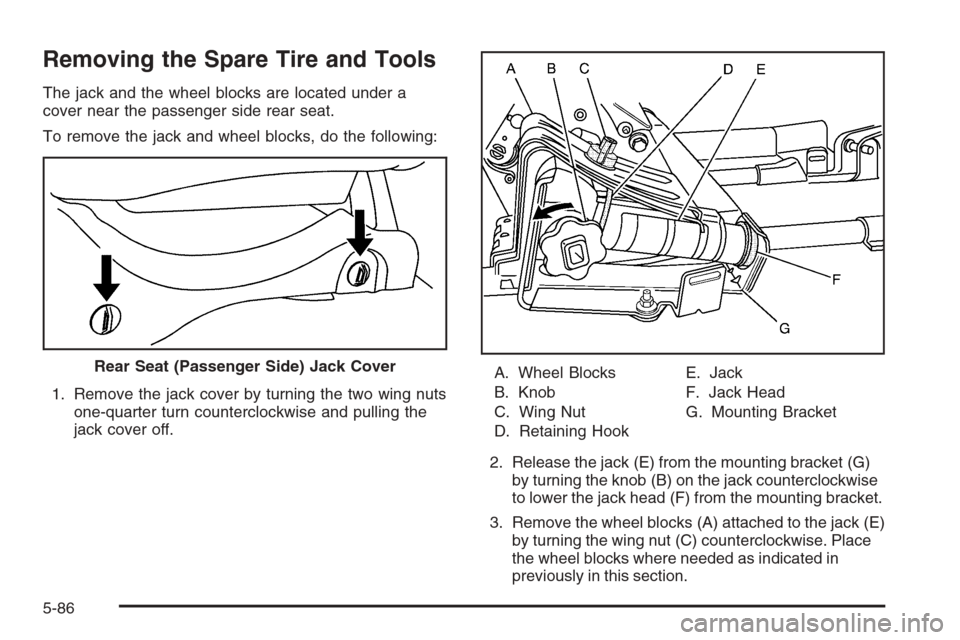
The jack and the wheel blocks are located under a
cover near the passenger side rear seat.
To remove the jack and wheel blocks, do the following:
1. Remove the jack cover by turning the two wing nuts
one-quarter turn counterclockwise and pulling the
jack cover off.A. Wheel Blocks
B. Knob
C. Wing Nut
D. Retaining HookE. Jack
F. Jack Head
G. Mounting Bracket
2. Release the jack (E) from the mounting bracket (G)
by turning the knob (B) on the jack counterclockwise
to lower the jack head (F) from the mounting bracket.
3. Remove the wheel blocks (A) attached to the jack (E)
by turning the wing nut (C) counterclockwise. Place
the wheel blocks where needed as indicated in
previously in this section. Rear Seat (Passenger Side) Jack Cover
5-86
Page 447 of 532
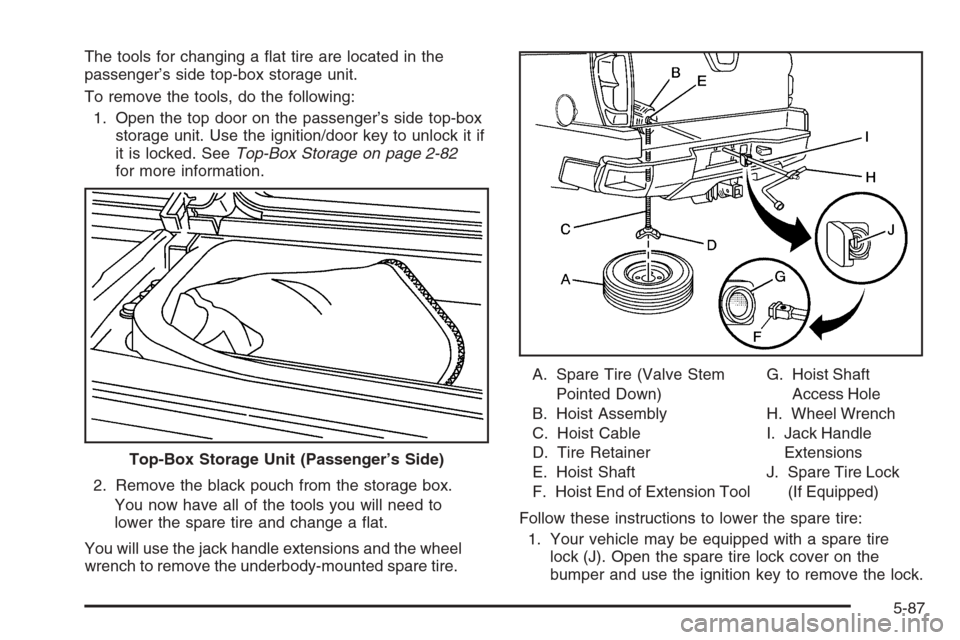
The tools for changing a �at tire are located in the
passenger’s side top-box storage unit.
To remove the tools, do the following:
1. Open the top door on the passenger’s side top-box
storage unit. Use the ignition/door key to unlock it if
it is locked. SeeTop-Box Storage on page 2-82
for more information.
2. Remove the black pouch from the storage box.
You now have all of the tools you will need to
lower the spare tire and change a �at.
You will use the jack handle extensions and the wheel
wrench to remove the underbody-mounted spare tire.A. Spare Tire (Valve Stem
Pointed Down)
B. Hoist Assembly
C. Hoist Cable
D. Tire Retainer
E. Hoist Shaft
F. Hoist End of Extension ToolG. Hoist Shaft
Access Hole
H. Wheel Wrench
I. Jack Handle
Extensions
J. Spare Tire Lock
(If Equipped)
Follow these instructions to lower the spare tire:
1. Your vehicle may be equipped with a spare tire
lock (J). Open the spare tire lock cover on the
bumper and use the ignition key to remove the lock. Top-Box Storage Unit (Passenger’s Side)
5-87
Page 448 of 532
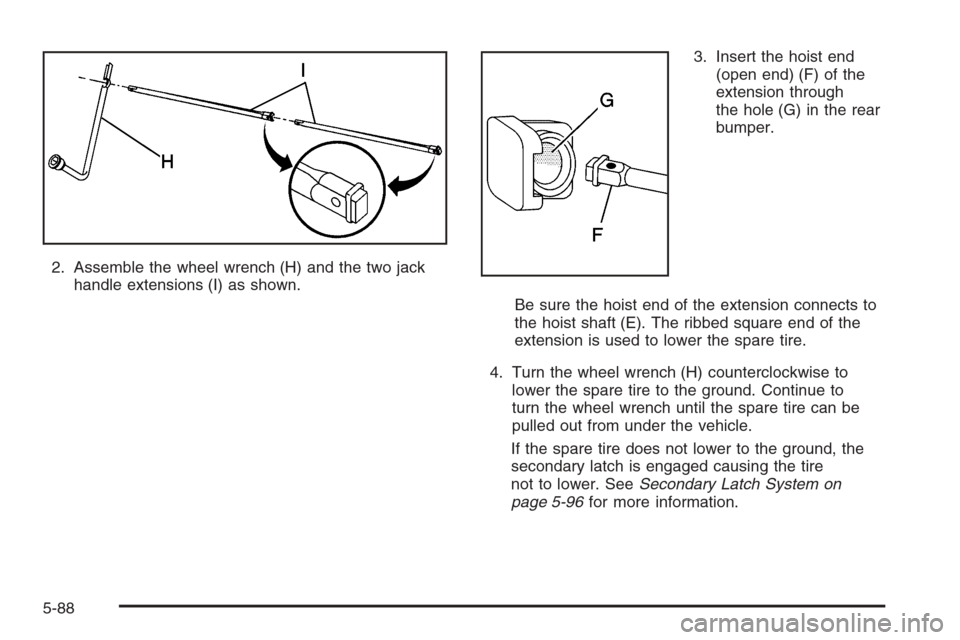
2. Assemble the wheel wrench (H) and the two jack
handle extensions (I) as shown.3. Insert the hoist end
(open end) (F) of the
extension through
the hole (G) in the rear
bumper.
Be sure the hoist end of the extension connects to
the hoist shaft (E). The ribbed square end of the
extension is used to lower the spare tire.
4. Turn the wheel wrench (H) counterclockwise to
lower the spare tire to the ground. Continue to
turn the wheel wrench until the spare tire can be
pulled out from under the vehicle.
If the spare tire does not lower to the ground, the
secondary latch is engaged causing the tire
not to lower. SeeSecondary Latch System on
page 5-96for more information.
5-88