Page 269 of 532

Audio Output
Audio from the DVD player or auxiliary inputs may be
heard through the following possible sources:
Wireless Headphones
Vehicle Speakers
Vehicle wired headphone jacks on the Rear Seat
Audio system (if equipped)
The RSE system will always transmit the audio signal
by infrared to the wireless headphones, if there is audio
available. See “Headphones” previously for more
information.
The RSE system is capable of outputting audio to the
vehicle speakers by using the radio. The RSE
system may be selected as an audio source on the
radio if the RSE system power is on. Once the
RSE system is selected as an audio source on the
radio, adjust the speaker volume on the radio, if
necessary. If the RSE system power is not on, the RSE
system will not be an available source on the radio.
Refer to the radio information for the radio that
your vehicle has for more information.The RSE system is capable of outputting audio to the
wired headphone jacks on the rear seat audio system
(if equipped). The RSE system may be selected as
an audio source on the rear seat audio system if
the RSE system power is on. Refer toRear Seat Audio
(RSA) on page 3-110for more information.Video Screen
The video screen is located in the overhead console.
To use the video screen, push forward on the release
latch and the screen will fold down. Adjust the screen’s
position as desired. When the video screen is not in
use, push it up into its latched position.
The DVD player and display will continue to operate
when the screen is in the up or the down position. The
video screen contains the transmitters for the wireless
headphones and the remote control. If the screen
is in the closed position, the signals will not be available
for the operation of the headphones or the remote
control.
Notice:Avoid directly touching the video screen,
as damage may occur. See “Cleaning the Video
Screen” later in this section for more information.
3-101
Page 270 of 532

DVD Player
The DVD player is located in the overhead console. The
DVD player can be controlled by the buttons on the
DVD player and/or by the buttons on the remote control.
See “Remote Control” later in this section for more
information.
The DVD player power may be turned on when the
ignition is in RUN, ACCESSORY, or when Retained
Accessory Power (RAP) is active.
The RSE system DVD player is only compatible with
DVDs of the appropriate region code for the country that
the vehicle was sold in. The DVD region code is
printed on the jacket of most DVDs.
Standard audio CDs, CD-R, CD-RW, Video CD and
Photo CD/CD-R media are fully supported by this DVD
player. DVD-R and DVD-RW media is supported if
formatted as DVD-Video. DVD+R and DVD+RW media
may or may not be supported by the DVD player.
The DVD player does not support DVD-RAM,
DVD-ROM, and DVD Audio media. An error message
will appear on the display if this type of media is inserted
into the DVD player.
When using the wired headphones, not included, if the
front seat passengers play a CD in the Radio with
Six-Disc CD (if equipped) or use XM™ Satellite RadioService (if equipped), you will hear the audio for these
sources, instead of the DVD or CD that is currently
playing through the RSE.
If an error message appears on the video screen, see
“DVD Messages” later in this section.
DVD Player Buttons
O(Power):Press this button to turn the RSE system
on and off. The power indicator light will illuminate
when the power is on.
X(Eject):Press this button to eject a DVD or CD.
SRCE (Source):Press this button to switch between
the DVD player and an auxiliary source.
3-102
Page 273 of 532

Remote Control Buttons
O(Power):Press this button to turn the DVD player
on and off.
v(Title):Press this button to return the DVD to the
main menu of the DVD.
n,q,p,o(Menu Navigation Arrows):Use the
arrow buttons to navigate through a menu.
z(Set-up Menu):Press this button to adjust the color,
tint, brightness, contrast, display mode, and dynamic
range compression. The dynamic range compression
feature can be used to reduce loud audio and increase
low audio produced by some DVDs.
e(Audio):Press this button to display a menu that
will only appear when a DVD is being played. The format
and content of this function will vary for each disc.
r(Fast Reverse):Press this button to fast reverse
the DVD or CD. To stop fast reversing, press this button
again. This button may not work when the DVD is
playing the copyright information or the previews.
SRCE (Source):Press this button to switch between
the DVD player and an auxiliary source.
c(Stop):Press this button to stop playing, rewinding,
or fast forwarding a DVD or CD. Press this button
twice to return to the beginning of the DVD.
t(Previous Track/Chapter):Press this button to
return to the start of the current track or chapter. Press
this button again to return to the previous track or
chapter. This button may not work when the DVD is
playing the copyright information or the previews.
3-105
Page 275 of 532

Battery Replacement
To change the batteries, do the following:
1. Remove the battery compartment door located on
the bottom of the remote control.
2. Replace the two AA batteries in the compartment.
Make sure that they are installed correctly, using
the diagram on the inside of the battery
compartment.
3. Close the battery door securely.
If the remote control is to be stored for a long period of
time, remove the batteries and keep them in a cool,
dry place.
Problem Recommended Action
No power. The ignition might not be
in on or accessory.
The parental control
button might have been
turned on. The power
indicator light will �ash.
Disc will not play. The system might be off.
The parental control
button might have been
turned on. The power
indicator light will �ash.
The system might be in
auxiliary mode.
The disc is upside down
or is not compatible.
The picture does not �ll
the screen. There are
black borders on the
top and bottom or on
both sides or it looks
stretched out.Check the display
mode settings in the
display menu.
The disc was ejected, but
it was pulled back into the
DVD player.The disc is being stored in
the DVD player. Press the
eject button again to eject
the disc.
3-107
Page 276 of 532

Problem Recommended Action
In auxiliary mode, the
picture moves or scrolls.Check the auxiliary input
connections at both
devices.
Change the Video Format
to PAL or NTSC. See
“Stereo RCA Jacks”
previously for how to
change the video format.
The language in the audio
or on the screen is wrong.Check the audio or
language selection in the
main DVD menu.
The remote control does
not work.Check to make sure there
is no obstruction between
the remote control and the
transmitter window.
Check the batteries to
make sure they are not
dead or installed
incorrectly.
The parental control
button might have been
turned on. The power
indicator light will �ash.Problem Recommended Action
After stopping the player, I
push Play but sometimes
the DVD starts where I
left off and sometimes at
the beginning.If the stop button was
pressed one time, the
DVD player will resume
playing where the DVD
was stopped. If the stop
button was pressed
two times the DVD player
will begin to play from the
beginning of the DVD.
The auxiliary source is
running but there is no
picture or sound.Check that the DVD
player is in the auxiliary
source mode.Check the
auxiliary input connections
at both devices.
My disc is stuck in the
player. The Load/Eject
button does not work.Turn the DVD power off,
then on, then press the
load/eject button on the
DVD player.Do not
attempt to forcibly remove
the disc from the DVD
player. This could
permanently damage the
disc and DVD player.
3-108
Page 340 of 532

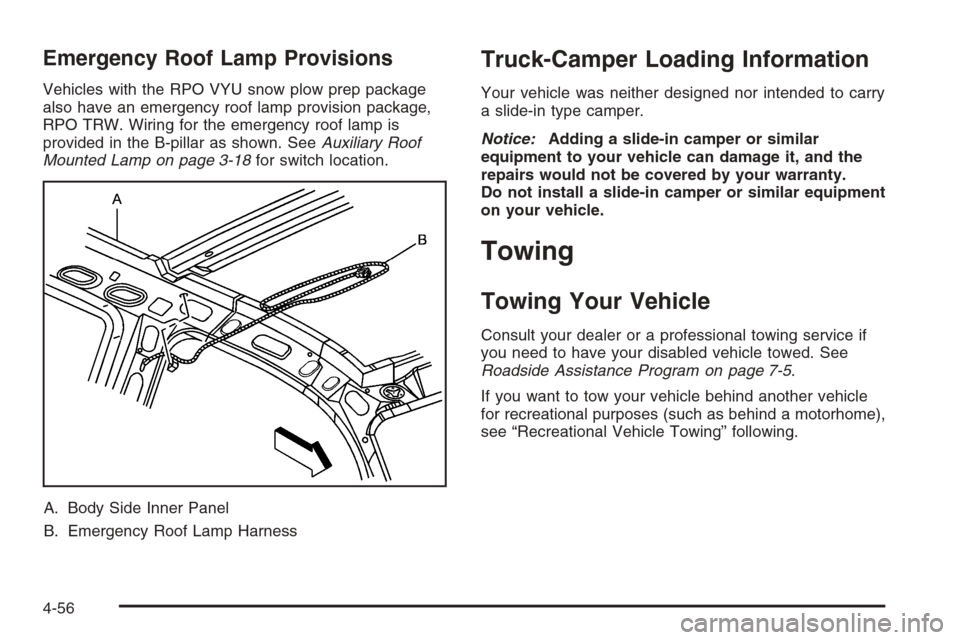
Emergency Roof Lamp Provisions
Vehicles with the RPO VYU snow plow prep package
also have an emergency roof lamp provision package,
RPO TRW. Wiring for the emergency roof lamp is
provided in the B-pillar as shown. SeeAuxiliary Roof
Mounted Lamp on page 3-18for switch location.
A. Body Side Inner Panel
B. Emergency Roof Lamp Harness
Truck-Camper Loading Information
Your vehicle was neither designed nor intended to carry
a slide-in type camper.
Notice:Adding a slide-in camper or similar
equipment to your vehicle can damage it, and the
repairs would not be covered by your warranty.
Do not install a slide-in camper or similar equipment
on your vehicle.
Towing
Towing Your Vehicle
Consult your dealer or a professional towing service if
you need to have your disabled vehicle towed. See
Roadside Assistance Program on page 7-5.
If you want to tow your vehicle behind another vehicle
for recreational purposes (such as behind a motorhome),
see “Recreational Vehicle Towing” following.
4-56
Page 358 of 532
Instrument Panel Jumper Wiring Harness
This harness may be included with your vehicle as part
of the heavy-duty trailer wiring package.
This harness is for an electric brake controller and
includes a trailer battery feed fuse. It should be installed
by your dealer or a quali�ed service center.
Auxiliary Battery
The auxiliary battery provision, if equipped, can be used
to supply electrical power to additional equipment that
you may choose to add.
If your vehicle has this
provision, this relay will be
located on the passenger’s
side of the vehicle, next
to the auxiliary battery.
When using this provision, connection should only be
made to the upper stud (A) of the relay. Do not
make connections to the lower stud (B) of the relay.
4-74
Page 359 of 532

The auxiliary battery circuit is protected by a megafuse
located behind the auxiliary battery.
Be sure to follow the proper installation instructions that
are included with any electrical equipment that you
install.
Notice:Leaving electrical equipment on for
extended periods will drain the battery. Always turn
off electrical equipment when not in use and do
not use equipment that exceeds the maximum
amperage rating for the auxiliary battery provision.Trailer Recommendations
You must subtract your hitch loads from the Cargo
Weight Rating (CWR). CWR is the maximum weight of
the load your vehicle can carry. It doesn’t include
the weight of the people inside, but you can �gure about
150 lbs. (68 kg) for each seat. The total cargo load
must not be more than your vehicles CWR.
Weigh your vehicle with your trailer attached, so that
you won’t go over the GVWR or GAWR. If you are using
a weight-distributing hitch, weigh the vehicle without
the spring bars in place.
You’ll get the best performance if you spread out the
weight of your load the right way, and if you choose the
correct hitch and trailer brakes.
For more information seeTowing a Trailer on page 4-62.
4-75