Page 11 of 484
To heat the entire seat, press the horizontal button
with the heated seat and seatback symbol. Press the
button to cycle through the temperature settings of
high, medium and low and to turn the heated seat off.
Indicator lights will be lit to designate the level of
heat selected: three for high, two for medium, and
one for low.
To heat only the seatback, press the vertical button with
the heated seatback symbol. An indicator light on the
seatback button will be lit to designate that only the
seatback is being heated. Additional presses of
the seatback button will cycle through the heat levels
for the seatback only. Press the horizontal button again
to heat the whole seat.
The heated front seats will be canceled after the ignition
is turned off. If you still want to use the heated front
seat feature after you restart your vehicle, you will
need to press the heated seat button again.
Your vehicle also has heated rear seats. SeeHeated
Seats on page 1-11under “Rear Seats”.Heated and Cooled Seats
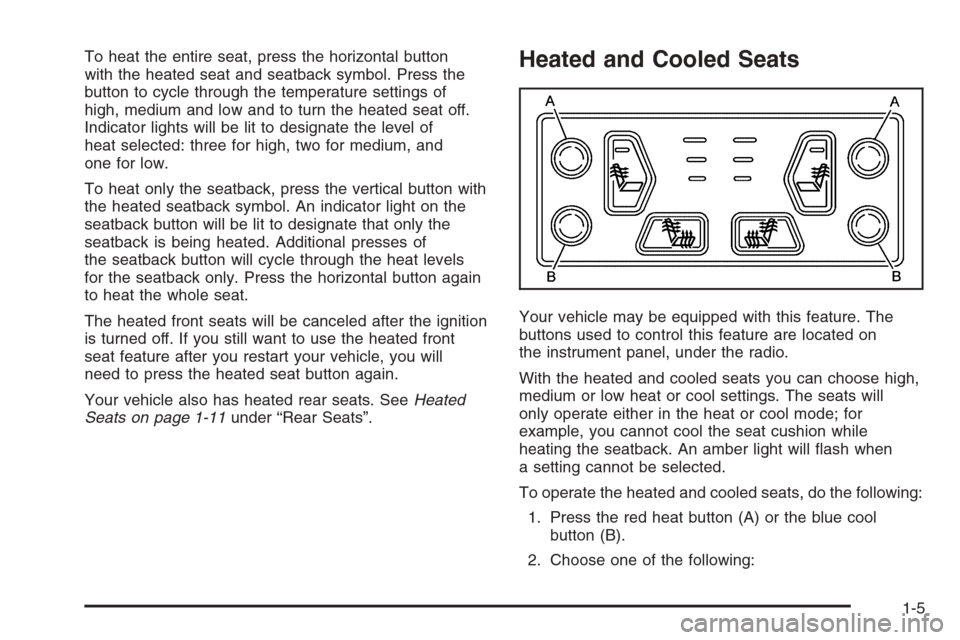
Your vehicle may be equipped with this feature. The
buttons used to control this feature are located on
the instrument panel, under the radio.
With the heated and cooled seats you can choose high,
medium or low heat or cool settings. The seats will
only operate either in the heat or cool mode; for
example, you cannot cool the seat cushion while
heating the seatback. An amber light will ash when
a setting cannot be selected.
To operate the heated and cooled seats, do the following:
1. Press the red heat button (A) or the blue cool
button (B).
2. Choose one of the following:
1-5
Page 12 of 484
I(Seatback Only):This can only be used for the
heat feature. Press this button to heat the seatback
and cycle through the heat settings of high, medium,
low and off. Red indicator lights will glow for each heat
setting chosen: three lights for high, two for medium
and one for low. A light in the button will also glow
to indicate the seatback heat is on.
J(Entire Seat):Press this button to heat or cool the
entire seat and cycle through the settings of high,
medium, low and off. Red (for heat) or blue (for cool)
indicator lights will glow for each setting chosen:
three lights for high, two for medium and one for low.
Reclining Seatbacks
Power Reclining Seatbacks
The front seats have power reclining seatbacks. Use
the vertical power seat control located on the outboard
side of the seat(s) to operate them.
To recline the seatback, press the control toward
the rear of the vehicle.
To raise the seatback, press the control toward the
front of the vehicle.
1-6
Page 17 of 484

Heated Seats
If your vehicle has this
feature, the buttons used
to control this feature
are located on the back of
the center console. The
engine must be running for
the heated seat feature
to work.
To heat the seat cushion, press the button to cycle
through the temperature settings of high and low.
Press the button a third time to turn the feature off.
An indicator light will glow for each heat setting when
the feature is operating.
The heated rear seats will shut off automatically when
the ignition is turned off.
Heated and Cooled Seats
Your vehicle may be
equipped with this feature.
The buttons used to
control this feature are
located on the back of the
center console.
With the heated and cooled seats you can choose high,
medium or low heat or cool settings. The seats will
only operate either in the heat or cool mode; for
example, you cannot cool the seat cushion while heating
the seatback. An amber light will ash when a setting
cannot be selected.
To operate the heated and cooled seats, do the following:
1. Press the red heat button (A) or the blue cool
button (B).
2. Choose one of the following:
1-11
Page 18 of 484

I(Seatback Only):This can only be used for the
heat feature. Press this button to heat the seatback and
cycle through the heat settings of high, medium, low
and off. Red indicator lights will glow for each heat
setting chosen: three lights for high, two for medium and
one for low. A light in the button will also glow to
indicate the seatback heat is on.
J(Entire Seat):Press this button to heat or cool the
entire seat and cycle through the settings of high,
medium, low and off. Red (for heat) or blue (for cool)
indicator lights will glow for each setting chosen:
three lights for high, two for medium and one for low.
60/40 Split Bench Seat
(Second Row)
If your vehicle has a 60/40 split bench, the seats can be
ipped and folded for additional cargo space.
Flip and Fold Feature
To ip and fold the seat, do the following:
1. Make sure that there is nothing under or in front of
the seat.
2. Make sure that the headrests are completely
lowered or removed.On regular models, the rear seatbacks may be
equipped with rearward folding headrests. When the
seatback is being folded forward, the head rest
will automatically fold rearward.
On extended models, the headrests need to be
removed and stored. To do this, push the button at
the base of the head rest, and pull the head rest
out from the seatback. Slide the head rest pins into
the holes on the top of the seat cushion.
3. Pull up on the strap
loop located at the rear
of the seat cushion
and ip the seat
cushion forward.
1-12
Page 42 of 484
5. To make the lap part tight, pull up on the
shoulder belt.
The lap part of the belt should be worn low and snug on
the hips, just touching the thighs. In a crash, this applies
force to the strong pelvic bones. And you would be less
likely to slide under the lap belt. If you slid under it, the
belt would apply force at your abdomen. This could cause
serious or even fatal injuries. The shoulder belt should go
over the shoulder and across the chest. These parts of
the body are best able to take belt restraining forces.
The safety belt locks if there is a sudden stop or crash,
or if you pull the belt very quickly out of the retractor.
1-36
Page 45 of 484
Q:What is wrong with this?
A:The belt is over an armrest.
{CAUTION:
You can be seriously injured if your belt goes
over an armrest like this. The belt would be
much too high. In a crash, you can slide under
the belt. The belt force would then be applied
at the abdomen, not at the pelvic bones, and
that could cause serious or fatal injuries.
Be sure the belt goes under the armrests.
1-39
Page 50 of 484
The lap part of the belt should be worn low and snug on
the hips, just touching the thighs. In a crash, this applies
force to the strong pelvic bones. And you would be less
likely to slide under the lap belt. If you slid under it, the
belt would apply force at your abdomen. This could cause
serious or even fatal injuries. The shoulder belt should go
over the shoulder and across the chest. These parts of
the body are best able to take belt restraining forces.
The safety belt locks if there is a sudden stop or a crash,
or if you pull the belt very quickly out of the retractor.
{CAUTION:
You can be seriously hurt if your shoulder belt
is too loose. In a crash, you would move
forward too much, which could increase injury.
The shoulder belt should t against your body.
To unlatch the belt, push the button on the buckle.
1-44
Page 55 of 484
Child Restraints
Older Children
Older children who have outgrown booster seats should
wear the vehicle’s safety belts.
If you have the choice, a child should sit in a seat that
has a lap-shoulder belt and get the additional restraint a
shoulder belt can provide.
Q:What is the proper way to wear safety belts?
A:If possible, an older child should wear a
lap-shoulder belt and get the additional restraint a
shoulder belt can provide. The shoulder belt
should not cross the face or neck. The lap belt
should t snugly below the hips, just touching the
top of the thighs. It should never be worn over
the abdomen, which could cause severe or even
fatal internal injuries in a crash.
Accident statistics show that children are safer if they
are restrained in the rear seat.
In a crash, children who are not buckled up can strike
other people who are buckled up, or can be thrown
out of the vehicle. Older children need to use safety
belts properly.
1-49


