2006 BMW Z4 3.0SI ROADSTER front lights
[x] Cancel search: front lightsPage 49 of 128

Reference
At a glance
Controls
Driving tips
Mobility
47
Reserve
Once the fuel level has fallen to the reserve
zone of approx. 2.1 US gallons/8 liters, indicator
lamp 1 lights up continuously.
Do not drive until the fuel tank is empty
and refill it well in advance. Otherwise the
engine may not operate properly and damage
could result.<
When you switch on the ignition, the indicator
lamp comes on briefly to indicate an operational
check.
Engine coolant temperature
gauge
Blue
The engine is still cold. Drive at moderate
engine and vehicle speeds.
Between the blue and red zones
Normal operating range. The needle may rise as
far as the edge of the red sector during normal
operation.
Red
When you switch on the ignition, warning
lamp1 comes on briefly to indicate an opera-
tional check.
Comes on while driving:
The engine has overheated. Stop and switch
the engine off immediately and allow it to cool
down.
For checking the coolant level, refer to page89.
Service interval display
The remaining driving distance in miles/km until
the next scheduled service is displayed briefly
immediately after you start the engine or switch
on the ignition.
The words OILSERVICE or INSPECTION indi-
cate the type of service due next. The computer
bases its calculations of the remaining driving
distance on the preceding driving style.
A flashing message and a minus sign in front of
the number mean that the service interval has
already been exceeded by the number of miles/
kilometers shown on the display. Please sched-
ule an appointment with your BMW Center or a
workshop that works according to BMW repair
procedures with correspondingly trained per-
sonnel.
The extent of service work required can
be read out from the remote control by
your BMW Service Advisor.<
Clock
If you wish to have a permanent time display,
you can have it appear in the car radio display,
refer to the Owner's Manual for Radio.
You can set the time and the time display in the
car radio as follows.
Page 54 of 128

Technology for driving comfort and safety
52 3.In the event of complete tire pressure loss,
0 psi/0 kilopascal, you can estimate the
possible distance for continued driving on
the basis of the following guidelines:
>With a light load:
1 person without luggage:
approx. 155 miles/250 km
>With a medium load:
1 person, cargo bay full,
or
2 persons without luggage:
approx. 90 miles/150 km
>With a full load:
2 persons, cargo bay full:
approx.30miles/50km.
Drive cautiously. Do not exceed a speed
of 50 mph/80 km/h. Driving characteris-
tics change if there is a loss of tire pressure.
This includes reduced tracking stability in brak-
ing, extended braking distance and altered nat-
ural steering characteristics.
If unusual vibration or loud noises occur during
the journey, this may be an indication that the
damaged tire has finally failed. Reduce your
speed and pull over to the side of the road at the
earliest opportunity. Otherwise, parts of the tire
could come loose and cause an accident. Do
not continue driving. Contact a BMW Center.<
Electric Power Steering EPS
The concept
The electric power steering is a direct, sporting
steering system. A special combination of elec-
tric motor and transmission helps you steer
more easily. As your speed increases, steering
power assistance is reduced.
Malfunction
The indicator lamp stays lit:
The system is malfunctioning or defec-
tive.
Steering remains operational.
Have the system checked as soon as possible.
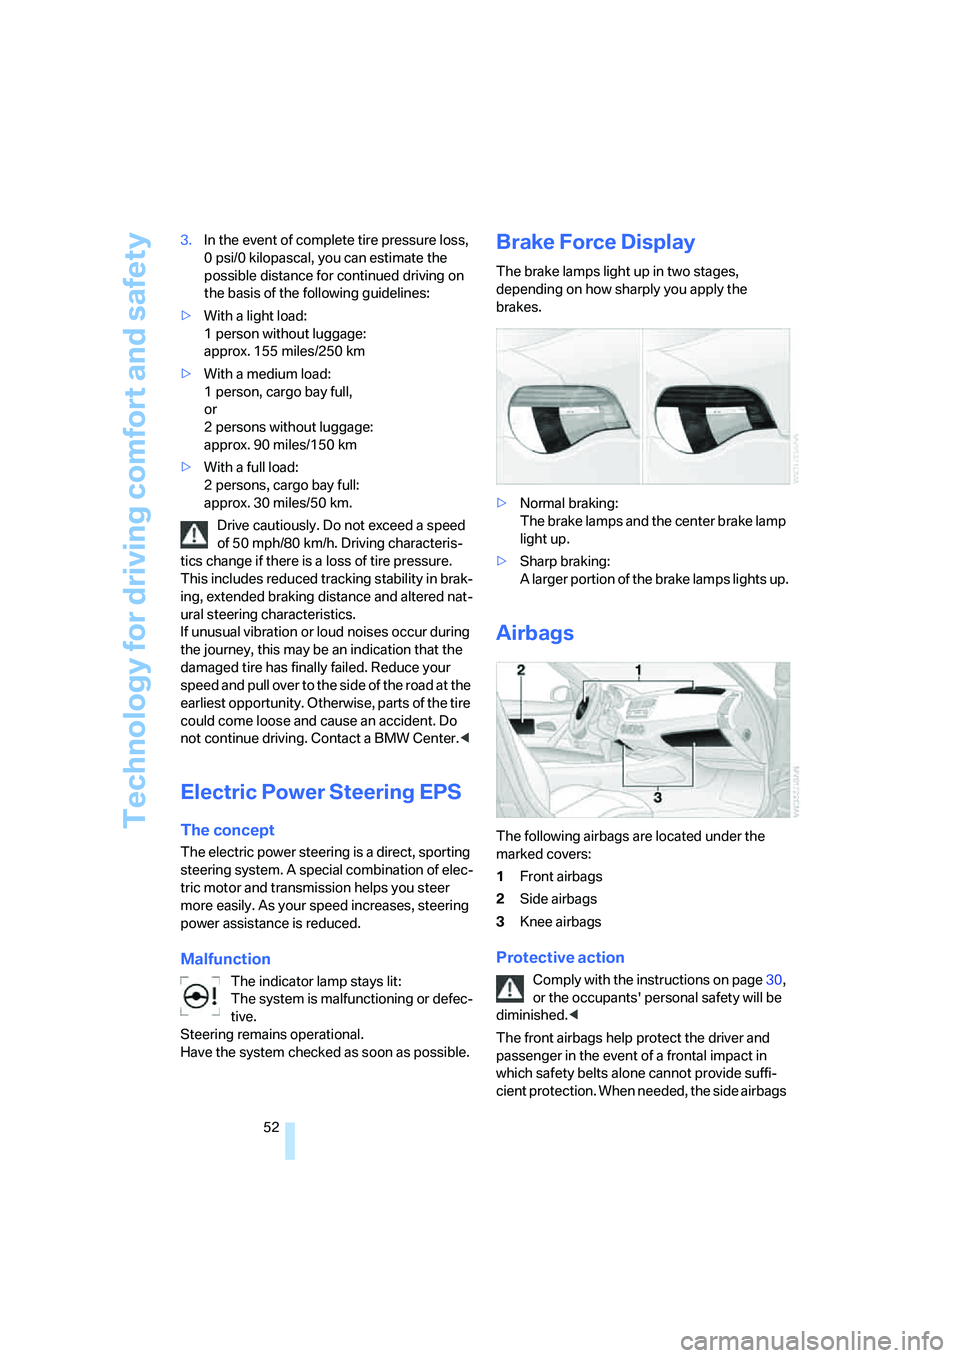
Brake Force Display
The brake lamps light up in two stages,
depending on how sharply you apply the
brakes.
>Normal braking:
The brake lamps and the center brake lamp
light up.
>Sharp braking:
A larger portion of the brake lamps lights up.
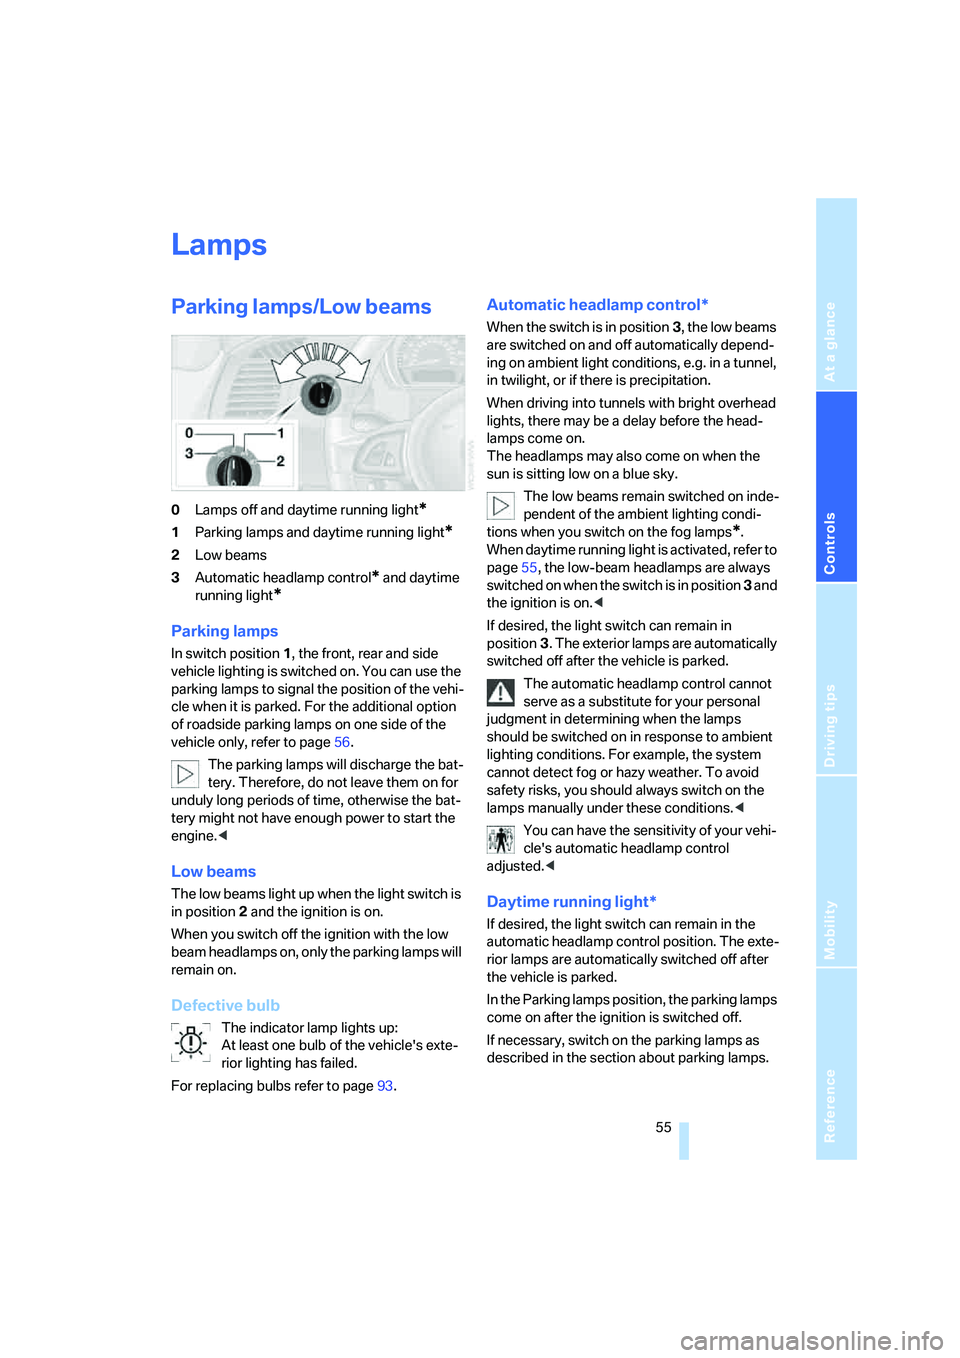
Airbags
The following airbags are located under the
marked covers:
1Front airbags
2Side airbags
3Knee airbags
Protective action
Comply with the instructions on page30,
or the occupants' personal safety will be
diminished.<
The front airbags help protect the driver and
passenger in the event of a frontal impact in
which safety belts alone cannot provide suffi-
cient protection. When needed, the side airbags
Page 57 of 128

Reference
At a glance
Controls
Driving tips
Mobility
55
Lamps
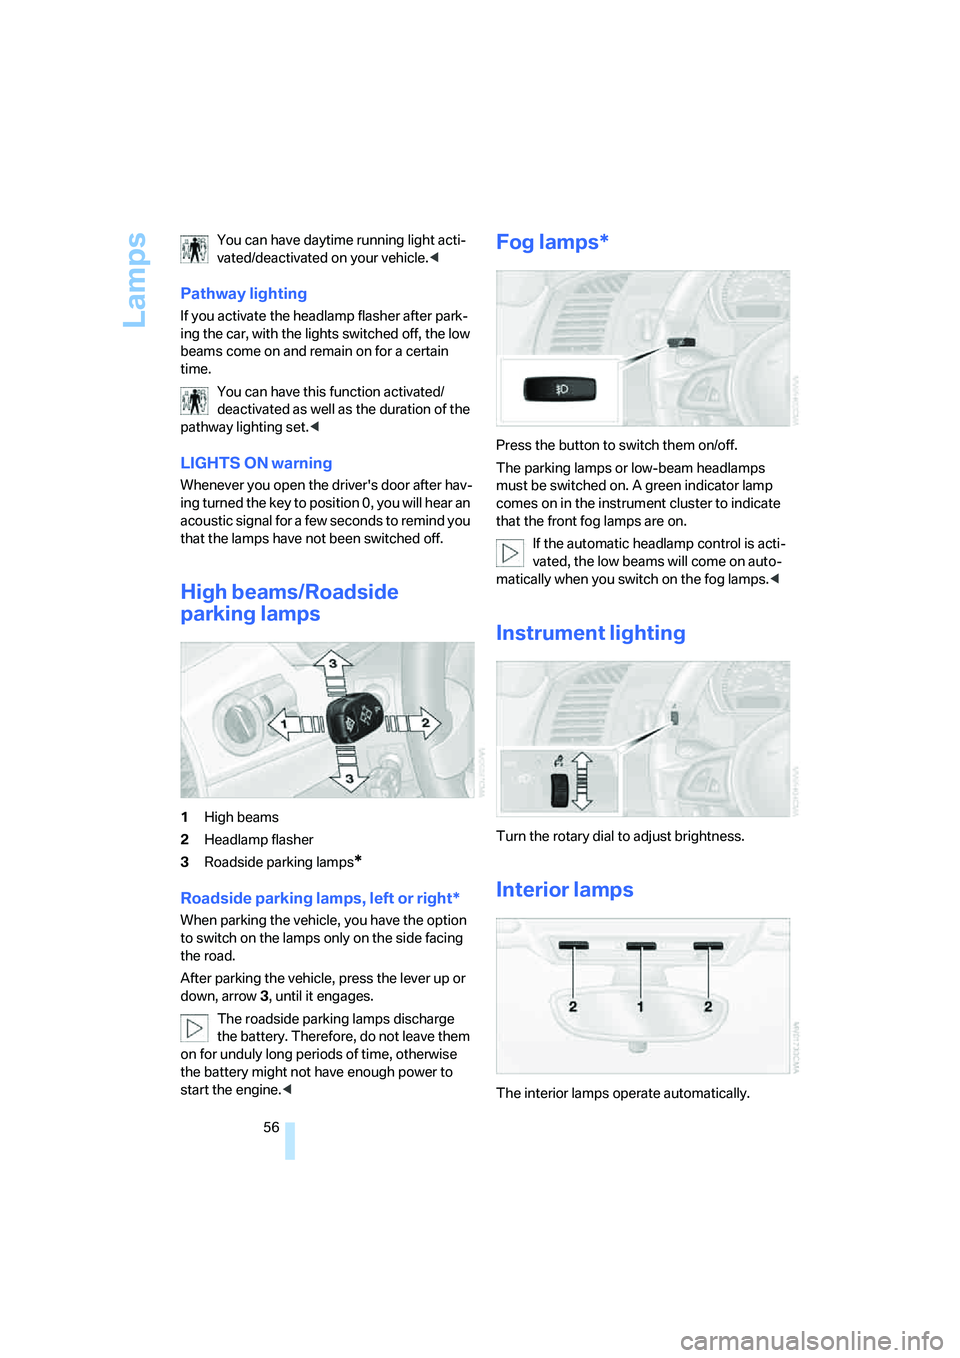
Parking lamps/Low beams
0Lamps off and daytime running light*
1Parking lamps and daytime running light*
2Low beams
3Automatic headlamp control
* and daytime
running light
*
Parking lamps
In switch position1, the front, rear and side
vehicle lighting is switched on. You can use the
parking lamps to signal the position of the vehi-
cle when it is parked. For the additional option
of roadside parking lamps on one side of the
vehicle only, refer to page56.
The parking lamps will discharge the bat-
tery. Therefore, do not leave them on for
unduly long periods of time, otherwise the bat-
tery might not have enough power to start the
engine.<
Low beams
The low beams light up when the light switch is
in position 2 and the ignition is on.
When you switch off the ignition with the low
beam headlamps on, only the parking lamps will
remain on.
Defective bulb
The indicator lamp lights up:
At least one bulb of the vehicle's exte-
rior lighting has failed.
For replacing bulbs refer to page93.
Automatic headlamp control*
When the switch is in position3, the low beams
are switched on and off automatically depend-
ing on ambient light conditions, e.g. in a tunnel,
in twilight, or if there is precipitation.
When driving into tunnels with bright overhead
lights, there may be a delay before the head-
lamps come on.
The headlamps may also come on when the
sun is sitting low on a blue sky.
The low beams remain switched on inde-
pendent of the ambient lighting condi-
tions when you switch on the fog lamps
*.
When daytime running light is activated, refer to
page55, the low-beam headlamps are always
switched on when the switch is in position 3 and
the ignition is on.<
If desired, the light switch can remain in
position3. The exterior lamps are automatically
switched off after the vehicle is parked.
The automatic headlamp control cannot
serve as a substitute for your personal
judgment in determining when the lamps
should be switched on in response to ambient
lighting conditions. For example, the system
cannot detect fog or hazy weather. To avoid
safety risks, you should always switch on the
lamps manually under these conditions.<
You can have the sensitivity of your vehi-
cle's automatic headlamp control
adjusted.<
Daytime running light*
If desired, the light switch can remain in the
automatic headlamp control position. The exte-
rior lamps are automatically switched off after
the vehicle is parked.
In the Parking lamps position, the parking lamps
come on after the ignition is switched off.
If necessary, switch on the parking lamps as
described in the section about parking lamps.
Page 58 of 128

Lamps
56 You can have daytime running light acti-
vated/deactivated on your vehicle.<
Pathway lighting
If you activate the headlamp flasher after park-
ing the car, with the lights switched off, the low
beams come on and remain on for a certain
time.
You can have this function activated/
deactivated as well as the duration of the
pathway lighting set.<
LIGHTS ON warning
Whenever you open the driver's door after hav-
ing turned the key to position 0, you will hear an
acoustic signal for a few seconds to remind you
that the lamps have not been switched off.
High beams/Roadside
parking lamps
1High beams
2Headlamp flasher
3Roadside parking lamps
*
Roadside parking lamps, left or right*
When parking the vehicle, you have the option
to switch on the lamps only on the side facing
the road.
After parking the vehicle, press the lever up or
down, arrow 3, until it engages.
The roadside parking lamps discharge
the battery. Therefore, do not leave them
on for unduly long periods of time, otherwise
the battery might not have enough power to
start the engine.<
Fog lamps*
Press the button to switch them on/off.
The parking lamps or low-beam headlamps
must be switched on. A green indicator lamp
comes on in the instrument cluster to indicate
that the front fog lamps are on.
If the automatic headlamp control is acti-
vated, the low beams will come on auto-
matically when you switch on the fog lamps.<
Instrument lighting
Turn the rotary dial to adjust brightness.
Interior lamps
The interior lamps operate automatically.
Page 100 of 128

Giving and receiving assistance
98
Giving and receiving assistance
Receiving assistance
If your vehicle has the necessary equipment,
you can use buttons in the center console to
contact Roadside Assistance or issue an emer-
gency call.
Requirements for initiating an emergency call or
contacting Roadside Assistance:
>The key must be in position 1 or higher.
>The car phone must be logged on to a
mobile telephone network.
>The emergency call system must be opera-
ble.
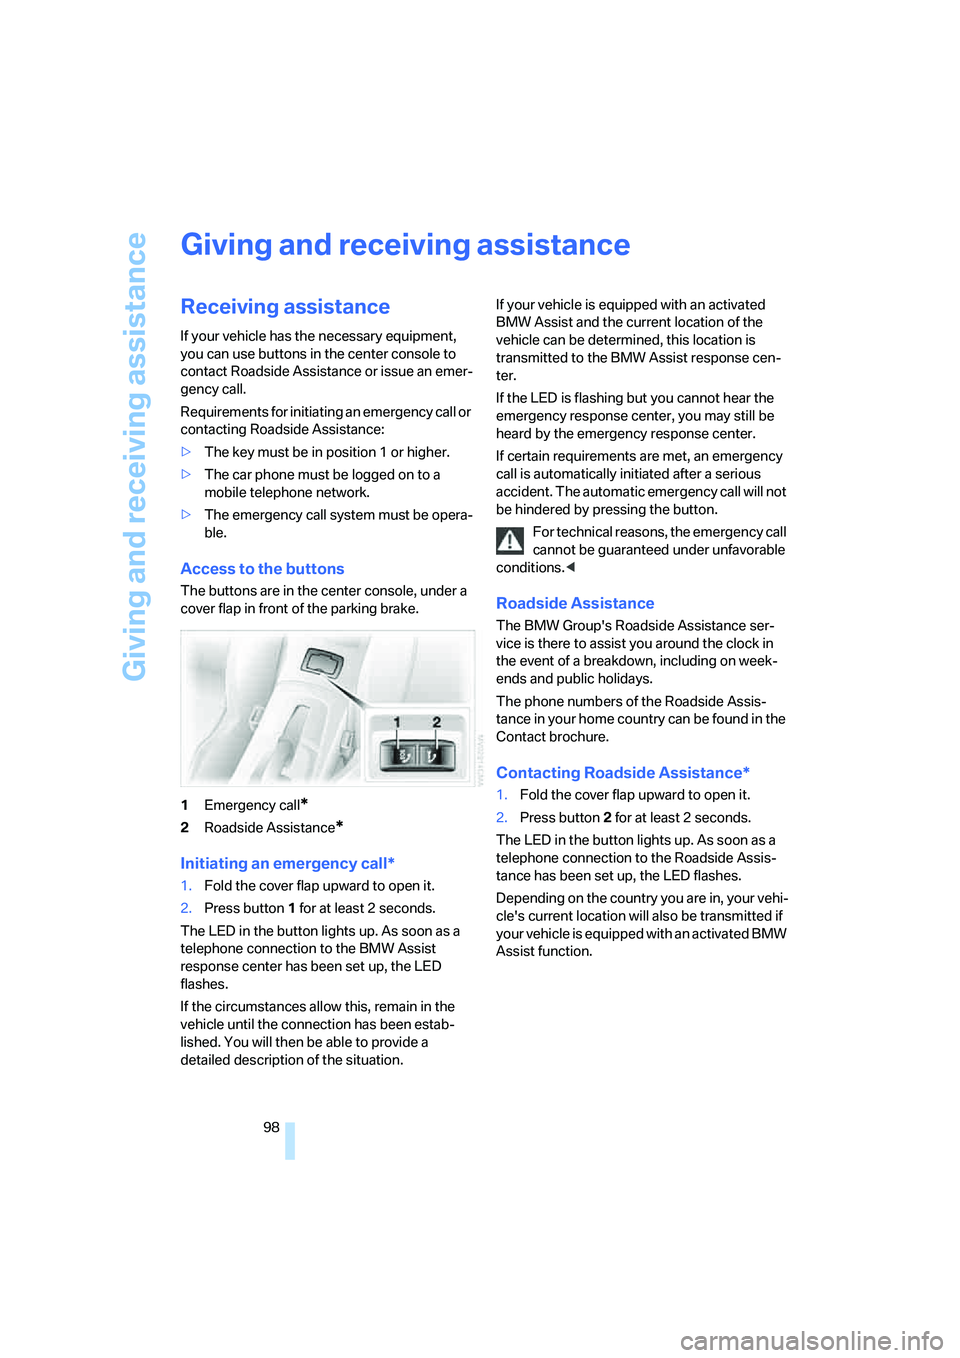
Access to the buttons
The buttons are in the center console, under a
cover flap in front of the parking brake.
1Emergency call
*
2Roadside Assistance*
Initiating an emergency call*
1.Fold the cover flap upward to open it.
2.Press button1 for at least 2 seconds.
The LED in the button lights up. As soon as a
telephone connection to the BMW Assist
response center has been set up, the LED
flashes.
If the circumstances allow this, remain in the
vehicle until the connection has been estab-
lished. You will then be able to provide a
detailed description of the situation.If your vehicle is equipped with an activated
BMW Assist and the current location of the
vehicle can be determined, this location is
transmitted to the BMW Assist response cen-
ter.
If the LED is flashing but you cannot hear the
emergency response center, you may still be
heard by the emergency response center.
If certain requirements are met, an emergency
call is automatically initiated after a serious
accident. The automatic emergency call will not
be hindered by pressing the button.
For technical reasons, the emergency call
cannot be guaranteed under unfavorable
conditions.<
Roadside Assistance
The BMW Group's Roadside Assistance ser-
vice is there to assist you around the clock in
the event of a breakdown, including on week-
ends and public holidays.
The phone numbers of the Roadside Assis-
tance in your home country can be found in the
Contact brochure.
Contacting Roadside Assistance*
1.Fold the cover flap upward to open it.
2.Press button2 for at least 2 seconds.
The LED in the button lights up. As soon as a
telephone connection to the Roadside Assis-
tance has been set up, the LED flashes.
Depending on the country you are in, your vehi-
cle's current location will also be transmitted if
your vehicle is equipped with an activated BMW
Assist function.