Page 103 of 172
Maintenance
General instructions . . . . . . . . . . 102
Toolkit . . . . . . . . . . . . . . . . . . . . . . . 102
Engine oil . . . . . . . . . . . . . . . . . . . . 103
Brake system, general . . . . . . . . 105
Brake pads . . . . . . . . . . . . . . . . . . . 105
Brake fluid . . . . . . . . . . . . . . . . . . . 107
Clutch . . . . . . . . . . . . . . . . . . . . . . . 109
Tyres . . . . . . . . . . . . . . . . . . . . . . . . 109
Rims . . . . . . . . . . . . . . . . . . . . . . . . . 110
Wheels . . . . . . . . . . . . . . . . . . . . . . 110
Front-wheel stand . . . . . . . . . . . . 117
Bulbs . . . . . . . . . . . . . . . . . . . . . . . . 119
Jump start . . . . . . . . . . . . . . . . . . . 127
Battery . . . . . . . . . . . . . . . . . . . . . . . 128
7101zMaintenance
Page 104 of 172
General instructionsThe 'Maintenance' chapter
describes work involving the
replacement of wear parts
that can be performed with
minimum effort.
Special tightening torques are
listed as applicable.
If you are interested in inform-
ation on more extensive work,
we recommend the repair
manual on CD-ROM which
applies to your particular mo-
torcycle. You can obtain a
copy from your authorised
BMW Motorrad dealer.
Some of the work calls for
special tools and a thorough
knowledge of motorcycles.
If you are in doubt consult a
specialist workshop, prefer-
ably your authorised BMW
Motorrad dealer.
ToolkitStandard on-board
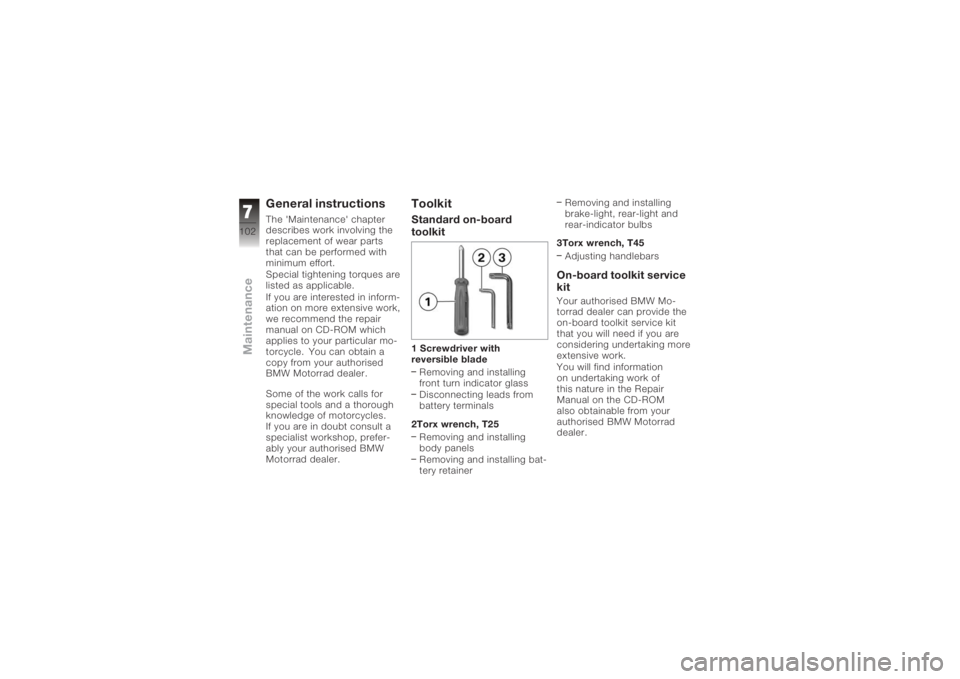
toolkit1 Screwdriver with
reversible bladeRemoving and installing
front turn indicator glass
Disconnecting leads from
battery terminals
2Torx wrench, T25 Removing and installing
body panels
Removing and installing bat-
tery retainer Removing and installing
brake-light, rear-light and
rear-indicator bulbs
3Torx wrench, T45 Adjusting handlebars
On-board toolkit service
kitYour authorised BMW Mo-
torrad dealer can provide the
on-board toolkit service kit
that you will need if you are
considering undertaking more
extensive work.
You will find information
on undertaking work of
this nature in the Repair
Manual on the CD-ROM
also obtainable from your
authorised BMW Motorrad
dealer.
7102zMaintenance
Page 129 of 172
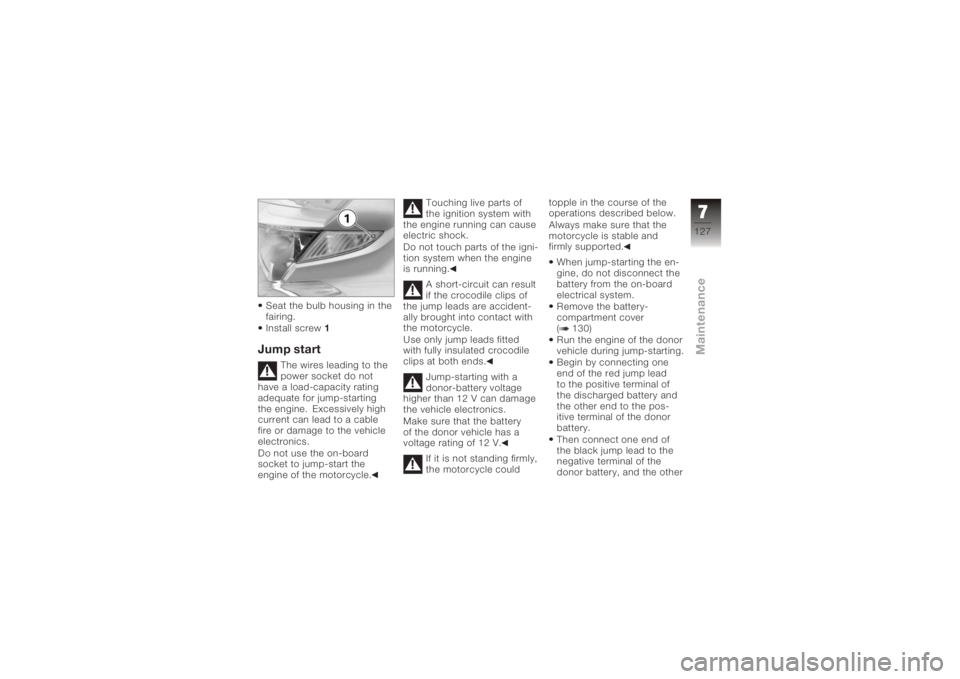
Seat the bulb housing in the
fairing.
Install screw1Jump start
The wires leading to the
power socket do not
have a load-capacity rating
adequate for jump-starting
the engine. Excessively high
current can lead to a cable
fire or damage to the vehicle
electronics.
Do not use the on-board
socket to jump-start the
engine of the motorcycle. Touching live parts of
the ignition system with
the engine running can cause
electric shock.
Do not touch parts of the igni-
tion system when the engine
is running.
A short-circuit can result
if the crocodile clips of
the jump leads are accident-
ally brought into contact with
the motorcycle.
Use only jump leads fitted
with fully insulated crocodile
clips at both ends.
Jump-starting with a
donor-battery voltage
higher than 12 V can damage
the vehicle electronics.
Make sure that the battery
of the donor vehicle has a
voltage rating of 12 V.
If it is not standing firmly,
the motorcycle could topple in the course of the
operations described below.
Always make sure that the
motorcycle is stable and
firmly supported.
When jump-starting the en-
gine, do not disconnect the
battery from the on-board
electrical system.
Remove the battery-
compartment cover
( 130)
Run the engine of the donor
vehicle during jump-starting.
Begin by connecting one
end of the red jump lead
to the positive terminal of
the discharged battery and
the other end to the pos-
itive terminal of the donor
battery.
Then connect one end of
the black jump lead to the
negative terminal of the
donor battery, and the other
7127zMaintenance
Page 130 of 172
end to the negative terminal
of the discharged battery.
Start the engine of the
vehicle with the discharged
battery in the usual way; if
the engine does not start,
wait a few minutes before
repeating the attempt
in order to protect the
starter motor and the donor
battery.
Allow both engines to idle
for a few minutes before
disconnecting the jump
leads.
Disconnect the jump lead
from the negative termin-
als first, then disconnect the
second lead from the posit-
ive terminals.
Installing battery-
compartment cover
( 130)
BatteryMaintenance instructionsCorrect upkeep, recharging
and storage will prolong the
life of the battery and are es-
sential if warranty claims are
to be considered.
Compliance with the points
below is important in order to
maximise battery life:Keep the surface of the bat-
tery clean and dry
Do not open the battery
Do not top up with water
Be sure to read and com-
ply with the instructions for
charging the battery on the
following pages
Do not turn the battery up-
side down
If the battery is not dis-
connected, the on-board
electronics (e.g. clock, etc.)
gradually drain the battery. This can cause the battery
to run flat. If this happens,
warranty claims will not be ac-
cepted.
If the motorcycle is to be out
of use for more than four
weeks, disconnect the battery
or connect a suitable trickle
charger to the battery.
BMW Motorrad has de-
veloped a trickle-charger
specially designed for com-
patibility with the electronics
of your motorcycle. Using this
charger, you can keep the
battery charged during long
periods of disuse, without
having to disconnect the bat-
tery from the motorcycle's
on-board systems. You can
obtain additional information
from your authorised BMW
Motorrad dealer.
7128zMaintenance
Page 131 of 172
Charging battery when
connected
Charging the connec-
ted battery directly at the
battery terminals can damage
the vehicle electronics.
Always disconnect the battery
from the on-board circuits be-
fore recharging it with a char-
ger connected directly to the
battery posts.
If you switch on the ig-
nition and the multifunc-
tion display and telltale lights
fail to light up, the battery is
completely flat. Attempting to
charge a completely flat bat-
tery via the on-board socket
can cause damage to the mo-
torcycle's electronics.
If a battery has discharged to
the extent that it is completely
flat, it has to be disconnec-
ted from the on-board circuits
and charged with the char- ger connected directly to the
battery posts.
Only chargers suitable
for this mode of charging
can be used to recharge the
battery via the on-board sock-
et. Unsuitable chargers could
cause damage to the motor-
cycle's on-board electrics.
Use BMW chargers with
the part numbers 71 60
7 688 864 (220 V) or, as
applicable, 71 60 7 688 865
(110 V). If you are in doubt,
disconnect the battery from
the on-board systems and
connect the charger directly
to the battery.
Charge via the power sock-
et, with the battery connec-
ted to the motorcycle's on-
board electrical system. The motorcycle's
on-board electronics
know when the battery is fully charged. The on-board
socket is switched off when
this happens.
Comply with the operating
instructions of the charger. If you are unable to
charge the battery
through the power socket,
you may be using a charger
that is not compatible with
your motorcycle's electronics.
If this happens, disconnect
the battery from the on-board
systems and connect the
charger directly to the
battery.
Charging battery when
disconnectedCharge the battery using a
suitable charger.
Comply with the operating
instructions of the charger.
Once the battery is fully
charged, disconnect the
7129zMaintenance
Page 132 of 172
charger terminal clips from
the battery terminals.The battery has to be re-
charged at regular inter-
vals in the course of a lengthy
period of disuse. See the in-
structions for caring for your
battery. Always fully recharge
the battery before restoring it
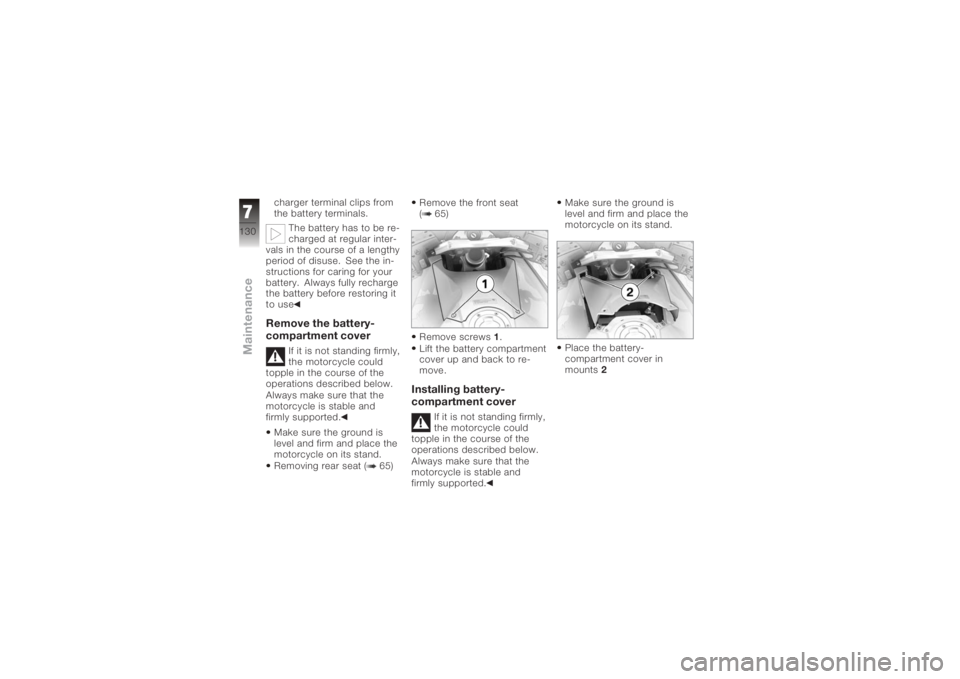
to useRemove the battery-
compartment cover
If it is not standing firmly,
the motorcycle could
topple in the course of the
operations described below.
Always make sure that the
motorcycle is stable and
firmly supported.
Make sure the ground is
level and firm and place the
motorcycle on its stand.
Removing rear seat ( 65) Remove the front seat
( 65)
Remove screws
1.
Lift the battery compartment
cover up and back to re-
move.
Installing battery-
compartment cover
If it is not standing firmly,
the motorcycle could
topple in the course of the
operations described below.
Always make sure that the
motorcycle is stable and
firmly supported. Make sure the ground is
level and firm and place the
motorcycle on its stand.
Place the battery-
compartment cover in
mounts
2
7130zMaintenance
Page 133 of 172
Install screws1.
Install the front seat ( 66)
Install the rear seat ( 67)Removing batteryRemove the battery-
compartment cover
( 130) Disconnection in
the wrong sequence
increases the risk of
short-circuits.
Always proceed in the correct
sequence.
Disconnect negative lead 3
first.
Remove protective cap 2
from the positive terminal.
Then disconnect positive
lead 1.
Remove screws 4and pull
the retainer to the rear.
Lift the battery up and out;
work it slightly back and forth if it is difficult to re-
move.
Installing batterySwitch off the ignition.
Place the battery in the bat-
tery compartment, positive
terminal on the left in the
forward direction of travel.
Slip the battery retainer
over the battery and install
screws
4.
Installation in the wrong
sequence increases the
risk of short-circuits.
7131zMaintenance
Page 134 of 172
Always proceed in the correct
sequence.
Never install the battery
without the protective cap.Connect battery positive
lead 1first.
Seat protective cap 2on the
positive terminal.
The connect battery negat-
ive lead 3.
Installing battery-
compartment cover
( 130)
Switch on the ignition.
Fully open the throttle once
or twice.
The engine management
system registers the
throttle-valve position.
Set the clock ( 47)
7132zMaintenance