2006 BMW M6 COUPE display
[x] Cancel search: displayPage 81 of 227

Controls
79Reference
At a glance
Driving tips
Communications
Navigation
Entertainment
Mobility
5.If necessary, move the controller to the left
to select "Head-Up Display".
6.Turn the controller until the desired setting
is selected.
The setting is stored for the remote control cur-
rently in use.
Notes
The visibility of the displays in the Head-Up Dis-
play is influenced by:
>Sunglasses with certain polarization filters
>Certain sitting positions
>Objects on the cover of the Head-Up Dis-
play
>Wet road surface and unfavorable lighting
conditions
If the image is distorted, please have the base
setting checked at a BMW center.
Specialized windshield
The windshield is a part of the system. The
shape of the windshield complies with the
requirements of the Head-Up Display to enable
a precise display. A film in the windshield pre-
vents double images from being displayed.
Have the windshield replaced only by a BMW
center or a repair shop that works in accordance
with BMW guidelines and uses appropriately
trained personnel.
Care instructions
You can find everything you need to know on
this topic by consulting the Caring for your vehi-
cle brochure.Only clean the cover of the Head-Up Dis-
play with a soft, lint-free cloth or with a
display cleaning cloth, otherwise damage may
result.<
Page 87 of 227

Controls
85Reference
At a glance
Driving tips
Communications
Navigation
Entertainment
Mobility
The current setting for air distribution is dis-
played on the Control Display.
A congenial climate
The AUTO program offers the optimum air dis-
tribution and air volume for virtually all condi-
tions, refer to AUTO program below. Now you
only need to select an interior temperature that
you find pleasant.
The following sections contain more detailed
information on the available setting options.
Most settings are stored for the remote control
currently in use, also refer to Personal Profile
settings on page29.
AUTO program
The AUTO program handles the
adjustment of air distribution to the
windshield and side windows, in
the direction of the upper body, and in the foot-
well, as well as the adjustment of the air volume.
It also adapts your instructions for the tempera-
ture to outside influences throughout the year.
The cooling is switched on automatically with
the AUTO program. At the same time, a con-
densation sensor controls the program in such
a way that window condensation is prevented
as much as possible.
Intensity of AUTO program
To meet your individual needs, you can
increase or decrease the intensity of the auto-
matic climate control.
iDrive, for explanation of principle, refer to
page16.
1.Press the button.
This opens the start menu.
2.Move the controller to the left to open "Cli-
mate".3.Select "Automatic programs" and press the
controller.
4.Select the desired intensity and press the
controller.
The marked intensity of the automatic
program is switched on.
Temperature
Set the desired temperature indi-
vidually on the driver's and front
passenger side.
The automatic climate control
achieves this temperature as quickly as possi-
ble at any time of year, if necessary with the
maximum cooling or heating capacity, and then
keeps it constant.
When switching between different tem-
perature settings in rapid succession, the
automatic climate control does not have suffi-
cient time to achieve the set temperature.<
Adapting temperature in upper body
region
1.Open the start menu.
2.Open "Climate".
3.Select "Vent settings" and press the con-
troller.
Page 88 of 227

Climate
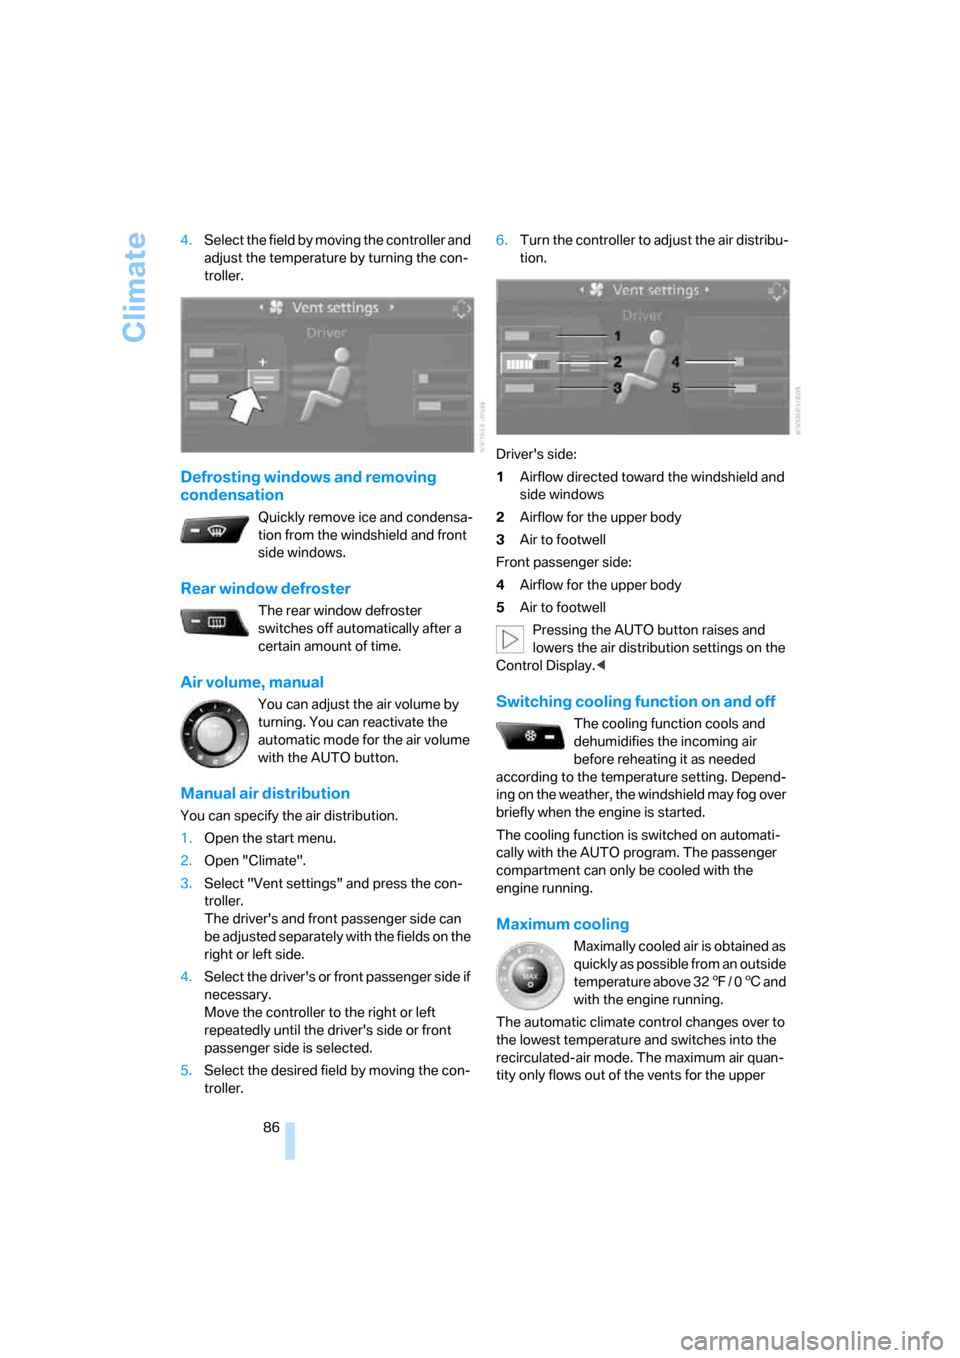
86 4.Select the field by moving the controller and
adjust the temperature by turning the con-
troller.
Defrosting windows and removing
condensation
Quickly remove ice and condensa-
tion from the windshield and front
side windows.
Rear window defroster
The rear window defroster
switches off automatically after a
certain amount of time.
Air volume, manual
You can adjust the air volume by
turning. You can reactivate the
automatic mode for the air volume
with the AUTO button.
Manual air distribution
You can specify the air distribution.
1.Open the start menu.
2.Open "Climate".
3.Select "Vent settings" and press the con-
troller.
The driver's and front passenger side can
be adjusted separately with the fields on the
right or left side.
4.Select the driver's or front passenger side if
necessary.
Move the controller to the right or left
repeatedly until the driver's side or front
passenger side is selected.
5.Select the desired field by moving the con-
troller.6.Turn the controller to adjust the air distribu-
tion.
Driver's side:
1Airflow directed toward the windshield and
side windows
2Airflow for the upper body
3Air to footwell
Front passenger side:
4Airflow for the upper body
5Air to footwell
Pressing the AUTO button raises and
lowers the air distribution settings on the
Control Display.<
Switching cooling function on and off
The cooling function cools and
dehumidifies the incoming air
before reheating it as needed
according to the temperature setting. Depend-
ing on the weather, the windshield may fog over
briefly when the engine is started.
The cooling function is switched on automati-
cally with the AUTO program. The passenger
compartment can only be cooled with the
engine running.
Maximum cooling
Maximally cooled air is obtained as
quickly as possible from an outside
temperature above 327/ 06 and
with the engine running.
The automatic climate control changes over to
the lowest temperature and switches into the
recirculated-air mode. The maximum air quan-
tity only flows out of the vents for the upper
Page 90 of 227

Climate
88 dard part of your scheduled maintenance.
You can have more detailed information shown
on the Control Display, refer to page63.
Parked car ventilation
The concept
The parked car ventilation blows air into the
passenger compartment to lower interior tem-
peratures.
It is ready to use in the parked-car mode at any
outside temperature.
You can set two different times for the system
to start. The parked car ventilation can also be
switched on and off directly. It remains
switched on for 30 minutes.
Since the system uses a substantial amount of
electrical current, you should refrain from acti-
vating it twice in succession without allowing
the battery to be recharged in normal operation
between uses.
The air emerges through the upper body region
vent outlets in the instrument panel. These vent
outlets must be open for the system to operate.
The parked car ventilation system is operated
via iDrive.
Switching on and off directly
iDrive, for explanation of principle, refer to
page16.
1.Open the start menu.
2.Move the controller to the left to open "Cli-
mate".
3.Select "Parked car operation" and press the
controller.
4.Select "Automatic ventilation" and press
the controller.5.Select "Parked car ventilation" and press
the controller.
The parked car ventilation is switched on.
The symbol on the display of the automatic
climate control flashes.
Preselecting activation times
iDrive, for explanation of principle, refer to
page16.
1.Open the start menu.
2.Move the controller to the left to open "Cli-
mate".
3.Select "Parked car operation" and press the
controller.
4.Select "Activation time" and press the con-
troller.
5.Move the controller to the left or right to
select "Timer 1" or "Timer 2".
Page 91 of 227

Controls
89Reference
At a glance
Driving tips
Communications
Navigation
Entertainment
Mobility
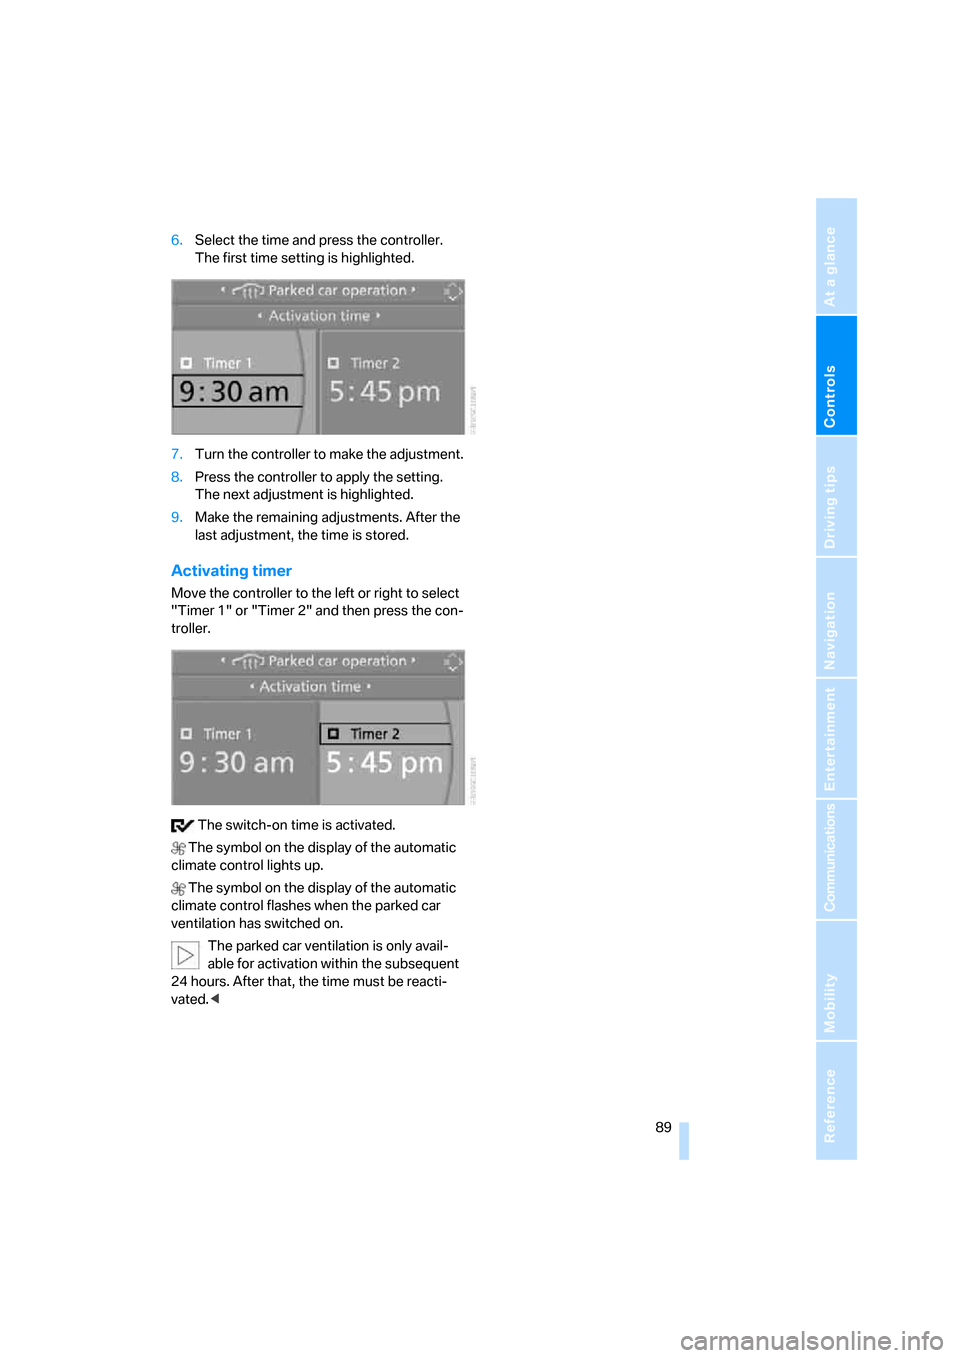
6.Select the time and press the controller.
The first time setting is highlighted.
7.Turn the controller to make the adjustment.
8.Press the controller to apply the setting.
The next adjustment is highlighted.
9.Make the remaining adjustments. After the
last adjustment, the time is stored.
Activating timer
Move the controller to the left or right to select
"Timer 1" or "Timer 2" and then press the con-
troller.
The switch-on time is activated.
The symbol on the display of the automatic
climate control lights up.
The symbol on the display of the automatic
climate control flashes when the parked car
ventilation has switched on.
The parked car ventilation is only avail-
able for activation within the subsequent
24 hours. After that, the time must be reacti-
vated.<
Page 108 of 227

Starting navigation system
106
Starting navigation system
Your navigation system can use satellites to
ascertain the precise position of your vehicle
and guide you reliably to any destination you
enter.
Navigation DVD
The navigation system requires a special navi-
gation DVD. The latest version is available at
your BMW center.
Inserting navigation DVD
1.Insert the navigation DVD with the labeled
side up. The DVD is automatically pulled in.
2.Wait several seconds for the system to scan
the data from the DVD.
Removing navigation DVD
1.Press button 1.
The DVD emerges slightly from the drive.
2.Remove the DVD.
If the DVD is not ejected from the drive, it is pos-
sible that it is jammed. A message appears on
the Control Display.
Display in the assistance
window
You can display the route or the current position
in the assistance window. This display remains
visible even if you switch to another application.
1.Move the controller to the right to enter the
assistance window.
2.Press the controller.
Other menu items are displayed.
3.Select the desired route view or "Current
position".
4.Press the controller.
*
Page 110 of 227

Destination entry
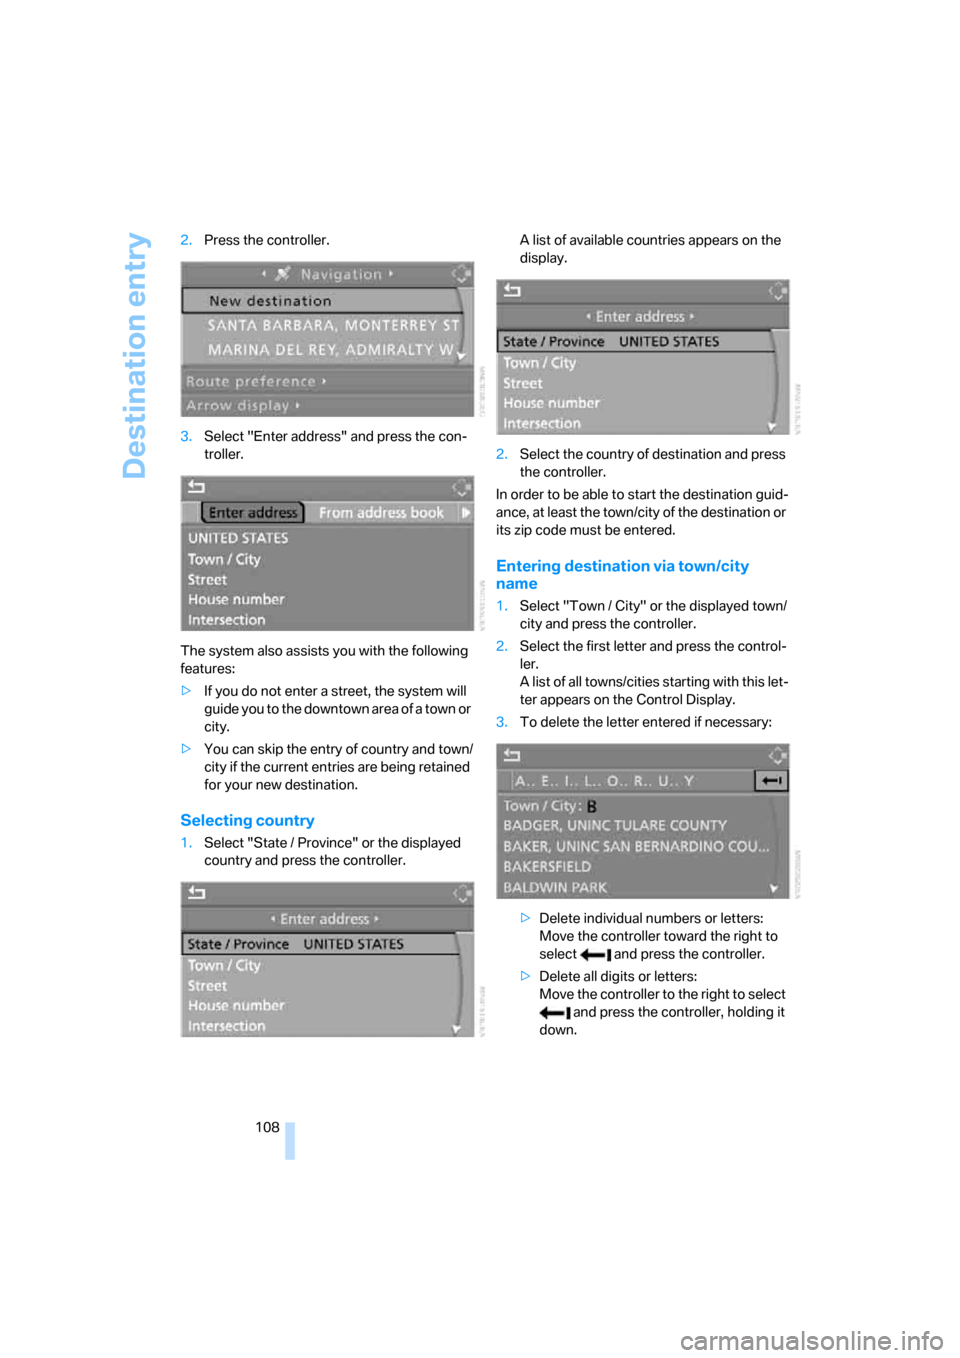
108 2.Press the controller.
3.Select "Enter address" and press the con-
troller.
The system also assists you with the following
features:
>If you do not enter a street, the system will
guide you to the downtown area of a town or
city.
>You can skip the entry of country and town/
city if the current entries are being retained
for your new destination.
Selecting country
1.Select "State / Province" or the displayed
country and press the controller.A list of available countries appears on the
display.
2.Select the country of destination and press
the controller.
In order to be able to start the destination guid-
ance, at least the town/city of the destination or
its zip code must be entered.
Entering destination via town/city
name
1.Select "Town / City" or the displayed town/
city and press the controller.
2.Select the first letter and press the control-
ler.
A list of all towns/cities starting with this let-
ter appears on the Control Display.
3.To delete the letter entered if necessary:
>Delete individual numbers or letters:
Move the controller toward the right to
select and press the controller.
>Delete all digits or letters:
Move the controller to the right to select
and press the controller, holding it
down.
Page 111 of 227

Navigation
Driving tips
109Reference
At a glance
Controls
Communications
Entertainment
Mobility
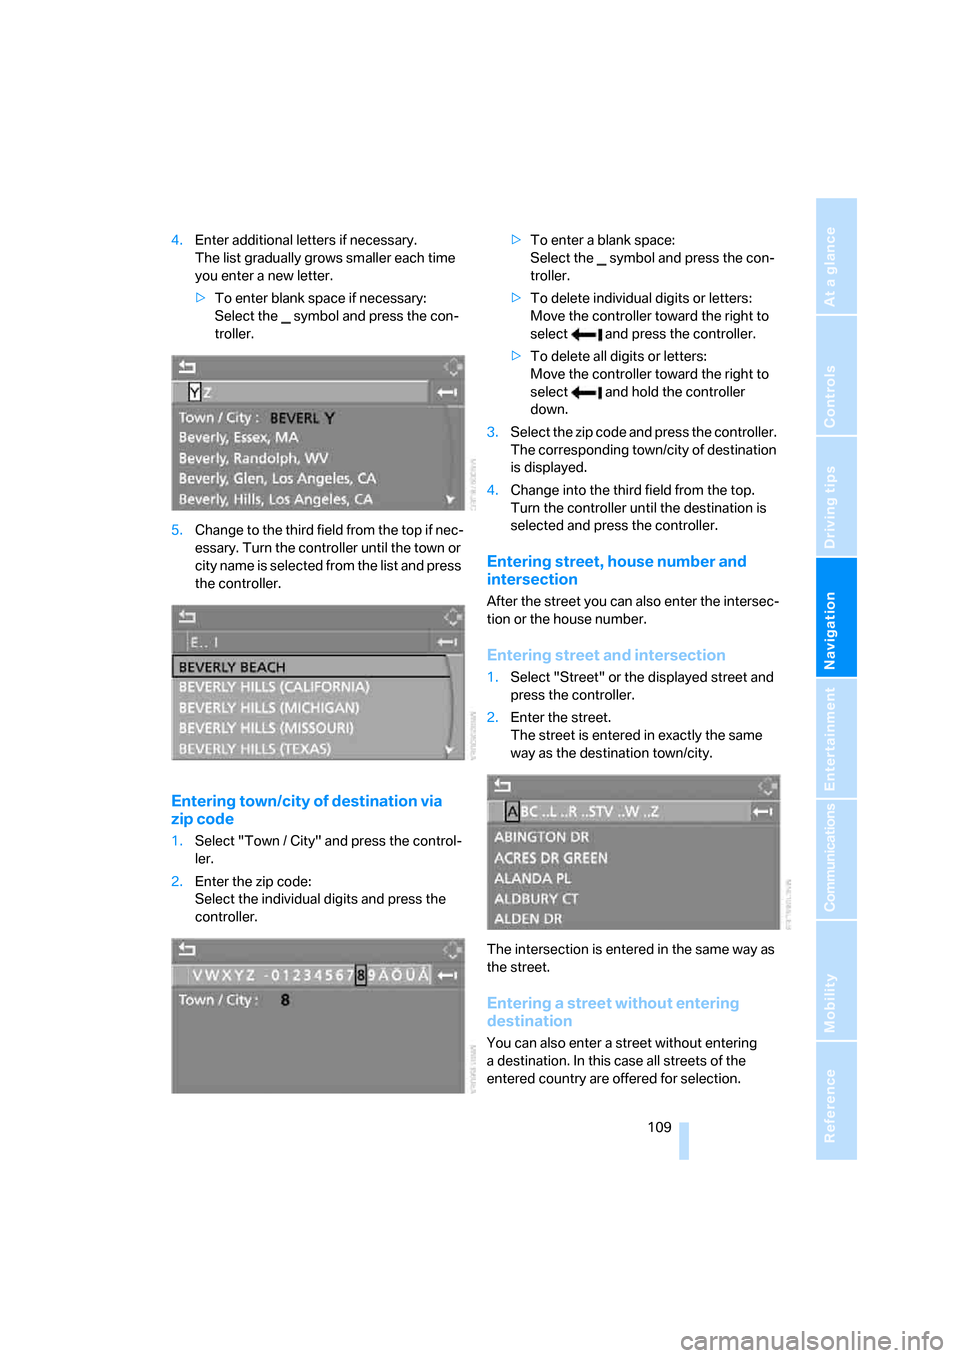
4.Enter additional letters if necessary.
The list gradually grows smaller each time
you enter a new letter.
>To enter blank space if necessary:
Select the symbol and press the con-
troller.
5.Change to the third field from the top if nec-
essary. Turn the controller until the town or
city name is selected from the list and press
the controller.
Entering town/city of destination via
zip code
1.Select "Town / City" and press the control-
ler.
2.Enter the zip code:
Select the individual digits and press the
controller.>To enter a blank space:
Select the symbol and press the con-
troller.
>To delete individual digits or letters:
Move the controller toward the right to
select and press the controller.
>To delete all digits or letters:
Move the controller toward the right to
select and hold the controller
down.
3.Select the zip code and press the controller.
The corresponding town/city of destination
is displayed.
4.Change into the third field from the top.
Turn the controller until the destination is
selected and press the controller.
Entering street, house number and
intersection
After the street you can also enter the intersec-
tion or the house number.
Entering street and intersection
1.Select "Street" or the displayed street and
press the controller.
2.Enter the street.
The street is entered in exactly the same
way as the destination town/city.
The intersection is entered in the same way as
the street.
Entering a street without entering
destination
You can also enter a street without entering
a destination. In this case all streets of the
entered country are offered for selection.