2006 BMW M5 SEDAN lock
[x] Cancel search: lockPage 57 of 231

Controls
55Reference
At a glance
Driving tips
Communications
Navigation
Entertainment
Mobility
Handbrake
The handbrake is primarily intended to prevent
the vehicle from rolling while parked; it brakes
the rear wheels.
Indicator lamp
The indicator lamp lights up, and a sig-
nal also sounds when starting off.
The handbrake is applied.
Indicator lamp for Canadian models.
Applying
The lever locks in position automatically.
Releasing
Pull slightly upwards, press the button and
lower the lever.
If exceptional circumstances should
make it necessary to engage the hand-
brake while the vehicle is in motion, do not pull it
too strongly. In doing so, continuously press the
button of the handbrake lever. Otherwise
excessive pressure can lead to the rear wheels
locking up and loss of traction – fishtailing – at
the rear axle.<
To prevent corrosion and one-sided brak-
ing action, occasionally apply the hand-
brake lightly when the vehicle is slowly coming
to a stop if the traffic conditions are suitable.
The brake lamps do not light up when the hand-
brake is applied.<
Sequential Manual
Transmission with Drivelogic
The concept
The SMG Sequential Manual Transmission
with Drivelogic is an automated manual trans-
mission in which an electrohydraulic system
handles the clutching and gear changes.
The Sequential Manual Transmission is oper-
ated with the selector lever and two shift pad-
dles on the steering wheel.
It offers you the following functions:
>Optional manual or automatic operation:
Sequential mode or Drive mode
>Selection option between different driving
programs, Drivelogic, refer to page57
>Upshift display, shift lights, refer to page58
>Automatic downshifting and prevention of
incorrect shifting even in Sequential opera-
tion
>Automatic double clutching
Selector lever positions
>R: Reverse gear
>N: Neutral
>Β: Drive position:
>+: manual upshifting
>–: manual downshifting
>D/S: switch between Drive mode and
Sequential mode
Shiftlock
Press the brake pedal before shifting out of N;
the shift command will not be executed unless
the brake is applied.
Page 64 of 231

Everything under control
62
Everything under control
Odometer, outside
temperature display, clock
1Time, outside temperature, refer to Com-
puter on page63
2Odometer and trip odometer
3Press button:
>with ignition switched on, trip odometer
is reset
>with ignition switched off, briefly display
odometer
Tachometer
The advance warning field, arrow1, and the red
warning field, arrow2, change depending on
the engine temperature. As the engine temper-
ature rises, the permissible engine speed also
increases. Avoid allowing the engine speed to
rise as far as the orange warning sector when-
ever possible.
Be sure to avoid engine speeds in the red warn-
ing field. In this range, the fuel supply is inter-
rupted to protect the engine.
Coolant temperature
Should the coolant, and with it the engine
become too hot, a warning lamp lights up. In
addition, a message appears on the Control
Display.
Checking coolant level, refer to page184.
Page 76 of 231

Technology for comfort, convenience and safety
74 a signal tone sounds. The setting is stored for
the remote control currently in use.
iDrive, for explanation of principle, refer to
page16.
1.Open the start menu.
2.Press the controller to open the menu.
3.Select "Vehicle settings" and press the
controller.
4.Change to upper field if necessary. Turn the
controller until "PDC" is selected and press
the controller.
5.Select "PDC display on" and press the con-
troller.
The PDC screen is activated.
The display appears on the Control Display as
soon as PDC is activated.
System limits
Even with PDC, final responsibility for
estimating the distance between the
vehicle and any obstructions always remains
with the driver. Even when sensors are pro-
vided, there is a blind spot in which objects can
no longer be detected. This applies especially
in those cases where the system approaches
the physical constraints of ultrasonic measure-
ment, as occurs with tow bars and trailer cou-
plings, and in the vicinity of thin or wedge-
shaped objects. Low objects already displayed,
e.g. a curb, can disappear from the detection
area of the sensors again before a continuous
tone sounds. Higher, protruding objects, e.g.
ledges, cannot be detected. Loud sources of
sound, inside and outside the vehicle, could
drown out the PDC signal tone.<
Driving stability control
systems
Your BMW is equipped with an extended array
of systems designed to enhance and maintain
vehicle stability under extreme conditions.
ABS Antilock Brake System
ABS prevents locking of the wheels during
braking. Safe steering response is maintained
even during full braking. Active safety is thus
increased.
The ABS is operational every time you start the
engine. Braking safely refer to page106.
CBC Cornering Brake Control
When braking during curves or when braking
during a lane change, driving stability and steer-
ing response are improved further.
Electronic brake-force distribution
The system controls the brake pressure in the
rear wheels to ensure stable braking behavior.
DBC Dynamic Brake Control
When you apply the brakes rapidly, this system
automatically produces the maximum braking
force boost and thus helps to achieve the short-
est possible braking distance during full brak-
ing. This system exploits all of the benefits pro-
vided by ABS.
Do not reduce the pressure on the brake pedal
for the duration of the full braking.
DSC Dynamic Stability Control
DSC optimizes the vehicle stability and traction.
It also detects unstable driving states such as
understeering and oversteering, and helps
keep the vehicle on course within the physical
limits by reducing the engine output and by
braking at the wheels.
The DSC is operational every time you start the
engine.
The laws of physics cannot be repealed,
even with DSC. An appropriate driving
style always remains the responsibility of the
Page 97 of 231

Controls
95Reference
At a glance
Driving tips
Communications
Navigation
Entertainment
Mobility
Glove compartment
Opening
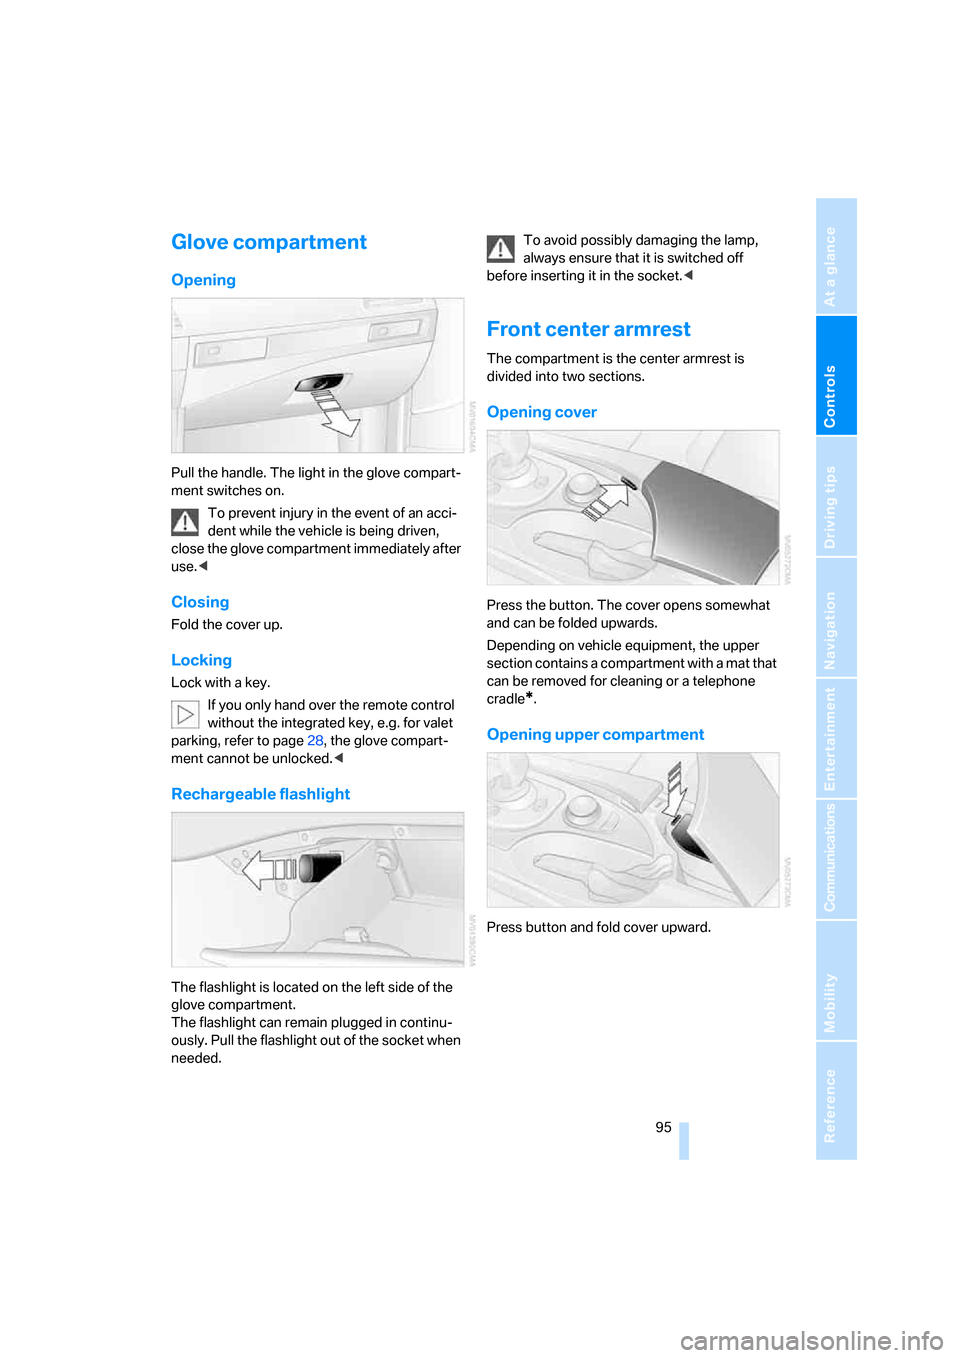
Pull the handle. The light in the glove compart-
ment switches on.
To prevent injury in the event of an acci-
dent while the vehicle is being driven,
close the glove compartment immediately after
use.<
Closing
Fold the cover up.
Locking
Lock with a key.
If you only hand over the remote control
without the integrated key, e.g. for valet
parking, refer to page28, the glove compart-
ment cannot be unlocked.<
Rechargeable flashlight
The flashlight is located on the left side of the
glove compartment.
The flashlight can remain plugged in continu-
ously. Pull the flashlight out of the socket when
needed.To avoid possibly damaging the lamp,
always ensure that it is switched off
before inserting it in the socket.<
Front center armrest
The compartment is the center armrest is
divided into two sections.
Opening cover
Press the button. The cover opens somewhat
and can be folded upwards.
Depending on vehicle equipment, the upper
section contains a compartment with a mat that
can be removed for cleaning or a telephone
cradle
*.
Opening upper compartment
Press button and fold cover upward.
Page 101 of 231

Controls
99Reference
At a glance
Driving tips
Communications
Navigation
Entertainment
Mobility
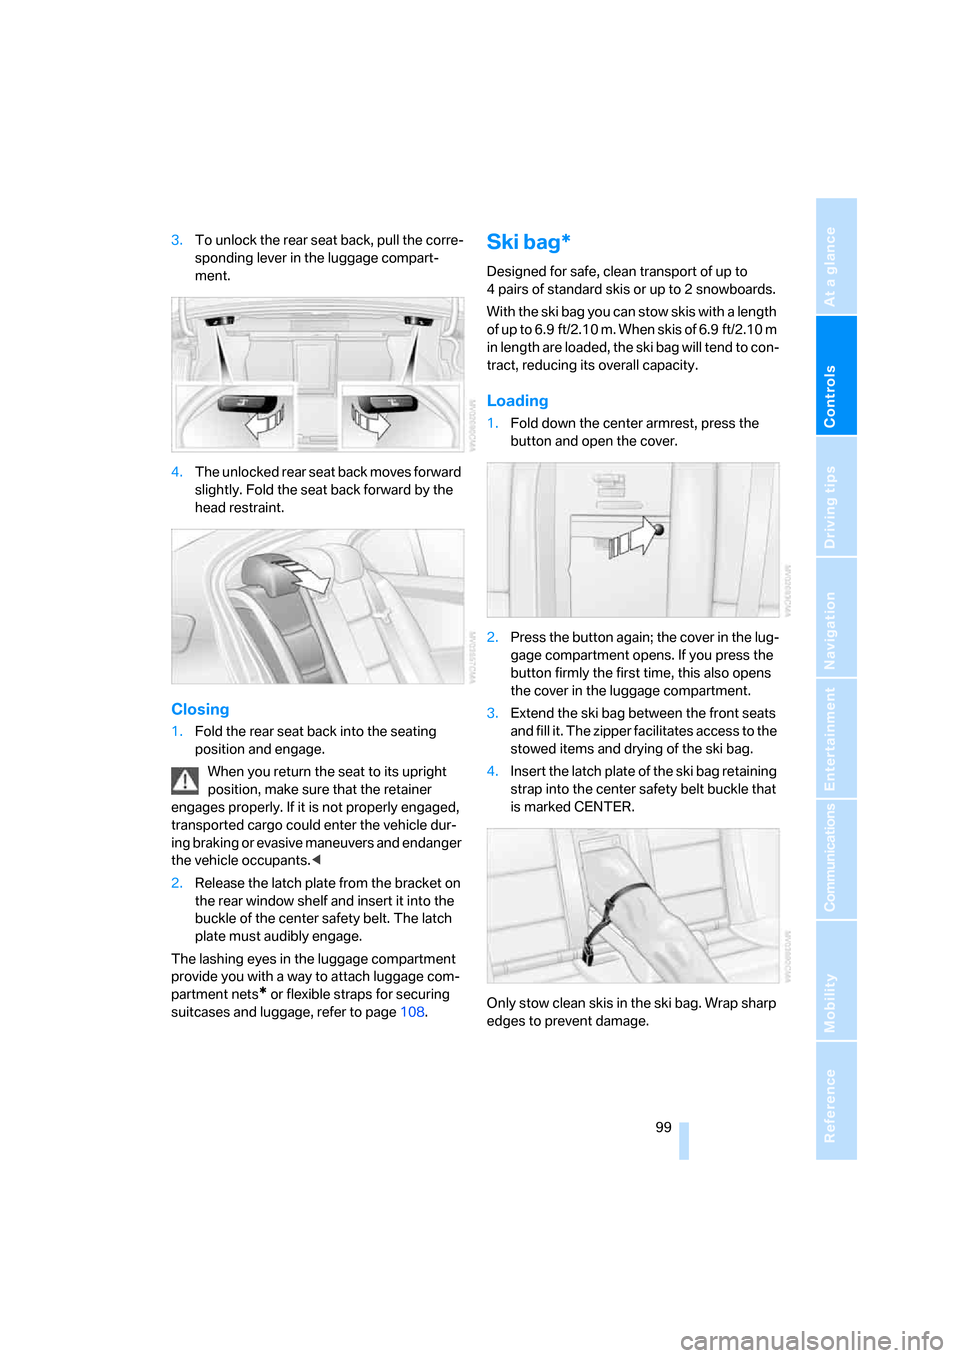
3.To unlock the rear seat back, pull the corre-
sponding lever in the luggage compart-
ment.
4.The unlocked rear seat back moves forward
slightly. Fold the seat back forward by the
head restraint.
Closing
1.Fold the rear seat back into the seating
position and engage.
When you return the seat to its upright
position, make sure that the retainer
engages properly. If it is not properly engaged,
transported cargo could enter the vehicle dur-
ing braking or evasive maneuvers and endanger
the vehicle occupants.<
2.Release the latch plate from the bracket on
the rear window shelf and insert it into the
buckle of the center safety belt. The latch
plate must audibly engage.
The lashing eyes in the luggage compartment
provide you with a way to attach luggage com-
partment nets
* or flexible straps for securing
suitcases and luggage, refer to page108.
Ski bag*
Designed for safe, clean transport of up to
4 pairs of standard skis or up to 2 snowboards.
With the ski bag you can stow skis with a length
o f u p t o 6 . 9 f t / 2 . 1 0 m . W h e n s k i s o f 6 . 9 f t / 2 . 1 0 m
in length are loaded, the ski bag will tend to con-
tract, reducing its overall capacity.
Loading
1.Fold down the center armrest, press the
button and open the cover.
2.Press the button again; the cover in the lug-
gage compartment opens. If you press the
button firmly the first time, this also opens
the cover in the luggage compartment.
3.Extend the ski bag between the front seats
and fill it. The zipper facilitates access to the
stowed items and drying of the ski bag.
4.Insert the latch plate of the ski bag retaining
strap into the center safety belt buckle that
is marked CENTER.
Only stow clean skis in the ski bag. Wrap sharp
edges to prevent damage.
Page 114 of 231

Starting navigation system
112
Starting navigation system
Your navigation system can use satellites to
ascertain the precise position of your vehicle
and guide you reliably to any destination you
enter.
Navigation DVD
The navigation system requires a special navi-
gation DVD. The latest version is available at
your BMW center.
Inserting navigation DVD
1.Insert the navigation DVD with the labeled
side up. The DVD is automatically pulled in.
2.Allow several seconds for the system to
scan the data from the DVD.
Removing navigation DVD
1.Press button 1.
The DVD emerges slightly from the drive.
2.Remove the DVD.
If the DVD is not ejected from the drive, it is pos-
sible that it is blocked. A message appears on
the Control Display.
Display in assistance window
You can display the route or the current position
in the assistance window. This display remains
visible even if you change to another applica-
tion.
1.Move the controller to the right to enter the
assistance window.
2.Press the controller.
Other menu items are displayed.
3.Select the desired route view or "Current
position".
4.Press the controller.
*
Page 157 of 231

155
Entertainment
Reference
At a glance
Controls
Driving tips Communications
Navigation
Mobility
Making calls with car phone:
BMW Assist calls
You can use the car phone via the hands-free
system for BMW Assist calls.
When the status information "Communication"
or "BMW Assist" is displayed in "BMW Ser-
vice", only BMW Assist calls are possible.
It may not be possible to establish a telephone
connection using the mobile phone while a con-
nection is being established to BMW Assist or
while a call to BMW Assist is already in
progress. If this happens, you must log off the
mobile phone from the vehicle if you wish to
place a call with the mobile phone.
Commissioning
Logging on mobile phone on vehicle
The following prerequisites must be met:
>The mobile phone is ready to operate.
>The Bluetooth link on the vehicle, refer to
page157, and on the mobile phone is
active.
>Depending on the mobile phone, preset-
tings on the mobile phone are necessary:
e.g. via the menu item Bluetooth activated
or the menu item Connection not with con-
firmation.
>For logging on, specify any desired number
as the Bluetooth passkey, e.g. 1. This Blue-
tooth passkey is no longer required follow-
ing successful logon.
>The ignition is switched on.
Only log on the mobile phone with the
vehicle stopped, otherwise the passen-
gers and other road user can be endangered
due to a lack of attentiveness on the part of the
driver.<
Switching on ignition
1.Insert the remote control as far as possible
into the ignition lock.
2.S w i t c h o n t h e s w i t c h o n i g n i t i o n b y p r e s s i n g
the Start/Stop button without depressing
the brake or clutch pedal.
Preparation with iDrive
iDrive, for explanation of principle, refer to
page16.
1.Press the button to open the start
menu.
2.Open the menu by pressing the controller.
3.Select "Communication settings" and
press the controller.
4.Select "Bluetooth" and press the controller.
5.Select "Phone" and press the controller.
Page 168 of 231

Telephoning
166
Mounting/removing snap-in
adapter
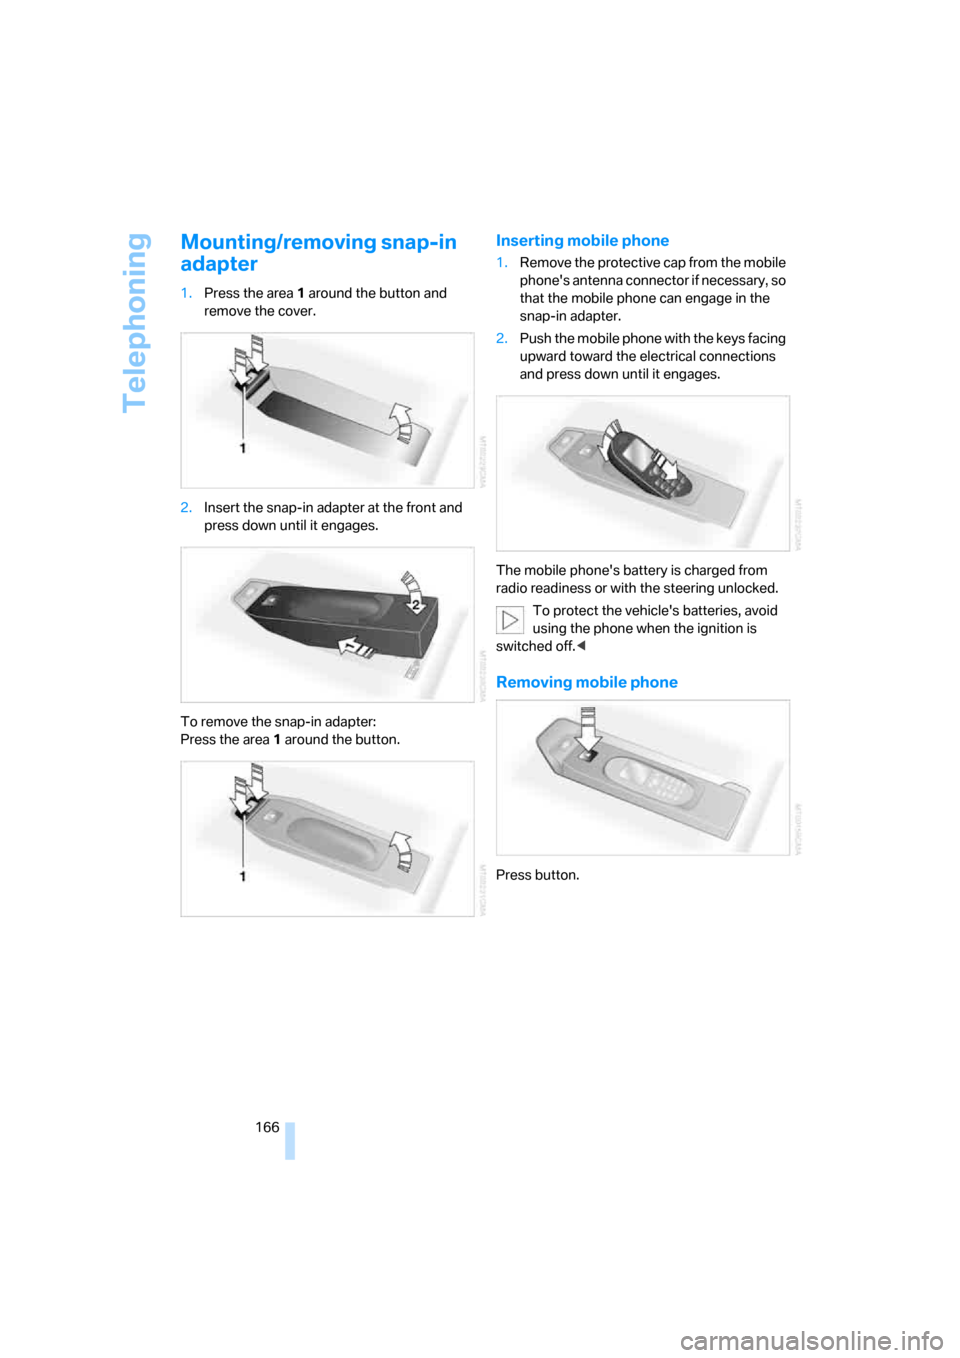
1.Press the area 1 around the button and
remove the cover.
2.Insert the snap-in adapter at the front and
press down until it engages.
To remove the snap-in adapter:
Press the area 1 around the button.
Inserting mobile phone
1.Remove the protective cap from the mobile
phone's antenna connector if necessary, so
that the mobile phone can engage in the
snap-in adapter.
2.Push the mobile phone with the keys facing
upward toward the electrical connections
and press down until it engages.
The mobile phone's battery is charged from
radio readiness or with the steering unlocked.
To protect the vehicle's batteries, avoid
using the phone when the ignition is
switched off.<
Removing mobile phone
Press button.