2006 BMW M5 center console
[x] Cancel search: center consolePage 16 of 231

Cockpit
14
Around the center console: controls and displays
Page 25 of 231

At a glance
23Reference
Controls
Driving tips
Communications
Navigation
Entertainment
Mobility
If no other commands are possible, then oper-
ate the equipment using iDrive.
Terminating or canceling voice
command system
Press the button on the steering wheel or in
the center console
or
Commands
Having possible commands read aloud
You can have the system read aloud the possi-
ble commands related to the selected menu
item on the Control Display.
To have the system list the possible com-
mands:
For example, if you have selected "CD", the
system will read aloud the possible commands
for operating the CD player and the CD
changer
*.
Opening help
Using alternative commands
There are often a number of commands to run a
function, e.g.:
Running functions directly with short
commands
With short commands you can carry out certain
functions directly, regardless of which menu
item is selected, refer to page205.
Opening start menuExample: selecting a track
1.Switch on Entertainment sound output if
necessary.
2.Press the button on the steering wheel
or in the center console.
5.Press the button on the steering wheel
or in the center console. {Cancel}
{Options}
{Help}
{Radio on} or {Turn radio on}
{Main menu}
3.{Entertainment}
The system says:
{{Entertainment}}
4.{CD}
The system says:
{{CD drive switched on}}
6.Select track, e.g.:
{Track 1}
The system says:
{{Track 1}}
Page 51 of 231

Controls
49Reference
At a glance
Driving tips
Communications
Navigation
Entertainment
Mobility
7.Turn the controller to select the desired set-
ting.
"Unchanged" retains the current setting
made outside of MDrive.
8.Press the controller.
The setting is stored for the remote control cur-
rently in use.
Activating settings
Press the button on the steering wheel.
The indicator lamp in the instrument
cluster lights up. The settings made on
the Control Display for the functions
contained in MDrive are active.
Pressing the button again deactivates MDrive.
If the indicator lamp flashes after pressing
the button, MDrive was unable to react, as
the ABS Antilock Brake System or DSC
Dynamic Stability Control is currently control-
ling the vehicle stability. Press the button
again when the indicator lamp no longer
flashes.<
Even with MDrive activated, you can change
individual settings outside MDrive, e.g. with the
buttons in the center console. To reactivate all
settings made for MDrive on the Control Dis-
play: press the button twice.
Page 59 of 231

Controls
57Reference
At a glance
Driving tips
Communications
Navigation
Entertainment
Mobility
Using shift paddles on steering wheel
>To upshift, briefly pull the right shift
paddle +.
>To downshift, briefly pull the left shift
paddle –.
Drivelogic
With Drivelogic various driving programs are
available to you.
Each time you change between the Sequential
mode and the Drive mode, the driving program
last selected in the respective mode is active.
Exception: after the first change from the
Sequential to the Drive mode, driving program 3
is active.
In Drive mode
Five driving programs, from relaxed 1 to sporty/
highly dynamic 5 are available for selection.
In Sequential mode
You can choose from six driving program from
balanced/dynamic 1 to sporty/purist 6.
Each time the engine is started, driving pro-
gram 3 is activated.
The sporty/purist driving program 6 is only
available with the DSC Dynamic Stability Con-
trol deactivated, refer to page75. When DSC is
activated, the system switches from driving
program 6 to 5.
To maintain vehicle stability, always drive
with the DSC switched on when possi-
ble.<
Selecting driving program with button
in center console
Press the button repeatedly until the desired
driving program is displayed in the instrument
cluster, refer to page56.
Selecting driving program via button
on steering wheel
You can also activate your preferred driving pro-
gram with the button on the steering wheel,
refer to MDrive on page48.
With the ignition switched on you can change
the settings of MDrive on the Control Display.
iDrive, for explanation of principle, refer to
page16.
1.Open the start menu.
2.Press the controller to open the menu.
3.Select "Vehicle settings" and press the
controller.
4.Select "MDrive" and press the controller.
5.Select "SMG Drivelogic" and press the con-
troller. The first setting is selected.
6.Turn controller to set Drive mode or
Sequential mode.
"Unchanged" retains the current settings
made outside of MDrive.
Page 79 of 231

Controls
77Reference
At a glance
Driving tips
Communications
Navigation
Entertainment
Mobility
System limits
The Flat Tire Monitor cannot indicate
sudden severe tire damage caused by
outside factors and does not detect a natural,
even pressure drop in all four tires.<
In the following situations, the system could be
delayed or malfunction:
>System has not been initialized
>Driving on snowy or slippery road surface
>Sporty driving style: slip in the drive wheels,
high lateral acceleration
>Driving with snow chains
*
Initializing system
The initialization finishes during driving,
which can be interrupted at any time.
When driving resumes, the initialization is con-
tinued automatically. Do not initialize the sys-
tem when driving with snow chains.<
With the button in the center console:
1.Start the engine, but do not start driving.
2.Press the button at least 4 seconds, how-
ever not longer than 2 minutes. After
releasing the button, the warning lamp in
the instrument cluster lights up yellow for a
few seconds. Warning lamp, refer to Indica-
tion of a flat tire. The message "Initializing
FTM..." appears on the Control Display for a
few seconds.
3.Start to drive. The initialization finishes dur-
ing driving without feedback.Using iDrive, for explanation of principle, refer to
page16:
1.Press the button.
This opens the start menu.
2.Press the controller to open the menu.
3.Select "Vehicle settings" and press the
controller.
4.Select "FTM" and press the controller.
5.Start the engine, but do not start driving.
6.Select "Set tire pressure" and press the
controller.
7.Select "Yes" and press the controller.
The message "Initializing..." is displayed for
a few seconds. The warning lamp in the
instrument cluster lights up yellow for a few
seconds.
8.Start to drive.
The initialization finishes during driving
without feedback.
Indication of a flat tire
The warning lamp lights up red. A mes-
sage appears on the Control Display.
In addition, an acoustic signal sounds.
There is a flat tire or extensive inflation pressure
loss.
Page 100 of 231

Practical interior accessories
98
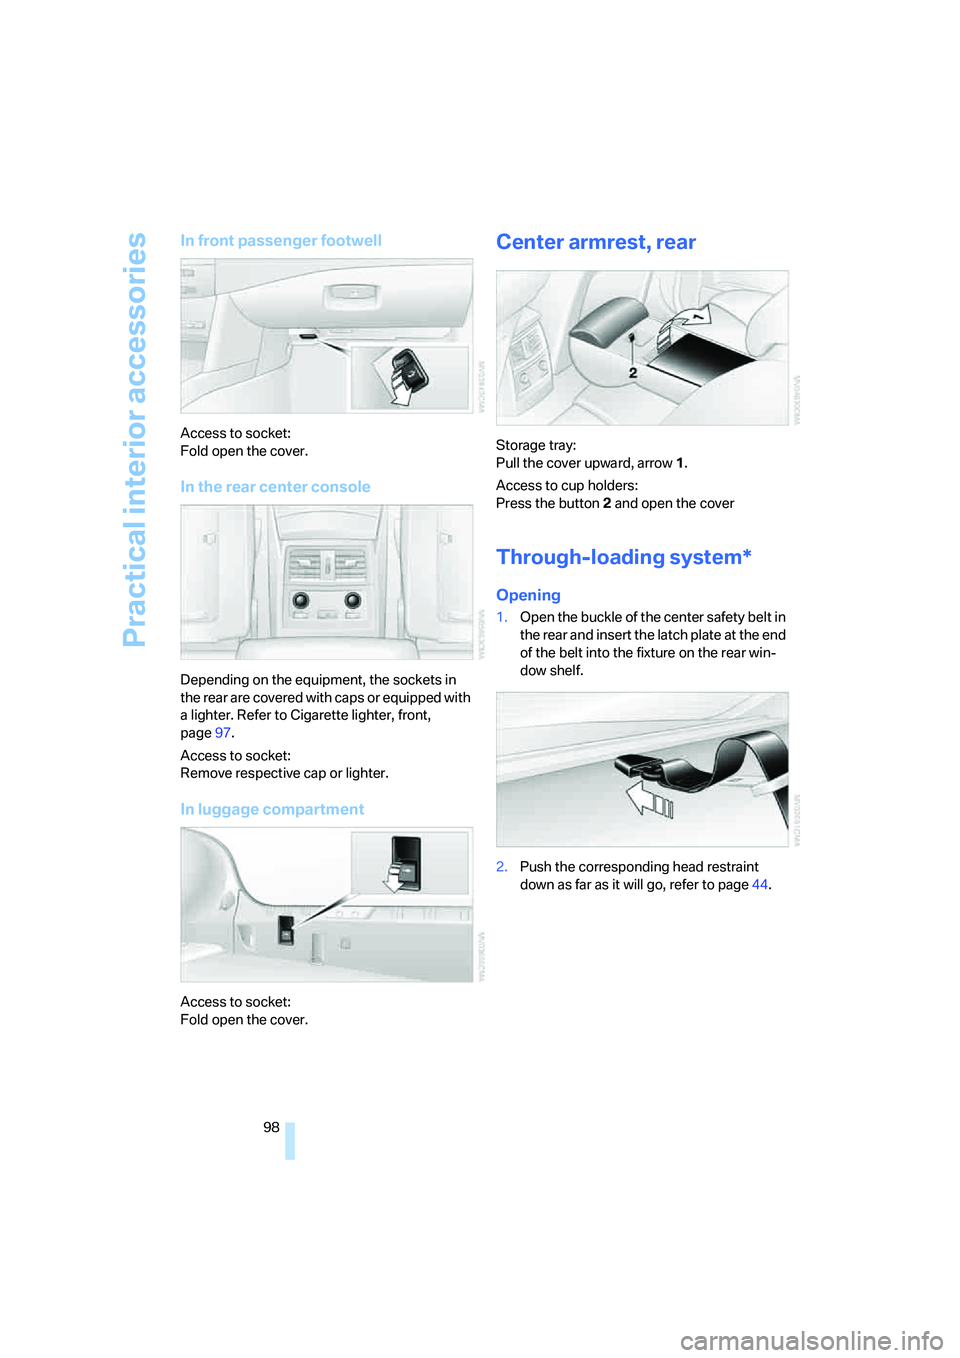
In front passenger footwell
Access to socket:
Fold open the cover.
In the rear center console
Depending on the equipment, the sockets in
the rear are covered with caps or equipped with
a lighter. Refer to Cigarette lighter, front,
page97.
Access to socket:
Remove respective cap or lighter.
In luggage compartment
Access to socket:
Fold open the cover.
Center armrest, rear
Storage tray:
Pull the cover upward, arrow1.
Access to cup holders:
Press the button2 and open the cover
Through-loading system*
Opening
1.Open the buckle of the center safety belt in
the rear and insert the latch plate at the end
of the belt into the fixture on the rear win-
dow shelf.
2.Push the corresponding head restraint
down as far as it will go, refer to page44.
Page 118 of 231

Destination entry
116 The related town/city is displayed after the
street name.
If a town/city has already been entered, you can
undo this entry. This may be practical if the
desired street does not exist in the entered des-
tination, because, for example, it belongs to
another part of the town/city.
1.Change to upper field.
The arrow is selected.
2.Turn the controller to the right until the
request for the entry of a street in the coun-
try appears and press the controller.
3.Change to the second field from the top and
enter the street.
Entering house number
All house numbers stored for the street on the
navigation DVD can be entered.
1.Select "House number" and press the con-
troller.
2.Enter the house number:
Select the desired digits and press the con-
troller.
3.Change into the third field from the top.
Turn the controller until the house number
is selected and press the controller.
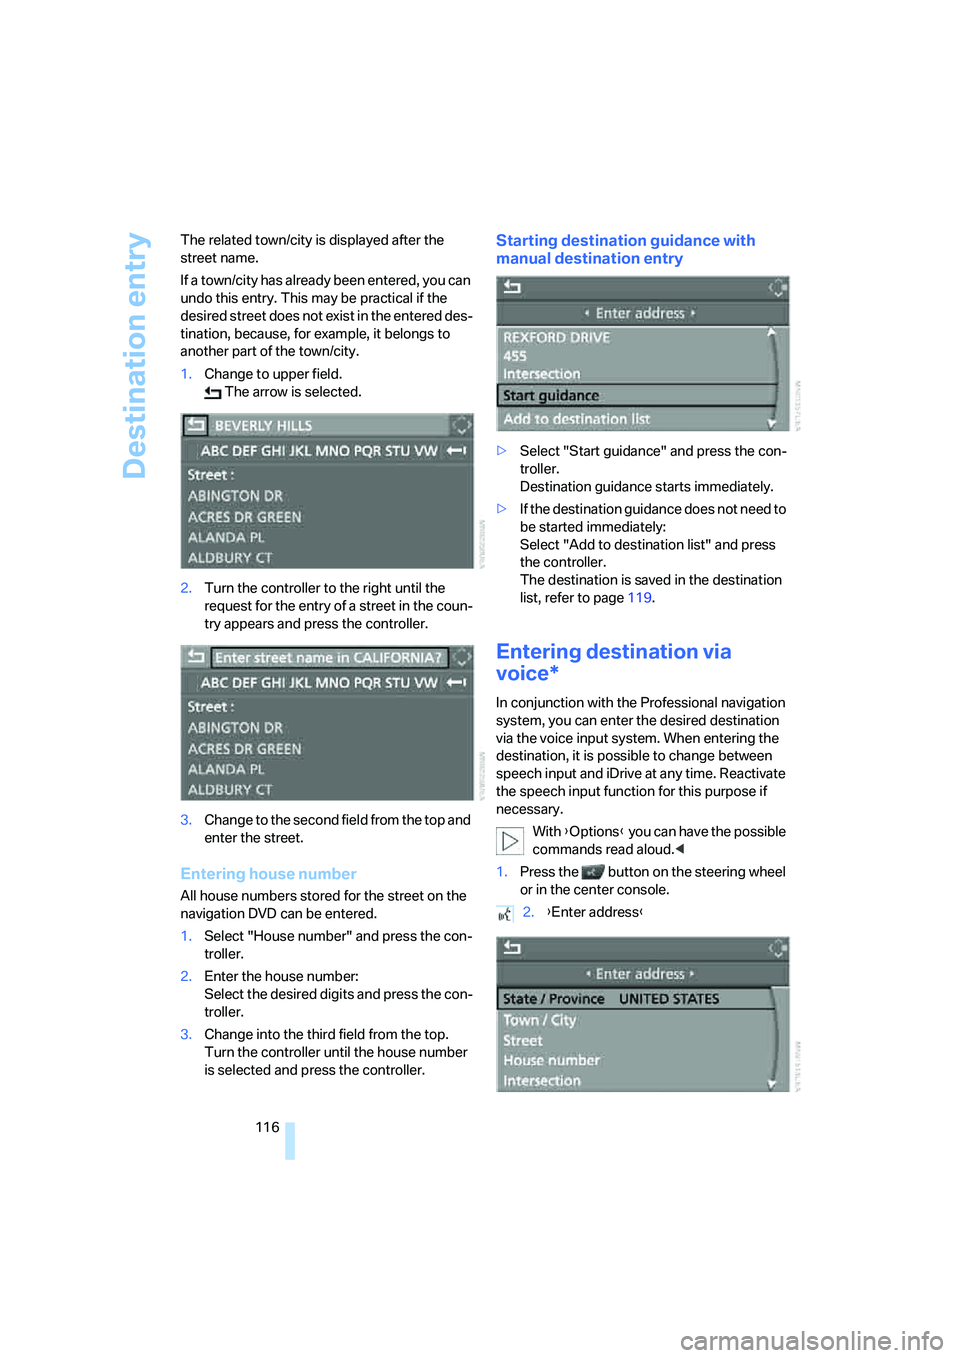
Starting destination guidance with
manual destination entry
>Select "Start guidance" and press the con-
troller.
Destination guidance starts immediately.
>If the destination guidance does not need to
be started immediately:
Select "Add to destination list" and press
the controller.
The destination is saved in the destination
list, refer to page119.
Entering destination via
voice*
In conjunction with the Professional navigation
system, you can enter the desired destination
via the voice input system. When entering the
destination, it is possible to change between
speech input and iDrive at any time. Reactivate
the speech input function for this purpose if
necessary.
With {Options} you can have the possible
commands read aloud.<
1.Press the button on the steering wheel
or in the center console.
2.{Enter address}
Page 212 of 231

Everything from A to Z
210
Everything from A to Z
Index
"..." Identifies Control Display
texts used to select
individual functions, and
indicates where to find them
in the text.
A
ABS Antilock Brake
System74
Accessories6
Acoustic signal, refer to Check
Control67
Activated-charcoal filter91
"Activation time" for parked-
car ventilation91
Active head restraints,
front43
"Active seat backrest"48
Active seat ventilation45
Adapter for spare key28
Adaptive brake lamps, refer to
Brake force display78
Adaptive Head Light84
"Add digits" for mobile
phone160
"Address book" for navigation
system120
Address for navigation
– deleting121
– entering113,116
– selecting121
– storing120
– storing current position120
"Add to address book"120
"Add to destination list"116
Adjusting active backrest
width41
Adjusting confirmation signals
for locking and unlocking31
Adjusting the tone during
audio operation, refer to
Tone control133Adjusting thigh support41
Adjustment in audio mode
– front-to-rear134
– right/left balance134
"After door opened"43
"After unlocking"43
Airbags78
– sitting safely40
– warning lamp80
Air circulation, refer to Air
recirculation90
Air distribution
– automatic88
– manual89
Airing, refer to Ventilation90
Air recirculation
– AUC Automatic recircu-
lated-air control90
– recirculated-air mode90
"Air recirculation on / off"47
Air vents87
– refer to Ventilation90
Air volume89
AKI, refer to Fuel quality
175
Alarm system34
– avoiding unintentional
alarms35
– interior motion sensor35
– switching off alarm35
– switching off tilt alarm
sensor and interior motion
sensor35
– tilt alarm sensor35
"All channels"143
"All doors"30
All-season tires, refer to
Winter tires180
"All stations", calling up with
radio136,139
Alterations, technical, refer to
For your own safety5
Altering stretch of road128"AM", reception
range132,136
Antenna for mobile phone154
Antifreeze
– coolant184
– washer fluid60
Antilock Brake System
ABS74
Anti-theft alarm system, refer
to Alarm system34
Anti-theft system, refer to
Central locking system29
Approved axle loads, refer to
Weights204
Approved engine oils184
Approved gross vehicle
weight, refer to Weights204
Armrest, refer to Center
armrest, rear98
Around the center console14
Around the steering wheel10
Arrival time
– refer to Computer64
– refer to Starting destination
guidance124
"Arrow display" for navigation
system125
Ashtray
– front97
– rear97
Assist, refer to
BMW Assist167
Assistance systems, refer to
Driving stability control
systems74
Assistance window20
"Assist. window off"21
AUC Automatic recirculated-
air control90